
User Manual
Page 2
... this product, or any lost profits or claims from third parties arising out of the use of this manual, either in this product are for your own personal use this manual. B 2 of HDMI Licensing, LLC. z CASIO COMPUTER CO., LTD. z Microsoft, Windows, and Windows Vista are trademarks or registered trademarks of the United States...
... this product, or any lost profits or claims from third parties arising out of the use of this manual, either in this product are for your own personal use this manual. B 2 of HDMI Licensing, LLC. z CASIO COMPUTER CO., LTD. z Microsoft, Windows, and Windows Vista are trademarks or registered trademarks of the United States...
User Manual
Page 3
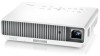
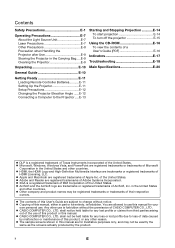
Contents About this manual 5 Projector Overview 6 Projector Features and Main Functions 6 Remote Controller and Projector Keys 8 Back Terminals 9 Operation During Projection 10 Selecting the Input Source 10 To select a ...
Contents About this manual 5 Projector Overview 6 Projector Features and Main Functions 6 Remote Controller and Projector Keys 8 Back Terminals 9 Operation During Projection 10 Selecting the Input Source 10 To select a ...
User Manual
Page 5
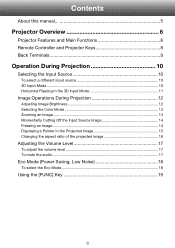
...Screen Size 47 Aspect Ratio Setting and Projection Image 48 Supported Signals 52 Using Wired LAN to Control the Projector (XJ-M145, XJ-M155, XJ-M245, XJ-M255 55 Supported External Devices 55 Controlling the Projector from a Computer 55 Projector RS-232C Control 60 Connecting the... Projector to a Computer 60 Specifications 62 About this manual are explained using the remote controller that comes with the projector. 5 Appendix 43 ...
...Screen Size 47 Aspect Ratio Setting and Projection Image 48 Supported Signals 52 Using Wired LAN to Control the Projector (XJ-M145, XJ-M155, XJ-M245, XJ-M255 55 Supported External Devices 55 Controlling the Projector from a Computer 55 Projector RS-232C Control 60 Connecting the... Projector to a Computer 60 Specifications 62 About this manual are explained using the remote controller that comes with the projector. 5 Appendix 43 ...
User Manual
Page 8
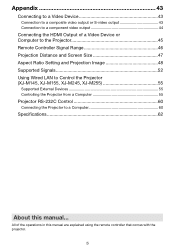
... the same procedures can also be performed directly on the remote controller that comes with batteries loaded. Remote Controller and Projector Keys Operations in this manual are presented based on the projector. You need to load the two supplied batteries before use. Remote Controller Keys [INPUT] key [MENU] key [P] (Power) key...
... the same procedures can also be performed directly on the remote controller that comes with batteries loaded. Remote Controller and Projector Keys Operations in this manual are presented based on the projector. You need to load the two supplied batteries before use. Remote Controller Keys [INPUT] key [MENU] key [P] (Power) key...
User Manual
Page 18
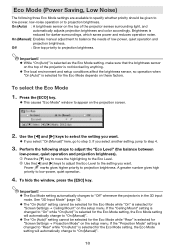
... the setting you select another setting, jump to step 4. 3. If you want . To hide the window, press the [ESC] key. On (Manual): Enables manual adjustment to projection brightness. z This causes "Eco Mode" window to "Off" whenever the projector is not blocked by anything. z The Eco Mode ...changed to "On" while "On (Auto)" is reduced for the Eco Mode setting, the Eco Mode setting will automatically change to "On (Manual)". 18 Important! Brightness is selected for darker surroundings, which saves power and reduces operation noise. Press the [ECO] key. Fewer marks gives ...
... the setting you select another setting, jump to step 4. 3. If you want . To hide the window, press the [ESC] key. On (Manual): Enables manual adjustment to projection brightness. z This causes "Eco Mode" window to "Off" whenever the projector is not blocked by anything. z The Eco Mode ...changed to "On" while "On (Auto)" is reduced for the Eco Mode setting, the Eco Mode setting will automatically change to "On (Manual)". 18 Important! Brightness is selected for darker surroundings, which saves power and reduces operation noise. Press the [ECO] key. Fewer marks gives ...
User Manual
Page 30
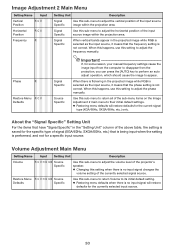
... Main Menu Setting Name Input Setting Unit Description Volume R C V H D U N Source Specific Use this setting to adjust the frequency manually. When this happens, use this sub-menu to adjust the vertical position of the projector's speaker. If, for the current signal type (...Name Input Vertical Position RCV Horizontal Position RCV Frequency R Setting Unit Description Signal Specific Use this setting to adjust the phase manually. Signal Specific When vertical bands appear in the "Setting Unit" column of the above table, the setting is performed, and...
... Main Menu Setting Name Input Setting Unit Description Volume R C V H D U N Source Specific Use this setting to adjust the frequency manually. When this happens, use this sub-menu to adjust the vertical position of the projector's speaker. If, for the current signal type (...Name Input Vertical Position RCV Horizontal Position RCV Frequency R Setting Unit Description Signal Specific Use this setting to adjust the phase manually. Signal Specific When vertical bands appear in the "Setting Unit" column of the above table, the setting is performed, and...
User Manual
Page 33
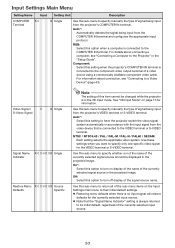
...source. 33 For information about connecting a computer, see "Connecting to a Video Device" (page 43). Use this sub-menu to specify manually the type of signal being input from the projector's COMPUTER IN terminal. On*: Select this option to turn off display of the signal ...the "Setup Guide". Input Settings Main Menu Setting Name Input Setting Unit Description COMPUTER R C Terminal N Single Use this sub-menu to specify manually the type of signal being input from the projector's VIDEO terminal or S-VIDEO terminal. For details about connection, see "Connecting a Computer to ...
...source. 33 For information about connecting a computer, see "Connecting to a Video Device" (page 43). Use this sub-menu to specify manually the type of signal being input from the projector's COMPUTER IN terminal. On*: Select this option to turn off display of the signal ...the "Setup Guide". Input Settings Main Menu Setting Name Input Setting Unit Description COMPUTER R C Terminal N Single Use this sub-menu to specify manually the type of signal being input from the projector's VIDEO terminal or S-VIDEO terminal. For details about connection, see "Connecting a Computer to ...
User Manual
Page 56
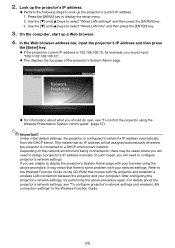
... projector's network settings, see "To control the projector using the above procedure again. For details about what you are unable to assign a projector's IP address manually. Look up a Web browser. 4. Use the [T] and [S] keys to display the setup menu. 2. Depending on the CD-ROM that comes with your computer. In the...
... projector's network settings, see "To control the projector using the above procedure again. For details about what you are unable to assign a projector's IP address manually. Look up a Web browser. 4. Use the [T] and [S] keys to display the setup menu. 2. Depending on the CD-ROM that comes with your computer. In the...
User Manual
Page 62
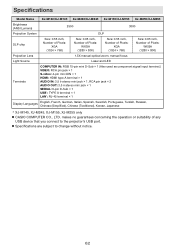
Specifications Model Name XJ-M140/XJ-M145 XJ-M240/XJ-M245 XJ-M150/XJ-M155 XJ-M250/XJ-M255 Brightness (ANSI Lumens) 2500 3000 Projection System DLP DLP chip ...no guarantees concerning the operation or suitability of Pixels: WXGA (1280 × 800) Projection Lens 1.5X manual optical zoom, manual focus Light Source Laser and LED Terminals COMPUTER IN: RGB 15-pin mini D-Sub × 1 ...German, Italian, Spanish, Swedish, Portuguese, Turkish, Russian, Chinese (Simplified), Chinese (Traditional), Korean, Japanese * XJ-M145, XJ-M245, XJ-M155, XJ-M255 only z CASIO COMPUTER CO., LTD.
Specifications Model Name XJ-M140/XJ-M145 XJ-M240/XJ-M245 XJ-M150/XJ-M155 XJ-M250/XJ-M255 Brightness (ANSI Lumens) 2500 3000 Projection System DLP DLP chip ...no guarantees concerning the operation or suitability of Pixels: WXGA (1280 × 800) Projection Lens 1.5X manual optical zoom, manual focus Light Source Laser and LED Terminals COMPUTER IN: RGB 15-pin mini D-Sub × 1 ...German, Italian, Spanish, Swedish, Portuguese, Turkish, Russian, Chinese (Simplified), Chinese (Traditional), Korean, Japanese * XJ-M145, XJ-M245, XJ-M155, XJ-M255 only z CASIO COMPUTER CO., LTD.
Setup Guide
Page 2
...'s Guide are registered trademarks or trademarks of Microsoft Corporation in the United States and other reason. z CASIO COMPUTER CO., LTD. z The sample screens shown in this manual, either in part or its entirety, is forbidden without notice. Any other countries. shall not be ... may be exactly the same as the screens actually produced by malfunction or maintenance of this manual. B E z Copying of this manual are trademarks or registered trademarks of ArcSoft, Inc. z CASIO COMPUTER CO., LTD. in the United States and other use of this product or this ...
...'s Guide are registered trademarks or trademarks of Microsoft Corporation in the United States and other reason. z CASIO COMPUTER CO., LTD. z The sample screens shown in this manual, either in part or its entirety, is forbidden without notice. Any other countries. shall not be ... may be exactly the same as the screens actually produced by malfunction or maintenance of this manual. B E z Copying of this manual are trademarks or registered trademarks of ArcSoft, Inc. z CASIO COMPUTER CO., LTD. in the United States and other use of this product or this ...
Setup Guide
Page 11
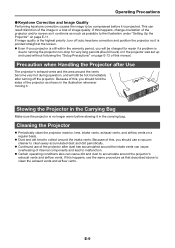
If this happens, change orientation of this manual. Stowing the Projector in the Carrying Bag Make sure the projector is pointed straight at the screen. Cleaning the Projector z Periodically clean the projector exterior, ...
If this happens, change orientation of this manual. Stowing the Projector in the Carrying Bag Make sure the projector is pointed straight at the screen. Cleaning the Projector z Periodically clean the projector exterior, ...

Setup Guide
Page 16
... the focus. Turn on the projector, a "Language" window will appear in the center of the projected image, and the focus ring to adjust keystone correction manually. Select the language you turn on the computer that prevents distortion of the projected image. Starting and Stopping Projection To start projection 1. Use the bundled...
... the focus. Turn on the projector, a "Language" window will appear in the center of the projected image, and the focus ring to adjust keystone correction manually. Select the language you turn on the computer that prevents distortion of the projected image. Starting and Stopping Projection To start projection 1. Use the bundled...

Setup Guide
Page 18
...of the table. Software Name Wireless Connection 3 EZ-Converter FA ArcSoft MediaConverter 3 for CASIO Projector Multi Projection Camera Update Software Description Software that comes with User's Guides. Manual Name Description File Name User's Guide Contains detailed information about installing the software, see ... 2. In order to read the User's Guide, you want to the right of the projector. To view the contents of the manual you need to : Wireless Function Guide (WirelessGuide_English.pdf) USB Function Guide (USB_Guide_English.pdf) Software for converting movie files. z If...
...of the table. Software Name Wireless Connection 3 EZ-Converter FA ArcSoft MediaConverter 3 for CASIO Projector Multi Projection Camera Update Software Description Software that comes with User's Guides. Manual Name Description File Name User's Guide Contains detailed information about installing the software, see ... 2. In order to read the User's Guide, you want to the right of the projector. To view the contents of the manual you need to : Wireless Function Guide (WirelessGuide_English.pdf) USB Function Guide (USB_Guide_English.pdf) Software for converting movie files. z If...

Setup Guide
Page 19
... keep you informed about indicators and warning messages, see below) before trying to turn on power. Projector is selected for use. "On (Auto)" or "On (Manual)" is warming up after being turned on the projection screen, or when the POWER, TEMP, and LIGHT indicators are lit or flashing in standby. E-17...
... keep you informed about indicators and warning messages, see below) before trying to turn on power. Projector is selected for use. "On (Auto)" or "On (Manual)" is warming up after being turned on the projection screen, or when the POWER, TEMP, and LIGHT indicators are lit or flashing in standby. E-17...
Setup Guide
Page 20
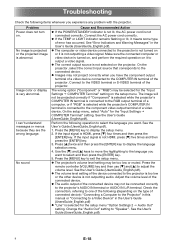
..., press [T] four times and then press the [ENTER] key. Check the connection, referring to one of connected device): "Connecting a Computer to the Projector" in this manual or "Connecting to the COMPUTER IN terminal of a video device. I can't understand messages or menus because they are the wrong language. z If the TEMP or...
..., press [T] four times and then press the [ENTER] key. Check the connection, referring to one of connected device): "Connecting a Computer to the Projector" in this manual or "Connecting to the COMPUTER IN terminal of a video device. I can't understand messages or menus because they are the wrong language. z If the TEMP or...