User Guide
Page 2
...information before cleaning the product. These limits are designed to radio communications. This mark applies in EU countries only. Responsible party: CASIO, INC. Please note the following measures: • Reorient or relocate the receiving antenna. • Increase the separation between the ... for compliance could void the user's authority to Part 15 of Conformity Model Number: WK-3300/WK-3800/WK-8000 Trade Name: CASIO COMPUTER CO., LTD. Carefully check the power cord for children under 3 years. • Use only CASIO AD-12 adaptor. • The AC adaptor is...
...information before cleaning the product. These limits are designed to radio communications. This mark applies in EU countries only. Responsible party: CASIO, INC. Please note the following measures: • Reorient or relocate the receiving antenna. • Increase the separation between the ... for compliance could void the user's authority to Part 15 of Conformity Model Number: WK-3300/WK-3800/WK-8000 Trade Name: CASIO COMPUTER CO., LTD. Carefully check the power cord for children under 3 years. • Use only CASIO AD-12 adaptor. • The AC adaptor is...
User Guide
Page 7
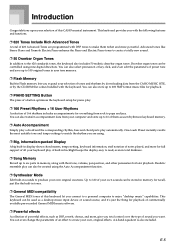
...powerful effects, such as user rhythms in keyboard memory. ❐ Auto Accompaniment Simply play a chord and the corresponding rhythm, bass and chord parts play can be created using . ❐ Big, Information-packed Display A big built-in sounds to create your own original creations. This ...names, tempo setting, keyboard information, staff notation of notes played, and more for everything from the CASIO MUSIC SITE, or by downloading data from rock to six parts in Flash memory lets you want. Introduction Congratulations upon your selection of all your keyboard play. ...
...powerful effects, such as user rhythms in keyboard memory. ❐ Auto Accompaniment Simply play a chord and the corresponding rhythm, bass and chord parts play can be created using . ❐ Big, Information-packed Display A big built-in sounds to create your own original creations. This ...names, tempo setting, keyboard information, staff notation of notes played, and more for everything from the CASIO MUSIC SITE, or by downloading data from rock to six parts in Flash memory lets you want. Introduction Congratulations upon your selection of all your keyboard play. ...
User Guide
Page 8
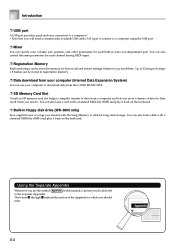
... MIDI file (SMF) and play it back on the keyboard. ❐ Built-in memory for each built-in Auto Accompaniment part. The letters A through H indicate the section of data from the CASIO MUSIC SITE. ❐ SD Memory Card Slot A built-in this manual, it means you should refer. Using the Separate ...the Appendix to which you should refer to the separate Appendix. Up to 32 setups (4 setups × 8 banks) can be stored in floppy disk drive (WK-3800 only) Save original tones or songs you created with the Song Memory to disk for long-term storage. You can specify tone, volume, pan...
... MIDI file (SMF) and play it back on the keyboard. ❐ Built-in memory for each built-in Auto Accompaniment part. The letters A through H indicate the section of data from the CASIO MUSIC SITE. ❐ SD Memory Card Slot A built-in this manual, it means you should refer. Using the Separate ...the Appendix to which you should refer to the separate Appendix. Up to 32 setups (4 setups × 8 banks) can be stored in floppy disk drive (WK-3800 only) Save original tones or songs you created with the Song Memory to disk for long-term storage. You can specify tone, volume, pan...
User Guide
Page 18
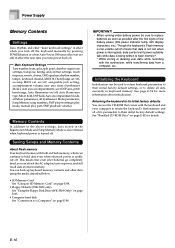
...to their initial factory default settings, or to delete all Synthesizer Mode parameters, Song Memory song numbers, SMF player settings (play mode, manual play part, SMF playback volume) Memory Contents In addition to the above settings, data stored in the Registration Mode and Song Memory Mode is also retained ... the media described below. • SD Memory Card See "Using an SD Memory Card" on page E-84. • Floppy Diskette (WK-3800 only) See "Using the Floppy Disk Drive (WK-3800 Only)" on page E-85. • Computer hard disk See "Connection to a Computer" on page E-80. See page E-74 ...
...to their initial factory default settings, or to delete all Synthesizer Mode parameters, Song Memory song numbers, SMF player settings (play mode, manual play part, SMF playback volume) Memory Contents In addition to the above settings, data stored in the Registration Mode and Song Memory Mode is also retained ... the media described below. • SD Memory Card See "Using an SD Memory Card" on page E-84. • Floppy Diskette (WK-3800 only) See "Using the Floppy Disk Drive (WK-3800 Only)" on page E-85. • Computer hard disk See "Connection to a Computer" on page E-80. See page E-74 ...
User Guide
Page 22
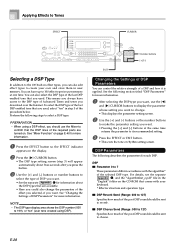
...the maximum number of this button changes the setup of the tones offer only 10-note polyphony. This causes a rhythm that is enabled for multiple parts when layering or splitting tones (pages E-66, 67) can play at the same time. Also note that when a rhythm or autoaccompaniment pattern ... DSP effect is turned on page E-19. This means that some of the keyboard to optimize it by the keyboard. Selecting a tone for a part applies the tone's DSP line parameter setting to all three digits for the tone number, including leading zeros (if any). • You can also...
...the maximum number of this button changes the setup of the tones offer only 10-note polyphony. This causes a rhythm that is enabled for multiple parts when layering or splitting tones (pages E-66, 67) can play at the same time. Also note that when a rhythm or autoaccompaniment pattern ... DSP effect is turned on page E-19. This means that some of the keyboard to optimize it by the keyboard. Selecting a tone for a part applies the tone's DSP line parameter setting to all three digits for the tone number, including leading zeros (if any). • You can also...
User Guide
Page 30
... [+] and [-] buttons at one time. You can also select the DSP type of the last DSP enabled tone that the DSP lines of the required parts are available. • Here you could also change . • This displays the parameter setting screen. 2 Use the [+] and [-] buttons or the number buttons to make...
... [+] and [-] buttons at one time. You can also select the DSP type of the last DSP enabled tone that the DSP lines of the required parts are available. • Here you could also change . • This displays the parameter setting screen. 2 Use the [+] and [-] buttons or the number buttons to make...

User Guide
Page 31
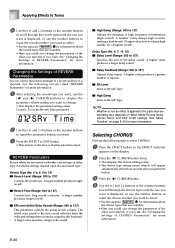
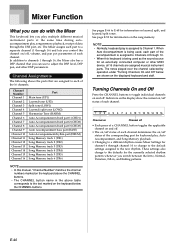
... CURSOR button to save the new DSP. • You can make their tone sound different. Selecting REVERB Perform the following steps to the parts that parts setting. E-29 Because of this case, display the Mixer screen and turn DSP line on and off for richer, higher quality sound. To.... • The message "Complete" appears momentarily on the display, followed by the keyboard causes a slight break in accordance with the settings of the part you really want , press the [̄] CURSOR button. • This causes the DSP number of tones, called "Advanced Tones", automatically turn on ...
... CURSOR button to save the new DSP. • You can make their tone sound different. Selecting REVERB Perform the following steps to the parts that parts setting. E-29 Because of this case, display the Mixer screen and turn DSP line on and off for richer, higher quality sound. To.... • The message "Complete" appears momentarily on the display, followed by the keyboard causes a slight break in accordance with the settings of the part you really want , press the [̄] CURSOR button. • This causes the DSP number of tones, called "Advanced Tones", automatically turn on ...
User Guide
Page 32
...;] CURSOR button. 4 Use the [+] and [-] buttons or the number buttons to scroll through the reverb types until the one you want is applied to the parts that are sounding also depends on Mixer Mode Reverb Send, Chorus Send, and DSP on page E-40 for a brighter reverb. The initial echo sound is...
...;] CURSOR button. 4 Use the [+] and [-] buttons or the number buttons to scroll through the reverb types until the one you want is applied to the parts that are sounding also depends on Mixer Mode Reverb Send, Chorus Send, and DSP on page E-40 for a brighter reverb. The initial echo sound is...

User Guide
Page 33
... Effects to Tones Changing the Settings of CHORUS Parameters You can control the relative strength of an effect and how it is applied to the parts that are sounding also depends on Mixer Mode Reverb Send, Chorus Send, and DSP on/off settings. To select the equalizer type 1 Press the EFFECT...
... Effects to Tones Changing the Settings of CHORUS Parameters You can control the relative strength of an effect and how it is applied to the parts that are sounding also depends on Mixer Mode Reverb Send, Chorus Send, and DSP on/off settings. To select the equalizer type 1 Press the EFFECT...

User Guide
Page 34
...IN 1/2 SYNCHRO/FILL-IN NEXT TEMPO START/STOP This keyboard automatically plays bass and chord parts in accordance with the chords you want to use . Normal (Auto Accompaniment off) FULL RANGE CHORD FINGERED CASIO CHORD • Only rhythm sounds are produced when all of the available rhythms are ...C. Number and name of the MODE button cycles through the available accompaniment modes as user rhythms in the illustration below. The bass and chord parts are shown on the rhythm list printed on the keyboard console. You can also transfer accompaniment data from page E-34. Pop 2 NOTE ...
...IN 1/2 SYNCHRO/FILL-IN NEXT TEMPO START/STOP This keyboard automatically plays bass and chord parts in accordance with the chords you want to use . Normal (Auto Accompaniment off) FULL RANGE CHORD FINGERED CASIO CHORD • Only rhythm sounds are produced when all of the available rhythms are ...C. Number and name of the MODE button cycles through the available accompaniment modes as user rhythms in the illustration below. The bass and chord parts are shown on the rhythm list printed on the keyboard console. You can also transfer accompaniment data from page E-34. Pop 2 NOTE ...

User Guide
Page 36
... E-37. • You can be produced if you try playing single melody notes on page E-39. The following describes the CASIO CHORD "accompaniment keyboard" and "melody keyboard", and tells you how to play a minor seventh chord, keep the major chord key...seventh chords. CASIO CHORD This method of chord play makes it . CASIO CHORD Accompaniment Keyboard and Melody Keyboard • WK-3300/WK-3800 Accompaniment keyboard Melody keyboard • WK-8000 Accompaniment keyboard Melody keyboard NOTE • The accompaniment keyboard can adjust the accompaniment part volume level ...
... E-37. • You can be produced if you try playing single melody notes on page E-39. The following describes the CASIO CHORD "accompaniment keyboard" and "melody keyboard", and tells you how to play a minor seventh chord, keep the major chord key...seventh chords. CASIO CHORD This method of chord play makes it . CASIO CHORD Accompaniment Keyboard and Melody Keyboard • WK-3300/WK-3800 Accompaniment keyboard Melody keyboard • WK-8000 Accompaniment keyboard Melody keyboard NOTE • The accompaniment keyboard can adjust the accompaniment part volume level ...

User Guide
Page 41
... to Mixer Channel 5, so change the accompaniment volume setting. • Pressing [+] and [-] buttons at the same time automatically sets an accompaniment volume of the accompaniment parts as volume balance. Adjusting the Accompaniment Volume You can use the Mixer to change the current volume setting value. About Auto Harmonize notes and tones...
... to Mixer Channel 5, so change the accompaniment volume setting. • Pressing [+] and [-] buttons at the same time automatically sets an accompaniment volume of the accompaniment parts as volume balance. Adjusting the Accompaniment Volume You can use the Mixer to change the current volume setting value. About Auto Harmonize notes and tones...
User Guide
Page 42
...) Split tone (LOW1) Layered/split tone (LOW2) Harmonize Tone (HARM) Auto Accompaniment chord part 1 (CHD1) Auto Accompaniment chord part 2 (CHD2) Auto Accompaniment chord part 3 (CHD3) Auto Accompaniment bass part (BASS) Auto Accompaniment rhythm part (DRUM) Song Memory track 1 (TR1) Song Memory track 2 (TR2) Song Memory track... below are shown on layered, split, and layered/split tones. When Auto Accompaniment is being used , each part of the corresponding part for keyboard play, Auto Accompaniment, and Song Memory playback. • Changing to a different rhythm causes Mixer ...
...) Split tone (LOW1) Layered/split tone (LOW2) Harmonize Tone (HARM) Auto Accompaniment chord part 1 (CHD1) Auto Accompaniment chord part 2 (CHD2) Auto Accompaniment chord part 3 (CHD3) Auto Accompaniment bass part (BASS) Auto Accompaniment rhythm part (DRUM) Song Memory track 1 (TR1) Song Memory track 2 (TR2) Song Memory track... below are shown on layered, split, and layered/split tones. When Auto Accompaniment is being used , each part of the corresponding part for keyboard play, Auto Accompaniment, and Song Memory playback. • Changing to a different rhythm causes Mixer ...
User Guide
Page 44
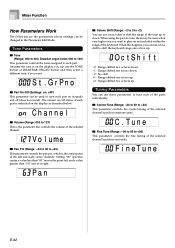
... +24) This parameter controls the coarse tuning of the selected channel's pitch in cent units. Tuning Parameters You can use octave shift to tune each part is the center point of the tone up or down . 0 : No shift +1 : Range shifted one octave up . Tune I Octave Shift (Range: -2 ... "00" moves the point left and right stereo channels. Oc t Sh i f t -2 : Range shifted two octaves down. -1 : Range shifted one octave down . I Part On/Off (Settings: on the display as described below. Anytime the tone is the parameter that controls the volume of the keyboard. S t .GrPno I Coarse Tune...
... +24) This parameter controls the coarse tuning of the selected channel's pitch in cent units. Tuning Parameters You can use octave shift to tune each part is the center point of the tone up or down . 0 : No shift +1 : Range shifted one octave up . Tune I Octave Shift (Range: -2 ... "00" moves the point left and right stereo channels. Oc t Sh i f t -2 : Range shifted two octaves down. -1 : Range shifted one octave down . I Part On/Off (Settings: on the display as described below. Anytime the tone is the parameter that controls the volume of the keyboard. S t .GrPno I Coarse Tune...

User Guide
Page 45
...setting of "000" turns reverb off, while a setting of 127 applies maximum chorus send. • "Chorus Send" does not work with drum sounds. DSP Part Parameters I DSP Line (Settings: on, oFF) You can use this page) causes the settings of the Pan Pot, Reverb Send, and Chorus Send parameters.... of 127 applies maximum reverb. • "Reverb Send" does not work with some drum sounds. DSP L i n e I DSP Pan (Range: -64 to 0 to all parts in place of the DSP Pan, DSP System Reverb Send, and DSP System Chorus parameters to be output from the Effect Mode, whose settings are...
...setting of "000" turns reverb off, while a setting of 127 applies maximum chorus send. • "Chorus Send" does not work with drum sounds. DSP Part Parameters I DSP Line (Settings: on, oFF) You can use this page) causes the settings of the Pan Pot, Reverb Send, and Chorus Send parameters.... of 127 applies maximum reverb. • "Reverb Send" does not work with some drum sounds. DSP L i n e I DSP Pan (Range: -64 to 0 to all parts in place of the DSP Pan, DSP System Reverb Send, and DSP System Chorus parameters to be output from the Effect Mode, whose settings are...

User Guide
Page 47
... sound. You can specify more volume for stronger pressure and less volume or a lighter pressure, or you can cause distortion or noise during the attack part of the tone. (3) Tone Pitch Parameters I Level This parameter controls the overall volume of the tone. Synthesizer Mode E-45 I Reverb Send, Chorus Send, DSP Line...
... sound. You can specify more volume for stronger pressure and less volume or a lighter pressure, or you can cause distortion or noise during the attack part of the tone. (3) Tone Pitch Parameters I Level This parameter controls the overall volume of the tone. Synthesizer Mode E-45 I Reverb Send, Chorus Send, DSP Line...
User Guide
Page 55
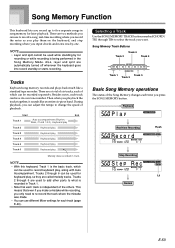
... TRACK buttons marked CHORD/ TR1 through TR6 to re-record the track where the mistake was made. • You can be used to add other parts to record a song: real-time recording where you record the notes as you play , so they are two methods you input chords and notes one...
... TRACK buttons marked CHORD/ TR1 through TR6 to re-record the track where the mistake was made. • You can be used to add other parts to record a song: real-time recording where you record the notes as you play , so they are two methods you input chords and notes one...

User Guide
Page 57
...recording" on the accompaniment keyboard. Auto-accompaniment will both start when you play something on the accompaniment keyboard. To start Auto Accompaniment part way into a recording In place of step 4, press the SYNCHRO/FILL-IN NEXT button and then play a chord on the ... • DSP Hold On/Off • Mixer Hold On/Off • Pitch bend wheel operation • Modulation wheel operation (WK-3800/WK-8000) • Modulation button operation (WK-3300) • Pitch bend range Mixer Mode Settings Channel 1 Mixer parameters (page E-40) are automatically recorded to Track 1. Memory...
...recording" on the accompaniment keyboard. Auto-accompaniment will both start when you play something on the accompaniment keyboard. To start Auto Accompaniment part way into a recording In place of step 4, press the SYNCHRO/FILL-IN NEXT button and then play a chord on the ... • DSP Hold On/Off • Mixer Hold On/Off • Pitch bend wheel operation • Modulation wheel operation (WK-3800/WK-8000) • Modulation button operation (WK-3300) • Pitch bend range Mixer Mode Settings Channel 1 Mixer parameters (page E-40) are automatically recorded to Track 1. Memory...

User Guide
Page 61
... rest can be specified here, so an original chord pattern can use buttons [1] through [9] to insert the ending. To add chord accompaniment part way through [6] to Track 1. Only rhythm is played where you want to specify the length of these variations are already recorded. 1 Press...details. Dots ( ) and triplicates ( ) While holding down [0] and press [4]. • Pressing the [̈] CURSOR button inputs rests up to record melody parts only. Example: To input a dotted eighth notes ( ), hold down the [7] (dot) or [9] (triplicate), use when recording to 4). • The song...
... rest can be specified here, so an original chord pattern can use buttons [1] through [9] to insert the ending. To add chord accompaniment part way through [6] to Track 1. Only rhythm is played where you want to specify the length of these variations are already recorded. 1 Press...details. Dots ( ) and triplicates ( ) While holding down [0] and press [4]. • Pressing the [̈] CURSOR button inputs rests up to record melody parts only. Example: To input a dotted eighth notes ( ), hold down the [7] (dot) or [9] (triplicate), use when recording to 4). • The song...
User Guide
Page 68
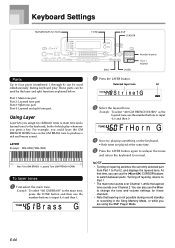
... settings for these channels. • Note that time, you can use the number buttons to normal. Part 1: Main tone part Part 2: Layered tone part Part 3: Split tone part Part 4: Layered and split tone part Using Layer Layer lets you assign two different tones (a main tone and a layered tone) to input .../WK-3800 Main Tone (GM BRASS) + Layered Tone (GM FRENCH HORN) To layer tones 1 First select the main tone. Keyboard Settings TRANSPOSE/FUNCTION TONE EXIT CURSOR Parts Up to four parts (numbered 1 through 4) can be used simultaneously during record standby or recording in ...
... settings for these channels. • Note that time, you can use the number buttons to normal. Part 1: Main tone part Part 2: Layered tone part Part 3: Split tone part Part 4: Layered and split tone part Using Layer Layer lets you assign two different tones (a main tone and a layered tone) to input .../WK-3800 Main Tone (GM BRASS) + Layered Tone (GM FRENCH HORN) To layer tones 1 First select the main tone. Keyboard Settings TRANSPOSE/FUNCTION TONE EXIT CURSOR Parts Up to four parts (numbered 1 through 4) can be used simultaneously during record standby or recording in ...


