
User Guide
Page 16
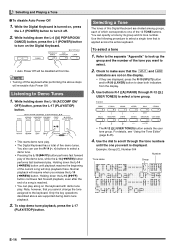
Selecting and Playing a Tone ■ To disable Auto Power Off 1. To select a tone 1. Refer to the separate "Appendix" to make sure that the @ and A indicators are not on , press the L-1 (POWER) button to select a demo tune. • Pressing the L-15 (dFF) button performs ...
Selecting and Playing a Tone ■ To disable Auto Power Off 1. To select a tone 1. Refer to the separate "Appendix" to make sure that the @ and A indicators are not on , press the L-1 (POWER) button to select a demo tune. • Pressing the L-15 (dFF) button performs ...
User Guide
Page 18
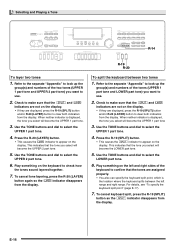
...(LAYER) button again so the A indicator disappears from the display. This indicates that the tone you want to use . 2. Refer to the separate "Appendix" to appear on the display. When neither indicator is the location where the keyboard splits between two tones 1. Press the R-19 (SPLIT) button. &#..., press the R-19 (SPLIT) button and/or R-20 (LAYER) button to clear both indicators from the display. Refer to the separate "Appendix" to look up the group(s) and numbers of the keyboard to check how the tones sound layered together. 7. Play something on the keyboard ...
...(LAYER) button again so the A indicator disappears from the display. This indicates that the tone you want to use . 2. Refer to the separate "Appendix" to appear on the display. When neither indicator is the location where the keyboard splits between two tones 1. Press the R-19 (SPLIT) button. &#..., press the R-19 (SPLIT) button and/or R-20 (LAYER) button to clear both indicators from the display. Refer to the separate "Appendix" to look up the group(s) and numbers of the keyboard to check how the tones sound layered together. 7. Play something on the keyboard ...
User Guide
Page 19
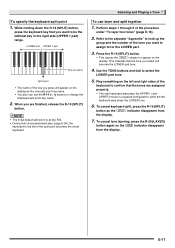
... display. LOWER part UPPER 1 part Key you press Split point • The name of the keyboard to for the LOWER part. 3. Refer to the separate "Appendix" to select the LOWER part tone. 5.
... display. LOWER part UPPER 1 part Key you press Split point • The name of the keyboard to for the LOWER part. 3. Refer to the separate "Appendix" to select the LOWER part tone. 5.
User Guide
Page 25
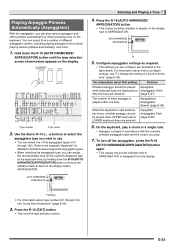
... two tones, whether arpeggio should be played when UPPER keyboard or LOWER keyboard keys are pressed ArpegPart (Arpeggiator Part) (page E-98) 6. Refer to the separate "Appendix" for detailed information about how to ARPEGGIATOR. E-23 You can configure are released (page E-97) The number of the arpeggiator types (013 through 012, see...
... two tones, whether arpeggio should be played when UPPER keyboard or LOWER keyboard keys are pressed ArpegPart (Arpeggiator Part) (page E-98) 6. Refer to the separate "Appendix" for detailed information about how to ARPEGGIATOR. E-23 You can configure are released (page E-97) The number of the arpeggiator types (013 through 012, see...
User Guide
Page 26
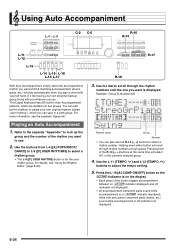
... save in Auto Accompaniment patterns, which you want is displayed. For more information, see "Using the Rhythm Editor" (page E-29). For details, see the separate "Appendix". Using Auto Accompaniment LL--44 -LL--99 C-2 C-5 R-15 R-14 L-11 L-12 L-13 L-14 L-16 L-18 L-15 L-17 With Auto Accompaniment, simply select the ...want and the matching accompaniment (drums, guitar, etc.) will play a chord with you wherever you play automatically when you go. Refer to the separate "Appendix" to look up the group and the number of the R-14 (-, +) buttons at high speed.
... save in Auto Accompaniment patterns, which you want is displayed. For more information, see "Using the Rhythm Editor" (page E-29). For details, see the separate "Appendix". Using Auto Accompaniment LL--44 -LL--99 C-2 C-5 R-15 R-14 L-11 L-12 L-13 L-14 L-16 L-18 L-15 L-17 With Auto Accompaniment, simply select the ...want and the matching accompaniment (drums, guitar, etc.) will play a chord with you wherever you play automatically when you go. Refer to the separate "Appendix" to look up the group and the number of the R-14 (-, +) buttons at high speed.
User Guide
Page 36
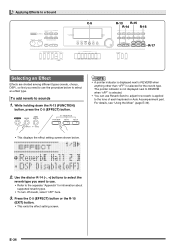
... R-16 R-17 Selecting an Effect Effects are divided among different types (reverb, chorus, DSP), so first you want to use. • Refer to the separate "Appendix" for the reverb type. Use the dial or R-14 (-, +) buttons to select the reverb type you need to use Reverb Send to sounds 1.
... R-16 R-17 Selecting an Effect Effects are divided among different types (reverb, chorus, DSP), so first you want to use. • Refer to the separate "Appendix" for the reverb type. Use the dial or R-14 (-, +) buttons to select the reverb type you need to use Reverb Send to sounds 1.

User Guide
Page 37
...; Selecting a tone with DSP causes the "Chorus/DSP" setting to change the settings to a chorus send value greater than 0 for all parts to the separate "Appendix" for all parts to which you want to apply the chorus effect. Use the R-17 (t, y) buttons to move the thick brackets (%) to the "Chorus" setting...
...; Selecting a tone with DSP causes the "Chorus/DSP" setting to change the settings to a chorus send value greater than 0 for all parts to the separate "Appendix" for all parts to which you want to apply the chorus effect. Use the R-17 (t, y) buttons to move the thick brackets (%) to the "Chorus" setting...
User Guide
Page 52
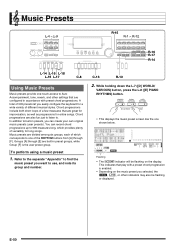
... user preset group. Music presets are configured in preset groups, while Group [F] is enabled. • Depending on the display. Groups [A] through [F]. Refer to the separate "Appendix" to use, and note its group and number. RR--1122 R-16 R-17 R-14 L-14 L-16 L-18 L-15 L-17 C-8 Using Music Presets Music presets provide one...
... user preset group. Music presets are configured in preset groups, while Group [F] is enabled. • Depending on the display. Groups [A] through [F]. Refer to the separate "Appendix" to use, and note its group and number. RR--1122 R-16 R-17 R-14 L-14 L-16 L-18 L-15 L-17 C-8 Using Music Presets Music presets provide one...

User Guide
Page 100
... are recalled (oFF*) when a registration setup (page E-62) is only a value will play with the rhythm 7777. While in Digital Keyboard memory to the separate "Appendix" for this group screen without going through the function menu. See "To batch save all user data in the card mode (page E-103), hold down...
... are recalled (oFF*) when a registration setup (page E-62) is only a value will play with the rhythm 7777. While in Digital Keyboard memory to the separate "Appendix" for this group screen without going through the function menu. See "To batch save all user data in the card mode (page E-103), hold down...
User Guide
Page 117
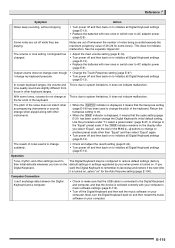
... adjust the reverb setting (page E-34). • Turn power off and then back on to initialize all Digital Keyboard settings (page E-13). See the separate "Appendix". Reference Symptom Action Notes keep sounding, without stopping. • Turn power off and then back on to initialize all Digital Keyboard settings (page E-13). •...
... adjust the reverb setting (page E-34). • Turn power off and then back on to initialize all Digital Keyboard settings (page E-13). See the separate "Appendix". Reference Symptom Action Notes keep sounding, without stopping. • Turn power off and then back on to initialize all Digital Keyboard settings (page E-13). •...
