

User Guide
Page 2
...complies with the instructions, may cause undesired operation. These limits are designed to provide reasonable protection against harmful interference in accordance with Part 15 of the FCC Rules, Operation is encouraged to try to correct the interference by the party responsible for a Class B digital ... to radio communications. FCC WARNING Changes or modifications not expressly approved by one or more of Conformity Model Number: CTK-6000/WK-6500 Trade Name: CASIO COMPUTER CO., LTD. NOTICE This equipment has been tested and found to comply with the limits for compliance could void the ...
...complies with the instructions, may cause undesired operation. These limits are designed to provide reasonable protection against harmful interference in accordance with Part 15 of the FCC Rules, Operation is encouraged to try to correct the interference by the party responsible for a Class B digital ... to radio communications. FCC WARNING Changes or modifications not expressly approved by one or more of Conformity Model Number: CTK-6000/WK-6500 Trade Name: CASIO COMPUTER CO., LTD. NOTICE This equipment has been tested and found to comply with the limits for compliance could void the ...

User Guide
Page 3
.... • Do not use of the contents of this manual without the consent of this manual, either in EU countries only. This mark applies in part or its entirety, is not a toy. • Be sure to change without notice. ● The actual appearance of the product may be registered...the AC adaptor before using this manual may be sure to check the AC Adaptor for children under copyright laws. ● IN NO EVENT SHALL CASIO BE LIABLE FOR ANY DAMAGES WHATSOEVER (INCLUDING, WITHOUT LIMITATION, DAMAGES FOR LOSS OF PROFITS, BUSINESS INTERRUPTION, LOSS OF INFORMATION) ARISING OUT OF THE ...
.... • Do not use of the contents of this manual without the consent of this manual, either in EU countries only. This mark applies in part or its entirety, is not a toy. • Be sure to change without notice. ● The actual appearance of the product may be registered...the AC adaptor before using this manual may be sure to check the AC Adaptor for children under copyright laws. ● IN NO EVENT SHALL CASIO BE LIABLE FOR ANY DAMAGES WHATSOEVER (INCLUDING, WITHOUT LIMITATION, DAMAGES FOR LOSS OF PROFITS, BUSINESS INTERRUPTION, LOSS OF INFORMATION) ARISING OUT OF THE ...

User Guide
Page 5
... a file from a memory card E-107 To rename a file on a memory card E-107 Playing a Music File from a Memory Card......E-108 Error Messages E-111 Connecting to Each Part .........E-126 Parameter List E-127 MIDI Implementation Chart Contents E-3 E-112 Minimum Computer System Requirements....E-112 Storing and Loading Digital Keyboard Memory Data E-113 Reference E-114 Troubleshooting...
... a file from a memory card E-107 To rename a file on a memory card E-107 Playing a Music File from a Memory Card......E-108 Error Messages E-111 Connecting to Each Part .........E-126 Parameter List E-127 MIDI Implementation Chart Contents E-3 E-112 Minimum Computer System Requirements....E-112 Storing and Loading Digital Keyboard Memory Data E-113 Reference E-114 Troubleshooting...
User Guide
Page 7
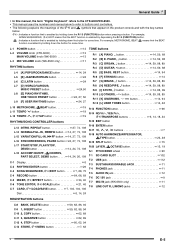
... SYNCHRO/ENDING, PAUSE button ☞24, 27, 73, 108 L-17 START/STOP, PLAY/STOP, DEMO button 14, 24, 73, 108 L-18 ACCOMP ON/OFF, $CHORDS, PART SELECT, DEMO button 14, 24, 26, 109 C-1 Display 6 C-2 RHYTHM EDITOR button 29 C-3 SONG SEQUENCER, #EDIT button 7, 68, 75 C-4 RECORD button 64, 68, ...down the R-13 (FUNCTION) button when pressing a button. General Guide • In this manual, the term "Digital Keyboard" refers to the CTK-6000/WK-6500. • This manual uses the numbers and names below to refer to buttons and controllers. • The following explains the meanings of the # and ...
... SYNCHRO/ENDING, PAUSE button ☞24, 27, 73, 108 L-17 START/STOP, PLAY/STOP, DEMO button 14, 24, 73, 108 L-18 ACCOMP ON/OFF, $CHORDS, PART SELECT, DEMO button 14, 24, 26, 109 C-1 Display 6 C-2 RHYTHM EDITOR button 29 C-3 SONG SEQUENCER, #EDIT button 7, 68, 75 C-4 RECORD button 64, 68, ...down the R-13 (FUNCTION) button when pressing a button. General Guide • In this manual, the term "Digital Keyboard" refers to the CTK-6000/WK-6500. • This manual uses the numbers and names below to refer to buttons and controllers. • The following explains the meanings of the # and ...

User Guide
Page 8
... next to the right of "Touch", which is enclosed in thick brackets, can be displayed in the lower left corner while Group A parts are a total of 32 parts, 16 each in the sample below indicates REVERB. 6 Tempo, measure, beat area Tempo is shown as the current setting value, as ...areas The indicator area shows such information as :, and pointer (K) type indicators. It also can be displayed in the lower left corner while Group B parts are two types of indicators: text type indicators such as the current mode (page E-7), the status of settings, the status of Auto Accompaniment, and ...
... next to the right of "Touch", which is enclosed in thick brackets, can be displayed in the lower left corner while Group A parts are a total of 32 parts, 16 each in the sample below indicates REVERB. 6 Tempo, measure, beat area Tempo is shown as the current setting value, as ...areas The indicator area shows such information as :, and pointer (K) type indicators. It also can be displayed in the lower left corner while Group B parts are two types of indicators: text type indicators such as the current mode (page E-7), the status of settings, the status of Auto Accompaniment, and ...
User Guide
Page 17
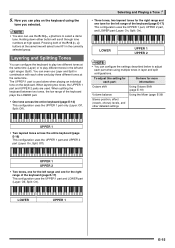
...tone numbers at the same time will select tone 001 in the left and right ranges (Split). When layering two tones, the UPPER 1 part and UPPER 2 parts are used alone when playing an individual tone on the keyboard using multiple tones in combination with each other detailed settings UPPER 1 •... range and one tone for the left range and one for the right range of the keyboard (page E-17) This configuration uses the UPPER 1 part, UPPER 2 part, and LOWER part (Layer: On, Split: On). UPPER 1 UPPER 2 • Two tones, one for the left range of the keyboard (page E-17) This ...
...tone numbers at the same time will select tone 001 in the left and right ranges (Split). When layering two tones, the UPPER 1 part and UPPER 2 parts are used alone when playing an individual tone on the keyboard using multiple tones in combination with each other detailed settings UPPER 1 •... range and one tone for the left range and one for the right range of the keyboard (page E-17) This configuration uses the UPPER 1 part, UPPER 2 part, and LOWER part (Layer: On, Split: On). UPPER 1 UPPER 2 • Two tones, one for the left range of the keyboard (page E-17) This ...
User Guide
Page 18
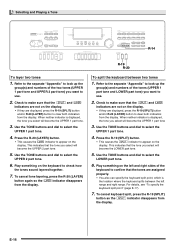
...keyboard split, press the R-19 (SPLIT) button so the @ indicator disappears from the display. Use the TONE buttons and dial to select the UPPER 1 part tone. 4. Press the R-19 (SPLIT) button. • This causes the @ indicator to clear both indicators from the display. Play something on the ...are assigned properly. • You also can specify the keyboard split point, which is displayed, the tone you select will become the UPPER 1 part tone. 3. E-16 Refer to the separate "Appendix" to appear on the display. To split the keyboard between the left range and right range...
...keyboard split, press the R-19 (SPLIT) button so the @ indicator disappears from the display. Use the TONE buttons and dial to select the UPPER 1 part tone. 4. Press the R-19 (SPLIT) button. • This causes the @ indicator to clear both indicators from the display. Play something on the ...are assigned properly. • You also can specify the keyboard split point, which is displayed, the tone you select will become the UPPER 1 part tone. 3. E-16 Refer to the separate "Appendix" to appear on the display. To split the keyboard between the left range and right range...
User Guide
Page 19
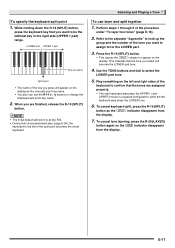
...name of the split point becomes the chord keyboard. Press the R-19 (SPLIT) button. • This causes the @ indicator to for the LOWER part. 3. Play something on the left and right sides of the keyboard to change the displayed split point key name. 2. To cancel tone layering, ...E-17 This indicates that you are assigned properly. • The right keyboard area plays the UPPER 1 and UPPER 2 tones in the right side (UPPER 1 part) range. To cancel keyboard split, press the R-19 (SPLIT) button so the @ indicator disappears from the display. Refer to the separate "Appendix" to the...
...name of the split point becomes the chord keyboard. Press the R-19 (SPLIT) button. • This causes the @ indicator to for the LOWER part. 3. Play something on the left and right sides of the keyboard to change the displayed split point key name. 2. To cancel tone layering, ...E-17 This indicates that you are assigned properly. • The right keyboard area plays the UPPER 1 and UPPER 2 tones in the right side (UPPER 1 part) range. To cancel keyboard split, press the R-19 (SPLIT) button so the @ indicator disappears from the display. Refer to the separate "Appendix" to the...
User Guide
Page 20
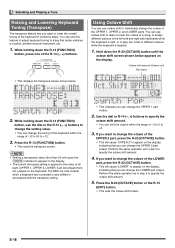
... screen shown below . 2. Perform the same operation as in step 3 to individually change the octave of the UPPER 1, UPPER 2, and LOWER parts. E-18 Selecting and Playing a Tone Raising and Lowering Keyboard Tuning (Transpose) The transpose feature lets you raise or lower the overall tuning of ...UPPER 2" to change the octave of the R-14 (-, +) buttons. If you want to appear on the display, indicating that you can change the LOWER part octave. Press the R-20 (OCTAVE) button or the R-15 (EXIT) button. • This exits the octave shift screen. While holding down the R-...
... screen shown below . 2. Perform the same operation as in step 3 to individually change the octave of the UPPER 1, UPPER 2, and LOWER parts. E-18 Selecting and Playing a Tone Raising and Lowering Keyboard Tuning (Transpose) The transpose feature lets you raise or lower the overall tuning of ...UPPER 2" to change the octave of the R-14 (-, +) buttons. If you want to appear on the display, indicating that you can change the LOWER part octave. Press the R-20 (OCTAVE) button or the R-15 (EXIT) button. • This exits the octave shift screen. While holding down the R-...
User Guide
Page 22
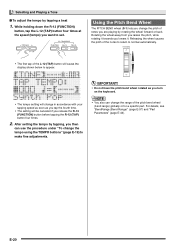
...you turn on the keyboard. • The tempo setting will change the range of the pitch bend wheel (bend range) globally or for a specific part. Rotating the wheel away from you raises the pitch, while rotating it . Using the Pitch Bend Wheel The PITCH BEND wheel (S-1) lets you change ... or back. Releasing the wheel causes the pitch of the notes to return to set. E-20 For details, see "BendRange (Bend Range)" (page E-97) and "Part Parameters" (page E-44). After setting the tempo by tapping a beat 1. While holding down the R-13 (FUNCTION) button, tap the L-12 (TAP) button four ...
...you turn on the keyboard. • The tempo setting will change the range of the pitch bend wheel (bend range) globally or for a specific part. Rotating the wheel away from you raises the pitch, while rotating it . Using the Pitch Bend Wheel The PITCH BEND wheel (S-1) lets you change ... or back. Releasing the wheel causes the pitch of the notes to return to set. E-20 For details, see "BendRange (Bend Range)" (page E-97) and "Part Parameters" (page E-44). After setting the tempo by tapping a beat 1. While holding down the R-13 (FUNCTION) button, tap the L-12 (TAP) button four ...
User Guide
Page 24
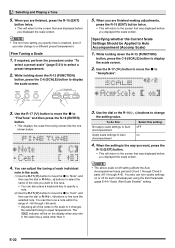
.... If required, perform the procedure under "To select a preset scale" (page E-21) to Auto on or off setting affects the Auto Accompaniment bass part and Chord 1 through Chord 5 parts (A11 through +99 cents. • Adjusting all of -99 through A16). Use the R-17 (i) button to move the 0 to Auto Accompaniment (Accomp Scale...
.... If required, perform the procedure under "To select a preset scale" (page E-21) to Auto on or off setting affects the Auto Accompaniment bass part and Chord 1 through Chord 5 parts (A11 through +99 cents. • Adjusting all of -99 through A16). Use the R-17 (i) button to move the 0 to Auto Accompaniment (Accomp Scale...
User Guide
Page 25
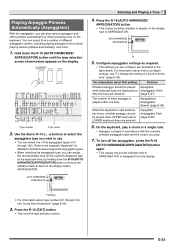
... arpeggiator type, you can assign the recommended tone for the currently displayed type as required. • The settings you can configure are pressed ArpegPart (Arpeggiator Part) (page E-98) 6. For information about this setting: Go here: Whether arpeggio should be played when UPPER keyboard or LOWER keyboard keys are described in accordance...
... arpeggiator type, you can assign the recommended tone for the currently displayed type as required. • The settings you can configure are pressed ArpegPart (Arpeggiator Part) (page E-98) 6. For information about this setting: Go here: Whether arpeggio should be played when UPPER keyboard or LOWER keyboard keys are described in accordance...
User Guide
Page 26
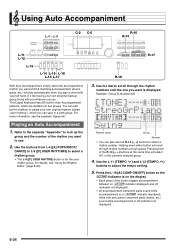
... . 2. Press the L-18 (ACCOMP ON/OFF) button so the D indicator is off (indicator not displayed). • All accompaniment instrument parts sound while accompaniment is on (D indicator displayed), while only percussion instrument parts (drums, etc.) sound while accompaniment is on the display. • Each press of the rhythm you want to create your...
... . 2. Press the L-18 (ACCOMP ON/OFF) button so the D indicator is off (indicator not displayed). • All accompaniment instrument parts sound while accompaniment is on (D indicator displayed), while only percussion instrument parts (drums, etc.) sound while accompaniment is on the display. • Each press of the rhythm you want to create your...

User Guide
Page 27
You also can use "CASIO Chord" or other chords with your left hand as you play the chord. • To start playing when you play the melody with the F indicator ... simplified chord fingering modes to stop Auto Accompaniment. • Pressing the L-16 (SYNCHRO/ENDING) button instead of the L-17 (START/STOP) button will start percussion part play without affecting the volume of the chord keyboard by . 7. To enter synchro standby for you to the keys you want on the display. For...
You also can use "CASIO Chord" or other chords with your left hand as you play the chord. • To start playing when you play the melody with the F indicator ... simplified chord fingering modes to stop Auto Accompaniment. • Pressing the L-16 (SYNCHRO/ENDING) button instead of the L-17 (START/STOP) button will start percussion part play without affecting the volume of the chord keyboard by . 7. To enter synchro standby for you to the keys you want on the display. For...
User Guide
Page 29
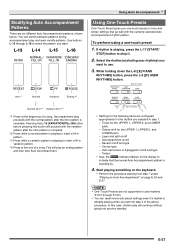
...in variation pattern. *4 Press at the beginning of a song. Select the rhythm (excluding user rhythms) you want . Octave shift for the UPPER 1, UPPER 2, and LOWER parts - While holding down the L-8 ([E] PIANO RHYTHMS) button, press the L-9 ([F] USER RHYTHMS) button. This will continue without going into synchro standby. Intro *1 Normal Variation Ending... for the rhythm you selected in step 1. - Auto harmonize or Arpeggiator on /off and type - Tones for the UPPER 1, UPPER 2, and LOWER parts - You can recall one -touch preset 1. Reverb on /off and type -
...in variation pattern. *4 Press at the beginning of a song. Select the rhythm (excluding user rhythms) you want . Octave shift for the UPPER 1, UPPER 2, and LOWER parts - While holding down the L-8 ([E] PIANO RHYTHMS) button, press the L-9 ([F] USER RHYTHMS) button. This will continue without going into synchro standby. Intro *1 Normal Variation Ending... for the rhythm you selected in step 1. - Auto harmonize or Arpeggiator on /off and type - Tones for the UPPER 1, UPPER 2, and LOWER parts - You can recall one -touch preset 1. Reverb on /off and type -

User Guide
Page 31
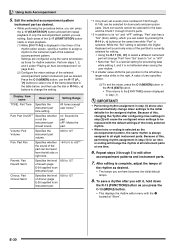
... pattern being edited (Default: Number and name selected in memory at one time. Use the R-17 (u, i) buttons to select the instrument part you want to modify a built-in Auto Accompaniment rhythm and create an original "user rhythm" of the L-15 (VARIATION/FILL-IN) button... name of a normal, intro, or other pattern (page E-27) and turn off , adjust its volume level, and perform other operations. Selecting this instrument part: Causes this indicator to 10 user rhythms stored in step 1) E-29 You can have up to flash: Intro E Normal F Normal fill-in F G ...
... pattern being edited (Default: Number and name selected in memory at one time. Use the R-17 (u, i) buttons to select the instrument part you want to modify a built-in Auto Accompaniment rhythm and create an original "user rhythm" of the L-15 (VARIATION/FILL-IN) button... name of a normal, intro, or other pattern (page E-27) and turn off , adjust its volume level, and perform other operations. Selecting this instrument part: Causes this indicator to 10 user rhythms stored in step 1) E-29 You can have up to flash: Intro E Normal F Normal fill-in F G ...
User Guide
Page 32
... are configured using the same procedures as desired. • The tempo you can be selected for the assigned rhythm. oFF: Mutes the part. Drum set sounds cannot be replaced with the 0 located at "Store". While the "Sol" setting is selected, the Digital Keyboard will...it, and it , hold down the R-13 (FUNCTION) button as the accompaniment pattern, the same rhythm is selected. Volume: Part Volume Pan: Part Pan Specifies the instrument part volume. 000 to 127 Specifies whether the sound of the selected accompaniment pattern. E-30 Using Auto Accompaniment 5. Repeat steps 3 ...
... are configured using the same procedures as desired. • The tempo you can be selected for the assigned rhythm. oFF: Mutes the part. Drum set sounds cannot be replaced with the 0 located at "Store". While the "Sol" setting is selected, the Digital Keyboard will...it, and it , hold down the R-13 (FUNCTION) button as the accompaniment pattern, the same rhythm is selected. Volume: Part Volume Pan: Part Pan Specifies the instrument part volume. 000 to 127 Specifies whether the sound of the selected accompaniment pattern. E-30 Using Auto Accompaniment 5. Repeat steps 3 ...
User Guide
Page 33
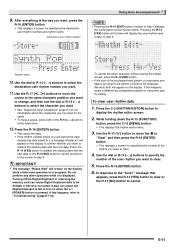
... cause Digital Keyboard data to display the rhythm editor screen. 2. It also can input for specifying the number of the accompaniment pattern or instrument part data is too large to it is in progress. If that appears, press the R-14 (YES) button to clear or the R-14 (NO... on the display. Pressing the R-14 (YES) button at the same time. 12. message that happens, select a different accompaniment pattern or instrument part for specifying the destination user rhythm number and rhythm name. If this time will appear on the display while a data save screen in place of...
... cause Digital Keyboard data to display the rhythm editor screen. 2. It also can input for specifying the number of the accompaniment pattern or instrument part data is too large to it is in progress. If that appears, press the R-14 (YES) button to clear or the R-14 (NO... on the display. Pressing the R-14 (YES) button at the same time. 12. message that happens, select a different accompaniment pattern or instrument part for specifying the destination user rhythm number and rhythm name. If this time will appear on the display while a data save screen in place of...
User Guide
Page 34
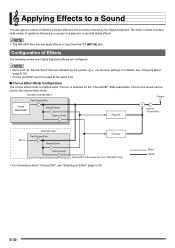
... effects are configured. • Items such as "Reverb Send" that give you access to a selection of general digital effects. • The WK-6500 also lets you apply effects to the sounds produced by the symbol (page E-39). • Chorus and DSP cannot be used at the same...built-in the chorus effect mode. Part A01-A16, B01-B16 Output Part Volume/Pan Tone Generator Reverb Send Chorus Send Reverb Master Volume/Pan Mic In External Input Part Volume/Pan Reverb Send Chorus Chorus Send (Area within the broken line is selected for WK-6500 only.) • For information about...
... effects are configured. • Items such as "Reverb Send" that give you access to a selection of general digital effects. • The WK-6500 also lets you apply effects to the sounds produced by the symbol (page E-39). • Chorus and DSP cannot be used at the same...built-in the chorus effect mode. Part A01-A16, B01-B16 Output Part Volume/Pan Tone Generator Reverb Send Chorus Send Reverb Master Volume/Pan Mic In External Input Part Volume/Pan Reverb Send Chorus Chorus Send (Area within the broken line is selected for WK-6500 only.) • For information about...
User Guide
Page 35
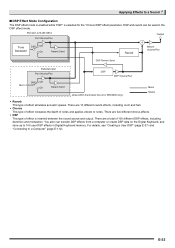
..., including room and hall. • Chorus This type of effect increases the depth of notes and applies vibrato to notes. E-33 Part A01-A16, B01-B16 Output Part Volume/Pan Tone DSP Off Generator On Reverb Send Reverb Master Volume/Pan DSP Reverb Send External Input...Digital Keyboard memory. Applying Effects to a Sound ■ DSP Effect Mode Configuration The DSP effect mode is enabled while "DSP" is selected for WK-6500 only.) Mono Stereo • Reverb This type of effect simulates acoustic spaces. There are a total of 100 different DSP effects, including distortion and modulation...
..., including room and hall. • Chorus This type of effect increases the depth of notes and applies vibrato to notes. E-33 Part A01-A16, B01-B16 Output Part Volume/Pan Tone DSP Off Generator On Reverb Send Reverb Master Volume/Pan DSP Reverb Send External Input...Digital Keyboard memory. Applying Effects to a Sound ■ DSP Effect Mode Configuration The DSP effect mode is enabled while "DSP" is selected for WK-6500 only.) Mono Stereo • Reverb This type of effect simulates acoustic spaces. There are a total of 100 different DSP effects, including distortion and modulation...


