
User Guide
Page 5
... children are present. Contact your original retailer or an authorized CASIO Service Provider. Location Avoid locating the product on an unstable stand, on an uneven surface, or any way. Contact your original retailer or an authorized CASIO Service Provider. Doing so can cause the product to fall ...over, creating the risk of the product and stand.* Climbing onto the product or stand can cause it from the wall outlet. 3. If you are ...
... children are present. Contact your original retailer or an authorized CASIO Service Provider. Location Avoid locating the product on an unstable stand, on an uneven surface, or any way. Contact your original retailer or an authorized CASIO Service Provider. Doing so can cause the product to fall ...over, creating the risk of the product and stand.* Climbing onto the product or stand can cause it from the wall outlet. 3. If you are ...
User Guide
Page 7
...contact a physician. Make sure you assemble the stand correctly, following symptoms. • Dim power indicator • Instrument does not turn on • Display that is flickering, dim, or difficult to strong sudden light or flashing light can cause the LCD panel's glass to one that is selected ... ever feel any condition such as an option. Display Screen • Never push on the display screen's LCD panel or subject it to fall and creating the risk of personal injury. Correct Stand* Assembly An incorrectly assembled stand can make the product top heavy, causing the ...
...contact a physician. Make sure you assemble the stand correctly, following symptoms. • Dim power indicator • Instrument does not turn on • Display that is flickering, dim, or difficult to strong sudden light or flashing light can cause the LCD panel's glass to one that is selected ... ever feel any condition such as an option. Display Screen • Never push on the display screen's LCD panel or subject it to fall and creating the risk of personal injury. Correct Stand* Assembly An incorrectly assembled stand can make the product top heavy, causing the ...
User Guide
Page 9
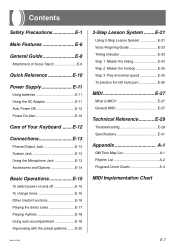
Contents Safety Precautions E-1 Main Features E-6 General Guide E-8 Attachment of Score Stand E-9 Quick Reference E-10 Power Supply E-11 Using batteries E-11 Using the AC Adaptor E-11 Auto Power Off E-12 Power On Alert E-12 Care of Your Keyboard ....... E-21 Using 3-Step Lesson System E-21 Voice Fingering Guide E-23 Timing Indicator E-23 Step 1: Master the...
Contents Safety Precautions E-1 Main Features E-6 General Guide E-8 Attachment of Score Stand E-9 Quick Reference E-10 Power Supply E-11 Using batteries E-11 Using the AC Adaptor E-11 Auto Power Off E-12 Power On Alert E-12 Care of Your Keyboard ....... E-21 Using 3-Step Lesson System E-21 Voice Fingering Guide E-23 Timing Indicator E-23 Step 1: Master the...
User Guide
Page 11
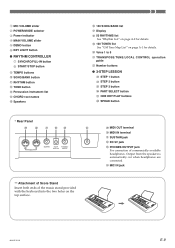
... jack W PHONES/OUTPUT jack For connection of the music stand provided with the keyboard into the two holes on page A-2 for details. 1 MIC VOLUME slider 2 POWER/MODE selector 3 Power indicator 4 MAIN VOLUME slider 5 DEMO button 6 KEY LIGHT button G RHYTHM CONTROLLER 7 SYNCHRO/FILL-IN button 8 ...START/STOP button 9 TEMPO buttons 0 SONG BANK button A RHYTHM button B TONE button C Percussion instrument list D CHORD root names E Speakers F 100 SONG BANK list G Display H 50 RHYTHMS list See "Rhythm List...
... jack W PHONES/OUTPUT jack For connection of the music stand provided with the keyboard into the two holes on page A-2 for details. 1 MIC VOLUME slider 2 POWER/MODE selector 3 Power indicator 4 MAIN VOLUME slider 5 DEMO button 6 KEY LIGHT button G RHYTHM CONTROLLER 7 SYNCHRO/FILL-IN button 8 ...START/STOP button 9 TEMPO buttons 0 SONG BANK button A RHYTHM button B TONE button C Percussion instrument list D CHORD root names E Speakers F 100 SONG BANK list G Display H 50 RHYTHMS list See "Rhythm List...
User Guide
Page 26
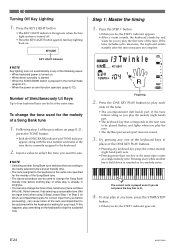
...• Pressing more than one key at the same time. To change the tone used to the keyboard. 2. To stop the sustained note. Turning Off Key Lighting 1. Following step 3 of the keyboard keys in which accompaniment waits for your input. Step 1: Master the timing 1. If the tune includes...button. • When you do, the STEP 1 indicator appears. • After a count sounds, the keyboard stands by and waits for the melody of Simultaneously Lit Keys Up to turn key lighting back on automatically in any time, press the START/STOP button. • When you want to 99). ...
...• Pressing more than one key at the same time. To change the tone used to the keyboard. 2. To stop the sustained note. Turning Off Key Lighting 1. Following step 3 of the keyboard keys in which accompaniment waits for your input. Step 1: Master the timing 1. If the tune includes...button. • When you do, the STEP 1 indicator appears. • After a count sounds, the keyboard stands by and waits for the melody of Simultaneously Lit Keys Up to turn key lighting back on automatically in any time, press the START/STOP button. • When you want to 99). ...

User Guide
Page 27
... an auto-accompaniment tune, the keyboard key that light. 3. To stop play at normal speed, regardless of the tune plays at any time, press the START/STOP button. • When you do , the STEP 2 indicator appears. • After a count sounds, the keyboard stands by the 3-Step Lesson System.... • The accompaniment (left hand) part of what you play at normal speed 1. Step 2: Master the melody 1. Play the notes indicated by and waits for the next note to play. Keys light when their notes start to...
... an auto-accompaniment tune, the keyboard key that light. 3. To stop play at normal speed, regardless of the tune plays at any time, press the START/STOP button. • When you do , the STEP 2 indicator appears. • After a count sounds, the keyboard stands by the 3-Step Lesson System.... • The accompaniment (left hand) part of what you play at normal speed 1. Step 2: Master the melody 1. Play the notes indicated by and waits for the next note to play. Keys light when their notes start to...

User Guide
Page 29
... from a computer or other sources. ❚ NOTE • General MIDI data made up of a large number of parts may not play correctly on this keyboard. • You will have most success playing back General MIDI data that has few parts and is turned on channels 1, 2, 3, 4, and 10. Each... MIDI equipment to reproduce the same nuances when playing General MIDI data, regardless of the manufacturer of the sound source. The letters MIDI stand for all sound source types, regardless of this setting when you can receive such data. General MIDI General MIDI standardizes MIDI data for ...
... from a computer or other sources. ❚ NOTE • General MIDI data made up of a large number of parts may not play correctly on this keyboard. • You will have most success playing back General MIDI data that has few parts and is turned on channels 1, 2, 3, 4, and 10. Each... MIDI equipment to reproduce the same nuances when playing General MIDI data, regardless of the manufacturer of the sound source. The letters MIDI stand for all sound source types, regardless of this setting when you can receive such data. General MIDI General MIDI standardizes MIDI data for ...

User Guide
Page 30
... sounded by the internal sound source. Loca l ❚ NOTE • When you are using the MIDI THRU function of this keyboard are using this keyboard in a stand-alone configuration, keyboard keys do not light while local control is also turned on automatically whenever you turn off local control. • This also turns on GM mapping...
... sounded by the internal sound source. Loca l ❚ NOTE • When you are using the MIDI THRU function of this keyboard are using this keyboard in a stand-alone configuration, keyboard keys do not light while local control is also turned on automatically whenever you turn off local control. • This also turns on GM mapping...


