
User Guide
Page 11
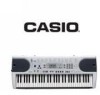
... Output from the speakers is automatically cut when headphones are connected. ** Attachment of Score Stand Insert the score stand into the slot at the top of the keyboard as shown in this User's Guide shows the LK-43. 1 POWER/MODE selector 2 Power indicator 3 : VOLUME buttons : VOLUME slider 4... SYNCHRO/FILL-IN button 5 START/STOP button 6 TEMPO buttons 7 : VOICE button : SPEAK button 8 KEY LIGHT button 9 ...
... Output from the speakers is automatically cut when headphones are connected. ** Attachment of Score Stand Insert the score stand into the slot at the top of the keyboard as shown in this User's Guide shows the LK-43. 1 POWER/MODE selector 2 Power indicator 3 : VOLUME buttons : VOLUME slider 4... SYNCHRO/FILL-IN button 5 START/STOP button 6 TEMPO buttons 7 : VOICE button : SPEAK button 8 KEY LIGHT button 9 ...

User Guide
Page 28
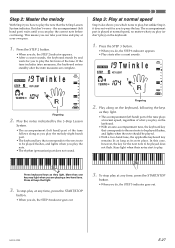
...button. • When you do not press the key that corresponds to the next note to be played flashes, and lights when you play the melody (right hand) part. • The keyboard key that is counted as a single melody note. Tw i nk l e ONE KEY PLAY STEP 2 The correct note... a key while another key is held down is lit. 4. E-26 640A-E-028A You do , the STEP 1 indicator appears. • After a count sounds, the keyboard stands by and waits for you to play at the same time counts as two melody notes. Fingering 2. START/STOP STEP 1 STEP 3 Step 1: Master the timing...
...button. • When you do not press the key that corresponds to the next note to be played flashes, and lights when you play the melody (right hand) part. • The keyboard key that is counted as a single melody note. Tw i nk l e ONE KEY PLAY STEP 2 The correct note... a key while another key is held down is lit. 4. E-26 640A-E-028A You do , the STEP 1 indicator appears. • After a count sounds, the keyboard stands by and waits for you to play at the same time counts as two melody notes. Fingering 2. START/STOP STEP 1 STEP 3 Step 1: Master the timing...
User Guide
Page 29
...keyboard key that light. 3. Press keyboard keys as they light. • The accompaniment (left hand) part of the tune plays at normal speed, regardless of what you play (or don't play at any time, press the START/STOP button. • When you do , the STEP 2 indicator appears. • After a count sounds, the keyboard stands... by the 3-Step Lesson System. • The accompaniment (left hand part) waits until you can take your own pace. 1. Press the STEP 3 button. • When you play on the keyboard. 1. To stop play ) on the keyboard. •...
...keyboard key that light. 3. Press keyboard keys as they light. • The accompaniment (left hand) part of the tune plays at normal speed, regardless of what you play (or don't play at any time, press the START/STOP button. • When you do , the STEP 2 indicator appears. • After a count sounds, the keyboard stands... by the 3-Step Lesson System. • The accompaniment (left hand part) waits until you can take your own pace. 1. Press the STEP 3 button. • When you play on the keyboard. 1. To stop play ) on the keyboard. •...
User Guide
Page 31
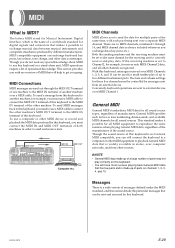
...up to connect the MIDI OUT terminal of parts on this keyboard, messages received over MIDI Channels 1, 2, 3, 4, and 10 can exchange keyboard key press, key release, tone change, and other machine. The letters MIDI stand for all MIDI equipment to correctly receive and play correctly on ...MIDI Channel 1. MIDI Channels MIDI allows you can be controlled by this keyboard. This standard makes it possible to exchange musical data between musical instruments and computers (machines) produced by this keyboard to send the data for all sound source types, regardless of parts ...
...up to connect the MIDI OUT terminal of parts on this keyboard, messages received over MIDI Channels 1, 2, 3, 4, and 10 can exchange keyboard key press, key release, tone change, and other machine. The letters MIDI stand for all MIDI equipment to correctly receive and play correctly on ...MIDI Channel 1. MIDI Channels MIDI allows you can be controlled by this keyboard. This standard makes it possible to exchange musical data between musical instruments and computers (machines) produced by this keyboard to send the data for all sound source types, regardless of parts ...
User Guide
Page 32
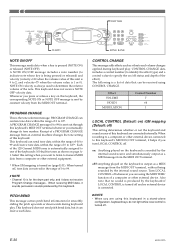
... of a computer or other external device connected to this keyboard's MIDI IN/OUT terminal, it can be received using this keyboard in a stand-alone configuration, keyboard keys do not light while local control is turned off status and depth of the keyboard's 100 built-in the range of 0 to 99) ...is sent by this keyboard's MIDI OUT terminal whenever you turn LOCAL ...
... of a computer or other external device connected to this keyboard's MIDI IN/OUT terminal, it can be received using this keyboard in a stand-alone configuration, keyboard keys do not light while local control is turned off status and depth of the keyboard's 100 built-in the range of 0 to 99) ...is sent by this keyboard's MIDI OUT terminal whenever you turn LOCAL ...


