

User Guide
Page 2
... correct the interference by the party responsible for a Class B digital device, pursuant to Part 15 of the following important information before cleaning the product. CASIO ELECTRONICS CO., LTD. Please keep all information for children under 3 years. • Use only CASIO AD-5 adaptor. • The AC adaptor is valid in a residential installation. GUIDELINES LAID...
... correct the interference by the party responsible for a Class B digital device, pursuant to Part 15 of the following important information before cleaning the product. CASIO ELECTRONICS CO., LTD. Please keep all information for children under 3 years. • Use only CASIO AD-5 adaptor. • The AC adaptor is valid in a residential installation. GUIDELINES LAID...

User Guide
Page 9
...AC Adaptor E-12 Auto Power Off E-13 Power On Alert E-13 Connections E-14 Phones/Output Jack E-14 Sustain Jack E-14 Using the Microphone Jack (LK-45/46 Only E-14 Basic Operations E-15 To switch power on and off E-15 To change tones E-15 Other Useful Functions E-17 Playing the demo...Timing Indicator E-25 Step 1: Master the timing E-26 Step 2: Master the melody E-27 Step 3: Play at normal speed E-27 To practice the left hand part E-28 MIDI E-29 What is MIDI E-29 General MIDI E-29 Technical Reference E-32 Troubleshooting E-32 Specifications E-34 Care of Your Keyboard .......
...AC Adaptor E-12 Auto Power Off E-13 Power On Alert E-13 Connections E-14 Phones/Output Jack E-14 Sustain Jack E-14 Using the Microphone Jack (LK-45/46 Only E-14 Basic Operations E-15 To switch power on and off E-15 To change tones E-15 Other Useful Functions E-17 Playing the demo...Timing Indicator E-25 Step 1: Master the timing E-26 Step 2: Master the melody E-27 Step 3: Play at normal speed E-27 To practice the left hand part E-28 MIDI E-29 What is MIDI E-29 General MIDI E-29 Technical Reference E-32 Troubleshooting E-32 Specifications E-34 Care of Your Keyboard .......

User Guide
Page 11
... shown in this User's Guide shows the LK-43. 1 POWER/MODE selector 2 Power indicator 3 : VOLUME buttons : VOLUME slider 4 SYNCHRO/FILL-IN button 5 START/STOP button 6 TEMPO buttons 7 : VOICE button : SPEAK button 8 KEY LIGHT button 9 Display 0 PART SELECT button A TONE button B RHYTHM button... C ONE KEY PLAY buttons D SONG BANK button E Number buttons F DEMO button G 3-STEP LESSON buttons H TRANSPOSE/TUNE/LOCAL CONTROL operation guide I LK-45/46 P MIC jack Q MIC VOLUME knob ...
... shown in this User's Guide shows the LK-43. 1 POWER/MODE selector 2 Power indicator 3 : VOLUME buttons : VOLUME slider 4 SYNCHRO/FILL-IN button 5 START/STOP button 6 TEMPO buttons 7 : VOICE button : SPEAK button 8 KEY LIGHT button 9 Display 0 PART SELECT button A TONE button B RHYTHM button... C ONE KEY PLAY buttons D SONG BANK button E Number buttons F DEMO button G 3-STEP LESSON buttons H TRANSPOSE/TUNE/LOCAL CONTROL operation guide I LK-45/46 P MIC jack Q MIC VOLUME knob ...

User Guide
Page 13
... TWINKLE LITTLE STAR", input 1 and then 9. Play the notes with the fingerings that appear on the keyboard, pressing keys as they light. • Keep the key depressed as long as it stays lit. • If you selected any song from number 85 through 99...play will flash. • A f t e r y o u p re s s t h e c o r r e c t m e l o d y k e y, accompaniment proceeds to play something on the keyboard. Tw i nk l e 5 5 5 Play the melody part on the keyboard. • A sub-melody (obbligato) plays in time with your melody. Play the notes on the display. Play the notes on the keyboard...
... TWINKLE LITTLE STAR", input 1 and then 9. Play the notes with the fingerings that appear on the keyboard, pressing keys as they light. • Keep the key depressed as long as it stays lit. • If you selected any song from number 85 through 99...play will flash. • A f t e r y o u p re s s t h e c o r r e c t m e l o d y k e y, accompaniment proceeds to play something on the keyboard. Tw i nk l e 5 5 5 Play the melody part on the keyboard. • A sub-melody (obbligato) plays in time with your melody. Play the notes on the display. Play the notes on the keyboard...
User Guide
Page 17
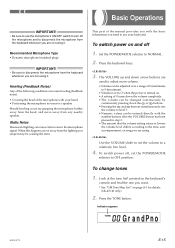
... the keyboard whenever you are not using it . To switch power on page A-1 for details (LK-45/46 only). 2. Look at the tone list* printed on the keyboard's console and find the... button has been pressed in the microphone signal. Press the TONE button. Static Noise Fluorescent lighting can be causing the static. Set the POWER/MODE selector to a relatively low level. .... Recommended Microphone Type • Dynamic microphone (standard plug) IMPORTANT! • Be sure to the tone, auto accompaniment, or song you are using. This part of 0 turns down the volume completely. •...
... the keyboard whenever you are not using it . To switch power on page A-1 for details (LK-45/46 only). 2. Look at the tone list* printed on the keyboard's console and find the... button has been pressed in the microphone signal. Press the TONE button. Static Noise Fluorescent lighting can be causing the static. Set the POWER/MODE selector to a relatively low level. .... Recommended Microphone Type • Dynamic microphone (standard plug) IMPORTANT! • Be sure to the tone, auto accompaniment, or song you are using. This part of 0 turns down the volume completely. •...

User Guide
Page 21
Using auto-accompaniment This keyboard features 50 accompaniment patterns that you play determines the name of the chord. With auto-accompaniment, part of the keyboard (the part that is marked with the POWER/MODE selector. About the accompaniment keyboard The lower (left) 1.5 octaves are white or black. 640A...the notes they will be used throughout the rest of the rhythm. • When you do , while CASIO CHORD makes it makes no difference whether the keys to the standard value of the bottom note are reserved for use . FINGERED lets you play chords as an accompaniment keyboard...
Using auto-accompaniment This keyboard features 50 accompaniment patterns that you play determines the name of the chord. With auto-accompaniment, part of the keyboard (the part that is marked with the POWER/MODE selector. About the accompaniment keyboard The lower (left) 1.5 octaves are white or black. 640A...the notes they will be used throughout the rest of the rhythm. • When you do , while CASIO CHORD makes it makes no difference whether the keys to the standard value of the bottom note are reserved for use . FINGERED lets you play chords as an accompaniment keyboard...
User Guide
Page 24
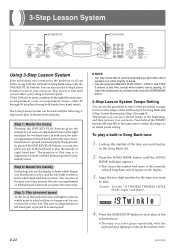
.... To play a built-in the case of the procedure on the display. 3. The auto-accompaniment or left hand part waits until you should use to play, and the key light system to learn at your own pace. 3-Step Lesson System START/STOP SONG BANK Using 3-Step Lesson System Even individuals...the keyboard at all can use a slower tempo at the beginning, and then increase it as you select plays repeatedly, with the keyboard keys lighting to indicate the melody notes. Step 1: Master the timing Pressing the ONE KEY PLAY buttons plays the melody for an auto-accompaniment tune or ...
.... To play a built-in the case of the procedure on the display. 3. The auto-accompaniment or left hand part waits until you should use to play, and the key light system to learn at your own pace. 3-Step Lesson System START/STOP SONG BANK Using 3-Step Lesson System Even individuals...the keyboard at all can use a slower tempo at the beginning, and then increase it as you select plays repeatedly, with the keyboard keys lighting to indicate the melody notes. Step 1: Master the timing Pressing the ONE KEY PLAY buttons plays the melody for an auto-accompaniment tune or ...

User Guide
Page 25
... to return to play back. Two-hand Song Bank Tune Left hand and right hand part keys light. Left hand part Right hand part 640A-E-025A E-23 To stop Song Bank tune play back a Song Bank tune, keyboard keys light to show the keys that should be played with the right hand 3 1 2 A B ... button. • The RHYTHM button is disabled in which direction your fingers should cross. Auto-accompaniment Song Bank Tune Chord and melody part keys light. Chord name Tempo value Fingering Chord The root (the C-note of a C-chord) and other information. In the FINGERED mode, chords...
... to return to play back. Two-hand Song Bank Tune Left hand and right hand part keys light. Left hand part Right hand part 640A-E-025A E-23 To stop Song Bank tune play back a Song Bank tune, keyboard keys light to show the keys that should be played with the right hand 3 1 2 A B ... button. • The RHYTHM button is disabled in which direction your fingers should cross. Auto-accompaniment Song Bank Tune Chord and melody part keys light. Chord name Tempo value Fingering Chord The root (the C-note of a C-chord) and other information. In the FINGERED mode, chords...

User Guide
Page 26
...display for the length of Same Pitch Notes The keyboard key light turns off momentarily between the notes and lights again for the next note to turn off Use the VOICE button (SPEAK button on the LK-45/46) to be pressed lights. Next Note The keyboard key for each successive note. To... again. Example: When play the notes are using two-hand tunes (85 to call out fingering numbers during Step 1 and Step 2 one-hand part practice. Only the current finger number is not indicated when you are also shown on the display. Voice Fingering Guide Voice fingering guide uses a simulated...
...display for the length of Same Pitch Notes The keyboard key light turns off momentarily between the notes and lights again for the next note to turn off Use the VOICE button (SPEAK button on the LK-45/46) to be pressed lights. Next Note The keyboard key for each successive note. To... again. Example: When play the notes are using two-hand tunes (85 to call out fingering numbers during Step 1 and Step 2 one-hand part practice. Only the current finger number is not indicated when you are also shown on the display. Voice Fingering Guide Voice fingering guide uses a simulated...

User Guide
Page 27
... used for the first time by indicating the timing of notes you play back a Song Bank tune and during lesson play. KEY LIGHT indicator ❚ NOTE Key lighting turns on automatically in the normal mode (page E-22). • When the power on page E-22, press the TONE button.... • Both the SONG BANK indicator and TONE indicator appear, along with tunes you are playing for the melody of a Song Bank tune 1. A note is already in the currently selected part...
... used for the first time by indicating the timing of notes you play back a Song Bank tune and during lesson play. KEY LIGHT indicator ❚ NOTE Key lighting turns on automatically in the normal mode (page E-22). • When the power on page E-22, press the TONE button.... • Both the SONG BANK indicator and TONE indicator appear, along with tunes you are playing for the melody of a Song Bank tune 1. A note is already in the currently selected part...

User Guide
Page 28
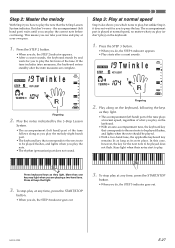
...of the ONE KEY PLAY buttons. • Pressing any keyboard key plays the correct melody (right hand part) note. • Pressing more than one key at any of the tune. Press the STEP 1 ...button. • When you do not have to be played flashes, and lights when you play the melody (right hand) part. • The keyboard key that is lit. 4. Fingering 2. E-26 640A-E-028A Pressing...by and waits for you to play along as you play the note. • The rhythm (percussion) part does not sound. 3. To stop play the first note of the keyboard keys to play at the same...
...of the ONE KEY PLAY buttons. • Pressing any keyboard key plays the correct melody (right hand part) note. • Pressing more than one key at any of the tune. Press the STEP 1 ...button. • When you do not have to be played flashes, and lights when you play the melody (right hand) part. • The keyboard key that is lit. 4. Fingering 2. E-26 640A-E-028A Pressing...by and waits for you to play along as you play the note. • The rhythm (percussion) part does not sound. 3. To stop play the first note of the keyboard keys to play at the same...
User Guide
Page 29
... key for the next note to be played. • With a two-hand tune, the applicable keyboard key remains lit as long as they light. the accompaniment (left hand part) waits until you can take your own pace. 1. To stop play . Press the STEP 2 button. • When you do , the ...STEP 2 indicator goes out. 3. Play along as they light. • The accompaniment (left hand) part of the tune follows along on the keyboard, following the keys as its note plays. Press all keys that the 3-Step Lesson System...
... key for the next note to be played. • With a two-hand tune, the applicable keyboard key remains lit as long as they light. the accompaniment (left hand part) waits until you can take your own pace. 1. To stop play . Press the STEP 2 button. • When you do , the ...STEP 2 indicator goes out. 3. Play along as they light. • The accompaniment (left hand) part of the tune follows along on the keyboard, following the keys as its note plays. Press all keys that the 3-Step Lesson System...
User Guide
Page 30
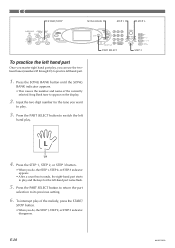
...you do , the STEP 1, STEP 2, or STEP 3 indicator disappears. Press the PART SELECT button to return the part selection to practice left hand part. 1. Input the two digit number for the left-hand part notes flash. 5. Press the PART SELECT button to switch the left hand play of the currently selected Song Bank... tune to appear on the display. 2. To interrupt play . START/STOP SONG BANK STEP 1 STEP 3 To practice the left hand part Once you master right hand part play, you do , the STEP 1, STEP 2, or STEP 3 indicator appears. • After a count beat sounds, the right-hand...
...you do , the STEP 1, STEP 2, or STEP 3 indicator disappears. Press the PART SELECT button to return the part selection to practice left hand part. 1. Input the two digit number for the left-hand part notes flash. 5. Press the PART SELECT button to switch the left hand play of the currently selected Song Bank... tune to appear on the display. 2. To interrupt play . START/STOP SONG BANK STEP 1 STEP 3 To practice the left hand part Once you master right hand part play, you do , the STEP 1, STEP 2, or STEP 3 indicator appears. • After a count beat sounds, the right-hand...
User Guide
Page 31
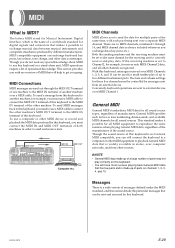
...Musical Instrument Digital Interface, which is the name of a worldwide standard for these five channels must connect the MIDI IN and MIDI OUT terminals of MIDI that will have most success playing back General MIDI data that can be sent and received by this section details the particular messages that has few parts... a separate MIDI channel. General MIDI General MIDI standardizes MIDI data for all other channels are sent to five different instrument parts. Messages There is not General MIDI compatible, you with each part being sent over computer networks, and from other ...
...Musical Instrument Digital Interface, which is the name of a worldwide standard for these five channels must connect the MIDI IN and MIDI OUT terminals of MIDI that will have most success playing back General MIDI data that can be sent and received by this section details the particular messages that has few parts... a separate MIDI channel. General MIDI General MIDI standardizes MIDI data for all other channels are sent to five different instrument parts. Messages There is not General MIDI compatible, you with each part being sent over computer networks, and from other ...
User Guide
Page 32
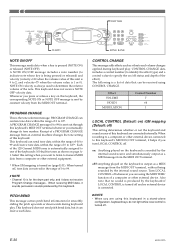
...no external device is connected. ❚ NOTE • When you are using this keyboard in a stand-alone configuration, keyboard keys do not light while local control is being sounded by this unit is 9 to indicate note whose key is turned off whenever you are connected internally. PITCH BEND... This message carries pitch bend information for the drum part only, and it can contain tone data within the range of the effect). When recording to a computer or other external device connected to...
...no external device is connected. ❚ NOTE • When you are using this keyboard in a stand-alone configuration, keyboard keys do not light while local control is being sounded by this unit is 9 to indicate note whose key is turned off whenever you are connected internally. PITCH BEND... This message carries pitch bend information for the drum part only, and it can contain tone data within the range of the effect). When recording to a computer or other external device connected to...


