
User Guide
Page 3
..., Phrase, and Part You Want to Play E-5 Preparing the Music Stand E-5 Power Supply E-5 Playing the Digital Keyboard .......... http://world.casio.com/ E-1 E-28 Playing the Rhythm Part only E-28 Playing All Parts E-29 Using Auto Accompaniment Effectively E-31...on Power and Playing E-6 Using Headphones E-7 Changing Keyboard Response to Touch Pressure (Touch Response) (LK-240 only E-7 Turning Off Keyboard Lighting E-8 Using the Voice Pads E-8 Using the Metronome E-9 Controlling the Keyboard Sounds E-10 Select from the CASIO website at the following URL. E-33 Connecting a...
..., Phrase, and Part You Want to Play E-5 Preparing the Music Stand E-5 Power Supply E-5 Playing the Digital Keyboard .......... http://world.casio.com/ E-1 E-28 Playing the Rhythm Part only E-28 Playing All Parts E-29 Using Auto Accompaniment Effectively E-31...on Power and Playing E-6 Using Headphones E-7 Changing Keyboard Response to Touch Pressure (Touch Response) (LK-240 only E-7 Turning Off Keyboard Lighting E-8 Using the Voice Pads E-8 Using the Metronome E-9 Controlling the Keyboard Sounds E-10 Select from the CASIO website at the following URL. E-33 Connecting a...
User Guide
Page 8
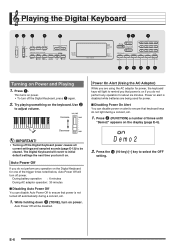
..., Auto Power Off will be cleared. Demo 2 bq 2. Press 1. Try playing something on . Auto Power Off will turn off automatically during a concert, etc. 3 1. The Digital Keyboard will light to ensure that keyboard keys do not perform any operation for one of times until "Demo2" appears on power. 1 • To turn off the Digital...
..., Auto Power Off will be cleared. Demo 2 bq 2. Press 1. Try playing something on . Auto Power Off will turn off automatically during a concert, etc. 3 1. The Digital Keyboard will light to ensure that keyboard keys do not perform any operation for one of times until "Demo2" appears on power. 1 • To turn off the Digital...
User Guide
Page 10
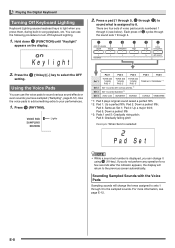
... fifth. *2: Pad 1: Up a perfect fifth; Pad 3: Same as Set 1; Use the voice pads to add something extra to light when you can use the voice pads to turn off Keyboard Lighting. 3 1. Pad 5: Down a perfect fifth *3: Pads 1 and 5: Gradually rising pitch; You can change the tones assigned to sets... Pad Se t • While a sound set number is assigned to the sampled sounds. Press bo (RHYTHM). Playing the Digital Keyboard Turning Off Keyboard Lighting Keyboard Lighting causes keyboard keys to your performances. 1. Press a pad (1 through 5, br through 3 to it bq using (10-key).
... fifth. *2: Pad 1: Up a perfect fifth; Pad 3: Same as Set 1; Use the voice pads to add something extra to light when you can use the voice pads to turn off Keyboard Lighting. 3 1. Pad 5: Down a perfect fifth *3: Pads 1 and 5: Gradually rising pitch; You can change the tones assigned to sets... Pad Se t • While a sound set number is assigned to the sampled sounds. Press bo (RHYTHM). Playing the Digital Keyboard Turning Off Keyboard Lighting Keyboard Lighting causes keyboard keys to your performances. 1. Press a pad (1 through 5, br through 3 to it bq using (10-key).
User Guide
Page 15
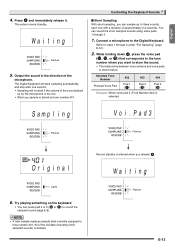
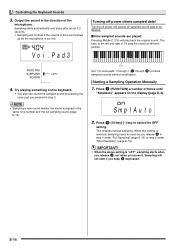
... is selected Samp l i ng Vo i .Pad3 Flashes Flashes Or i g i na l Lights 6. Wa i t i ng Flashes 5. Selected Tone Number 402 403 404 Pressed Voice Pad Pad 1 (br) Pad 2 (bs) Pad 3 (bt) Example: When voice pad 3 (Tone Number 404) is shown below. The Digital Keyboard will not start sampling automatically, and stop after one with...
... is selected Samp l i ng Vo i .Pad3 Flashes Flashes Or i g i na l Lights 6. Wa i t i ng Flashes 5. Selected Tone Number 402 403 404 Pressed Voice Pad Pad 1 (br) Pad 2 (bs) Pad 3 (bt) Example: When voice pad 3 (Tone Number 404) is shown below. The Digital Keyboard will not start sampling automatically, and stop after one with...
User Guide
Page 16
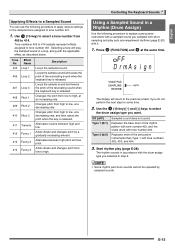
...you pressed in step 2. Press (10-key) [-] key to the left and right of the microphone. Controlling the Keyboard Sounds 3. C4 br ck Set 1 of times until "SmplAuto" appears on the keyboard. • You also can sound the sampled sound by the microphone is "oFF", sampling starts when 4 you release...Pressing Middle C (C4) will 4 not start if the volume of the sound picked up by pressing the voice pad you keep depressed. Vo i .Pad3 Lights 4. When this setting is 4 selected, sampling starts as soon as you press it. Output the sound in step 4 under "Full Sampling" (page E-12)...
...you pressed in step 2. Press (10-key) [-] key to the left and right of the microphone. Controlling the Keyboard Sounds 3. C4 br ck Set 1 of times until "SmplAuto" appears on the keyboard. • You also can sound the sampled sound by the microphone is "oFF", sampling starts when 4 you release...Pressing Middle C (C4) will 4 not start if the volume of the sound picked up by pressing the voice pad you keep depressed. Vo i .Pad3 Lights 4. When this setting is 4 selected, sampling starts as soon as you press it. Output the sound in step 4 under "Full Sampling" (page E-12)...
User Guide
Page 17
...and low pitch. 414 Funny 3 Adds vibrato and changes pitch from 405 to replace a percussive instrument with it. 3 4 1. Controlling the Keyboard Sounds Using a Sampled Sound in accordance with the applicable effect, as described below. Press (FUNCTION) and at a decreasing rate, and then raises..., at the same time. Tone No. Effect Name 405 Loop 1 406 Loop 2 Description Loops the sampled sound. D r mA s i g n Lights The display will play (page E-28). Replaces the bass drum of the percussive instruments than Type 1 with tone number 403. Replaces more of the rhythm...
...and low pitch. 414 Funny 3 Adds vibrato and changes pitch from 405 to replace a percussive instrument with it. 3 4 1. Controlling the Keyboard Sounds Using a Sampled Sound in accordance with the applicable effect, as described below. Press (FUNCTION) and at a decreasing rate, and then raises..., at the same time. Tone No. Effect Name 405 Loop 1 406 Loop 2 Description Loops the sampled sound. D r mA s i g n Lights The display will play (page E-28). Replaces the bass drum of the percussive instruments than Type 1 with tone number 403. Replaces more of the rhythm...
User Guide
Page 18
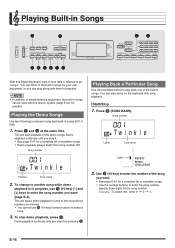
...demo bq playback is referred to as "songs". bq • You cannot use (10-key) [-] and [+] keys to play along on the keyboard with the lesson system (page E-20) for practice. Playing Back a Particular Song Use the procedure below to enter the song number you stop it ...song playback. This will start playback of the song you can play back built-in songs can listen to 090). 1. Song number Tw i nk l e Lights Tune name Lights bq 2. bl 3. Example: To select 001, enter 0 3 0 3 1. Playing the Demo Songs Use the following procedure to play along with them for...
...demo bq playback is referred to as "songs". bq • You cannot use (10-key) [-] and [+] keys to play along on the keyboard with the lesson system (page E-20) for practice. Playing Back a Particular Song Use the procedure below to enter the song number you stop it ...song playback. This will start playback of the song you can play back built-in songs can listen to 090). 1. Song number Tw i nk l e Lights Tune name Lights bq 2. bl 3. Example: To select 001, enter 0 3 0 3 1. Playing the Demo Songs Use the following procedure to play along with them for...

User Guide
Page 19
... Holding down skips forward at high speed until you press to perform pause, skip forward, and skip back operations. ■ Pause 1. Keyboard keys will continue (repeat) until you want to temporarily turn off . This skips song playback forward to the next measure. 9 Each ...press of Specific Measures You can use the procedure in this section to 7 stop playback. bl Song playback will light as notes are repeated. 7 1. Repeating Playback of skips ahead one measure. This pauses song playback. Beat Measure Tempo Fingering bl 4. ...
... Holding down skips forward at high speed until you press to perform pause, skip forward, and skip back operations. ■ Pause 1. Keyboard keys will continue (repeat) until you want to temporarily turn off . This skips song playback forward to the next measure. 9 Each ...press of Specific Measures You can use the procedure in this section to 7 stop playback. bl Song playback will light as notes are repeated. 7 1. Repeating Playback of skips ahead one measure. This pauses song playback. Beat Measure Tempo Fingering bl 4. ...

User Guide
Page 20
Lights 7 4. Changing Playback Speed (Tempo) You can use the following procedure to adjust the balance between the volume of the repeat operation. This specifies the measure ... on the display (page E-4). Holding down playback to select as the end measure and starts repeat playback of times until "Song Vol" appears on the keyboard and song playback volume. 3 1. While the tempo value is flashing, you can use to pause playback, 9 8 to skip forward, or to change the tempo setting...
Lights 7 4. Changing Playback Speed (Tempo) You can use the following procedure to adjust the balance between the volume of the repeat operation. This specifies the measure ... on the display (page E-4). Holding down playback to select as the end measure and starts repeat playback of times until "Song Vol" appears on the keyboard and song playback volume. 3 1. While the tempo value is flashing, you can use to pause playback, 9 8 to skip forward, or to change the tempo setting...

User Guide
Page 24
... pass! Press br. During this lesson, the display shows the key you need to announce which finger you play appears on the screen. Flashes Lights 2. Press bs. To stop Lesson 1, press br or bl. Advance to start the lessons. Don't worry if you should use . Take ... the correct note. Bravo! Go back and try again. Song playback will wait for the next note flashes. 3. Play notes on the keyboard in Songs to Master Keyboard Play Lessons 1, 2, and 3 Now it sounds like. 1. This starts Lesson 2. E-22 Follow the instructions to press next. This starts...
... pass! Press br. During this lesson, the display shows the key you need to announce which finger you play appears on the screen. Flashes Lights 2. Press bs. To stop Lesson 1, press br or bl. Advance to start the lessons. Don't worry if you should use . Take ... the correct note. Bravo! Go back and try again. Song playback will wait for the next note flashes. 3. Play notes on the keyboard in Songs to Master Keyboard Play Lessons 1, 2, and 3 Now it sounds like. 1. This starts Lesson 2. E-22 Follow the instructions to press next. This starts...

User Guide
Page 25
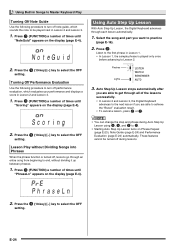
...Lesson 2 and Lesson 3. 3 1. Press bt. Remember everything you complete Lesson 3 play to turn off both hands and find out how the Digital Keyboard evaluates your play . 1. Tw i nk l e Disappears Turning Off Voice Fingering Guide Use the following procedure to turn off voice fingering guide, which... Though song playback stands by waiting for you to press the correct keys as you what finger to use to play next. Lights 2. E-23 Press the keyboard keys you which tells you learned in Lesson 2. 4 Song playback will cause song playback to end. Lesson Settings Playing without Phrase...
...Lesson 2 and Lesson 3. 3 1. Press bt. Remember everything you complete Lesson 3 play to turn off both hands and find out how the Digital Keyboard evaluates your play . 1. Tw i nk l e Disappears Turning Off Voice Fingering Guide Use the following procedure to turn off voice fingering guide, which... Though song playback stands by waiting for you to press the correct keys as you what finger to use to play next. Lights 2. E-23 Press the keyboard keys you which tells you learned in Lesson 2. 4 Song playback will cause song playback to end. Lesson Settings Playing without Phrase...
User Guide
Page 26
...turned off during Auto Step Up Lesson using 8, 9, and br to ck. • Starting Auto Step Up Lesson turns on the display (page E-4). Flashes Lights 3. evaluation result. • To cancel a lesson, press cl or bl. • You can change the step and phrase during lessons. Press the (...and displays a score in Lesson 2 and Lesson 3. 3 1. Press (FUNCTION) a number of the lessons successfully. • In Lesson 2 and Lesson 3, the Digital Keyboard advances to the next lesson if you want to get through all of times until "Scoring" appears on Phrase Repeat (page E-23), Note Guide (page...
...turned off during Auto Step Up Lesson using 8, 9, and br to ck. • Starting Auto Step Up Lesson turns on the display (page E-4). Flashes Lights 3. evaluation result. • To cancel a lesson, press cl or bl. • You can change the step and phrase during lessons. Press the (...and displays a score in Lesson 2 and Lesson 3. 3 1. Press (FUNCTION) a number of the lessons successfully. • In Lesson 2 and Lesson 3, the Digital Keyboard advances to the next lesson if you want to get through all of times until "Scoring" appears on Phrase Repeat (page E-23), Note Guide (page...

User Guide
Page 28
... press the key with the finger indicated on the screen as quickly as you press keys in response to keyboard keys that measures your score. • Pressing a key before it lights appears on -screen fingering guide indications. 1. The next key will not advance to on the display (Unit... ! Press bp (SONG BANK). 2. This causes the lighting of remaining notes Displayed during a game. The shorter the time, the higher your reaction speed as possible. Music Challenge Keyboard Game 1 bnbobp bl cm Music Challenge is a game that light and to the next note. 0.3sec Time Number of ...
... press the key with the finger indicated on the screen as quickly as you press keys in response to keyboard keys that measures your score. • Pressing a key before it lights appears on -screen fingering guide indications. 1. The next key will not advance to on the display (Unit... ! Press bp (SONG BANK). 2. This causes the lighting of remaining notes Displayed during a game. The shorter the time, the higher your reaction speed as possible. Music Challenge Keyboard Game 1 bnbobp bl cm Music Challenge is a game that light and to the next note. 0.3sec Time Number of ...

User Guide
Page 31
...Mode You can select from among the following five chord input modes. • FINGERED 1 • FINGERED 2 • FINGERED 3 • CASIO CHORD • FULL RANGE CHORD bm 1. Chords (no melody played) Melody bq 2. Play other chords with your own personal back up group ...on the accompaniment keyboard 4 Accompaniment for the D-F#-A-C chord (D7) sounds. 4. Press bm. This enables chord input on page E-32. Accompaniment keyboard Lights Using Auto Accompaniment bm 5. Chord input mode Cho r d 3. Use the (10-key...
...Mode You can select from among the following five chord input modes. • FINGERED 1 • FINGERED 2 • FINGERED 3 • CASIO CHORD • FULL RANGE CHORD bm 1. Chords (no melody played) Melody bq 2. Play other chords with your own personal back up group ...on the accompaniment keyboard 4 Accompaniment for the D-F#-A-C chord (D7) sounds. 4. Press bm. This enables chord input on page E-32. Accompaniment keyboard Lights Using Auto Accompaniment bm 5. Chord input mode Cho r d 3. Use the (10-key...

User Guide
Page 36
... XP) • For information about how to 16. 3 1. Whenever you want for sending Digital Keyboard data to select one of a Song Bank song (page E-16), or while the Digital Keyboard is lighting during a power on the display (page E-4). Ch" appears on alert operation. Press (FUNCTION) a...during playback of the following URL. This also will automatically configure the navigate (L) channel as navigate channels. http://world.casio.com/ MIDI Settings Keyboard Channel A keyboard channel is the channel used to display only the notes of a particular channel (part) as on-screen guide ...
... XP) • For information about how to 16. 3 1. Whenever you want for sending Digital Keyboard data to select one of a Song Bank song (page E-16), or while the Digital Keyboard is lighting during a power on the display (page E-4). Ch" appears on alert operation. Press (FUNCTION) a...during playback of the following URL. This also will automatically configure the navigate (L) channel as navigate channels. http://world.casio.com/ MIDI Settings Keyboard Channel A keyboard channel is the channel used to display only the notes of a particular channel (part) as on-screen guide ...

User Guide
Page 41
...) or 30 minutes (during AC adaptor operation) without any operation 10 cm × 2 2 W + 2 W 9.5 V = 7.7 W E-39 Reference English Specifications Model Keyboard Touch Response (LK-240 only) Key Light System Maximum Polyphony Tones Built-in Tones Sampling Tones Reverb Voice Pad Metronome Beats per Measure Tempo Range Song Bank Tunes Step Up... only) Mic In jack Power Jack Power Supply Batteries Battery Life AC Adaptor Auto Power Off Speakers Output Power Consumption LK-160/LK-165/LK-240 61 standard-size keys 2 types, Off Up to 4 keys can be lit at the same time 48 notes (24 for certain...
...) or 30 minutes (during AC adaptor operation) without any operation 10 cm × 2 2 W + 2 W 9.5 V = 7.7 W E-39 Reference English Specifications Model Keyboard Touch Response (LK-240 only) Key Light System Maximum Polyphony Tones Built-in Tones Sampling Tones Reverb Voice Pad Metronome Beats per Measure Tempo Range Song Bank Tunes Step Up... only) Mic In jack Power Jack Power Supply Batteries Battery Life AC Adaptor Auto Power Off Speakers Output Power Consumption LK-160/LK-165/LK-240 61 standard-size keys 2 types, Off Up to 4 keys can be lit at the same time 48 notes (24 for certain...


