
User Guide
Page 3
...21 Lessons 1, 2, and 3 E-22 Lesson Settings E-23 Using Auto Step Up Lesson E-24 Music Challenge Keyboard Game E-26 Using Auto Accompaniment......... http://world.casio.com/ E-1 E-33 Connecting a Computer E-33 MIDI Settings E-34 Connecting to Audio Equipment E-36 Reference E-... and Playing E-6 Using Headphones E-7 Changing Keyboard Response to Touch Pressure (Touch Response) (LK-240 only E-7 Turning Off Keyboard Lighting E-8 Using the Voice Pads E-8 Using the Metronome E-9 Controlling the Keyboard Sounds E-10 Select from the CASIO website at the following URL. English Contents...
...21 Lessons 1, 2, and 3 E-22 Lesson Settings E-23 Using Auto Step Up Lesson E-24 Music Challenge Keyboard Game E-26 Using Auto Accompaniment......... http://world.casio.com/ E-1 E-33 Connecting a Computer E-33 MIDI Settings E-34 Connecting to Audio Equipment E-36 Reference E-... and Playing E-6 Using Headphones E-7 Changing Keyboard Response to Touch Pressure (Touch Response) (LK-240 only E-7 Turning Off Keyboard Lighting E-8 Using the Voice Pads E-8 Using the Metronome E-9 Controlling the Keyboard Sounds E-10 Select from the CASIO website at the following URL. English Contents...

User Guide
Page 4
You can tear it out and refer to the LK-160/LK-165/LK-240. • In this manual, buttons and other controllers are identified using the numbers shown below. • There is a button number reference at the back of this manual. General Guide • In this manual, the term "Digital Keyboard" refers to the button numbers as required. 1 2 345 6 7 8 9 bk bl bm bn bo bp bq br bs bt ck cl cm cn co cp cq cr cn cs ct E-2
You can tear it out and refer to the LK-160/LK-165/LK-240. • In this manual, buttons and other controllers are identified using the numbers shown below. • There is a button number reference at the back of this manual. General Guide • In this manual, the term "Digital Keyboard" refers to the button numbers as required. 1 2 345 6 7 8 9 bk bl bm bn bo bp bq br bs bt ck cl cm cn co cp cq cr cn cs ct E-2
User Guide
Page 6
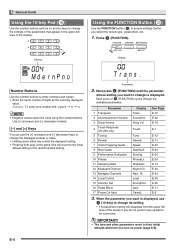
... parameter whose setting you turn on power (page E-6). E-12 2 Accompaniment Volume AcompVol E-32 3 Song Volume Song Vol E-18 4 Touch Response (LK-240 only) Touch E-7 5 Tuning Tune E-12 6 Reverb Reverb E-11 7 Voice Fingering Guide Speak E-23 8 Note Guide NoteGuid E-24 9 Performance... Evaluation Scoring E-24 10 Phrase PhraseLn E-24 11 Sampling Start SmplAuto E-14 12 Keyboard Channel Keybd Ch E-34 13 Navigate Channels Navi. When the parameter you want to change is displayed, use the [+] (increase) and...
... parameter whose setting you turn on power (page E-6). E-12 2 Accompaniment Volume AcompVol E-32 3 Song Volume Song Vol E-18 4 Touch Response (LK-240 only) Touch E-7 5 Tuning Tune E-12 6 Reverb Reverb E-11 7 Voice Fingering Guide Speak E-23 8 Note Guide NoteGuid E-24 9 Performance... Evaluation Scoring E-24 10 Phrase PhraseLn E-24 11 Sampling Start SmplAuto E-14 12 Keyboard Channel Keybd Ch E-34 13 Navigate Channels Navi. When the parameter you want to change is displayed, use the [+] (increase) and...

User Guide
Page 7
...AC adaptor specified for information about options. Low battery indicator (flashes) • Never insert metal, pencils, or any type of the Digital Keyboard. Use of a different type of AC adaptor can be used to avoid putting any other nickel based batteries. 1. Open the battery cover on... the bottom of load on the side of the wire, take care to power this Digital Keyboard. Purchase it separately from your retailer. No bending! English Getting Ready to Play Preparing the Music Stand Using Batteries Music stand •...
...AC adaptor specified for information about options. Low battery indicator (flashes) • Never insert metal, pencils, or any type of the Digital Keyboard. Use of a different type of AC adaptor can be used to avoid putting any other nickel based batteries. 1. Open the battery cover on... the bottom of load on the side of the wire, take care to power this Digital Keyboard. Purchase it separately from your retailer. No bending! English Getting Ready to Play Preparing the Music Stand Using Batteries Music stand •...
User Guide
Page 8
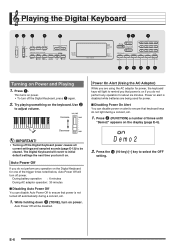
... below, Auto Power Off will light to be disabled. This turns on alert is disabled while batteries are using the AC adaptor for power, the keyboard keys will turn off power. Demo 2 bq 2. During battery operation : 6 minutes During AC adaptor operation : 30 minutes ■ Disabling Auto Power Off...you do not perform any operation for one of times until "Demo2" appears on power. Playing the Digital Keyboard 12 3 5 6 bnbo bq br bs bt ck cl cm Turning on the keyboard. Auto Power Off If you are being used for power. ■ Disabling Power On Alert You can ...
... below, Auto Power Off will light to be disabled. This turns on alert is disabled while batteries are using the AC adaptor for power, the keyboard keys will turn off power. Demo 2 bq 2. During battery operation : 6 minutes During AC adaptor operation : 30 minutes ■ Disabling Auto Power Off...you do not perform any operation for one of times until "Demo2" appears on power. Playing the Digital Keyboard 12 3 5 6 bnbo bq br bs bt ck cl cm Turning on the keyboard. Auto Power Off If you are being used for power. ■ Disabling Power On Alert You can ...

User Guide
Page 9
...Touch bq 2. PHONES/OUTPUT jack Pressing fast produces louder notes. • Headphones do not leave the adaptor plugged in accordance with keyboard pressure (speed). Doing so creates the risk of the same expressivity you are using headphones that best matches your playing style. ... and [+] keys to Touch Pressure (Touch Response) (LK-240 only) Touch Response alters tone volume in when removing the headphones. Normal Touch Response More sensitive Touch Response than Type 1 E-7 Playing the Digital Keyboard Changing Keyboard Response to select one of played notes change in speakers,...
...Touch bq 2. PHONES/OUTPUT jack Pressing fast produces louder notes. • Headphones do not leave the adaptor plugged in accordance with keyboard pressure (speed). Doing so creates the risk of the same expressivity you are using headphones that best matches your playing style. ... and [+] keys to Touch Pressure (Touch Response) (LK-240 only) Touch Response alters tone volume in when removing the headphones. Normal Touch Response More sensitive Touch Response than Type 1 E-7 Playing the Digital Keyboard Changing Keyboard Response to select one of played notes change in speakers,...
User Guide
Page 10
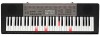
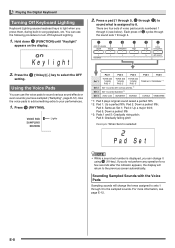
... cl) to sound what is displayed, you can use the following procedure to select the OFF setting. Press the (10-key) [-] key to turn off Keyboard Lighting. 3 1. Lights Set 1 Set 2 Set 3 Set 4 Pad 1 Pad 2 Pad 3 TONE 402 "VOICE PAD 1" TONE 403 "VOICE PAD 2" TONE 404 "VOICE PAD 3"..., etc. Press bo (RHYTHM). Pad 2: Down a perfect fifth; Hold down (FUNCTION) until "Keylight" appears on the display. 2. Playing the Digital Keyboard Turning Off Keyboard Lighting Keyboard Lighting causes keyboard keys to the sampled sounds. br bs bt ck cl cm Key l i gh t bq 2.
... cl) to sound what is displayed, you can use the following procedure to select the OFF setting. Press the (10-key) [-] key to turn off Keyboard Lighting. 3 1. Lights Set 1 Set 2 Set 3 Set 4 Pad 1 Pad 2 Pad 3 TONE 402 "VOICE PAD 1" TONE 403 "VOICE PAD 2" TONE 404 "VOICE PAD 3"..., etc. Press bo (RHYTHM). Pad 2: Down a perfect fifth; Hold down (FUNCTION) until "Keylight" appears on the display. 2. Playing the Digital Keyboard Turning Off Keyboard Lighting Keyboard Lighting causes keyboard keys to the sampled sounds. br bs bt ck cl cm Key l i gh t bq 2.

User Guide
Page 11
... per measure setting (which determines when the bell sounds) is changed automatically with a steady beat to change the tempo of the metronome. 1. Playing the Digital Keyboard Changing the Metronome Tempo Use the following procedure to help keep you specify 0 for the currently selected song. 5 1. Tempo value (flashes) Changing the Metronome Sound...
... per measure setting (which determines when the bell sounds) is changed automatically with a steady beat to change the tempo of the metronome. 1. Playing the Digital Keyboard Changing the Metronome Tempo Use the following procedure to help keep you specify 0 for the currently selected song. 5 1. Tempo value (flashes) Changing the Metronome Sound...

User Guide
Page 12
... the instrument type. The tone of the drum sets is selected (tone numbers 395 through 400), each keyboard key is assigned a different percussion sound. Settings Tone Number: "001" Reverb: "06" Transpose: "00" Touch Response (LK-240 only): Off: Returns to enter the tone number. Specify three digits for playing 1. Example: To select...
... the instrument type. The tone of the drum sets is selected (tone numbers 395 through 400), each keyboard key is assigned a different percussion sound. Settings Tone Number: "001" Reverb: "06" Transpose: "00" Touch Response (LK-240 only): Off: Returns to enter the tone number. Specify three digits for playing 1. Example: To select...
User Guide
Page 13
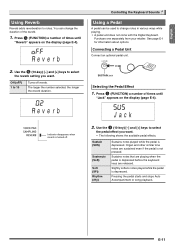
...(SFt) Rhythm (rHy) Sustains notes played while the pedal is depressed. Sustains notes that are playing when the pedal is depressed before the keyboard keys are sustained even if the pedal is turned off reverb. Purchase one separately from your retailer. Organ and other similar tone notes are ... reverb. 3 1. Use the (10-key) [-] and [+] keys to change the duration of times until "Jack" appears on the display (page E-4). Controlling the Keyboard Sounds Using a Pedal A pedal can change notes in various ways while playing. • A pedal unit does not come with the Digital...
...(SFt) Rhythm (rHy) Sustains notes played while the pedal is depressed. Sustains notes that are playing when the pedal is depressed before the keyboard keys are sustained even if the pedal is turned off reverb. Purchase one separately from your retailer. Organ and other similar tone notes are ... reverb. 3 1. Use the (10-key) [-] and [+] keys to change the duration of times until "Jack" appears on the display (page E-4). Controlling the Keyboard Sounds Using a Pedal A pedal can change notes in various ways while playing. • A pedal unit does not come with the Digital...
User Guide
Page 14
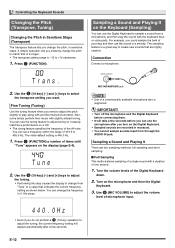
... and Playing It There are highly creative. A simple operation lets you instantly change from "Tune" to adjust tuning so it exactly matches a performance on the Keyboard (Sampling) You can use the sound in a melody. Sampling a Sound and Playing It on a CD. • The tuning feature specifies the frequency of ...feature lets you change the frequency in 0.1Hz steps. Turn the volume levels of times until "Tune" appears on the microphone and then the Digital Keyboard. Use (MIC VOLUME) to adjust the volume level of microphone input. 440 . 0Hz bq • Even if you do not perform a (10...
... and Playing It There are highly creative. A simple operation lets you instantly change from "Tune" to adjust tuning so it exactly matches a performance on the Keyboard (Sampling) You can use the sound in a melody. Sampling a Sound and Playing It on a CD. • The tuning feature specifies the frequency of ...feature lets you change the frequency in 0.1Hz steps. Turn the volume levels of times until "Tune" appears on the microphone and then the Digital Keyboard. Use (MIC VOLUME) to adjust the volume level of microphone input. 440 . 0Hz bq • Even if you do not perform a (10...
User Guide
Page 15
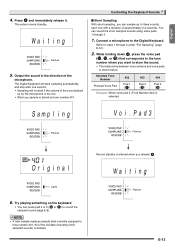
... short sampled sounds) is deleted. 4 Record standby is shown below. All of the microphone. This enters record standby. Try playing something on the keyboard. Selected Tone Number 402 403 404 Pressed Voice Pad Pad 1 (br) Pad 2 (bs) Pad 3 (bt) Example: When voice pad ...3 (Tone Number 404) is too low. • What you want to steps 1 through 3. 1. Controlling the Keyboard Sounds ■ Short Sampling With short sampling, you release . Refer to store the sound. • The relationship between tone numbers and voice pads is entered...
... short sampled sounds) is deleted. 4 Record standby is shown below. All of the microphone. This enters record standby. Try playing something on the keyboard. Selected Tone Number 402 403 404 Pressed Voice Pad Pad 1 (br) Pad 2 (bs) Pad 3 (bt) Example: When voice pad ...3 (Tone Number 404) is too low. • What you want to steps 1 through 3. 1. Controlling the Keyboard Sounds ■ Short Sampling With short sampling, you release . Refer to store the sound. • The relationship between tone numbers and voice pads is entered...
User Guide
Page 16
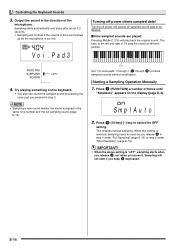
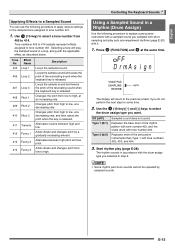
... pressing the voice pad you pressed in step 2. C4 br ck Set 1 of the microphone. Press (FUNCTION) a number of times until "SmplAuto" appears on the keyboard. • You also can sound the sampled sound by the microphone is too low. Smp l Au t o bq 2. Sampling will not start if you press it... C (C4) will play the sound at different pitches. When this setting is "oFF", sampling starts when 4 you release , not when you keep depressed. Controlling the Keyboard Sounds 3. Turning off power will causes all sampled sound data to select the OFF setting.
... pressing the voice pad you pressed in step 2. C4 br ck Set 1 of the microphone. Press (FUNCTION) a number of times until "SmplAuto" appears on the keyboard. • You also can sound the sampled sound by the microphone is too low. Smp l Au t o bq 2. Sampling will not start if you press it... C (C4) will play the sound at different pitches. When this setting is "oFF", sampling starts when 4 you release , not when you keep depressed. Controlling the Keyboard Sounds 3. Turning off power will causes all sampled sound data to select the OFF setting.
User Guide
Page 17
... number 401. Selecting a tone will return to the previous screen if you do not perform the next step for some time. Tone No. Controlling the Keyboard Sounds Using a Sampled Sound in step 2. • Some rhythm part drum sounds cannot be replaced by a gradually increasing amount. 413 Funny 2 Alternates ...assign type you want. E-15 Start rhythm play (page E-28). Loops the sample sound and raises the pitch of the resonating sound when the keyboard key is released. 407 Loop 3 Loops the sample sound and lowers the pitch of the rhythm pattern with tone number 402, and the snare...
... number 401. Selecting a tone will return to the previous screen if you do not perform the next step for some time. Tone No. Controlling the Keyboard Sounds Using a Sampled Sound in step 2. • Some rhythm part drum sounds cannot be replaced by a gradually increasing amount. 413 Funny 2 Alternates ...assign type you want. E-15 Start rhythm play (page E-28). Loops the sample sound and raises the pitch of the resonating sound when the keyboard key is released. 407 Loop 3 Loops the sample sound and lowers the pitch of the rhythm pattern with tone number 402, and the snare...
User Guide
Page 18
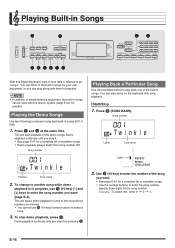
...songs. • Use the number buttons to enter the number of the demo songs. bl Demo playback continues until you can play along on the keyboard with the lesson system (page E-20) for the song number. Press bl and bm at the same time. To change to enter the song ...enter the song number. This will start playback of the song you entered. Playing Built-in Songs 3 6 bp bq 7 8 9 bk bl bm With this Digital Keyboard, built-in songs. Song number Tw i nk l e Lights Tune name Lights bq 2. Playing the Demo Songs Use the following procedure to the song whose number...
...songs. • Use the number buttons to enter the number of the demo songs. bl Demo playback continues until you can play along on the keyboard with the lesson system (page E-20) for the song number. Press bl and bm at the same time. To change to enter the song ...enter the song number. This will start playback of the song you entered. Playing Built-in Songs 3 6 bp bq 7 8 9 bk bl bm With this Digital Keyboard, built-in songs. Song number Tw i nk l e Lights Tune name Lights bq 2. Playing the Demo Songs Use the following procedure to the song whose number...

User Guide
Page 19
... repeat. Press bk. Press again to temporarily turn off . Press to resume playback from the point where you want to play and practice. Press bl. Keyboard keys will continue (repeat) until you press to stop it. Press 8. Disappears E-17 This skips song playback forward to the previous measure. 8 Each press of...
... repeat. Press bk. Press again to temporarily turn off . Press to resume playback from the point where you want to play and practice. Press bl. Keyboard keys will continue (repeat) until you press to stop it. Press 8. Disappears E-17 This skips song playback forward to the previous measure. 8 Each press of...

User Guide
Page 20
.... This specifies the measure as the end measure, press again. Holding down playback to its original default tempo. bk • During repeat play on the keyboard and song playback volume. 3 1. The tempo value will stop flashing if you can use bq (10-key) to change the tempo setting. Adjusting the Song...
.... This specifies the measure as the end measure, press again. Holding down playback to its original default tempo. bk • During repeat play on the keyboard and song playback volume. 3 1. The tempo value will stop flashing if you can use bq (10-key) to change the tempo setting. Adjusting the Song...

User Guide
Page 21
After selecting a song, hold down (SONG BANK) for about two seconds until the displayed tone name changes to the keyboard. bm 1. Play along with the remaining part. Turning Off the Part of a song during playback and practice playing the along with song playback. • If ... part off Left hand part off Both hand parts off , only the notes of cycles through the settings shown below lets you select the same keyboard tone as the song tone, the display contents will not change. 2.
After selecting a song, hold down (SONG BANK) for about two seconds until the displayed tone name changes to the keyboard. bm 1. Play along with the remaining part. Turning Off the Part of a song during playback and practice playing the along with song playback. • If ... part off Left hand part off Both hand parts off , only the notes of cycles through the settings shown below lets you select the same keyboard tone as the song tone, the display contents will not change. 2.

User Guide
Page 22
... hand parts for each phrase of the phrases, practice the entire song. 4 Now you have mastered the entire song! Master all of a song. Your Digital Keyboard comes with a Step Up Lesson feature that . Phrase 1 • Right Hand Lesson 1, 2, 3 • Left Hand Lesson 1, 2, 3 • Both Hand Lesson 1, 2, 3 ...4 Repeat the above to break it up into phrases to do just that helps you to help you master keyboard play. Final Phrase Step Up Lesson Flow Step Up Lesson takes you master the song. E-20 Using Built-in songs are pre-divided into shorter...
... hand parts for each phrase of the phrases, practice the entire song. 4 Now you have mastered the entire song! Master all of a song. Your Digital Keyboard comes with a Step Up Lesson feature that . Phrase 1 • Right Hand Lesson 1, 2, 3 • Left Hand Lesson 1, 2, 3 • Both Hand Lesson 1, 2, 3 ...4 Repeat the above to break it up into phrases to do just that helps you to help you master keyboard play. Final Phrase Step Up Lesson Flow Step Up Lesson takes you master the song. E-20 Using Built-in songs are pre-divided into shorter...

User Guide
Page 23
... appears during Auto Step Up Lesson (page E-24) immediately before practice from Phrase 1 up to the keyboard (page E-19). Appears at high speed. • The Digital Keyboard remembers the last phrase you want to start playing on the display during Step Lessons. This message appears ...following are the messages that appear on the keyboard. E-21 English Messages that Appear during Lessons The following a phrase for which "" (see above) is displayed, and during an Auto ...
... appears during Auto Step Up Lesson (page E-24) immediately before practice from Phrase 1 up to the keyboard (page E-19). Appears at high speed. • The Digital Keyboard remembers the last phrase you want to start playing on the display during Step Lessons. This message appears ...following are the messages that appear on the keyboard. E-21 English Messages that Appear during Lessons The following a phrase for which "" (see above) is displayed, and during an Auto ...


