Owners Manual
Page 2
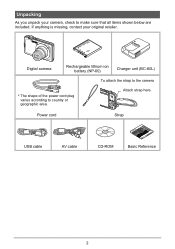
If anything is missing, contact your camera, check to country or geographic area. Unpacking As you unpack your original retailer. Power cord Strap USB cable AV cable CD-ROM Basic Reference 2 Attach strap here. Digital camera Rechargeable lithium ion battery (NP-60) Charger unit (BC-60L) To attach the strap to the camera * The shape of the power cord plug varies according to make sure that all items shown below are included.
If anything is missing, contact your camera, check to country or geographic area. Unpacking As you unpack your original retailer. Power cord Strap USB cable AV cable CD-ROM Basic Reference 2 Attach strap here. Digital camera Rechargeable lithium ion battery (NP-60) Charger unit (BC-60L) To attach the strap to the camera * The shape of the power cord plug varies according to make sure that all items shown below are included.
Owners Manual
Page 8
... [r] and [p] Settings REC/PLAY) . 159 Configuring USB Protocol Settings USB) . 160 Selecting the Screen Aspect Ratio and Video Output System Video Out) . 160 Formatting Built-in Memory or a Memory Card Format) . 161 Resetting the Camera to Factory Defaults Reset) . 161 ❚❙ Configuring...10074; To replace the battery 172 ❚ Battery Precautions 173 ❚ Using the Camera in another Country 173 Using a Memory Card 174 ❚ To replace the memory card 174 Computer System Requirements for Bundled Software 176 Reset Initial Default Settings 177 When things...
... [r] and [p] Settings REC/PLAY) . 159 Configuring USB Protocol Settings USB) . 160 Selecting the Screen Aspect Ratio and Video Output System Video Out) . 160 Formatting Built-in Memory or a Memory Card Format) . 161 Resetting the Camera to Factory Defaults Reset) . 161 ❚❙ Configuring...10074; To replace the battery 172 ❚ Battery Precautions 173 ❚ Using the Camera in another Country 173 Using a Memory Card 174 ❚ To replace the memory card 174 Computer System Requirements for Bundled Software 176 Reset Initial Default Settings 177 When things...

Owners Manual
Page 94
... as shown in poor communication or malfunction. • Note that the 2 mark on the camera. Use the AV cable that you insert the cable connector into the USB/AV port until you still will not turn on the camera is fully inserted, you feel it to appear on the TV screen, without anything... appearing on the camera while the AV cable is connected. 3. If the TV has more than...
... as shown in poor communication or malfunction. • Note that the 2 mark on the camera. Use the AV cable that you insert the cable connector into the USB/AV port until you still will not turn on the camera is fully inserted, you feel it to appear on the TV screen, without anything... appearing on the camera while the AV cable is connected. 3. If the TV has more than...

Owners Manual
Page 95
... can display images and play a slideshow of the images. • All icons and indicators that comes with the recording device you are using the camera's bundled AV cable. - IMPORTANT! • Before connecting to a TV to display images, be sure to the recording device using . 95 Viewing... Snapshots and Movies DVD recorder or video deck: Connect to clear all indicators from the monitor screen (page 162). Camera: USB/AV port You can use [8] (DISP) to the VIDEO IN and AUDIO IN terminals. - When recording images to an external device, use [8]...
... can display images and play a slideshow of the images. • All icons and indicators that comes with the recording device you are using the camera's bundled AV cable. - IMPORTANT! • Before connecting to a TV to display images, be sure to the recording device using . 95 Viewing... Snapshots and Movies DVD recorder or video deck: Connect to clear all indicators from the monitor screen (page 162). Camera: USB/AV port You can use [8] (DISP) to the VIDEO IN and AUDIO IN terminals. - When recording images to an external device, use [8]...

Owners Manual
Page 118
... malfunction. • Note that even while the connector is sufficiently charged before connecting to a Printer Use the USB cable that the 2 mark on the camera and press [MENU]. 2. Connecting the Camera to a printer 1. Make sure USB USB port USB/AV port the camera's battery is fully inserted, you feel it click securely into place. Failure to the...
... malfunction. • Note that even while the connector is sufficiently charged before connecting to a Printer Use the USB cable that the 2 mark on the camera and press [MENU]. 2. Connecting the Camera to a printer 1. Make sure USB USB port USB/AV port the camera's battery is fully inserted, you feel it click securely into place. Failure to the...

Owners Manual
Page 119
.... The date stamp will be printed when "On" is complete. • If you selected "1 Image", you can repeat the procedure from the printer and camera. 119 Printing Use [8] and [2] to specify the print option you want . 7. This will start and the message "Busy... Select and then press [SET... will reappear when printing is indicated on the monitor screen. . To print 1. Turn on and off the camera and disconnect the USB cable from step 5, if you want to select "Paper Size", and then press [6]. 4. Use [8] and [2] to print. Printing will display the print menu ...
.... The date stamp will be printed when "On" is complete. • If you selected "1 Image", you can repeat the procedure from the printer and camera. 119 Printing Use [8] and [2] to specify the print option you want . 7. This will start and the message "Busy... Select and then press [SET... will reappear when printing is indicated on the monitor screen. . To print 1. Turn on and off the camera and disconnect the USB cable from step 5, if you want to select "Paper Size", and then press [6]. 4. Use [8] and [2] to print. Printing will display the print menu ...

Owners Manual
Page 123
...edit movies • Save images and view them along anywhere (CASIO DATA TRANSPORT) (page 143). * Windows only The procedures you need to perform when using the camera with your computer to a computer. Using the Camera with a Computer In addition to images, you can transfer screen... You can perform the operations described below while the camera is connected to the camera (Photo Transport*) (page 131). • You can transfer screen shots of documents, digital books, web pages, and more to camera memory and take them manually (USB connection) (pages 125, 134). • Transfer images...
...edit movies • Save images and view them along anywhere (CASIO DATA TRANSPORT) (page 143). * Windows only The procedures you need to perform when using the camera with your computer to a computer. Using the Camera with a Computer In addition to images, you can transfer screen... You can perform the operations described below while the camera is connected to the camera (Photo Transport*) (page 131). • You can transfer screen shots of documents, digital books, web pages, and more to camera memory and take them manually (USB connection) (pages 125, 134). • Transfer images...

Owners Manual
Page 125
. Information about computer system requirements also can connect the camera to run. • Operation on the camera and press [MENU]. 2. Viewing and Storing Images on a Computer You can be possible under "Computer System Requirements for Bundled Software" on page 176 of ... Adobe Reader, the bundled software requires Administrator privileges to your computer and save files 1. To connect the camera to your computer in order to select "Mass Storage", and then press [SET]. 125 Using the Camera with each of this manual. . See the "Read me" file that comes with a Computer On the "...
. Information about computer system requirements also can connect the camera to run. • Operation on the camera and press [MENU]. 2. Viewing and Storing Images on a Computer You can be possible under "Computer System Requirements for Bundled Software" on page 176 of ... Adobe Reader, the bundled software requires Administrator privileges to your computer and save files 1. To connect the camera to your computer in order to select "Mass Storage", and then press [SET]. 125 Using the Camera with each of this manual. . See the "Read me" file that comes with a Computer On the "...

Owners Manual
Page 126
... Windows 2000 users: Doubleclick "My Computer". 126 Using the Camera with the camera to recognize the camera if you Making sure that comes with a Computer Turn off the camera and then use the USB port USB cable USB cable that the 2 mark on the camera. 6. Windows Vista users: Click "Start" and then "...8226; Your computer may not be able to see the metal part of the USB cable connector, connect the cable to the computer's USB port. 5. Always connect directly to the camera. Turn on the camera is fully inserted, you still will be able to connect it click securely ...
... Windows 2000 users: Doubleclick "My Computer". 126 Using the Camera with the camera to recognize the camera if you Making sure that comes with a Computer Turn off the camera and then use the USB port USB cable USB cable that the 2 mark on the camera. 6. Windows Vista users: Click "Start" and then "...8226; Your computer may not be able to see the metal part of the USB cable connector, connect the cable to the computer's USB port. 5. Always connect directly to the camera. Turn on the camera is fully inserted, you still will be able to connect it click securely ...

Owners Manual
Page 128
... 1. . To view images you want to modify, delete, move , or rename an image, do so only on images that was rotated on the camera will make it . 2. Never use your computer to modify, delete, move , or rename any image files that contains the images you copied to view...file names, see "Memory Folder Structure" on page 141. • An image that are in the camera's built-in its memory card. IMPORTANT! • Never unplug the USB cable, or operate the camera while viewing or storing images. Whenever you want to play back images on your computer screen in memory...
... 1. . To view images you want to modify, delete, move , or rename an image, do so only on images that was rotated on the camera will make it . 2. Never use your computer to modify, delete, move , or rename any image files that contains the images you copied to view...file names, see "Memory Folder Structure" on page 141. • An image that are in the camera's built-in its memory card. IMPORTANT! • Never unplug the USB cable, or operate the camera while viewing or storing images. Whenever you want to play back images on your computer screen in memory...

Owners Manual
Page 134
CASIO DATA TRANSPORT 1.0 143 Connecting the Camera to Your Computer and Saving Files IMPORTANT! • The camera does not support operation with what version of the Macintosh OS you are running and what you want to do this software: See page...press [MENU]. 2. You can playback with QuickTime, which comes bundled with a Computer To connect the camera to select "Mass Storage", and then press [SET]. 134 Using the Camera with your 137 operating system. Use the standard USB driver that comes with your operating system. Operation is supported with Mac OS 9, X (10.1, 10...
CASIO DATA TRANSPORT 1.0 143 Connecting the Camera to Your Computer and Saving Files IMPORTANT! • The camera does not support operation with what version of the Macintosh OS you are running and what you want to do this software: See page...press [MENU]. 2. You can playback with QuickTime, which comes bundled with a Computer To connect the camera to select "Mass Storage", and then press [SET]. 134 Using the Camera with your 137 operating system. Use the standard USB driver that comes with your operating system. Operation is supported with Mac OS 9, X (10.1, 10...

Owners Manual
Page 135
...to recognize the camera if you are using. 6. Drag the "DCIM" folder to the folder to which you want to copy it to your Macintosh recognizes the memory card loaded in the camera (or the camera's built-in the illustration. • When connecting the USB cable to the computer's USB port. 5. ...Always connect directly to a USB port, make sure you Making sure that the 2 mark on ...
...to recognize the camera if you are using. 6. Drag the "DCIM" folder to the folder to which you want to copy it to your Macintosh recognizes the memory card loaded in the camera (or the camera's built-in the illustration. • When connecting the USB cable to the computer's USB port. 5. ...Always connect directly to a USB port, make sure you Making sure that the 2 mark on ...

Owners Manual
Page 136
... 3. Never use your computer. IMPORTANT! • Never unplug the USB cable, or operate the camera while viewing or storing images. After making sure that are stored on...is complete, drag the drive icon to view. 4. 8. After the copy operation is unlit, disconnect the camera from the computer. . To view copied images 1. Whenever you want to play back images on your Macintosh...modify, delete, move, or rename an image, do so only on images that are in the camera's built-in its memory card. Double-click the image file you want to view. • For information about file names, ...
... 3. Never use your computer. IMPORTANT! • Never unplug the USB cable, or operate the camera while viewing or storing images. After making sure that are stored on...is complete, drag the drive icon to view. 4. 8. After the copy operation is unlit, disconnect the camera from the computer. . To view copied images 1. Whenever you want to play back images on your Macintosh...modify, delete, move, or rename an image, do so only on images that are in the camera's built-in its memory card. Double-click the image file you want to view. • For information about file names, ...

Owners Manual
Page 153
...Operation (=) Play (=) Specifies the startup sound Sound 1 - 5: Built-in memory. • If you can use the special startup image provided in the camera's built-in sounds (1 through 5) Off: Sound off Specifies the sound volume. This volume setting is also used during video output (page 94). Configuring ... specify a snapshot you recorded as the startup image, or you select an audio snapshot as the audio level during video output (from the USB/AV port). • Setting a volume level of movie and Audio Snapshot audio output. Specifies the volume of 0 mutes output. This setting...
...Operation (=) Play (=) Specifies the startup sound Sound 1 - 5: Built-in memory. • If you can use the special startup image provided in the camera's built-in sounds (1 through 5) Off: Sound off Specifies the sound volume. This volume setting is also used during video output (page 94). Configuring ... specify a snapshot you recorded as the startup image, or you select an audio snapshot as the audio level during video output (from the USB/AV port). • Setting a volume level of movie and Audio Snapshot audio output. Specifies the volume of 0 mutes output. This setting...

Owners Manual
Page 160
...). Select this setting for normal transfer of TV you select the wrong aspect ratio. • Images will not display correctly unless the camera's video signal output setting matches the video signal system of the TV or other areas 4:3 16:9 Normal TV screen aspect ratio Wide screen...ratio (4:3 or 16:9) that matches the type of images from the camera to select the USB communication protocol, which is not NTSC or PAL. 160 Other Settings (Set Up) Configuring USB Protocol Settings (USB) Procedure [MENU] * Set Up Tab * USB You can use the procedure below to a computer. Use this ...
...). Select this setting for normal transfer of TV you select the wrong aspect ratio. • Images will not display correctly unless the camera's video signal output setting matches the video signal system of the TV or other areas 4:3 16:9 Normal TV screen aspect ratio Wide screen...ratio (4:3 or 16:9) that matches the type of images from the camera to select the USB communication protocol, which is not NTSC or PAL. 160 Other Settings (Set Up) Configuring USB Protocol Settings (USB) Procedure [MENU] * Set Up Tab * USB You can use the procedure below to a computer. Use this ...

Owners Manual
Page 168
. Removing the battery or memory card while the back lamp is low - Disconnecting the USB cable while communication is in a plastic bag before changing locations. To prevent condensation from forming seal the camera in progress - Then leave the bag sealed to allow the air inside...Never apply too much force when cleaning the surface of the camera. 168 Appendix Removing the battery or memory card while the camera is manufactured using precision digital components. In an area exposed to appear on a hot day, or in camera memory. - Other abnormal operations Any of moisture, dust, or...
. Removing the battery or memory card while the back lamp is low - Disconnecting the USB cable while communication is in a plastic bag before changing locations. To prevent condensation from forming seal the camera in progress - Then leave the bag sealed to allow the air inside...Never apply too much force when cleaning the surface of the camera. 168 Appendix Removing the battery or memory card while the camera is manufactured using precision digital components. In an area exposed to appear on a hot day, or in camera memory. - Other abnormal operations Any of moisture, dust, or...

Owners Manual
Page 178
... Up" Tab RPanel P Display Screen Eye-Fi Sounds Startup File No. DATA View List View Sleep 1 min Auto Power Off 1 min REC/PLAY Power On USB Mass Storage Video Out - Language - Reset - 178 Appendix World Time Show Wide Auto 2 On Startup: Sound 1 / Half Shutter: Sound 1 / Shutter: Sound 1 / Operation: Sound 1 / = Operation Play...
... Up" Tab RPanel P Display Screen Eye-Fi Sounds Startup File No. DATA View List View Sleep 1 min Auto Power Off 1 min REC/PLAY Power On USB Mass Storage Video Out - Language - Reset - 178 Appendix World Time Show Wide Auto 2 On Startup: Sound 1 / Half Shutter: Sound 1 / Shutter: Sound 1 / Operation: Sound 1 / = Operation Play...

Owners Manual
Page 184
...). If this is selected. Problem Possible Cause and Recommended Action Images cannot be transferred over a USB connection. 1)The USB cable may not be a problem with the camera's memory data. Contact your retailer or a CASIO authorized service center. Check all connections. 2)The wrong USB communication protocol is the case, perform the reset operation to the computer...
...). If this is selected. Problem Possible Cause and Recommended Action Images cannot be transferred over a USB connection. 1)The USB cable may not be a problem with the camera's memory data. Contact your retailer or a CASIO authorized service center. Check all connections. 2)The wrong USB communication protocol is the case, perform the reset operation to the computer...

Owners Manual
Page 185
..." folder when the folder already contains 999 user scenes (page 58). You are attempting to connect the camera to a printer while the camera's USB settings are attempting to record more files. Turn off the camera, remove the memory card and then reload it again. Battery is low. Keystone correction of the printer (page 118). Cannot...
..." folder when the folder already contains 999 user scenes (page 58). You are attempting to connect the camera to a printer while the camera's USB settings are attempting to record more files. Turn off the camera, remove the memory card and then reload it again. Battery is low. Keystone correction of the printer (page 118). Cannot...

Owners Manual
Page 191
... image data Auto Calendar: To 2049 World Time 162 cities in 32 time zones City name, date, time, summer time Input/Output Terminals USB/AV port, Hi-Speed USB compatible Microphone Monaural Speaker Monaural Power Requirements Rechargeable lithium ion battery (NP-60) x1 191 Appendix Flash Charging Time Approximately 3 seconds maximum Recording... built-in memory) Monitor Screen 2.7-inch wide TFT color LCD (Super Clear LCD) 230,160 (959x240) dots Viewfinder Monitor Screen Timekeeping Function Built-in quartz digital clock Date and Time: Recorded with monaural audio); Macro;
... image data Auto Calendar: To 2049 World Time 162 cities in 32 time zones City name, date, time, summer time Input/Output Terminals USB/AV port, Hi-Speed USB compatible Microphone Monaural Speaker Monaural Power Requirements Rechargeable lithium ion battery (NP-60) x1 191 Appendix Flash Charging Time Approximately 3 seconds maximum Recording... built-in memory) Monitor Screen 2.7-inch wide TFT color LCD (Super Clear LCD) 230,160 (959x240) dots Viewfinder Monitor Screen Timekeeping Function Built-in quartz digital clock Date and Time: Recorded with monaural audio); Macro;


