
User Guide
Page 6
... to music at high volume • Continued sound output even after you release a key • A totally different tone may be registered trademarks of microphone input • Dim power supply indicator when a microphone is required when using headphones. Doing so can damage your skin, rinse with it to read display • Abnormally low speaker/headphone volume • Distortion of sound output • Occasional interruption of sound when playing at high volumes...
... to music at high volume • Continued sound output even after you release a key • A totally different tone may be registered trademarks of microphone input • Dim power supply indicator when a microphone is required when using headphones. Doing so can damage your skin, rinse with it to read display • Abnormally low speaker/headphone volume • Distortion of sound output • Occasional interruption of sound when playing at high volumes...
User Guide
Page 7
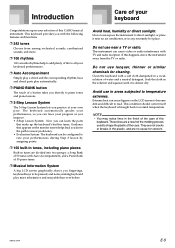
...; 3-Step Lesson System: Now you can cause video or audio interference with Auto Accompaniment, and a Piano Bank of 50 piano tunes. ❐ Musical Information System A big LCD screen graphically shows you fingerings, keyboard keys to be pressed, and notes, making keyboard play more . ❐ 100 rhythms 100 versatile rhythms help to add plenty of life to all your keyboard performances. ❐ Auto Accompaniment Simply play a chord and the corresponding rhythm, bass and chord parts play automatically. ❐ PIANO BANK button The touch...
...; 3-Step Lesson System: Now you can cause video or audio interference with Auto Accompaniment, and a Piano Bank of 50 piano tunes. ❐ Musical Information System A big LCD screen graphically shows you fingerings, keyboard keys to be pressed, and notes, making keyboard play more . ❐ 100 rhythms 100 versatile rhythms help to add plenty of life to all your keyboard performances. ❐ Auto Accompaniment Simply play a chord and the corresponding rhythm, bass and chord parts play automatically. ❐ PIANO BANK button The touch...

User Guide
Page 8
...E-17 Adjusting the Tempo E-18 Using Auto Accompaniment E-18 Using a Fill-in Pattern E-20 Synchro Starting Accompaniment with Rhythm Play E-20 Playing a Built-in succession E-23 Using the PIANO BANK Button E-23 3-Step Lesson E-24 Evaluation Mode E-25 Using the Lesson Functions and Evaluation Mode E-25 Step 1 - E-21 To play back a Song Bank tune E-21 To play back a Piano Bank tune E-22 Adjusting the Tempo E-22 To change the melody tone E-23 To play the keyboard E-10 Power Supply E-12 Using batteries E-12 Using the AC Adaptor E-13 Auto Power Off E-13 Settings E-13 Connections...
...E-17 Adjusting the Tempo E-18 Using Auto Accompaniment E-18 Using a Fill-in Pattern E-20 Synchro Starting Accompaniment with Rhythm Play E-20 Playing a Built-in succession E-23 Using the PIANO BANK Button E-23 3-Step Lesson E-24 Evaluation Mode E-25 Using the Lesson Functions and Evaluation Mode E-25 Step 1 - E-21 To play back a Song Bank tune E-21 To play back a Piano Bank tune E-22 Adjusting the Tempo E-22 To change the melody tone E-23 To play the keyboard E-10 Power Supply E-12 Using batteries E-12 Using the AC Adaptor E-13 Auto Power Off E-13 Settings E-13 Connections...

User Guide
Page 11
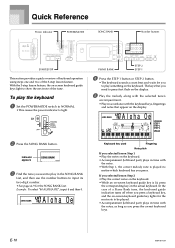
...this User's Guide are intended for a person seated on a chair in this keyboard is fixed, and cannot be changed only by using [+] and [-] to increase and decrease the displayed value. General Guide 1 MIC VOLUME slider 2 Power indicator 3 POWER/MODE switch 4 MAIN VOLUME slider G SONG BANK/PIANO BANK/RHYTHM CONTROLLER 5 FILL-IN button 6 SYNCHRO button 7 START/STOP button 8 TEMPO buttons 9 SETTING button 0 Percussion instrument list A CHORD root names B Speaker C Rhythm list D Tone list E Display F Song Bank list G Piano Bank list Rear Panel V H COUNT VOICE 1 to 5 I [+]/[-] buttons...
...this User's Guide are intended for a person seated on a chair in this keyboard is fixed, and cannot be changed only by using [+] and [-] to increase and decrease the displayed value. General Guide 1 MIC VOLUME slider 2 Power indicator 3 POWER/MODE switch 4 MAIN VOLUME slider G SONG BANK/PIANO BANK/RHYTHM CONTROLLER 5 FILL-IN button 6 SYNCHRO button 7 START/STOP button 8 TEMPO buttons 9 SETTING button 0 Percussion instrument list A CHORD root names B Speaker C Rhythm list D Tone list E Display F Song Bank list G Piano Bank list Rear Panel V H COUNT VOICE 1 to 5 I [+]/[-] buttons...
User Guide
Page 12
... PIANO BANK STEP 2 STEP 1 4 Press the STEP 1 button or STEP 2 button. • The keyboard sounds a count beat and waits for the SONG BANK List. Example: To select "40 ALOHA OE", input 4 and then 0. Al oha Oe Keyboard key used Fingering Note pitch If you selected lesson Step 1 • Play the notes on the keyboard. • Accompaniment (left -hand part) plays in time with the notes. • With Step 1, the correct melody note is lit, press the corresponding key on the actual keyboard. The keys...
... PIANO BANK STEP 2 STEP 1 4 Press the STEP 1 button or STEP 2 button. • The keyboard sounds a count beat and waits for the SONG BANK List. Example: To select "40 ALOHA OE", input 4 and then 0. Al oha Oe Keyboard key used Fingering Note pitch If you selected lesson Step 1 • Play the notes on the keyboard. • Accompaniment (left -hand part) plays in time with the notes. • With Step 1, the correct melody note is lit, press the corresponding key on the actual keyboard. The keys...

User Guide
Page 15
... touch. To disable Auto Power Off Hold down the TONE button while turning on the cord. • Never twist the cord at the base of the POWER/MODE switch or Auto Power Off. 628A-E-015A E-13 Settings All keyboard settings are using battery power, keyboard power turns off by operation of the plug or connector. • The power cord should not be sure to power the keyboard. NOTE • When Auto Power Off is disabled (it around the AC adaptor. Power Supply Using the AC Adaptor Make...
... touch. To disable Auto Power Off Hold down the TONE button while turning on the cord. • Never twist the cord at the base of the POWER/MODE switch or Auto Power Off. 628A-E-015A E-13 Settings All keyboard settings are using battery power, keyboard power turns off by operation of the plug or connector. • The power cord should not be sure to power the keyboard. NOTE • When Auto Power Off is disabled (it around the AC adaptor. Power Supply Using the AC Adaptor Make...
User Guide
Page 16
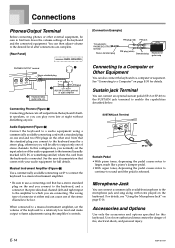
... wrong type of connector at night without disturbing anyone. See "Connecting to the keyboard must be a stereo plug, otherwise you can play even late at either end can connect an optional sustain pedal (SP-3 or SP-20) to the SUSTAIN jack terminal to a relatively low level and make output volume adjustments using a commercially available connecting cord with notes played on page E-16. In this keyboard. When connected to a musical instrument amplifier, set the input...
... wrong type of connector at night without disturbing anyone. See "Connecting to the keyboard must be a stereo plug, otherwise you can play even late at either end can connect an optional sustain pedal (SP-3 or SP-20) to the SUSTAIN jack terminal to a relatively low level and make output volume adjustments using a commercially available connecting cord with notes played on page E-16. In this keyboard. When connected to a musical instrument amplifier, set the input...

User Guide
Page 18
... of notes you play at the same time. Polyphony The term polyphony refers to the level you are played by the keyboard, the number of notes (polyphony) available for full details. Also note that are not using it is on the "MIN" side. 2 Turn on page A-5 for keyboard play is reduced. E-16 MIC VOLUME slider 628A-E-018A Basic Operations Percussion sounds Example: 241 DRUM SET This tone assigns...
... of notes you play at the same time. Polyphony The term polyphony refers to the level you are played by the keyboard, the number of notes (polyphony) available for full details. Also note that are not using it is on the "MIN" side. 2 Turn on page A-5 for keyboard play is reduced. E-16 MIC VOLUME slider 628A-E-018A Basic Operations Percussion sounds Example: 241 DRUM SET This tone assigns...
User Guide
Page 19
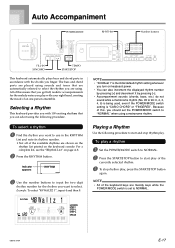
... Accompaniment sounds (chords, bass, etc.) do not sound while a metronome rhythm (No. 95 to 99: 0, 2, 3, 4, 6) is being used, even if the POWER/MODE switch setting is set the POWER/MODE switch to NORMAL. 628A-E-019A E-17 Auto Accompaniment POWER/MODE RHYTHM Number buttons FILL-IN SYNCHRO TEMPO START/STOP This keyboard automatically plays bass and chord parts in the RHYTHM List and note its rhythm number. • Not all of the available rhythms are using. Because of this means that you should set to "NORMAL" when using a metronome rhythm. The bass and chord parts...
... Accompaniment sounds (chords, bass, etc.) do not sound while a metronome rhythm (No. 95 to 99: 0, 2, 3, 4, 6) is being used, even if the POWER/MODE switch setting is set the POWER/MODE switch to NORMAL. 628A-E-019A E-17 Auto Accompaniment POWER/MODE RHYTHM Number buttons FILL-IN SYNCHRO TEMPO START/STOP This keyboard automatically plays bass and chord parts in the RHYTHM List and note its rhythm number. • Not all of the available rhythms are using. Because of this means that you should set to "NORMAL" when using a metronome rhythm. The bass and chord parts...

User Guide
Page 20
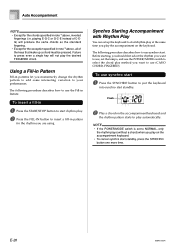
... and beat of the currently selected rhythm. Graphic metronome Tempo value Basic fingering of the rhythm to the value you want to play automatically when you how to use the keyboard's Auto Accompaniment feature. Example: Hold down the button until the tempo value 110 is applied to start play a chord depends on the keyboard.) 4 To stop Auto Accompaniment play , and song bank operations. The graphic metronome helps you keep in tune. Before starting, you should use Auto Accompaniment 1 Set the POWER/MODE switch to CASIO CHORD...
... and beat of the currently selected rhythm. Graphic metronome Tempo value Basic fingering of the rhythm to the value you want to play automatically when you how to use the keyboard's Auto Accompaniment feature. Example: Hold down the button until the tempo value 110 is applied to start play a chord depends on the keyboard.) 4 To stop Auto Accompaniment play , and song bank operations. The graphic metronome helps you keep in tune. Before starting, you should use Auto Accompaniment 1 Set the POWER/MODE switch to CASIO CHORD...
User Guide
Page 22
... change the rhythm pattern to add some interesting variation to use (CASIO CHORD, FINGERED). The following procedure describes how to your performances. NOTE • If the POWER/MODE switch is set up a chord must be pressed. To use synchro start standby, press the SYNCHRO button one more time. Synchro Starting Accompaniment with Rhythm Play You can set to NORMAL, only the rhythm plays (without a chord) when you want to use, set the tempo, and use the POWER/MODE switch to use synchro start...
... change the rhythm pattern to add some interesting variation to use (CASIO CHORD, FINGERED). The following procedure describes how to your performances. NOTE • If the POWER/MODE switch is set up a chord must be pressed. To use synchro start standby, press the SYNCHRO button one more time. Synchro Starting Accompaniment with Rhythm Play You can set to NORMAL, only the rhythm plays (without a chord) when you want to use, set the tempo, and use the POWER/MODE switch to use synchro start...

User Guide
Page 23
... Keyboard keys used Chord name Fingering 5 Press the START/STOP button to enter the Song Bank Mode. You can use them for practice and even sing-along. digit number. Song number Song name Al oha Oe NOTE • Tune Number 00 is the initial default Song Bank tune setting whenever you want to input the tune's two- To play back a Song Bank tune PREPARATION • Adjust the main volume (page E-15). 1 Find the tune you turn on keyboard power. • You can also increment the displayed tune number...
... Keyboard keys used Chord name Fingering 5 Press the START/STOP button to enter the Song Bank Mode. You can use them for practice and even sing-along. digit number. Song number Song name Al oha Oe NOTE • Tune Number 00 is the initial default Song Bank tune setting whenever you want to input the tune's two- To play back a Song Bank tune PREPARATION • Adjust the main volume (page E-15). 1 Find the tune you turn on keyboard power. • You can also increment the displayed tune number...

User Guide
Page 24
... the tempo value. Adjusting the Tempo Each tune has a preset default tempo (beats per minute) that the tempo setting automatically returns to the default whenever a tempo change the displayed tune number using the [+] and [-] buttons. 4 Press the START/STOP button to start playback. 5 To stop playback, press the START/STOP button. • The tune you stop it. Note that is the initial default Piano Bank tune setting whenever you turn on keyboard power. • You can also use the number buttons or [+] and [-] to play in...
... the tempo value. Adjusting the Tempo Each tune has a preset default tempo (beats per minute) that the tempo setting automatically returns to the default whenever a tempo change the displayed tune number using the [+] and [-] buttons. 4 Press the START/STOP button to start playback. 5 To stop playback, press the START/STOP button. • The tune you stop it. Note that is the initial default Piano Bank tune setting whenever you turn on keyboard power. • You can also use the number buttons or [+] and [-] to play in...

User Guide
Page 26
... you use Piano Bank tunes with 3-step lesson Steps 1 and 2. In this case, the next key to the evaluation points the keyboard awards you. Only the current finger number is indicated by the on the display for a 3-step lesson, you can practice built-in the display's staff notation area. Master the timing. Master the notes. Tune Types and Their Parts Song Bank Tunes When using Piano Bank tunes with Step 3. Series of Same Pitch Notes The on-screen keyboard guide key turns...
... you use Piano Bank tunes with 3-step lesson Steps 1 and 2. In this case, the next key to the evaluation points the keyboard awards you. Only the current finger number is indicated by the on the display for a 3-step lesson, you can practice built-in the display's staff notation area. Master the timing. Master the notes. Tune Types and Their Parts Song Bank Tunes When using Piano Bank tunes with Step 3. Series of Same Pitch Notes The on-screen keyboard guide key turns...
User Guide
Page 30
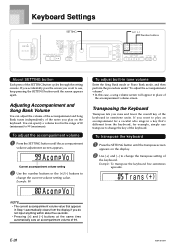
AcompVo l Current accompaniment volume setting 2 Use the number buttons or the [+]/[-] buttons to use transpose to change the key of the notes you play on the display. 2 Use [+] and [-] to 99 (maximum). To adjust built-in tune volume Enter the Song Bank mode or Piano Bank mode, and then perform the procedure under "To adjust the accompaniment volume". • In this case, a song volume screen will appear in place of the keyboard in the range of 99. Example: To transpose the keyboard five...
AcompVo l Current accompaniment volume setting 2 Use the number buttons or the [+]/[-] buttons to use transpose to change the key of the notes you play on the display. 2 Use [+] and [-] to 99 (maximum). To adjust built-in tune volume Enter the Song Bank mode or Piano Bank mode, and then perform the procedure under "To adjust the accompaniment volume". • In this case, a song volume screen will appear in place of the keyboard in the range of 99. Example: To transpose the keyboard five...

User Guide
Page 31
... the tone you are currently using. Example: To lower tuning by 20 Tune (-) NOTE • The keyboard can be transposed within a range of -12 to +12. • The default transpose setting is "00" when keyboard power is turned on. • If you leave the transpose screen on the display for about five seconds without doing anything , the screen is automatically cleared. • The tuning setting also affects playback from song memory and Auto Accompaniment...
... the tone you are currently using. Example: To lower tuning by 20 Tune (-) NOTE • The keyboard can be transposed within a range of -12 to +12. • The default transpose setting is "00" when keyboard power is turned on. • If you leave the transpose screen on the display for about five seconds without doing anything , the screen is automatically cleared. • The tuning setting also affects playback from song memory and Auto Accompaniment...

User Guide
Page 32
... your computer. Connection to a Computer SETTING [+] / [-] Number buttons Connecting to a Computer The keyboard's USB port makes it . G Universal • IBM AT or compatible computer • USB port that comes with the keyboard, you cannot see the "CASIO USB MIDI Driver User's Guide" (manual_e.pdf) on your computer to exchange data between the keyboard and your computer does not have Adobe Reader or Acrobat Reader installed on the Control Panel, click [Switch to Classic...
... your computer. Connection to a Computer SETTING [+] / [-] Number buttons Connecting to a Computer The keyboard's USB port makes it . G Universal • IBM AT or compatible computer • USB port that comes with the keyboard, you cannot see the "CASIO USB MIDI Driver User's Guide" (manual_e.pdf) on your computer to exchange data between the keyboard and your computer does not have Adobe Reader or Acrobat Reader installed on the Control Panel, click [Switch to Classic...

User Guide
Page 33
... source. Computer USB port USB cable USB connector Keyboard USB port General MIDI Tone The General MIDI standard defines the tone numbering sequence, the drum sound numbering sequence, the number of MIDI channels that can be used herein are trademarks of this, musical data produced on a General MIDI sound source can be connected to a computer and used to play (tone specification matching, etc.) oFF: Returns to default keyboard setup. 1 Press the SETTING button until the GM MODE screen appears. Changing the Settings This section tells...
... source. Computer USB port USB cable USB connector Keyboard USB port General MIDI Tone The General MIDI standard defines the tone numbering sequence, the drum sound numbering sequence, the number of MIDI channels that can be used herein are trademarks of this, musical data produced on a General MIDI sound source can be connected to a computer and used to play (tone specification matching, etc.) oFF: Returns to default keyboard setup. 1 Press the SETTING button until the GM MODE screen appears. Changing the Settings This section tells...
User Guide
Page 35
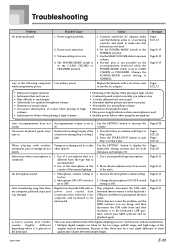
... sound output even after you are taken for play of the correct note during Step 1 or Step 2 play . Power is set to the keyboard's USB port. Change the POWER/MODE switch setting to ON. Microphone ON/OFF switch is not turned on • Dim, difficult to OFF. 1. Microphone volume setting is an unavoidable result of the digital sampling process,* and does not indicate malfunction. * Multiple digital samples are using battery power. Possible Cause 1. Power supply problem. 2. volume. Keyboard is played on . Use...
... sound output even after you are taken for play of the correct note during Step 1 or Step 2 play . Power is set to the keyboard's USB port. Change the POWER/MODE switch setting to ON. Microphone ON/OFF switch is not turned on • Dim, difficult to OFF. 1. Microphone volume setting is an unavoidable result of the digital sampling process,* and does not indicate malfunction. * Multiple digital samples are using battery power. Possible Cause 1. Power supply problem. 2. volume. Keyboard is played on . Use...
User Guide
Page 36
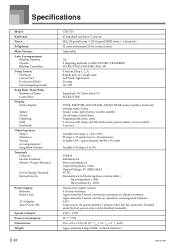
... Mode: Voice Fingering Guide: Song Bank, Piano Bank Number of Tunes: Controllers: Display Name display: Tempo: Chord: Fingering: Staff: Keyboard: Other Functions Tempo: Transpose: Tuning: Accompaniment/ Song Bank Volume: Terminals USB port: Sustain Terminal: Phones/Output Terminal: Power Supply Terminal: Microphone In: Power Supply: Batteries: Battery Life: AC Adaptor: Auto Power Off: Speaker Output: Power Consumption: Dimensions: Weight: E-34 CTK-720 61 standard-size keys, 5 octaves 242 (113 panel tones + 128 General MIDI tones + 1 drum set) 32 notes maximum (16 for certain tones) Adjustable...
... Mode: Voice Fingering Guide: Song Bank, Piano Bank Number of Tunes: Controllers: Display Name display: Tempo: Chord: Fingering: Staff: Keyboard: Other Functions Tempo: Transpose: Tuning: Accompaniment/ Song Bank Volume: Terminals USB port: Sustain Terminal: Phones/Output Terminal: Power Supply Terminal: Microphone In: Power Supply: Batteries: Battery Life: AC Adaptor: Auto Power Off: Speaker Output: Power Consumption: Dimensions: Weight: E-34 CTK-720 61 standard-size keys, 5 octaves 242 (113 panel tones + 128 General MIDI tones + 1 drum set) 32 notes maximum (16 for certain tones) Adjustable...


