
User Guide
Page 7
..., even in total darkness. ❐ Song Memory function • Record up the keyboard's built-in tunes, or eliminate the melody part of a Song Bank tunes or either hand part of a Piano Bank tune, and then play along automatically. You can even turn off the output of a channel and play more . ❐ PIANO BANK button The touch of a button takes you directly to piano tones and piano lessons. ❐ Advanced 3-Step Lesson System The 3-Step Lesson System lets you practice...
..., even in total darkness. ❐ Song Memory function • Record up the keyboard's built-in tunes, or eliminate the melody part of a Song Bank tunes or either hand part of a Piano Bank tune, and then play along automatically. You can even turn off the output of a channel and play more . ❐ PIANO BANK button The touch of a button takes you directly to piano tones and piano lessons. ❐ Advanced 3-Step Lesson System The 3-Step Lesson System lets you practice...

User Guide
Page 8
... timing E-28 Step 2 - Contents Safety Precautions E-1 Main Features E-5 Contents E-6 General Guide E-8 About the display E-11 Quick Reference E-12 To play the keyboard E-12 Power Supply E-14 Using batteries E-14 Using the AC Adaptor E-15 Auto Power Off E-15 Settings and Memory Contents E-16 Connections E-17 Phones/Output Terminal E-17 Connecting to a Computer or Other Equipment E-17 Assignable jack Terminal E-17 Microphone Jack E-18 Accessories and Options E-18 Basic Operations E-19 To play all tunes in Tune........ Play...
... timing E-28 Step 2 - Contents Safety Precautions E-1 Main Features E-5 Contents E-6 General Guide E-8 About the display E-11 Quick Reference E-12 To play the keyboard E-12 Power Supply E-14 Using batteries E-14 Using the AC Adaptor E-15 Auto Power Off E-15 Settings and Memory Contents E-16 Connections E-17 Phones/Output Terminal E-17 Connecting to a Computer or Other Equipment E-17 Assignable jack Terminal E-17 Microphone Jack E-18 Accessories and Options E-18 Basic Operations E-19 To play all tunes in Tune........ Play...

User Guide
Page 11
... 9 PLAY/STOP button, START/STOP button 0 Song/Piano Bank controller indicator A Rhythm controller indicator B SONG BANK button C PIANO BANK button D TEMPO buttons E Speaker F RHYTHM list G TONE list H SONG BANK/SING ALONG list I Display J PIANO BANK list K CHORD root names L Percussion instrument list M Voice 1 to 5 N MIC jack O MIC VOLUME knob P SING ALONG button Q KEY CONTROL/TRANSPOSE buttons R button S SETTING button T SONG MEMORY button U ONE TOUCH PRESET button V RHYTHM button W TONE button G ADVANCED 3-STEP LESSON SYSTEM X SPEAK button Y METRONOME button Z LEFT button, TRACK 1 button...
... 9 PLAY/STOP button, START/STOP button 0 Song/Piano Bank controller indicator A Rhythm controller indicator B SONG BANK button C PIANO BANK button D TEMPO buttons E Speaker F RHYTHM list G TONE list H SONG BANK/SING ALONG list I Display J PIANO BANK list K CHORD root names L Percussion instrument list M Voice 1 to 5 N MIC jack O MIC VOLUME knob P SING ALONG button Q KEY CONTROL/TRANSPOSE buttons R button S SETTING button T SONG MEMORY button U ONE TOUCH PRESET button V RHYTHM button W TONE button G ADVANCED 3-STEP LESSON SYSTEM X SPEAK button Y METRONOME button Z LEFT button, TRACK 1 button...
User Guide
Page 13
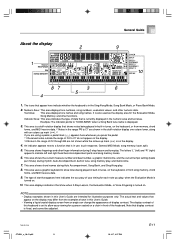
About the display 2 General Guide 9 1 10 87 3 6 5 4 1. This area shows the current measure number and beat number, a graphic metronome, and the current tempo setting (beats per minute) during rhythm, Auto Accompaniment, built-in use: touch response, General MIDI Mode, song memory, layer, split. 5. This area displays indicators that show notes being played in built-in tunes, on the keyboard, or from memory, chord forms, and MIDI receive data.*1 Notes in the range F 6 to C7 are shown in this keyboard is set to C7...
About the display 2 General Guide 9 1 10 87 3 6 5 4 1. This area shows the current measure number and beat number, a graphic metronome, and the current tempo setting (beats per minute) during rhythm, Auto Accompaniment, built-in use: touch response, General MIDI Mode, song memory, layer, split. 5. This area displays indicators that show notes being played in built-in tunes, on the keyboard, or from memory, chord forms, and MIDI receive data.*1 Notes in the range F 6 to C7 are shown in this keyboard is set to C7...

User Guide
Page 16
..., with power turned on • Dim, difficult to use with new ones. • Never mix batteries of different types. • Do not charge the batteries. • Make sure the positive (+) and negative (-) ends of the following shows the approximate battery life. NOTE • The keyboard may sound • Abnormal rhythm pattern and demo tune play • Abnormally low microphone volume • Distortion of microphone input • Dim power supply indicator...
..., with power turned on • Dim, difficult to use with new ones. • Never mix batteries of different types. • Do not charge the batteries. • Make sure the positive (+) and negative (-) ends of the following shows the approximate battery life. NOTE • The keyboard may sound • Abnormal rhythm pattern and demo tune play • Abnormally low microphone volume • Distortion of microphone input • Dim power supply indicator...
User Guide
Page 18
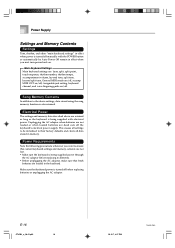
Electrical Power The settings and memory data described above settings, data stored using the song memory function is turned off the keyboard's electrical power supply. Unplugging the AC adaptor when batteries are not loaded or when loaded batteries are : layer, split, split point, touch response, rhythm number, rhythm tempo, accompaniment volume, layered tone, split tone, layered split tone, General MIDI mode on/off, accomp MIDI OUT on/off . Make sure that fresh batteries are not lost. • Make sure the keyboard is being supplied power through the AC adaptor before replacing ...
Electrical Power The settings and memory data described above settings, data stored using the song memory function is turned off the keyboard's electrical power supply. Unplugging the AC adaptor when batteries are not loaded or when loaded batteries are : layer, split, split point, touch response, rhythm number, rhythm tempo, accompaniment volume, layered tone, split tone, layered split tone, General MIDI mode on/off, accomp MIDI OUT on/off . Make sure that fresh batteries are not lost. • Make sure the keyboard is being supplied power through the AC adaptor before replacing ...
User Guide
Page 19
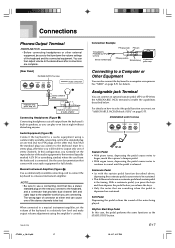
... speakers, so you want, see "ASSIGNABLE JACK (Default: SUS)" on page E-51 for full details. Rhythm Start/Stop Pedal In this configuration, you normally set the volume of the keyboard to a relatively low level and make output volume adjustments using a commercially available connecting cord with the sustain pedal function described above, depressing the sostenuto pedal causes notes to be able to a musical instrument amplifier. See "MIDI" on page E-55. Sostenuto Pedal • As with a standard plug...
... speakers, so you want, see "ASSIGNABLE JACK (Default: SUS)" on page E-51 for full details. Rhythm Start/Stop Pedal In this configuration, you normally set the volume of the keyboard to a relatively low level and make output volume adjustments using a commercially available connecting cord with the sustain pedal function described above, depressing the sostenuto pedal causes notes to be able to a musical instrument amplifier. See "MIDI" on page E-55. Sostenuto Pedal • As with a standard plug...

User Guide
Page 21
... in tones. To select a tone 1 Find the tone you input one of the drum sets is selected (tone numbers 246 through 254), each keyboard key is Song Bank Mode. To play the keyboard 1 Press the POWER button to turn the keyboard on. 2 Set the MODE switch to NORMAL. 3 Use the VOLUME slider to set the volume to select. Basic Operations SING ALONG PIANO BANK SONG BANK TONE Number buttons [+] / [-] POWER VOLUME MODE This section provides information on page A-6. 2 Press the TONE button. For a complete list, see the "Tone List" on performing basic keyboard operations...
... in tones. To select a tone 1 Find the tone you input one of the drum sets is selected (tone numbers 246 through 254), each keyboard key is Song Bank Mode. To play the keyboard 1 Press the POWER button to turn the keyboard on. 2 Set the MODE switch to NORMAL. 3 Use the VOLUME slider to set the volume to select. Basic Operations SING ALONG PIANO BANK SONG BANK TONE Number buttons [+] / [-] POWER VOLUME MODE This section provides information on page A-6. 2 Press the TONE button. For a complete list, see the "Tone List" on performing basic keyboard operations...

User Guide
Page 24
... start play back a Song Bank tune PREPARATION • Adjust the main volume (page E-19). 1 Find the tune you turn on keyboard power. • You can be used Chord name Fingering 5 Press the PLAY/STOP button to stop playback of the Song Bank tune. • The tune you select continues to light. A Piano Bank Group tune can use them for your own listening pleasure, or you stop it easier for a vocalist to input the tune's two- digit number...
... start play back a Song Bank tune PREPARATION • Adjust the main volume (page E-19). 1 Find the tune you turn on keyboard power. • You can be used Chord name Fingering 5 Press the PLAY/STOP button to stop playback of the Song Bank tune. • The tune you select continues to light. A Piano Bank Group tune can use them for your own listening pleasure, or you stop it easier for a vocalist to input the tune's two- digit number...

User Guide
Page 25
... Keyboard keys used Chord name Fingering NOTE • Chord names are not displayed for the Piano Bank List. 2 Press the PIANO BANK button to start playback. 5 To stop it. While the tune is flashing, you can also use the number buttons or [+] and [-] to 255. Example: Display during Song Bank play until you stop playback, press the PLAY/STOP button. • The tune you select continues to play Staff display A l oha Oe Indicators appear NOTE • Pressing the PIANO BANK button changes the tone...
... Keyboard keys used Chord name Fingering NOTE • Chord names are not displayed for the Piano Bank List. 2 Press the PIANO BANK button to start playback. 5 To stop it. While the tune is flashing, you can also use the number buttons or [+] and [-] to 255. Example: Display during Song Bank play until you stop playback, press the PLAY/STOP button. • The tune you select continues to play Staff display A l oha Oe Indicators appear NOTE • Pressing the PIANO BANK button changes the tone...

User Guide
Page 31
... the most work . See "Using the Phrase Practice Mode" on -screen keyboard guide. • The key for the next note to be performed with Step 2 play. • You cannot pause Step 2 play. • Rhythm does not sound during Step 2 play. Br avo ! Indicator appears Keyboard keys used Fingering 3 Play the notes as the note plays. • If multiple keys light on the on the display. • A count beat sounds and then evaluation mode starts. This displays only the points accumulated...
... the most work . See "Using the Phrase Practice Mode" on -screen keyboard guide. • The key for the next note to be performed with Step 2 play. • You cannot pause Step 2 play. • Rhythm does not sound during Step 2 play. Br avo ! Indicator appears Keyboard keys used Fingering 3 Play the notes as the note plays. • If multiple keys light on the on the display. • A count beat sounds and then evaluation mode starts. This displays only the points accumulated...

User Guide
Page 33
... same time automatically returns the currently selected rhythm or tune to its default tempo. 4 To turn voice fingering guide on or off Press the SPEAK button to that was in effect when you entered the Evaluation Mode. Flash Tempo value NOTE • While the tempo value is flashing, you practice with a steady beat, without accompaniment (rhythm). 704A-E-033A CTK591_e_22-31.p65 31 To start the metronome 1 Press the METRONOME button to start sounding the metronome...
... same time automatically returns the currently selected rhythm or tune to its default tempo. 4 To turn voice fingering guide on or off Press the SPEAK button to that was in effect when you entered the Evaluation Mode. Flash Tempo value NOTE • While the tempo value is flashing, you practice with a steady beat, without accompaniment (rhythm). 704A-E-033A CTK591_e_22-31.p65 31 To start the metronome 1 Press the METRONOME button to start sounding the metronome...

User Guide
Page 37
... displayed.) 4 To stop Auto Accompaniment play . To set the tempo 1 Use the TEMPO buttons to input a three-digit value. Note that differ from memory and metronome operation. Refer to the following pages for Song Bank, 3-step lesson, and Auto Accompaniment chord play . For details, see "Adjusting the Accompaniment Volume" on the current MODE switch position. NOTE • All of 40 to 255. Metronome Flash Tempo value Beat number NOTE • While the tempo value is set the tempo of the main volume. Before starting, you should first select the rhythm...
... displayed.) 4 To stop Auto Accompaniment play . To set the tempo 1 Use the TEMPO buttons to input a three-digit value. Note that differ from memory and metronome operation. Refer to the following pages for Song Bank, 3-step lesson, and Auto Accompaniment chord play . For details, see "Adjusting the Accompaniment Volume" on the current MODE switch position. NOTE • All of 40 to 255. Metronome Flash Tempo value Beat number NOTE • While the tempo value is set the tempo of the main volume. Before starting, you should first select the rhythm...

User Guide
Page 43
SONG MEMORY Button Operation Each press of this keyboard records and plays back notes much like a standard tape recorder. The letter that identifies a track (L or R) appears on . During playback you play it. Start Track 1 Track 2 End Auto Accompaniment (rhythm, bass, chords), melody Melody Data recorded in real time, as you can adjust the tempo to enter the Rhythm Mode. Tracks The song memory of the SONG MEMORY button cycles through the functions shown below. Track 2 can be used for melody only, and is for later playback...
SONG MEMORY Button Operation Each press of this keyboard records and plays back notes much like a standard tape recorder. The letter that identifies a track (L or R) appears on . During playback you play it. Start Track 1 Track 2 End Auto Accompaniment (rhythm, bass, chords), melody Melody Data recorded in real time, as you can adjust the tempo to enter the Rhythm Mode. Tracks The song memory of the SONG MEMORY button cycles through the functions shown below. Track 2 can be used for melody only, and is for later playback...

User Guide
Page 45
... AC adaptor when batteries are not loaded or when loaded batteries are dead cuts off the keyboard while a record operation is played back. • Tone number • Rhythm number • INTRO, SYNCHRO/ENDING, NORMAL/FILL-IN, VARIATION/FILL-IN button operations • Pedal operations Memory Capacity The keyboard has memory for a single song, or you are . To record using real-time recording. Flash • Recording automatically stops (and Auto Accompaniment and rhythm stops playing if they normally are currently recording to a track that...
... AC adaptor when batteries are not loaded or when loaded batteries are dead cuts off the keyboard while a record operation is played back. • Tone number • Rhythm number • INTRO, SYNCHRO/ENDING, NORMAL/FILL-IN, VARIATION/FILL-IN button operations • Pedal operations Memory Capacity The keyboard has memory for a single song, or you are . To record using real-time recording. Flash • Recording automatically stops (and Auto Accompaniment and rhythm stops playing if they normally are currently recording to a track that...

User Guide
Page 46
... memory playback you can use real-time recording to add a melody in Track 2. TEMPO NOTE • During memory playback, the entire keyboard functions as a melody keyboard, regardless of either track on or off. To record to Track 2 while playing back Track 1 1 Use the SONG MEMORY button to enter record standby, and then use the TRACK 1 and TRACK 2 buttons to turn playback of the MODE switch setting. • You can also use layer (page E-46) and split (page E-46) to play along on the display...
... memory playback you can use real-time recording to add a melody in Track 2. TEMPO NOTE • During memory playback, the entire keyboard functions as a melody keyboard, regardless of either track on or off. To record to Track 2 while playing back Track 1 1 Use the SONG MEMORY button to enter record standby, and then use the TRACK 1 and TRACK 2 buttons to turn playback of the MODE switch setting. • You can also use layer (page E-46) and split (page E-46) to play along on the display...
User Guide
Page 50
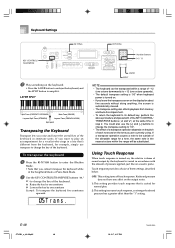
... transpose the keyboard 1 Press the RHYTHM button to enter the Rhythm Mode. • Note that you cannot transpose the keyboard while in the Song Bank Mode or Piano Bank Mode. 2 Use the KEY CONTROL/TRANSPOSE buttons ( / ) to its default key, perform the above procedure and press both of the KEY CONTROL/ TRANSPOSE buttons ( and ) at the same time in step 2. LAYER SPLIT NOTE • The keyboard can be substituted. Using Touch Response When touch response is turned on, the relative volume of sound output by one semitone Example: To transpose the keyboard...
... transpose the keyboard 1 Press the RHYTHM button to enter the Rhythm Mode. • Note that you cannot transpose the keyboard while in the Song Bank Mode or Piano Bank Mode. 2 Use the KEY CONTROL/TRANSPOSE buttons ( / ) to its default key, perform the above procedure and press both of the KEY CONTROL/ TRANSPOSE buttons ( and ) at the same time in step 2. LAYER SPLIT NOTE • The keyboard can be substituted. Using Touch Response When touch response is turned on, the relative volume of sound output by one semitone Example: To transpose the keyboard...

User Guide
Page 56
... . MIDI SETTING TRACK 1 TRACK 2 Number buttons [+] / [-] MODE To turn off specific sounds before playing back MIDI data that the no sound is produced by the keyboard if LOCAL CONTROL is turned off and no external device is connected. 1 Press the SETTING button until the MIDI IN CHORD JUDGE screen appears. MIDI IN CHORD JUDGE (Default: Off) on the keyboard is sounded by the internal sound source and simultaneously output as it helps if you change the navigate channel to this keyboard are specified by the MODE switch, chords...
... . MIDI SETTING TRACK 1 TRACK 2 Number buttons [+] / [-] MODE To turn off specific sounds before playing back MIDI data that the no sound is produced by the keyboard if LOCAL CONTROL is turned off and no external device is connected. 1 Press the SETTING button until the MIDI IN CHORD JUDGE screen appears. MIDI IN CHORD JUDGE (Default: Off) on the keyboard is sounded by the internal sound source and simultaneously output as it helps if you change the navigate channel to this keyboard are specified by the MODE switch, chords...
User Guide
Page 61
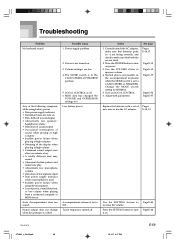
... playing from a connected computer or MIDI device Auto Accompaniment does not sound. Sound output does not change when key pressure is turned off . 6. Possible Cause 1. Power supply problem. 2. MIDI data has changed the VOLUME and EXPRESSION settings to NORMAL. 5. Press the SETTING button to 000. E-14, 15 Use the SETTING button to make sure that batteries are not dead. 2. Correctly attach the AC adaptor, make sure that batteries poles (+/-) are facing correctly, and check to increase the volume. Adjust both parameters. Touch response...
... playing from a connected computer or MIDI device Auto Accompaniment does not sound. Sound output does not change when key pressure is turned off . 6. Possible Cause 1. Power supply problem. 2. MIDI data has changed the VOLUME and EXPRESSION settings to NORMAL. 5. Press the SETTING button to 000. E-14, 15 Use the SETTING button to make sure that batteries are not dead. 2. Correctly attach the AC adaptor, make sure that batteries poles (+/-) are facing correctly, and check to increase the volume. Adjust both parameters. Touch response...
User Guide
Page 63
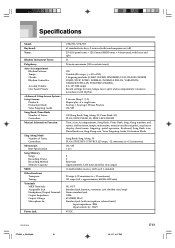
...6 2 2 Real-time Approximately 5,100 notes (total for tone, tempo, layer, split, and accompaniment volume in accordance with rhythm. 3 lessons (Step 1, 2, 3) Repeat play of Tunes: Controllers: Metronome: Beat Specification: Song Memory Songs: Recording Tracks: Recording Method: Memory Capacity: MIDI: Other Functions Transpose: Tuning: Terminals MIDI Terminals: Assignable Jack: Headphone/Output Terminal: Output Impedance: Output Voltage: Microphone In: Power Jack: CTK-591/CTK-593 61 standard-size keys, 5 octaves (with microphone volume knob) Input impedance: 3KΩ Input sensitivity: 10mV...
...6 2 2 Real-time Approximately 5,100 notes (total for tone, tempo, layer, split, and accompaniment volume in accordance with rhythm. 3 lessons (Step 1, 2, 3) Repeat play of Tunes: Controllers: Metronome: Beat Specification: Song Memory Songs: Recording Tracks: Recording Method: Memory Capacity: MIDI: Other Functions Transpose: Tuning: Terminals MIDI Terminals: Assignable Jack: Headphone/Output Terminal: Output Impedance: Output Voltage: Microphone In: Power Jack: CTK-591/CTK-593 61 standard-size keys, 5 octaves (with microphone volume knob) Input impedance: 3KΩ Input sensitivity: 10mV...


