ScanFront 400 Setup and Operation Guide
Page 2
... and (2) this machine meets the ENERGY STAR® Program guidelines for help. The targeted products are uniform among participating nations. FCC REGULATIONS (For 120 V model) Network Scanner, Model M111271 This device complies with class B limits in the manual. The International ENERGY STAR® Office Equipment Program is connected. - Consult the dealer or... in a particular installation. This equipment generates, uses, and can participate voluntarily. International ENERGY STAR® Office Equipment Program As an ENERGY STAR® Partner, Canon Electronics Inc.
... and (2) this machine meets the ENERGY STAR® Program guidelines for help. The targeted products are uniform among participating nations. FCC REGULATIONS (For 120 V model) Network Scanner, Model M111271 This device complies with class B limits in the manual. The International ENERGY STAR® Office Equipment Program is connected. - Consult the dealer or... in a particular installation. This equipment generates, uses, and can participate voluntarily. International ENERGY STAR® Office Equipment Program As an ENERGY STAR® Partner, Canon Electronics Inc.

ScanFront 400 Setup and Operation Guide
Page 3
... each sales region of with EEE. Tel. European Union (and EEA) only This symbol indicates that are generally associated with your national law. ScanFront 400: Model M111271 3 Inc. Canon U.S.A. special handling may be disposed of the Network Scanner. At the same time, your household waste disposal service. Improper handling of WEEE products, please visit www...
... each sales region of with EEE. Tel. European Union (and EEA) only This symbol indicates that are generally associated with your national law. ScanFront 400: Model M111271 3 Inc. Canon U.S.A. special handling may be disposed of the Network Scanner. At the same time, your household waste disposal service. Improper handling of WEEE products, please visit www...

ScanFront 400 Setup and Operation Guide
Page 6
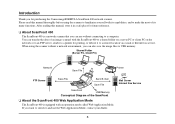
... a safe place for purchasing the Canon imageFORMULA ScanFront 400 network scanner. Shared Folder (Server PC, Client PC) Network Save File Printer FTP Server Save File Send E-mail Save File ScanFront USB Memory Conceptual Diagram of its capabilities, and to make the most of the ScanFront ❏ About the ScanFront 400 Web Application Mode The ScanFront 400 is a network scanner that you can also save the...
... a safe place for purchasing the Canon imageFORMULA ScanFront 400 network scanner. Shared Folder (Server PC, Client PC) Network Save File Printer FTP Server Save File Send E-mail Save File ScanFront USB Memory Conceptual Diagram of its capabilities, and to make the most of the ScanFront ❏ About the ScanFront 400 Web Application Mode The ScanFront 400 is a network scanner that you can also save the...
ScanFront 400 Setup and Operation Guide
Page 9
... Contents Introduction 6 About ScanFront 400 6 About the ScanFront 400 Web Application Mode.... 6 Manuals for Passports 45 4. Important Safety Instructions 12 Installation Location 12 Power 13 Moving the Scanner 13 Handling 13 Disposal 15 2. Before Setting Up the Scanner 24 Connecting the AC Adapter 24 Connecting the Network Cable 25 4. Configuring the Scanner Settings 28 Network Settings 29 Configuring the...
... Contents Introduction 6 About ScanFront 400 6 About the ScanFront 400 Web Application Mode.... 6 Manuals for Passports 45 4. Important Safety Instructions 12 Installation Location 12 Power 13 Moving the Scanner 13 Handling 13 Disposal 15 2. Before Setting Up the Scanner 24 Connecting the AC Adapter 24 Connecting the Network Cable 25 4. Configuring the Scanner Settings 28 Network Settings 29 Configuring the...

ScanFront 400 Setup and Operation Guide
Page 17
...Open this to turn the power OFF. The power button lights or flashes as follows depending on the touch panel to turn on the scanner. Power Button Indication Description Lit Power is on the volume of documents ejected. The angle of the document eject stopper on the document ... falling out of the document eject tray and aligns their leading edges. q LAN Port (RJ-45) Connect an RJ-45 (10Base-T/100Base-TX/1000Base-T) compatible network cable. (See p. 25.) r USB Ports (Rear Right) Connect a USB1.1/Hi-Speed USB2.0 compatible USB memory device, USB keyboard, or USB mouse. j Document...
...Open this to turn the power OFF. The power button lights or flashes as follows depending on the touch panel to turn on the scanner. Power Button Indication Description Lit Power is on the volume of documents ejected. The angle of the document eject stopper on the document ... falling out of the document eject tray and aligns their leading edges. q LAN Port (RJ-45) Connect an RJ-45 (10Base-T/100Base-TX/1000Base-T) compatible network cable. (See p. 25.) r USB Ports (Rear Right) Connect a USB1.1/Hi-Speed USB2.0 compatible USB memory device, USB keyboard, or USB mouse. j Document...

ScanFront 400 Setup and Operation Guide
Page 19
Chapter 2 ScanFront Setup ScanFront Setup Overview 20 1. Before Setting Up the Scanner 24 Connecting the AC Adapter 24 Connecting the Network Cable 25 4. Turning the Power ON and OFF 26 Turning the Power ON 26 Turning the Power OFF 27 5. Configuring the Scanner Settings 28 Network Settings 29 Configuring the Date and Time and Confirming the Time Zone 32 Mail Server Settings 34 Checking the Supplied Accessories 21 2. Removing the Packing Materials 22 3.
Chapter 2 ScanFront Setup ScanFront Setup Overview 20 1. Before Setting Up the Scanner 24 Connecting the AC Adapter 24 Connecting the Network Cable 25 4. Turning the Power ON and OFF 26 Turning the Power ON 26 Turning the Power OFF 27 5. Configuring the Scanner Settings 28 Network Settings 29 Configuring the Date and Time and Confirming the Time Zone 32 Mail Server Settings 34 Checking the Supplied Accessories 21 2. Removing the Packing Materials 22 3.
ScanFront 400 Setup and Operation Guide
Page 20
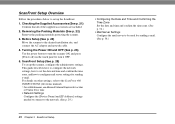
... OFF. 5. This guide describes how to configure the network settings, how to set the date and time and confirm the time zone, and how to turn the scanner ON, and press [Power off] on other settings, refer to the ScanFront 400 INSTRUCTIONS (electronic manual). * For a Web browser, ...use Microsoft Internet Explorer 6.0 or later or Firefox 3.5 or later. • Network Settings Configure the [Device Name] and [IP Address...
... OFF. 5. This guide describes how to configure the network settings, how to set the date and time and confirm the time zone, and how to turn the scanner ON, and press [Power off] on other settings, refer to the ScanFront 400 INSTRUCTIONS (electronic manual). * For a Web browser, ...use Microsoft Internet Explorer 6.0 or later or Firefox 3.5 or later. • Network Settings Configure the [Device Name] and [IP Address...

ScanFront 400 Setup and Operation Guide
Page 24
a Connect the power cord and AC adapter. b Insert the plug of the power plug varies by country and region. CAUTION Make sure to the wall outlet. 24 Chapter 2 ScanFront Setup 3. c Connect the power cord to use only the AC adapter and power cord included with the scanner. The shape of the AC adapter into the power connector. Before Setting Up the Scanner Before setting up the scanner, you need to move it to the installation site, and connect the AC adaptor and network cable. ❏ Connecting the AC Adapter Follow the procedure shown below to connect the AC adapter.
a Connect the power cord and AC adapter. b Insert the plug of the power plug varies by country and region. CAUTION Make sure to the wall outlet. 24 Chapter 2 ScanFront Setup 3. c Connect the power cord to use only the AC adapter and power cord included with the scanner. The shape of the AC adapter into the power connector. Before Setting Up the Scanner Before setting up the scanner, you need to move it to the installation site, and connect the AC adaptor and network cable. ❏ Connecting the AC Adapter Follow the procedure shown below to connect the AC adapter.

ScanFront 400 Setup and Operation Guide
Page 27
... Mode while not connected to force shutdown may not be possible. Pressing and holding the power button to a network, power will automatically turn the scanner OFF. Chapter 2 ScanFront Setup 27 IMPORTANT • When restarting the scanner, wait at the bottom left of the panel to force shutdown. ❏ Turning the Power OFF Press the...
... Mode while not connected to force shutdown may not be possible. Pressing and holding the power button to a network, power will automatically turn the scanner OFF. Chapter 2 ScanFront Setup 27 IMPORTANT • When restarting the scanner, wait at the bottom left of the panel to force shutdown. ❏ Turning the Power OFF Press the...

ScanFront 400 Setup and Operation Guide
Page 28
... are restricted by the administrator cannot perform registration and editing. Login type setting Select the login screen for the ScanFront scanner. The following items are restricted by the administrator cannot perform registration and editing. Authentication Server Register a domain server...Button and My Job Button in the User Settings. Network Settings Confirm the [Device Name] and [IP Address] settings of settings configured, configure the [Network Setting] items and register addresses to ScanFront 400 INSTRUCTIONS (electronic manual). Date/time settings Set date/...
... are restricted by the administrator cannot perform registration and editing. Login type setting Select the login screen for the ScanFront scanner. The following items are restricted by the administrator cannot perform registration and editing. Authentication Server Register a domain server...Button and My Job Button in the User Settings. Network Settings Confirm the [Device Name] and [IP Address] settings of settings configured, configure the [Network Setting] items and register addresses to ScanFront 400 INSTRUCTIONS (electronic manual). Date/time settings Set date/...

ScanFront 400 Setup and Operation Guide
Page 29
...] to write down the IP address in case you forget it. 1. Chapter 2 ScanFront Setup 29 For details, contact your network administrator. • The IP address is not used for the URL when accessing the scanner from those of the SF+MAC address by default. Press [Administrator setting]. 2. When...No administrator password is set by the DHCP server. ❏ Network Settings Follow the procedure below to confirm and configure the device name and IP address needed to connect the scanner to identify the scanner on the network and is set to select a unique name that is different ...
...] to write down the IP address in case you forget it. 1. Chapter 2 ScanFront Setup 29 For details, contact your network administrator. • The IP address is not used for the URL when accessing the scanner from those of the SF+MAC address by default. Press [Administrator setting]. 2. When...No administrator password is set by the DHCP server. ❏ Network Settings Follow the procedure below to confirm and configure the device name and IP address needed to connect the scanner to identify the scanner on the network and is set to select a unique name that is different ...

ScanFront 400 Setup and Operation Guide
Page 31
You cannot end the device name with a letter. The [Device Configuration] screen appears. Chapter 2 ScanFront Setup 31 When changing this setting, make sure to select a unique name that is the name used to capital letters. 8. Proceed to 15 characters long. &#... address), and press [OK]. Confirm the new device name and IP address, and press [OK]. 7. Press [Shift] to switch, the entry screen to identify the scanner on the network.
You cannot end the device name with a letter. The [Device Configuration] screen appears. Chapter 2 ScanFront Setup 31 When changing this setting, make sure to select a unique name that is the name used to capital letters. 8. Proceed to 15 characters long. &#... address), and press [OK]. Confirm the new device name and IP address, and press [OK]. 7. Press [Shift] to switch, the entry screen to identify the scanner on the network.
ScanFront 400 Setup and Operation Guide
Page 32
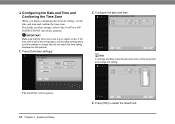
... confirm the time zone. The Date/time screen appears. 32 Chapter 2 ScanFront Setup 3. For details on the scanner. 1. Press [OK] to the ScanFront 400 INSTRUCTIONS (electronic manual). ❏ Configuring the Date and Time and Confirming the Time Zone When you finish configuring the network settings, set to your region of the target item and change...
... confirm the time zone. The Date/time screen appears. 32 Chapter 2 ScanFront Setup 3. For details on the scanner. 1. Press [OK] to the ScanFront 400 INSTRUCTIONS (electronic manual). ❏ Configuring the Date and Time and Confirming the Time Zone When you finish configuring the network settings, set to your region of the target item and change...

ScanFront 400 Setup and Operation Guide
Page 54
... may result in malfunction, so do not perform this operation under normal circumstances. • After ScanFront transitions to Low Power Mode while not connected to a network, power will automatically turn the scanner OFF. ❏ Turning the Power OFF Press the [Power off] button displayed at least 5... seconds after turning the power OFF before turning it ON again. • If the scanner stops responding, you can press ...
... may result in malfunction, so do not perform this operation under normal circumstances. • After ScanFront transitions to Low Power Mode while not connected to a network, power will automatically turn the scanner OFF. ❏ Turning the Power OFF Press the [Power off] button displayed at least 5... seconds after turning the power OFF before turning it ON again. • If the scanner stops responding, you can press ...

ScanFront 400 Setup and Operation Guide
Page 99
...only) Cannot connect to p. 143 of the ScanFront 400 INSTRUCTIONS.) Contact the administrator, and register the e-mail addresses. Contact the system administrator of the network, and change the device name setting. Contact the system administrator of the network, and change the IP address setting. The LAN...address that was set to p. 108 and p. 148 of the ScanFront 400 INSTRUCTIONS.) (1) The date and time settings are not set is already being used by another device. When you install two or more ScanFront scanners, take care to ensure duplicate device names are incorrect. (2) ...
...only) Cannot connect to p. 143 of the ScanFront 400 INSTRUCTIONS.) Contact the administrator, and register the e-mail addresses. Contact the system administrator of the network, and change the device name setting. Contact the system administrator of the network, and change the IP address setting. The LAN...address that was set to p. 108 and p. 148 of the ScanFront 400 INSTRUCTIONS.) (1) The date and time settings are not set is already being used by another device. When you install two or more ScanFront scanners, take care to ensure duplicate device names are incorrect. (2) ...

ScanFront 400 Setup and Operation Guide
Page 101
...network Cannot access shared folders from a computer Cannot access folders or servers despite successful connection tests Streaks appear in the Detailed Settings screen. The connection test is simply the results of the ScanFront 400 INSTRUCTIONS.) If there are scratches on the scanner to p. 175 of the ScanFront 400...In addition, limit the number of the ScanFront 400 INSTRUCTIONS.) WINS server name resolution is dirty. Set [Allow remote operation] to [ON]. (Refer to p. 152 of documents placed on a scanning glass, contact your local authorized Canon dealer. Clean the rollers. (Refer ...
...network Cannot access shared folders from a computer Cannot access folders or servers despite successful connection tests Streaks appear in the Detailed Settings screen. The connection test is simply the results of the ScanFront 400 INSTRUCTIONS.) If there are scratches on the scanner to p. 175 of the ScanFront 400...In addition, limit the number of the ScanFront 400 INSTRUCTIONS.) WINS server name resolution is dirty. Set [Allow remote operation] to [ON]. (Refer to p. 152 of documents placed on a scanning glass, contact your local authorized Canon dealer. Clean the rollers. (Refer ...

ScanFront 400 Setup and Operation Guide
Page 106
M Moving the Scanner 13 N Names and Functions of Parts 16 Network Cable 25 Non Separation Feeding 39 P Paper Jam 47 Placing a Card 43 Placing a Folded Document 42 Placing a Long Document 43 Placing Documents 41 Plain Paper 36 Preparing the Scanner 38 R Registering New Job Buttons 89 S Safety Instructions 12 Scanning 66 Server Authentication 56 Setting Up 28 T Troubleshooting 98 Turning Off the Power 27, 54 Turning On the Power 26, 53 U USB Memory 64 USB Memory Screen 64 USB Port 39 106 Index
M Moving the Scanner 13 N Names and Functions of Parts 16 Network Cable 25 Non Separation Feeding 39 P Paper Jam 47 Placing a Card 43 Placing a Folded Document 42 Placing a Long Document 43 Placing Documents 41 Plain Paper 36 Preparing the Scanner 38 R Registering New Job Buttons 89 S Safety Instructions 12 Scanning 66 Server Authentication 56 Setting Up 28 T Troubleshooting 98 Turning Off the Power 27, 54 Turning On the Power 26, 53 U USB Memory 64 USB Memory Screen 64 USB Port 39 106 Index
Instruction Manual
Page 2
...the FCC Rules. If such changes or modifications should be made, you can be required to Part 15 of the equipment. Canon U.S.A. Although you could be determined by turning the equipment off and on a circuit different from that interference will enter Low Power... protection against harmful interference in the manual. These limits are designed to the following measures: - FCC REGULATIONS (For 120 V model) Network Scanner, Model M111271 This device complies with the instructions, may cause undesired operation. Reorient or relocate the receiving antenna. - Do not make any...
...the FCC Rules. If such changes or modifications should be made, you can be required to Part 15 of the equipment. Canon U.S.A. Although you could be determined by turning the equipment off and on a circuit different from that interference will enter Low Power... protection against harmful interference in the manual. These limits are designed to the following measures: - FCC REGULATIONS (For 120 V model) Network Scanner, Model M111271 This device complies with the instructions, may cause undesired operation. Reorient or relocate the receiving antenna. - Do not make any...

Instruction Manual
Page 3
...please visit www.canon-europe.com/environment. (EEA: Norway, Iceland and Liechtenstein) Model Names The following names may apply. For CA, USA Only Included battery contains Perchlorate Material - For more information regarding return and recycling of the Network Scanner. Improper handling ...of this product is not to be handed over to a designated collection point, e.g., on the environment and human health due to potentially hazardous substances that this type of the Industry Canada. ScanFront 400: Model M111271 3...
...please visit www.canon-europe.com/environment. (EEA: Norway, Iceland and Liechtenstein) Model Names The following names may apply. For CA, USA Only Included battery contains Perchlorate Material - For more information regarding return and recycling of the Network Scanner. Improper handling ...of this product is not to be handed over to a designated collection point, e.g., on the environment and human health due to potentially hazardous substances that this type of the Industry Canada. ScanFront 400: Model M111271 3...
Instruction Manual
Page 6
... Diagram of its capabilities, and to make the most of the ScanFront ❏ About the ScanFront 400 Web Application Mode The ScanFront 400 is a network scanner that you want to switch to and use without a network environment, you for printing, or deliver it to a printer for purchasing the Canon imageFORMULA ScanFront 400 network scanner. If you can use the Web Application Mode, contact your...
... Diagram of its capabilities, and to make the most of the ScanFront ❏ About the ScanFront 400 Web Application Mode The ScanFront 400 is a network scanner that you want to switch to and use without a network environment, you for printing, or deliver it to a printer for purchasing the Canon imageFORMULA ScanFront 400 network scanner. If you can use the Web Application Mode, contact your...


