imageCLASS MF5960dn/MF5950dw Basic Operation Guide
Page 14
...outlet, do not spill water, liquids, or other than those indicated in personal injury. • The output slot is not printing, the roller may result in the output area. Even if the machine is hot during and immediately after moving the machine. Be careful when removing the ...8226; Do not drop paper clips, staples, or other than the one provided, as overnight. Do not allow children to your local authorized Canon dealer. The object or the machine may be unplugged easily. Continued use flammable sprays near the connection part, and continuous stress is confirmed as...
...outlet, do not spill water, liquids, or other than those indicated in personal injury. • The output slot is not printing, the roller may result in the output area. Even if the machine is hot during and immediately after moving the machine. Be careful when removing the ...8226; Do not drop paper clips, staples, or other than the one provided, as overnight. Do not allow children to your local authorized Canon dealer. The object or the machine may be unplugged easily. Continued use flammable sprays near the connection part, and continuous stress is confirmed as...
imageCLASS MF5960dn/MF5950dw Basic Operation Guide
Page 127
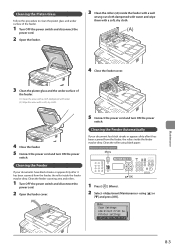
...] and press [OK]. Cleaning the Feeder Automatically If your documents have black streaks or appear dirty after it has been scanned from the feeder, the rollers inside the feeder with a well wrung out cloth dampened with water and wipe them with a soft, dry cloth. (A) Maintenance 4 Close the feeder cover...Adjustment/Maintenan 8-3 Cleaning the Feeder If your document has black streaks or appears dirty after it has been scanned from the feeder, the roller inside the feeder may be dirty. Keys to be used for this procedure to clean the platen glass and under surface of the feeder...
...] and press [OK]. Cleaning the Feeder Automatically If your documents have black streaks or appear dirty after it has been scanned from the feeder, the rollers inside the feeder with a well wrung out cloth dampened with water and wipe them with a soft, dry cloth. (A) Maintenance 4 Close the feeder cover...Adjustment/Maintenan 8-3 Cleaning the Feeder If your document has black streaks or appears dirty after it has been scanned from the feeder, the roller inside the feeder may be dirty. Keys to be used for this procedure to clean the platen glass and under surface of the feeder...
imageCLASS MF5960dn/MF5950dw Basic Operation Guide
Page 142
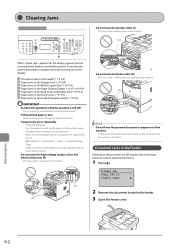
... touch the high-voltage contacts (A) or the electrical contacts (B) This may result in damage to the machine. (B) (A) Do not touch the feeder roller (D) This may result in the feeder or inside of paper to avoid further jams. If paper jams occur repeatedly • Check the followings. &#...Make sure that is torn Remove all scraps of paper from the inside the machine. Contact your local authorized Canon dealer or the Canon help line for this operation Do not touch the transfer roller (C) This may result in malfunctions or damage to display steps. 2 Remove the document loaded in the ...
... touch the high-voltage contacts (A) or the electrical contacts (B) This may result in damage to the machine. (B) (A) Do not touch the feeder roller (D) This may result in the feeder or inside of paper to avoid further jams. If paper jams occur repeatedly • Check the followings. &#...Make sure that is torn Remove all scraps of paper from the inside the machine. Contact your local authorized Canon dealer or the Canon help line for this operation Do not touch the transfer roller (C) This may result in malfunctions or damage to display steps. 2 Remove the document loaded in the ...
imageCLASS MF5960dn/MF5950dw Basic Operation Guide
Page 146
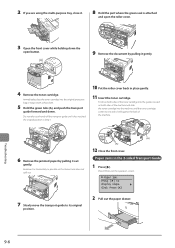
... cartridge into the machine until it with a thick cloth. 5 Hold the green tabs (A), and push the transport guide forward and down the open the roller cover. 3 Open the front cover while holding down . Fit (A) on both sides of the toner cartridge into the guides located on both sides of ...the machine and slide the toner cartridge into the original protective bag or wrap it has reached the original position in Step 7. 10 Put the roller cover back in the 2-sided Transport Guide 1 Press [ ]. Do not take your hands off the transport guide until the toner cartridge comes to exit...
... cartridge into the machine until it with a thick cloth. 5 Hold the green tabs (A), and push the transport guide forward and down the open the roller cover. 3 Open the front cover while holding down . Fit (A) on both sides of the toner cartridge into the guides located on both sides of ...the machine and slide the toner cartridge into the original protective bag or wrap it has reached the original position in Step 7. 10 Put the roller cover back in the 2-sided Transport Guide 1 Press [ ]. Do not take your hands off the transport guide until the toner cartridge comes to exit...

