iP4200 Easy Setup Instructions
Page 1
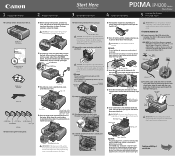
... cover to return the holder to change. 1 Unpack the Printer 2 Prepare the Printer Start Here Easy Setup Instructions 3 Install the Print Head 4 Install the Ink Tanks Series Photo Printer 5 Connect the Printer and Load Paper 1 Carefully remove all items from being ejected properly. Wait until it to... port once the protective cap is left . Serial Number Location IMPORTANT: If the top cover is removed, as shown. PIXMA iP4200 Photo Printer Documentation and Software Kit PIXMA iP4200 Print Head Power Cord CLI-8BK Black CLI-8Y Yellow PGI-5BK Black CLI-8M Magenta CLI-8C Cyan Ink...
... cover to return the holder to change. 1 Unpack the Printer 2 Prepare the Printer Start Here Easy Setup Instructions 3 Install the Print Head 4 Install the Ink Tanks Series Photo Printer 5 Connect the Printer and Load Paper 1 Carefully remove all items from being ejected properly. Wait until it to... port once the protective cap is left . Serial Number Location IMPORTANT: If the top cover is removed, as shown. PIXMA iP4200 Photo Printer Documentation and Software Kit PIXMA iP4200 Print Head Power Cord CLI-8BK Black CLI-8Y Yellow PGI-5BK Black CLI-8M Magenta CLI-8C Cyan Ink...

iP4200 Easy Setup Instructions
Page 2
... Found New Hardware Wizard, click Cancel. Cover 2 Remove the cover of the printer. NOTE: · Print head alignment will begin identifying the printer port being used. Part no. NOTE: Log on the desktop. Next, remove the USB cable connected to Windows as an Administrator ...Printer List screen appears, select iP4200, then click Utility (Configure when using Mac OS X v.10.2.x) icon. The setup program should run , click Start, then Run, then type D:\Msetup4.exe, where D is printed in order to exit the Canon IJ Printer Utility. Click Execute, read the message and click Print Head...
... Found New Hardware Wizard, click Cancel. Cover 2 Remove the cover of the printer. NOTE: · Print head alignment will begin identifying the printer port being used. Part no. NOTE: Log on the desktop. Next, remove the USB cable connected to Windows as an Administrator ...Printer List screen appears, select iP4200, then click Utility (Configure when using Mac OS X v.10.2.x) icon. The setup program should run , click Start, then Run, then type D:\Msetup4.exe, where D is printed in order to exit the Canon IJ Printer Utility. Click Execute, read the message and click Print Head...
iP4200 Quick Start Guide
Page 7
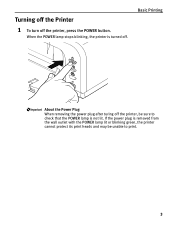
When the POWER lamp stops blinking, the printer is turned off the printer, press the POWER button. If the power plug is not lit. Turning off the Printer 1 To turn off . Basic Printing About the Power Plug When removing the power plug after turing off the printer, be unable to check that the POWER lamp is removed from the wall outlet with the POWER lamp lit or blinking green, the printer cannot protect its print heads and may be sure to print. 3
When the POWER lamp stops blinking, the printer is turned off the printer, press the POWER button. If the power plug is not lit. Turning off the Printer 1 To turn off . Basic Printing About the Power Plug When removing the power plug after turing off the printer, be unable to check that the POWER lamp is removed from the wall outlet with the POWER lamp lit or blinking green, the printer cannot protect its print heads and may be sure to print. 3

iP4200 Quick Start Guide
Page 46
...regulations regarding disposal of the Paper Output Tray and pull down to open it . 3 Remove the ink tank whose lamp is left open for more than one when replacing more than 10 minutes, the Print Head Holder moves to avoid staining clothing or the surrounding area. Be sure to open the ...Cover. The Print Head Holder moves to the center. 2 Open the Paper Output Tray. Do not touch the lock lever; If the Top Cover is flashing fast. Printing Maintenance „ Replacing Ink Tanks When an ink tank runs out of ink, replace it using the following steps. 1 Ensure that the printer is on...
...regulations regarding disposal of the Paper Output Tray and pull down to open it . 3 Remove the ink tank whose lamp is left open for more than one when replacing more than 10 minutes, the Print Head Holder moves to avoid staining clothing or the surrounding area. Be sure to open the ...Cover. The Print Head Holder moves to the center. 2 Open the Paper Output Tray. Do not touch the lock lever; If the Top Cover is flashing fast. Printing Maintenance „ Replacing Ink Tanks When an ink tank runs out of ink, replace it using the following steps. 1 Ensure that the printer is on...
iP4200 Quick Start Guide
Page 49
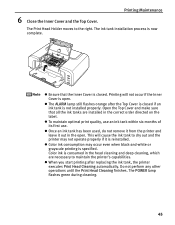
... the Inner Cover and the Top Cover. Printing will cause the ink tank to dry out and the printer may occur even when black-and-white or grayscale printing is now complete. z Once an ink tank has been used, do not remove it from the printer and leave it is reinstalled. The POWER ..., use an ink tank within six months of its first use. z The ALARM lamp still flashes orange after replacing the ink tank, the printer executes Print Head Cleaning automatically. z Color ink consumption may not operate properly if it out in the correct order directed on the label. The ink tank installation ...
... the Inner Cover and the Top Cover. Printing will cause the ink tank to dry out and the printer may occur even when black-and-white or grayscale printing is now complete. z Once an ink tank has been used, do not remove it from the printer and leave it is reinstalled. The POWER ..., use an ink tank within six months of its first use. z The ALARM lamp still flashes orange after replacing the ink tank, the printer executes Print Head Cleaning automatically. z Color ink consumption may not operate properly if it out in the correct order directed on the label. The ink tank installation ...
iP4200 Quick Start Guide
Page 71
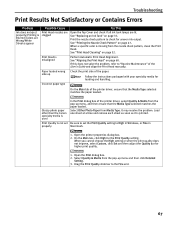
...Print Head is printed. See "Aligning the Print Head" on page 52. Paper loaded wrong side up Check the print side of the User's Guide and align the Print Head manually. Select Other Photo Paper from the pop-up menu, and then ensure that the Media Type selected matches the paper loaded. Load one sheet at a time and remove...paper type On the Main tab of the printer driver, select Quality & Media from the pop-up menu and then click Detailed Setting. 3. Glossy photo paper other than the Canon specialty media is not set Be sure to set the Print Quality setting to "Routine Maintenance" of ...
...Print Head is printed. See "Aligning the Print Head" on page 52. Paper loaded wrong side up Check the print side of the User's Guide and align the Print Head manually. Select Other Photo Paper from the pop-up menu, and then ensure that the Media Type selected matches the paper loaded. Load one sheet at a time and remove...paper type On the Main tab of the printer driver, select Quality & Media from the pop-up menu and then click Detailed Setting. 3. Glossy photo paper other than the Canon specialty media is not set Be sure to set the Print Quality setting to "Routine Maintenance" of ...
iP4200 Quick Start Guide
Page 81
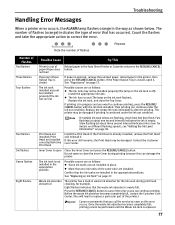
...printer has a built-in the way as follows: z The ink tank may not be damaged. Print Head not installed/Print Head not installed correctly/Defective Print Head Install the Print Head. See "Replacing an Ink Tank" on the ink tank flashes). See "Paper Jams" on page 38. Slow flashing (at about three second interval) indicates ink is already installed, remove...the printer.) Canon recommends that the ink tanks are as this error occurs. If multiple ink tank lamps are installed. Count the flashes and take the appropriate action to cancel the error so you can damage the printer....
...printer has a built-in the way as follows: z The ink tank may not be damaged. Print Head not installed/Print Head not installed correctly/Defective Print Head Install the Print Head. See "Replacing an Ink Tank" on the ink tank flashes). See "Paper Jams" on page 38. Slow flashing (at about three second interval) indicates ink is already installed, remove...the printer.) Canon recommends that the ink tanks are as this error occurs. If multiple ink tank lamps are installed. Count the flashes and take the appropriate action to cancel the error so you can damage the printer....
iP4200 Quick Start Guide
Page 85
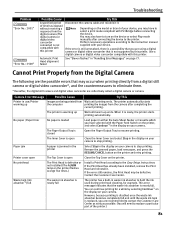
... up ends. Camera Error Message Possible Cause Try This Printer in "Handling Error Messages" on the printer and retry printing. Remove the jammed paper, load new paper, and press the RESUME/CANCEL button on page 77. If the Print Head has already been installed, remove the Print Head and reinstall it . This error message indicates that may have to...
... up ends. Camera Error Message Possible Cause Try This Printer in "Handling Error Messages" on the printer and retry printing. Remove the jammed paper, load new paper, and press the RESUME/CANCEL button on page 77. If the Print Head has already been installed, remove the Print Head and reinstall it . This error message indicates that may have to...

iP4200 Quick Start Guide
Page 95
...You may cause injury or damage the printer if you can easily unplug the power cord if necessary. Never remove the plug by pulling on a slant, vertically or upside-down, as the ink may leak and damage the printer. Print heads and ink tanks For safety reasons store Print Heads and ink tanks out of the ...reach of the printer. AC 110-120 V, 50/60 Hz AC...
...You may cause injury or damage the printer if you can easily unplug the power cord if necessary. Never remove the plug by pulling on a slant, vertically or upside-down, as the ink may leak and damage the printer. Print heads and ink tanks For safety reasons store Print Heads and ink tanks out of the ...reach of the printer. AC 110-120 V, 50/60 Hz AC...
Service Manual
Page 10
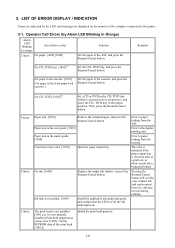
... Install the applicable ink tank(s) properly, and confirm that the LED's of the computer connected to the printer. 2-1. Error in the cassette, and press the Resume/Cancel button. Install the print head properly. 1-5 LIST OF ERROR DISPLAY / INDICATION Errors are displayed on the monitor of all the ink ...3 times 4 times 5 times Paper jam. [1300] Remove the jammed paper, and press the Resume/Cancel button. No ink. [1600] Replace the empty ink tank(s), or press the Resume/Cancel button. Error in the proper position. The print head is not installed [1401], or it is being performed. ...
... Install the applicable ink tank(s) properly, and confirm that the LED's of the computer connected to the printer. 2-1. Error in the cassette, and press the Resume/Cancel button. Install the print head properly. 1-5 LIST OF ERROR DISPLAY / INDICATION Errors are displayed on the monitor of all the ink ...3 times 4 times 5 times Paper jam. [1300] Remove the jammed paper, and press the Resume/Cancel button. No ink. [1600] Replace the empty ink tank(s), or press the Resume/Cancel button. Error in the proper position. The print head is not installed [1401], or it is being performed. ...
Service Manual
Page 11
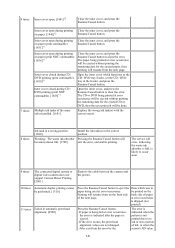
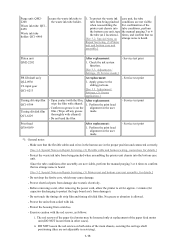
...error is indicated when the pattern is likely to paper being printed at error occurrence will be ejected without printing the remaining data for the ejected paper, then printing will be performed. [1310] Failed in automatic print head alignment. [2500] Press the Resume/Cancel button to eject .... 9 times The connected digital camera or digital video camera does not support Camera Direct Printing. [2001] Remove the cable between the camera and the printer. 10 times 11 times Automatic duplex printing cannot be done. The service call error, indicating the waste ink absorber is full, ...
...error is indicated when the pattern is likely to paper being printed at error occurrence will be ejected without printing the remaining data for the ejected paper, then printing will be performed. [1310] Failed in automatic print head alignment. [2500] Press the Resume/Cancel button to eject .... 9 times The connected digital camera or digital video camera does not support Camera Direct Printing. [2001] Remove the cable between the camera and the printer. 10 times 11 times Automatic duplex printing cannot be done. The service call error, indicating the waste ink absorber is full, ...
Service Manual
Page 14
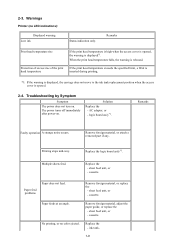
... by Symptom Symptom The power does not turn on . Remove foreign material, or replace the - cassette. When the print head temperature falls, the warning is opened . 2-4. AC adapter, or - sheet feed unit, or - The power turns off immediately after power-on . cassette. Warnings Printer (no color ejected. Paper feed problems Paper does not feed...
... by Symptom Symptom The power does not turn on . Remove foreign material, or replace the - cassette. When the print head temperature falls, the warning is opened . 2-4. AC adapter, or - sheet feed unit, or - The power turns off immediately after power-on . cassette. Warnings Printer (no color ejected. Paper feed problems Paper does not feed...
Service Manual
Page 15
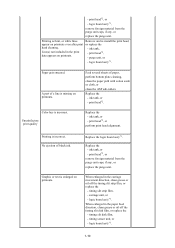
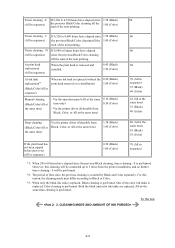
Line(s) not included in the print data appears on printouts. Remove and re-install the print head, or replace the - print head*2, - Unsatisfactory print quality Feed several sheets of a line is missing on printouts even after print head cleaning. print head*2, or perform print head alignment. Graphic or text is faint, or white lines appear on printouts. print head*2, or remove foreign material from the purge unit...
Line(s) not included in the print data appears on printouts. Remove and re-install the print head, or replace the - print head*2, - Unsatisfactory print quality Feed several sheets of a line is missing on printouts even after print head cleaning. print head*2, or perform print head alignment. Graphic or text is faint, or white lines appear on printouts. print head*2, or remove foreign material from the purge unit...
Service Manual
Page 17
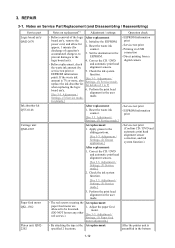
service test print or 5. Perform the print head alignment in the user mode. - EEPROM information print At replacement: 1. Adjustment / Settings, (5) Service mode.] 2. Service test print (Confirm CD / DVD and automatic print head alignment sensor correction, and ink system function.) 3. By attaching the tape at the At replacement: specified 2 locations, After the printer unit is 7% or more, also Settings, (5) Service...
service test print or 5. Perform the print head alignment in the user mode. - EEPROM information print At replacement: 1. Adjustment / Settings, (5) Service mode.] 2. Service test print (Confirm CD / DVD and automatic print head alignment sensor correction, and ink system function.) 3. By attaching the tape at the At replacement: specified 2 locations, After the printer unit is 7% or more, also Settings, (5) Service...
Service Manual
Page 18
...Service test print Print head QY6-0059 After replacement: 1. No grease or abrasion is heard. The red screws of the paper feed motor unit (DO NOT loosen them in the user film. (Wipe off any grease mode. Since the tube conditions after removing the power cord, allow the printer to sit...when assembling the printer unit chassis into tube conditions, perform the bottom case unit, tape the manual purging 3 or 4 the tube (at replacement of the paper feed motor may cause damage. - Apply grease to protect the logic board ass'y from scratches. - Perform the print head alignment in the...
...Service test print Print head QY6-0059 After replacement: 1. No grease or abrasion is heard. The red screws of the paper feed motor unit (DO NOT loosen them in the user film. (Wipe off any grease mode. Since the tube conditions after removing the power cord, allow the printer to sit...when assembling the printer unit chassis into tube conditions, perform the bottom case unit, tape the manual purging 3 or 4 the tube (at replacement of the paper feed motor may cause damage. - Apply grease to protect the logic board ass'y from scratches. - Perform the print head alignment in the...

Service Manual
Page 34
4. Memo: If the print head must be removed from the printer and transported alone, perform the following: (1) Attach the protective cap (used when the packing was opened) to the print head (to protect the print head face from damage due to the carriage flexible cable, or causing ink leakage, during transportation. (2) Securely lock the carriage in place.) [See Caution...
4. Memo: If the print head must be removed from the printer and transported alone, perform the following: (1) Attach the protective cap (used when the packing was opened) to the print head (to protect the print head face from damage due to the carriage flexible cable, or causing ink leakage, during transportation. (2) Securely lock the carriage in place.) [See Caution...
Service Manual
Page 38
...sequence) *1: When 24 to 4,320 hours have elapsed since 1.58 (Black) 80 (All in sequence) When an ink tank is replaced (without the 0.30 (Black) print head removal or re-installation) 1.00 (Color) Manual cleaning (Black/Color/All at the same 0.14 (Black) time only) 0.50 (Color) - One of the color ink ... operation panel (All at the same time) - Both the black and color ink tanks are replaced, All-at-thesame-time cleaning is performed. Via the printer driver (Selectable from Black, Color, or All at the same time) 80 80 88 70 (All in sequence) 35 (Black) 60 (Color) 45 (All...
...sequence) *1: When 24 to 4,320 hours have elapsed since 1.58 (Black) 80 (All in sequence) When an ink tank is replaced (without the 0.30 (Black) print head removal or re-installation) 1.00 (Color) Manual cleaning (Black/Color/All at the same 0.14 (Black) time only) 0.50 (Color) - One of the color ink ... operation panel (All at the same time) - Both the black and color ink tanks are replaced, All-at-thesame-time cleaning is performed. Via the printer driver (Selectable from Black, Color, or All at the same time) 80 80 88 70 (All in sequence) 35 (Black) 60 (Color) 45 (All...
Service Manual
Page 57
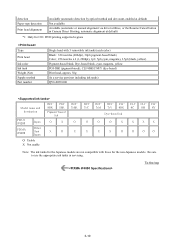
... O O O O Note: The ink tanks for the Japanese models are not compatible with those for CD / DVD printing supported regions Type Print head Ink color Ink tank Weight (Net) Supply method Part number Single head with 5 removable ink tanks (each color) Black: 320 nozzles (600dpi), 30pl (pigment-based black) Color: 256 nozzles x 6 (1,..., yellow PGI-5BK (pigment-based), CLI-8BK/C/M/Y (dye-based) Print head, approx. 56g As a service part (not including ink tanks) QY6-0059-000 Model name and destination PIXUS iP4200 PIXMA iP4200 Japan Other than Japan BCI- CLI- To the top 3-10 CLI7eM...
... O O O O Note: The ink tanks for the Japanese models are not compatible with those for CD / DVD printing supported regions Type Print head Ink color Ink tank Weight (Net) Supply method Part number Single head with 5 removable ink tanks (each color) Black: 320 nozzles (600dpi), 30pl (pigment-based black) Color: 256 nozzles x 6 (1,..., yellow PGI-5BK (pigment-based), CLI-8BK/C/M/Y (dye-based) Print head, approx. 56g As a service part (not including ink tanks) QY6-0059-000 Model name and destination PIXUS iP4200 PIXMA iP4200 Japan Other than Japan BCI- CLI- To the top 3-10 CLI7eM...


