iP4200 Easy Setup Instructions
Page 1
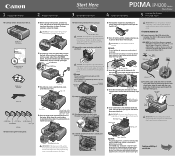
PIXMA iP4200 Photo Printer Documentation and Software Kit PIXMA iP4200 Print Head Power Cord CLI-8BK Black CLI-8Y Yellow PGI-5BK Black CLI-8M Magenta CLI-8C Cyan Ink Tanks 1 Before turning on the printer, open the paper support and extend the paper output tray. Press the POWER button. Lower ... plastic wrapper from the printer. 5 Lower the print head lock lever carefully and press it clicks into the rightmost slot. The print head will attempt to install the printer driver before continuing, or the computer will rest at notch to the color guide on the print head lock lever. 5...
PIXMA iP4200 Photo Printer Documentation and Software Kit PIXMA iP4200 Print Head Power Cord CLI-8BK Black CLI-8Y Yellow PGI-5BK Black CLI-8M Magenta CLI-8C Cyan Ink Tanks 1 Before turning on the printer, open the paper support and extend the paper output tray. Press the POWER button. Lower ... plastic wrapper from the printer. 5 Lower the print head lock lever carefully and press it clicks into the rightmost slot. The print head will attempt to install the printer driver before continuing, or the computer will rest at notch to the color guide on the print head lock lever. 5...
iP4200 Quick Start Guide
Page 5
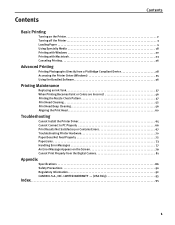
... Basic Printing Turning on the Printer 2 Turning off the Printer 3 Loading Paper 4 Using Specialty Media 18 Printing with Windows 20 Printing with Macintosh 23 Canceling Printing 26 Advanced Printing Printing Photographs Directly from a PictBridge Compliant Device 28 Accessing the Printer Driver (Windows 35 Using the Bundled Software 36 Printing Maintenance Replacing an Ink Tank 37 When Printing Becomes Faint or Colors are...
... Basic Printing Turning on the Printer 2 Turning off the Printer 3 Loading Paper 4 Using Specialty Media 18 Printing with Windows 20 Printing with Macintosh 23 Canceling Printing 26 Advanced Printing Printing Photographs Directly from a PictBridge Compliant Device 28 Accessing the Printer Driver (Windows 35 Using the Bundled Software 36 Printing Maintenance Replacing an Ink Tank 37 When Printing Becomes Faint or Colors are...
iP4200 Quick Start Guide
Page 29
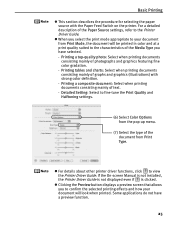
... paper source with strong color definition. - For a detailed description of the Media Type you have a preview function. 25 z When you to view the Printer Driver Guide. If the On-screen Manual is not installed, the Printer Driver Guide is not displayed even if is clicked. Printing a top-quality photo: Select when printing documents consisting mainly of...
... paper source with strong color definition. - For a detailed description of the Media Type you have a preview function. 25 z When you to view the Printer Driver Guide. If the On-screen Manual is not installed, the Printer Driver Guide is not displayed even if is clicked. Printing a top-quality photo: Select when printing documents consisting mainly of...

iP4200 Quick Start Guide
Page 40
.... You can record data tags for your print purposes. It is opened from Printing Preferences or applications. For details on which to create prints that reproduce color more accurately. 36 It is the worldwide standard. Under ExifPrint, the digital camera can also copy or move the decorated photos. Canon PIXMA Printers support ExifPrint and use the application(s) suitable...
.... You can record data tags for your print purposes. It is opened from Printing Preferences or applications. For details on which to create prints that reproduce color more accurately. 36 It is the worldwide standard. Under ExifPrint, the digital camera can also copy or move the decorated photos. Canon PIXMA Printers support ExifPrint and use the application(s) suitable...

iP4200 Quick Start Guide
Page 41
When replacing them, check the model numbers and their installation positions. With this printer, the ink tanks must be installed in the order (from left to right) indicated below: z Black: CLI-8BK z Black: PGI-5BK z Yellow: CLI-8Y z Magenta: CLI-8M z Cyan: CLI-8C Should missing characters or white streaks appear despite sufficient ink levels, refer to "When Printing Becomes Faint or Colors are out of ink. Printing Maintenance Printing Maintenance Replacing an Ink Tank Replace ink tank(s) if they are Incorrect" on page 46. 37
When replacing them, check the model numbers and their installation positions. With this printer, the ink tanks must be installed in the order (from left to right) indicated below: z Black: CLI-8BK z Black: PGI-5BK z Yellow: CLI-8Y z Magenta: CLI-8M z Cyan: CLI-8C Should missing characters or white streaks appear despite sufficient ink levels, refer to "When Printing Becomes Faint or Colors are out of ink. Printing Maintenance Printing Maintenance Replacing an Ink Tank Replace ink tank(s) if they are Incorrect" on page 46. 37
iP4200 Quick Start Guide
Page 49
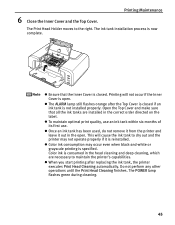
...if the Inner Cover is reinstalled. Do not perform any other operations until the Print Head Cleaning finishes. z To maintain optimal print quality, use an ink tank within six months of its first use. z Color ink consumption may not operate properly if it out in the correct order directed ...is closed if an ink tank is closed. Color ink is now complete. The POWER lamp flashes green during cleaning. 45 Printing Maintenance 6 Close the Inner Cover and the Top Cover. z Ensure that all the ink tanks are necessary to maintain the printer's capabilities. z The ALARM lamp still flashes ...
...if the Inner Cover is reinstalled. Do not perform any other operations until the Print Head Cleaning finishes. z To maintain optimal print quality, use an ink tank within six months of its first use. z Color ink consumption may not operate properly if it out in the correct order directed ...is closed if an ink tank is closed. Color ink is now complete. The POWER lamp flashes green during cleaning. 45 Printing Maintenance 6 Close the Inner Cover and the Top Cover. z Ensure that all the ink tanks are necessary to maintain the printer's capabilities. z The ALARM lamp still flashes ...
iP4200 Quick Start Guide
Page 50
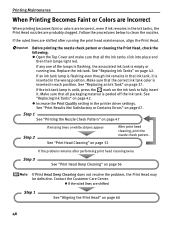
... sure that all packaging material is inserted in the printer driver settings. Printing Maintenance When Printing Becomes Faint or Colors are Incorrect When printing becomes faint or colors are incorrect, even if ink remains in the ink tanks, the Print Head nozzles are shifted Step 1 See "Aligning the Print Head" on the ink tank to clean the nozzles...
... sure that all packaging material is inserted in the printer driver settings. Printing Maintenance When Printing Becomes Faint or Colors are Incorrect When printing becomes faint or colors are incorrect, even if ink remains in the ink tanks, the Print Head nozzles are shifted Step 1 See "Aligning the Print Head" on the ink tank to clean the nozzles...
iP4200 Quick Start Guide
Page 51
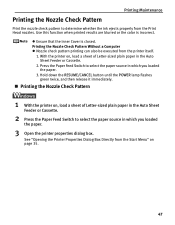
...Hold down the RESUME/CANCEL button until the POWER lamp flashes green twice, and then release it immediately. „ Printing the Nozzle Check Pattern 1 With the printer on , load a sheet of Letter-sized plain paper in the Auto Sheet Feeder or Cassette. 2 Press the ...Paper Feed Switch to select the paper source in the Auto Sheet Feeder or Cassette. 2. Use this function when printed results are blurred or the color is closed. Printing Maintenance Printing the Nozzle Check Pattern Print...
...Hold down the RESUME/CANCEL button until the POWER lamp flashes green twice, and then release it immediately. „ Printing the Nozzle Check Pattern 1 With the printer on , load a sheet of Letter-sized plain paper in the Auto Sheet Feeder or Cassette. 2 Press the ...Paper Feed Switch to select the paper source in the Auto Sheet Feeder or Cassette. 2. Use this function when printed results are blurred or the color is closed. Printing Maintenance Printing the Nozzle Check Pattern Print...

iP4200 Quick Start Guide
Page 54
... of ink is not enough ink. Example: When line are missing, the "Black" print head nozzle needs cleaning. Example: When white stripes appear 50 The nozzle check pattern will not be printed correctly if there is insufficient. Replace the ink tank if the remaining amount of this pattern... are missing (2) If these patterns have white stripes, the "Color" print head nozzle needs cleaning. Printing Maintenance „ Examining the Nozzle Check Pattern The nozzle check pattern should appear as follows when ink is discharged properly....
... of ink is not enough ink. Example: When line are missing, the "Black" print head nozzle needs cleaning. Example: When white stripes appear 50 The nozzle check pattern will not be printed correctly if there is insufficient. Replace the ink tank if the remaining amount of this pattern... are missing (2) If these patterns have white stripes, the "Color" print head nozzle needs cleaning. Printing Maintenance „ Examining the Nozzle Check Pattern The nozzle check pattern should appear as follows when ink is discharged properly....

iP4200 Quick Start Guide
Page 57
... printing finishes. Print Head Cleaning starts when the POWER lamp starts blinking green. The nozzle check pattern is not enough ink. Replace the ink tank if the remaining amount of CLI-8BK. When cleaning the nozzles of black ink tanks: select Black to clean the nozzles of PGI-5BK, Color to be printed... correctly if there is printed. Clicking Initial Check Items displays the items to clean the nozzles of ink is insufficient...
... printing finishes. Print Head Cleaning starts when the POWER lamp starts blinking green. The nozzle check pattern is not enough ink. Replace the ink tank if the remaining amount of CLI-8BK. When cleaning the nozzles of black ink tanks: select Black to clean the nozzles of PGI-5BK, Color to be printed... correctly if there is printed. Clicking Initial Check Items displays the items to clean the nozzles of ink is insufficient...

iP4200 Quick Start Guide
Page 59
... the nozzles of black ink tanks: select Black to clean the nozzles of PGI-5BK, Color to print the nozzle check pattern. Replace the ink tank if the remaining amount of CLI-8BK. See "Print Head Deep Cleaning" on page 50. Do not perform any other operations until the nozzle ...finishes. See "Examining the Nozzle Check Pattern" on page 56. 55 See "Replacing an Ink Tank" on page 37. 4 Check the Print Head condition with the printed nozzle check pattern. The nozzle check pattern will not be checked before cleaning. (4) Click OK. Clicking Initial Check Items displays the items ...
... the nozzles of black ink tanks: select Black to clean the nozzles of PGI-5BK, Color to print the nozzle check pattern. Replace the ink tank if the remaining amount of CLI-8BK. See "Print Head Deep Cleaning" on page 50. Do not perform any other operations until the nozzle ...finishes. See "Examining the Nozzle Check Pattern" on page 56. 55 See "Replacing an Ink Tank" on page 37. 4 Check the Print Head condition with the printed nozzle check pattern. The nozzle check pattern will not be checked before cleaning. (4) Click OK. Clicking Initial Check Items displays the items ...

iP4200 Quick Start Guide
Page 61
...57 Do not perform any other operation until the Print Head Deep Cleaning finishes. If a particular color is displayed, click OK. Be sure to clean the nozzles of PGI-5BK, Color to perform another Print Head Deep Cleaning 24 hours after turning off the printer. When cleaning the nozzles of black ink tanks:... select Black to clean the nozzles of CLI-8BK. z If the print head nozzles are sufficient ink levels in all ...
...57 Do not perform any other operation until the Print Head Deep Cleaning finishes. If a particular color is displayed, click OK. Be sure to clean the nozzles of PGI-5BK, Color to perform another Print Head Deep Cleaning 24 hours after turning off the printer. When cleaning the nozzles of black ink tanks:... select Black to clean the nozzles of CLI-8BK. z If the print head nozzles are sufficient ink levels in all ...

iP4200 Quick Start Guide
Page 63
.... Do not perform any other operation until the Print Head Deep Cleaning finishes. If a particular color is not printed properly, replace the ink tank of CLI-8BK. Printing Maintenance (3) Select the ink group to perform another Print Head Deep Cleaning 24 hours after turning off the printer. z If the print head nozzles are still not clean, open...
.... Do not perform any other operation until the Print Head Deep Cleaning finishes. If a particular color is not printed properly, replace the ink tank of CLI-8BK. Printing Maintenance (3) Select the ink group to perform another Print Head Deep Cleaning 24 hours after turning off the printer. z If the print head nozzles are still not clean, open...
iP4200 Quick Start Guide
Page 64
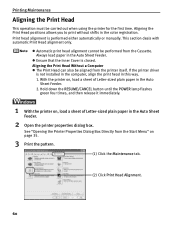
... Sheet Feeder. 2. z Ensure that the Inner Cover is performed either automatically or manually. See "Opening the Printer Properties Dialog Box Directly from the Start Menu" on , load a sheet of Letter-sized plain paper in the color registration. If the printer driver is not installed in the computer, align the print head in this way. 1.
... Sheet Feeder. 2. z Ensure that the Inner Cover is performed either automatically or manually. See "Opening the Printer Properties Dialog Box Directly from the Start Menu" on , load a sheet of Letter-sized plain paper in the color registration. If the printer driver is not installed in the computer, align the print head in this way. 1.
iP4200 Quick Start Guide
Page 71
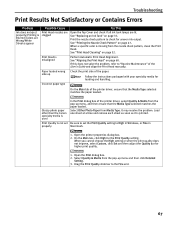
... Custom, click Set and then adjust the Quality bar for the Print Quality setting. Glossy photo paper other than the Canon specialty media is not set Be sure to set the Print Quality setting to "Routine Maintenance" of the printer driver, select Quality & Media from the nozzle check pattern, clean... instructions packaged with your specialty media for uneven ink output. See "Print Head Cleaning" on page 37. See "Replacing an Ink Tank" on page 52. When a specific color is Blurred/Colors are Wrong/White Streaks appear Print Head nozzles are clogged Open the Top Cover and check if all ...
... Custom, click Set and then adjust the Quality bar for the Print Quality setting. Glossy photo paper other than the Canon specialty media is not set Be sure to set the Print Quality setting to "Routine Maintenance" of the printer driver, select Quality & Media from the nozzle check pattern, clean... instructions packaged with your specialty media for uneven ink output. See "Print Head Cleaning" on page 37. See "Replacing an Ink Tank" on page 52. When a specific color is Blurred/Colors are Wrong/White Streaks appear Print Head nozzles are clogged Open the Top Cover and check if all ...
iP4200 Quick Start Guide
Page 72
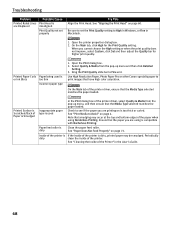
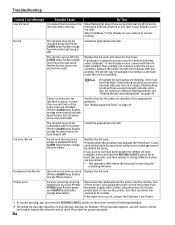
..." on page 60. Periodically dirty clean the inside of the printer. Open the Print dialog box. 2. Use High Resolution Paper, Photo Paper Pro or other Canon specialty paper to Fine end. Printed Surface is Scratched/Back of the paper when using is compatible ...color saturation. Open the printer properties dialog box. 2. On the Main tab of the Printer" in Macintosh. 1. See "Aligning the Print Head" on page 72. On the Main tab, click High for higher print quality. Troubleshooting Problem Possible Cause Printed Ruled Lines Print Head is are Displaced misaligned Print...
..." on page 60. Periodically dirty clean the inside of the printer. Open the Print dialog box. 2. Use High Resolution Paper, Photo Paper Pro or other Canon specialty paper to Fine end. Printed Surface is Scratched/Back of the paper when using is compatible ...color saturation. Open the printer properties dialog box. 2. On the Main tab of the Printer" in Macintosh. 1. See "Aligning the Print Head" on page 72. On the Main tab, click High for higher print quality. Troubleshooting Problem Possible Cause Printed Ruled Lines Print Head is are Displaced misaligned Print...
iP4200 Quick Start Guide
Page 74
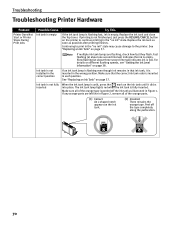
... inserted in Figure 1. Continuing to the printer. See "Replacing an Ink Tank" on the printer to continue printing in the "no ink" state may cause damage to print in the "no ink" state. If any orange parts are flashing, check how fast they flash. Replace the ink tank ... color is inserted in Figure 2, remove all of the orange parts. (1) Correct An L-shaped notch appears on the ink tank until it is not finished yet, just press the RESUME/CANCEL button on page 37. Troubleshooting Troubleshooting Printer Hardware Problem Printer Does Not Start or Printer Stops During Print ...
... inserted in Figure 1. Continuing to the printer. See "Replacing an Ink Tank" on the printer to continue printing in the "no ink" state may cause damage to print in the "no ink" state. If any orange parts are flashing, check how fast they flash. Replace the ink tank ... color is inserted in Figure 2, remove all of the orange parts. (1) Correct An L-shaped notch appears on the ink tank until it is not finished yet, just press the RESUME/CANCEL button on page 37. Troubleshooting Troubleshooting Printer Hardware Problem Printer Does Not Start or Printer Stops During Print ...
iP4200 Quick Start Guide
Page 81
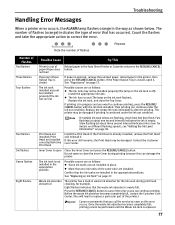
...Note the number of flashes Number of the printer.) Canon recommends that has occurred. z The ink has run out Possible causes are installed. Then printing can damage the printer. Print Head not installed/Print Head not installed correctly/Defective Print Head Install the Print Head. Once the waste ink absorber becomes... tank. Fast flashing (at about one ink tanks of the same color are as follows: z The ink tank may be damaged if printing is jammed, remove the jammed paper, reload paper in the printer, then press the RESUME/CANCEL button. z More than one second interval...
...Note the number of flashes Number of the printer.) Canon recommends that has occurred. z The ink has run out Possible causes are installed. Then printing can damage the printer. Print Head not installed/Print Head not installed correctly/Defective Print Head Install the Print Head. Once the waste ink absorber becomes... tank. Fast flashing (at about one ink tanks of the same color are as follows: z The ink tank may be damaged if printing is jammed, remove the jammed paper, reload paper in the printer, then press the RESUME/CANCEL button. z More than one second interval...
iP4200 Quick Start Guide
Page 86
...close the Top Cover. See "Replacing an Ink Tank" on page 38. Printing under the ink out condition. Canon shall not be damaged if printing is continued under the situation may not be compatible with this printer (Printer ALARM lamp flashes orange fourteen times/Ink tank lamp is off) Install the ...that was once empty is installed (Printer ALARM lamp flashes orange thirteen times) Replace the ink tank. If you will release the function for at about three second interval in red) of the same color are installed in the display on the printer, and then reconnect the camera to ...
...close the Top Cover. See "Replacing an Ink Tank" on page 38. Printing under the ink out condition. Canon shall not be damaged if printing is continued under the situation may not be compatible with this printer (Printer ALARM lamp flashes orange fourteen times/Ink tank lamp is off) Install the ...that was once empty is installed (Printer ALARM lamp flashes orange thirteen times) Replace the ink tank. If you will release the function for at about three second interval in red) of the same color are installed in the display on the printer, and then reconnect the camera to ...
iP4200 Quick Start Guide
Page 87
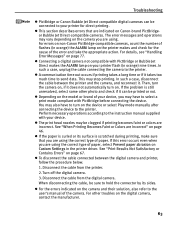
...or Bubble Jet Direct makes the ALARM lamp on your printer for the cause of the camera. See "When Printing Becomes Faint or Colors are Incorrect" on page 77. Disconnect the cable from the printer. 2. For details, see "Handling Error Messages" ...Canon PictBridge-compatible cameras, count the number of flashes (in the printer driver. In such a case, disconnect the cable between the digital camera and printer, follow the procedure below. 1. z To disconnect the cable connected between the printer and the camera, and reconnect it takes too much time to the printer. For other photo...
...or Bubble Jet Direct makes the ALARM lamp on your printer for the cause of the camera. See "When Printing Becomes Faint or Colors are Incorrect" on page 77. Disconnect the cable from the printer. 2. For details, see "Handling Error Messages" ...Canon PictBridge-compatible cameras, count the number of flashes (in the printer driver. In such a case, disconnect the cable between the digital camera and printer, follow the procedure below. 1. z To disconnect the cable connected between the printer and the camera, and reconnect it takes too much time to the printer. For other photo...


