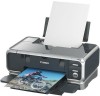
iP4000 Quick Start Guide
Page 4
... the U.S. z Microsoft® and Windows® are not intended to be, nor should they be understood to be an easy-to-use guide to change without the prior written consent of their respective owners. Disclaimer Canon U.S.A., Inc. z Macintosh, Mac and the Mac logo are subject to your Canon PIXMA iP4000/iP3000 Photo Printer. Copyright This manual is...
... the U.S. z Microsoft® and Windows® are not intended to be, nor should they be understood to be an easy-to-use guide to change without the prior written consent of their respective owners. Disclaimer Canon U.S.A., Inc. z Macintosh, Mac and the Mac logo are subject to your Canon PIXMA iP4000/iP3000 Photo Printer. Copyright This manual is...
iP4000 Quick Start Guide
Page 5
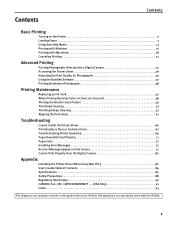
... Cannot Print Properly from the Digital Camera 80 Appendix Installing the Printer Driver When Using Mac OS 9 82 User's Guide Table of Contents 84 Specifications 85 Safety Precautions 88 Regulatory Information 90 CANON U.S.A., INC. LIMITED WARRANTY --- (USA Only 91 Index 93 ...The diagrams and computer screens in this guide refer to the iP4000. Contents Contents Basic Printing Turning on the Printer 2 Loading Paper 3 Using Specialty Media 13 Printing with Windows 15 Printing with the...
... Cannot Print Properly from the Digital Camera 80 Appendix Installing the Printer Driver When Using Mac OS 9 82 User's Guide Table of Contents 84 Specifications 85 Safety Precautions 88 Regulatory Information 90 CANON U.S.A., INC. LIMITED WARRANTY --- (USA Only 91 Index 93 ...The diagrams and computer screens in this guide refer to the iP4000. Contents Contents Basic Printing Turning on the Printer 2 Loading Paper 3 Using Specialty Media 13 Printing with Windows 15 Printing with the...
iP4000 Quick Start Guide
Page 6
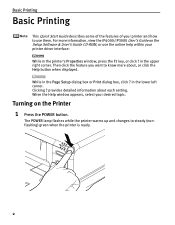
..., or use them. Clicking ? The POWER lamp flashes while the printer warms up and changes to know more information, view the iP4000/iP3000 User's Guide on the Printer 1 Press the POWER button. When the Help window appears, select your printer driver interface: While in the printer's Properties window, press the F1 key, or click ? Basic Printing Basic...
..., or use them. Clicking ? The POWER lamp flashes while the printer warms up and changes to know more information, view the iP4000/iP3000 User's Guide on the Printer 1 Press the POWER button. When the Help window appears, select your printer driver interface: While in the printer's Properties window, press the F1 key, or click ? Basic Printing Basic...
iP4000 Quick Start Guide
Page 11
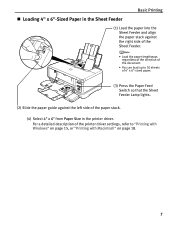
For a detailed description of the printer driver settings, refer to 20 sheets of 4" x 6"-sized paper. (3) Press the Paper Feed Switch so that the Sheet Feeder Lamp lights. (2) Slide the paper guide ... side of the Sheet Feeder. • Load the paper lengthways regardless of the direction of the document. • You can load up to "Printing with Windows" on page 15, or "Printing with Macintosh" on page 18. 7 Basic Printing „ Loading 4" x 6"-Sized Paper in the...
For a detailed description of the printer driver settings, refer to 20 sheets of 4" x 6"-sized paper. (3) Press the Paper Feed Switch so that the Sheet Feeder Lamp lights. (2) Slide the paper guide ... side of the Sheet Feeder. • Load the paper lengthways regardless of the direction of the document. • You can load up to "Printing with Windows" on page 15, or "Printing with Macintosh" on page 18. 7 Basic Printing „ Loading 4" x 6"-Sized Paper in the...
iP4000 Quick Start Guide
Page 16
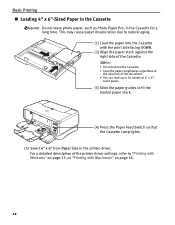
...; Load the paper lengthways regardless of the direction of 4" x 6"- Basic Printing „ Loading 4" x 6"-Sized Paper in the Cassette Do not leave photo paper, such as Photo Paper Pro, in the printer driver. sized paper. (3) Slide the paper guides to 20 sheets of the document. • You can load up to fit the loaded... the Paper Feed Switch so that the Cassette Lamp lights. (5) Select 4" x 6" from Paper Size in the Cassette for a long time. For a detailed description of the printer driver settings, refer to "Printing with Windows" on page 18. 12
...; Load the paper lengthways regardless of the direction of 4" x 6"- Basic Printing „ Loading 4" x 6"-Sized Paper in the Cassette Do not leave photo paper, such as Photo Paper Pro, in the printer driver. sized paper. (3) Slide the paper guides to 20 sheets of the document. • You can load up to fit the loaded... the Paper Feed Switch so that the Cassette Lamp lights. (5) Select 4" x 6" from Paper Size in the Cassette for a long time. For a detailed description of the printer driver settings, refer to "Printing with Windows" on page 18. 12
iP4000 Quick Start Guide
Page 19
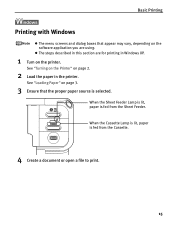
z The steps described in this section are using. See "Loading Paper" on page 3. 3 Ensure that appear may vary, depending on the printer. When the Sheet Feeder Lamp is lit, paper is fed from the Cassette. 4 Create a document or open a file to print. 15 See "Turning on the Printer" on page 2. 2 Load the paper in Windows XP. 1 Turn on the software application you are for printing in the printer. When the Cassette Lamp is lit, paper is fed from the Sheet Feeder. Basic Printing Printing with Windows z The menu screens and dialog boxes that the proper paper source is selected.
z The steps described in this section are using. See "Loading Paper" on page 3. 3 Ensure that appear may vary, depending on the printer. When the Sheet Feeder Lamp is lit, paper is fed from the Cassette. 4 Create a document or open a file to print. 15 See "Turning on the Printer" on page 2. 2 Load the paper in Windows XP. 1 Turn on the software application you are for printing in the printer. When the Cassette Lamp is lit, paper is fed from the Sheet Feeder. Basic Printing Printing with Windows z The menu screens and dialog boxes that the proper paper source is selected.
iP4000 Quick Start Guide
Page 21
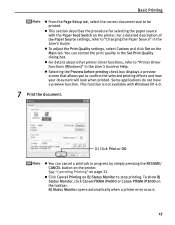
.... z This section describes the procedure for selecting the paper source with Windows NT 4.0. 7 Print the document. (1) Click Print or OK. z Click Cancel Printing on the taskbar. To show BJ Status Monitor, click Canon PIXMA iP4000 or Canon PIXMA iP3000 on BJ Status Monitor to stop printing. z For details about other printer driver functions, refer to be printed.
.... z This section describes the procedure for selecting the paper source with Windows NT 4.0. 7 Print the document. (1) Click Print or OK. z Click Cancel Printing on the taskbar. To show BJ Status Monitor, click Canon PIXMA iP4000 or Canon PIXMA iP3000 on BJ Status Monitor to stop printing. z For details about other printer driver functions, refer to be printed.

iP4000 Quick Start Guide
Page 32
... these tabs, refer to all application programs. 1 Click Start and select Control Panel, Printers and Other Hardware, and then Printers and Faxes. In Windows NT 4.0, select Document Default. (iP4000 only) The Printer Properties dialog box opens. Advanced Printing Accessing the Printer Driver The Printer Properties dialog box can usually be opened by selecting Print from the File...
... these tabs, refer to all application programs. 1 Click Start and select Control Panel, Printers and Other Hardware, and then Printers and Faxes. In Windows NT 4.0, select Document Default. (iP4000 only) The Printer Properties dialog box opens. Advanced Printing Accessing the Printer Driver The Printer Properties dialog box can usually be opened by selecting Print from the File...
iP4000 Quick Start Guide
Page 33
...printer driver. z Click ? in this printer. See inside the back cover for a list of Canon Specialty Papers and ink tanks for printing photographs can significantly improve the quality of your operating system: In Windows... printed images: Paper and Ink Using recommended Canon paper, specialty media, and inks for this chapter. Printer Driver Settings The printer driver has a variety of settings that affect...if desired. 29 in the User's Guide. In Macintosh z Click ? Your printer automatically adjusts printer settings to "Printing Media" in the upper right corner, then click the feature ...
...printer driver. z Click ? in this printer. See inside the back cover for a list of Canon Specialty Papers and ink tanks for printing photographs can significantly improve the quality of your operating system: In Windows... printed images: Paper and Ink Using recommended Canon paper, specialty media, and inks for this chapter. Printer Driver Settings The printer driver has a variety of settings that affect...if desired. 29 in the User's Guide. In Macintosh z Click ? Your printer automatically adjusts printer settings to "Printing Media" in the upper right corner, then click the feature ...
iP4000 Quick Start Guide
Page 35
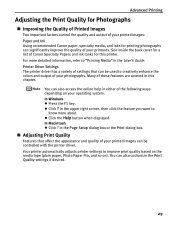
... PRO automatically adjusts the photographs taken with a digital camera. Photo Optimizer PRO is not available. 1 Open the Printer Properties dialog box. In Windows Me, Windows 98, or Windows 95 If Background Printing has been disabled, the Photo Optimizer PRO function is available for unsatisfactory color balance and over- Use this feature to adjust the print quality...
... PRO automatically adjusts the photographs taken with a digital camera. Photo Optimizer PRO is not available. 1 Open the Printer Properties dialog box. In Windows Me, Windows 98, or Windows 95 If Background Printing has been disabled, the Photo Optimizer PRO function is available for unsatisfactory color balance and over- Use this feature to adjust the print quality...

iP4000 Quick Start Guide
Page 36
In Windows Me, Windows 98, or Windows 95 If Background Printing has been disabled, the Vivid Photo function is not available. To use Vivid Photo option: Vivid Photo intensifies background colors such as fields, trees, oceans and skies, while maintaining natural skin tones in the images. Advanced Printing 3 Select the Photo Optimizer PRO check box. 4 Click OK. To use Vivid Photo, select the Vivid Photo check box on the Effects tab. 32
In Windows Me, Windows 98, or Windows 95 If Background Printing has been disabled, the Vivid Photo function is not available. To use Vivid Photo option: Vivid Photo intensifies background colors such as fields, trees, oceans and skies, while maintaining natural skin tones in the images. Advanced Printing 3 Select the Photo Optimizer PRO check box. 4 Click OK. To use Vivid Photo, select the Vivid Photo check box on the Effects tab. 32

iP4000 Quick Start Guide
Page 37
Advanced Printing To use Photo Noise Reduction, select the Photo Noise Reduction check box on the Effects tab. 33 To use Vivid Photo, select the Vivid Photo check box under Special Effects. In Windows Me, Windows 98, or Windows 95 If Background Printing has been disabled, the Photo Noise Reduction function is not available. To reduce noise from images taken with a digital camera: The Photo Noise Reduction function reduces noise from blue portions such as the sky, and dark portions of the images taken with your digital camera.
Advanced Printing To use Photo Noise Reduction, select the Photo Noise Reduction check box on the Effects tab. 33 To use Vivid Photo, select the Vivid Photo check box under Special Effects. In Windows Me, Windows 98, or Windows 95 If Background Printing has been disabled, the Photo Noise Reduction function is not available. To reduce noise from images taken with a digital camera: The Photo Noise Reduction function reduces noise from blue portions such as the sky, and dark portions of the images taken with your digital camera.
iP4000 Quick Start Guide
Page 41
... to read the camera data precisely, producing optimal prints. This enables you to the Photo Application Guide. * Windows XP, Windows 2000, Windows Me, and Windows 98 are supported. ** ExifPrint is compatible with a digital camera and the paper type... on which to print. Internet Explorer 5.5. You can easily print out homepages displayed on or off, if the camera was on Internet Explorer in portrait or night scene mode, etc. Canon BJ Printers...
... to read the camera data precisely, producing optimal prints. This enables you to the Photo Application Guide. * Windows XP, Windows 2000, Windows Me, and Windows 98 are supported. ** ExifPrint is compatible with a digital camera and the paper type... on which to print. Internet Explorer 5.5. You can easily print out homepages displayed on or off, if the camera was on Internet Explorer in portrait or night scene mode, etc. Canon BJ Printers...
iP4000 Quick Start Guide
Page 42
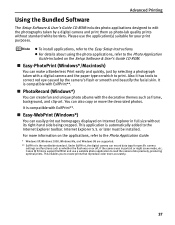
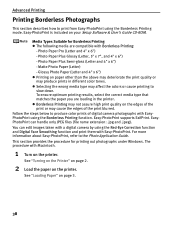
... them with Borderless Printing: - See "Turning on the Printer" on page 2. 2 Load the paper on page 3. 38 Media Types Suitable for printing out photographs under Windows. Follow the steps below to print from Easy-PhotoPrint using the Borderless Printing function. Photo Paper Pro (Letter and 4" x 6") - Photo Paper Plus Glossy (Letter, 5" x 7", and 4" x 6") - For more information...
... them with Borderless Printing: - See "Turning on the Printer" on page 2. 2 Load the paper on page 3. 38 Media Types Suitable for printing out photographs under Windows. Follow the steps below to print from Easy-PhotoPrint using the Borderless Printing function. Photo Paper Pro (Letter and 4" x 6") - Photo Paper Plus Glossy (Letter, 5" x 7", and 4" x 6") - For more information...

iP4000 Quick Start Guide
Page 43
.... (1) Store the photographs you want to open the Easy-PhotoPrint. All photographs in a folder on the hard disk. (2) In Windows, click Start, select All Programs (or Programs), Canon Utilities, Easy- Guidance Thumbnail Folder window 39 3 Ensure that the proper paper source is fed from the Sheet Feeder. Advanced Printing When the Sheet Feeder...
.... (1) Store the photographs you want to open the Easy-PhotoPrint. All photographs in a folder on the hard disk. (2) In Windows, click Start, select All Programs (or Programs), Canon Utilities, Easy- Guidance Thumbnail Folder window 39 3 Ensure that the proper paper source is fed from the Sheet Feeder. Advanced Printing When the Sheet Feeder...

iP4000 Quick Start Guide
Page 45
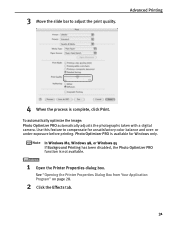
When the confirmation message is displayed, click OK. Advanced Printing (1) Click the Layout/Print tab. (2) Select Borderless (full). (3) In Windows, click Print. In Macintosh, click Print. And then, click Print in the Print dialog box. 41 7 Select the layout and print the photograph.
When the confirmation message is displayed, click OK. Advanced Printing (1) Click the Layout/Print tab. (2) Select Borderless (full). (3) In Windows, click Print. In Macintosh, click Print. And then, click Print in the Print dialog box. 41 7 Select the layout and print the photograph.
iP4000 Quick Start Guide
Page 46
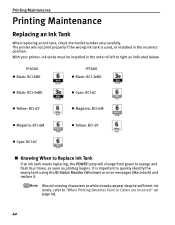
...or installed in the order of left to quickly identify the empty tank using the BJ Status Monitor (Windows) or error messages (Macintosh) and replace it. With your printer, ink tanks must be installed in the incorrect position. Should missing characters or white streaks appear despite... sufficient ink levels, refer to orange and flash four times, as soon as indicated below. iP4000 z Black: BCI-6BK iP3000 z Black:...
...or installed in the order of left to quickly identify the empty tank using the BJ Status Monitor (Windows) or error messages (Macintosh) and replace it. With your printer, ink tanks must be installed in the incorrect position. Should missing characters or white streaks appear despite... sufficient ink levels, refer to orange and flash four times, as soon as indicated below. iP4000 z Black: BCI-6BK iP3000 z Black:...

iP4000 Quick Start Guide
Page 70
... with your desktop to proceed beyond the Printer Port screen Reinstall the printer driver. 1. Click Exit on the desktop. Reinstall the printer driver. Click Start and select My Computer. 2. For non-Windows XP, open software applications before reinstalling the printer driver. ROM is inserted into the CD... inserted the Setup Software & User's Guide CD-ROM into the drive If the printer driver installation did not start installation. Restart the computer. 8. Close all open the My Computer window, and then double-click the CD-ROM icon. Check the cable connection. 7. ...
... with your desktop to proceed beyond the Printer Port screen Reinstall the printer driver. 1. Click Exit on the desktop. Reinstall the printer driver. Click Start and select My Computer. 2. For non-Windows XP, open software applications before reinstalling the printer driver. ROM is inserted into the CD... inserted the Setup Software & User's Guide CD-ROM into the drive If the printer driver installation did not start installation. Restart the computer. 8. Close all open the My Computer window, and then double-click the CD-ROM icon. Check the cable connection. 7. ...
iP4000 Quick Start Guide
Page 71
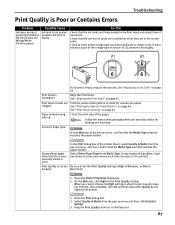
If there remains a part of the paper. Select Other Photo Paper from the pop-up menu, and then confirm that the ink tanks are Print the nozzle check pattern to High in Windows, or Fine in properly Macintosh. 1. Open the Printer Properties dialog box. 2. Select Quality & Media from the pop...Ink tank is empty Try This Check that the Media Type selected matches the paper loaded. Glossy photo paper other than the Canon specialty media is used In the Print dialog box of the printer driver, confirm that they are in (1). clogged See "Printing the Nozzle Check Pattern" on page ...
If there remains a part of the paper. Select Other Photo Paper from the pop-up menu, and then confirm that the ink tanks are Print the nozzle check pattern to High in Windows, or Fine in properly Macintosh. 1. Open the Printer Properties dialog box. 2. Select Quality & Media from the pop...Ink tank is empty Try This Check that the Media Type selected matches the paper loaded. Glossy photo paper other than the Canon specialty media is used In the Print dialog box of the printer driver, confirm that they are in (1). clogged See "Printing the Nozzle Check Pattern" on page ...

iP4000 Quick Start Guide
Page 72
...Intensity setting is too high Try This Use High Resolution Paper, Photo Paper Pro or other Canon specialty paper to widen the clearance between the Print Head and the loaded paper. 1. Reduce the Intensity setting in the BJ Printer Utility dialog box (Macintosh), the setting is used 1. On...open the Custom Setting dialog box. See "Media Types Suitable for Color Adjustment, and then click Set. 3. Open the Printer Properties dialog box. 2. In Windows XP, Windows 2000, and Windows NT 4.0 When not logged on as an administrator, refer to Avoid" on , hold down the RESUME/CANCEL button ...
...Intensity setting is too high Try This Use High Resolution Paper, Photo Paper Pro or other Canon specialty paper to widen the clearance between the Print Head and the loaded paper. 1. Reduce the Intensity setting in the BJ Printer Utility dialog box (Macintosh), the setting is used 1. On...open the Custom Setting dialog box. See "Media Types Suitable for Color Adjustment, and then click Set. 3. Open the Printer Properties dialog box. 2. In Windows XP, Windows 2000, and Windows NT 4.0 When not logged on as an administrator, refer to Avoid" on , hold down the RESUME/CANCEL button ...


