
i550 Quick Start Guide
Page 3
... 22 Printing Maintenance Replacing an Ink Tank 23 When Printing Becomes Faint or Colors are Incorrect 28 Printing the Nozzle Check Pattern 29 Print Head Cleaning 31 Print Head Deep Cleaning 34 Aligning Print Head 36 Troubleshooting Cannot Install the Printer Driver 40 Print Quality ...is Poor or Contains Errors 41 Troubleshooting Printer Hardware 43 Paper Does Not Feed Properly 44 Handling Error Messages 45 An Error Message Appears on the Screen 46 Appendix User's Guide Table of Contents 47 Specifications 48 Safety Precautions 50 Regulatory Information 52 CANON...
... 22 Printing Maintenance Replacing an Ink Tank 23 When Printing Becomes Faint or Colors are Incorrect 28 Printing the Nozzle Check Pattern 29 Print Head Cleaning 31 Print Head Deep Cleaning 34 Aligning Print Head 36 Troubleshooting Cannot Install the Printer Driver 40 Print Quality ...is Poor or Contains Errors 41 Troubleshooting Printer Hardware 43 Paper Does Not Feed Properly 44 Handling Error Messages 45 An Error Message Appears on the Screen 46 Appendix User's Guide Table of Contents 47 Specifications 48 Safety Precautions 50 Regulatory Information 52 CANON...
i550 Quick Start Guide
Page 23
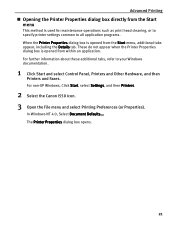
...print head cleaning, or to specify printer settings common to your Windows documentation. 1 Click Start and select Control Panel, Printers and Other Hardware, and then Printers and Faxes. In Windows NT 4.0, Select Document Defaults.... For non-XP Windows, Click Start, select Settings, and then Printers. 2 Select the Canon i550... icon. 3 Open the File menu and select Printing Preferences (or Properties). These do not appear when the Printer Properties dialog box is opened from the...
...print head cleaning, or to specify printer settings common to your Windows documentation. 1 Click Start and select Control Panel, Printers and Other Hardware, and then Printers and Faxes. In Windows NT 4.0, Select Document Defaults.... For non-XP Windows, Click Start, select Settings, and then Printers. 2 Select the Canon i550... icon. 3 Open the File menu and select Printing Preferences (or Properties). These do not appear when the Printer Properties dialog box is opened from the...

i550 Quick Start Guide
Page 29
...do not touch the open ink port. 4 Install the ink tank. (1) Insert the ink tank in the open . An ink tank left out in the print head holder. (2) Press on the "PUSH" mark until the ink tank snaps firmly into place. 5 Close the front cover. Note z To maintain optimal... consumed in the printer may occur even when black-andwhite or grayscale printing is now complete. z Do not re-attach the protective cap once you have removed it out in the open and then reinstalled in the head cleaning and deep cleaning, which are necessary to maintain the printer's capabilities. 27 Color ink...
...do not touch the open ink port. 4 Install the ink tank. (1) Insert the ink tank in the open . An ink tank left out in the print head holder. (2) Press on the "PUSH" mark until the ink tank snaps firmly into place. 5 Close the front cover. Note z To maintain optimal... consumed in the printer may occur even when black-andwhite or grayscale printing is now complete. z Do not re-attach the protective cap once you have removed it out in the open and then reinstalled in the head cleaning and deep cleaning, which are necessary to maintain the printer's capabilities. 27 Color ink...
i550 Quick Start Guide
Page 30
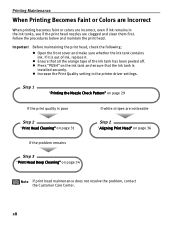
... the ink tanks, see if the print head nozzles are clogged and clean them first. Step 1 "Printing the Nozzle Check Pattern" on page 29 If the print quality is poor Step 2 "Print Head Cleaning" on page 31 If white stripes are noticeable Step 2 "Aligning Print Head" on page 36 If the problem remains Step 3 "Print Head Deep Cleaning" on the ink tank and...
... the ink tanks, see if the print head nozzles are clogged and clean them first. Step 1 "Printing the Nozzle Check Pattern" on page 29 If the print quality is poor Step 2 "Print Head Cleaning" on page 31 If white stripes are noticeable Step 2 "Aligning Print Head" on page 36 If the problem remains Step 3 "Print Head Deep Cleaning" on the ink tank and...

i550 Quick Start Guide
Page 33
... output by the printer. (1) Lines missing here indicate, the print head requires cleaning. Printing Maintenance „ Examining the Nozzle Check Pattern The nozzle check pattern should appear as follows when ink is on. 2 Open the Printer Properties dialog box. See "Aligning Print Head" on page 36 Print Head Cleaning Clean the print head if you suspect that the printer is discharged properly.
... output by the printer. (1) Lines missing here indicate, the print head requires cleaning. Printing Maintenance „ Examining the Nozzle Check Pattern The nozzle check pattern should appear as follows when ink is on. 2 Open the Printer Properties dialog box. See "Aligning Print Head" on page 36 Print Head Cleaning Clean the print head if you suspect that the printer is discharged properly.

i550 Quick Start Guide
Page 34
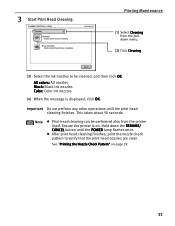
Printing Maintenance 3 Start Print Head Cleaning. (1) Click the Maintenance tab. (2) Click Cleaning. (3) Select the ink nozzles to open the Printer Utility dialog box. 32 All colors: All nozzles Black: Black ink nozzles Color: Color ink nozzles (4) When the message is displayed, click OK. 1 Ensure the printer is on. 2 Open the Printer Utility dialog box. (1) Select Page Setup... in the File menu. (2) Click Utilities to be cleaned, and then click Execute.
Printing Maintenance 3 Start Print Head Cleaning. (1) Click the Maintenance tab. (2) Click Cleaning. (3) Select the ink nozzles to open the Printer Utility dialog box. 32 All colors: All nozzles Black: Black ink nozzles Color: Color ink nozzles (4) When the message is displayed, click OK. 1 Ensure the printer is on. 2 Open the Printer Utility dialog box. (1) Select Page Setup... in the File menu. (2) Click Utilities to be cleaned, and then click Execute.
i550 Quick Start Guide
Page 35
This takes about 50 seconds. Note z Print head cleaning can be performed also from the pulldown menu. (2) Click Cleaning. (3) Select the ink nozzles to verify that the print head nozzles are clean. See "Printing the Nozzle Check Pattern" on . Ensure the printer is displayed, click OK. Printing Maintenance (1) Select Cleaning from the printer itself. All colors: All nozzles Black: Black ink...
This takes about 50 seconds. Note z Print head cleaning can be performed also from the pulldown menu. (2) Click Cleaning. (3) Select the ink nozzles to verify that the print head nozzles are clean. See "Printing the Nozzle Check Pattern" on . Ensure the printer is displayed, click OK. Printing Maintenance (1) Select Cleaning from the printer itself. All colors: All nozzles Black: Black ink...

i550 Quick Start Guide
Page 36
... 3 Start Print Head Deep Cleaning. (1) Click the Maintenace tab (2) Click Deep Cleaning (3) Select the ink nozzles to be cleaned, and then click OK. See "Opening the Printer Properties dialog box directly from the Start menu" on . 2 Open the Printer Properties dialog box. Printing Maintenance Print Head Deep Cleaning If print quality does not improve by standard print head cleaning, try print head deep cleaning, which is...
... 3 Start Print Head Deep Cleaning. (1) Click the Maintenace tab (2) Click Deep Cleaning (3) Select the ink nozzles to be cleaned, and then click OK. See "Opening the Printer Properties dialog box directly from the Start menu" on . 2 Open the Printer Properties dialog box. Printing Maintenance Print Head Deep Cleaning If print quality does not improve by standard print head cleaning, try print head deep cleaning, which is...

i550 Quick Start Guide
Page 37
.... 35 Important The process takes one or two minutes to verify that the print head nozzles are clean. in the File menu. (2) Click Utilities to open the Printer Utility dialog box. 3 Start Print Head Deep Cleaning. (1) Select Cleaning from the pulldown menu. (2) Click Deep Cleaning. (3) Select the ink nozzles to be worn out. All colors: All nozzles Black...
.... 35 Important The process takes one or two minutes to verify that the print head nozzles are clean. in the File menu. (2) Click Utilities to open the Printer Utility dialog box. 3 Start Print Head Deep Cleaning. (1) Select Cleaning from the pulldown menu. (2) Click Deep Cleaning. (3) Select the ink nozzles to be worn out. All colors: All nozzles Black...

i550 Quick Start Guide
Page 43
.... When a specific color is missing from the nozzle check pattern, clean the print head. • If ink supply is uneven: See "Print Head Cleaning" on page 31 • If straight lines are firmly seated in (1). Troubleshooting Print Quality is Poor or Contains Errors Problem Ink does not come out.../ Printing is Blurred/ Colors are Wrong / White Streaks Possible Cause Ink tank is...
.... When a specific color is missing from the nozzle check pattern, clean the print head. • If ink supply is uneven: See "Print Head Cleaning" on page 31 • If straight lines are firmly seated in (1). Troubleshooting Print Quality is Poor or Contains Errors Problem Ink does not come out.../ Printing is Blurred/ Colors are Wrong / White Streaks Possible Cause Ink tank is...
i550 Quick Start Guide
Page 44
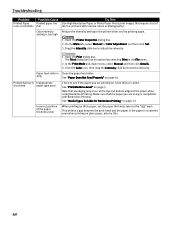
...Clean the paper feed roller. On the Main tab, select Manual for Borderless Printing" on page 13 Incorrect position of the paper thickness lever When printing on thick paper, set the intensity. Make sure that require a lot of Curls or Ink Blots thin ink (i.e. This widens a gap between the print head... and the paper. Troubleshooting Problem Possible Cause Try This Printed Paper Printed paper too Use High Resolution Paper or Photo Paper Pro to print images that the paper you are using Borderless Printing. Open the Printer Properties dialog ...
...Clean the paper feed roller. On the Main tab, select Manual for Borderless Printing" on page 13 Incorrect position of the paper thickness lever When printing on thick paper, set the intensity. Make sure that require a lot of Curls or Ink Blots thin ink (i.e. This widens a gap between the print head... and the paper. Troubleshooting Problem Possible Cause Try This Printed Paper Printed paper too Use High Resolution Paper or Photo Paper Pro to print images that the paper you are using Borderless Printing. Open the Printer Properties dialog ...
i550 Quick Start Guide
Page 47
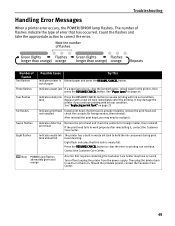
... Center. tank Replace with a new ink tank immediately after reinstalling it . If print head is already installed, remove the print head and not installed check the contacts for foreign matter, then reinstall. print head If the print head fails to hold the ink consumed during print head cleaning. Eight flashes Indicates waste ink tank almost full The printer has a built-in...
... Center. tank Replace with a new ink tank immediately after reinstalling it . If print head is already installed, remove the print head and not installed check the contacts for foreign matter, then reinstall. print head If the print head fails to hold the ink consumed during print head cleaning. Eight flashes Indicates waste ink tank almost full The printer has a built-in...
i550 Quick Start Guide
Page 57
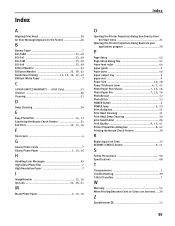
...Print Head 36 An Error Message Appears on the Screen 46 B Banner Paper 7 , BCI-3eBK 23 49 , BCI-3eC 23 49 , BCI-3eM 23 49 , BCI-3eY 23 49 BBBJJoSPrdrtiaentrtuleMssMsonPoirntiointrtoirn..g 1....2....,......1....3....,...12..63..,,...32..92..,,..444323 Brilliant White Paper 7 C CANON LIMITED WARRANTY --- (USA Only 53 Chooser 46 Cleaning 31 D Deep Cleaning... 2 POWER lamp 2 23 Print dialog box 41 Print Head Cleaning 31 Print Head Deep Cleaning 34 print head holder 26 , , Print Quality 9 11 41 , Printer Properties dialog box 8 42 Printing the Nozzle Check Pattern 29 ...
...Print Head 36 An Error Message Appears on the Screen 46 B Banner Paper 7 , BCI-3eBK 23 49 , BCI-3eC 23 49 , BCI-3eM 23 49 , BCI-3eY 23 49 BBBJJoSPrdrtiaentrtuleMssMsonPoirntiointrtoirn..g 1....2....,......1....3....,...12..63..,,...32..92..,,..444323 Brilliant White Paper 7 C CANON LIMITED WARRANTY --- (USA Only 53 Chooser 46 Cleaning 31 D Deep Cleaning... 2 POWER lamp 2 23 Print dialog box 41 Print Head Cleaning 31 Print Head Deep Cleaning 34 print head holder 26 , , Print Quality 9 11 41 , Printer Properties dialog box 8 42 Printing the Nozzle Check Pattern 29 ...

i550 Quick Start Guide
Page 8
... squeeze the sides of the ink tanks as shown in the right position, colors will not be printed correctly. For details, refer to install the other ink tanks in the correct position and carry out print head cleaning. Black Cyan Magenta Yellow 5 Use the same procedure to the User's Guide. 6 Close the front cover...
... squeeze the sides of the ink tanks as shown in the right position, colors will not be printed correctly. For details, refer to install the other ink tanks in the correct position and carry out print head cleaning. Black Cyan Magenta Yellow 5 Use the same procedure to the User's Guide. 6 Close the front cover...
i550 Quick Start Guide
Page 22
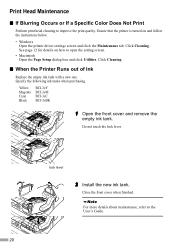
...; If Blurring Occurs or If a Specific Color Does Not Print Perform print head cleaning to the User's Guide. 20 Click Cleaning. „ When the Printer Runs out of Ink Replace ...front cover and remove the empty ink tank. For more details about maintenance, refer to improve the print quality. Close the front cover when finished. See page 12 for details on and follow the instructions ...tab. lock lever 2 Install the new ink tank. Do not touch the lock lever. Click Cleaning. Ensure that the printer is turned on how to open the setting screen. • Macintosh Open the...
...; If Blurring Occurs or If a Specific Color Does Not Print Perform print head cleaning to the User's Guide. 20 Click Cleaning. „ When the Printer Runs out of Ink Replace ...front cover and remove the empty ink tank. For more details about maintenance, refer to improve the print quality. Close the front cover when finished. See page 12 for details on and follow the instructions ...tab. lock lever 2 Install the new ink tank. Do not touch the lock lever. Click Cleaning. Ensure that the printer is turned on how to open the setting screen. • Macintosh Open the...


