
i550 Quick Start Guide
Page 28
... steps. 1 Ensure that the printer is on, and then open the front cover. Printing Maintenance „ Replacing Ink Tanks When ink tanks run out of the ink tank and discard it. 26 remove only the ink tank. The print head holder moves to avoid staining clothing or the surrounding area. Do not touch the...
... steps. 1 Ensure that the printer is on, and then open the front cover. Printing Maintenance „ Replacing Ink Tanks When ink tanks run out of the ink tank and discard it. 26 remove only the ink tank. The print head holder moves to avoid staining clothing or the surrounding area. Do not touch the...

i550 Quick Start Guide
Page 29
... place. 5 Close the front cover. Color ink is specified. Printing Maintenance Important z Do not squeeze the side of first use. The print head holder moves to the right. The ink tank installation process is removed, do not remove it from the printer and leave it . z Color ink consumption... may occur even when black-andwhite or grayscale printing is consumed in the printer may cause...
... place. 5 Close the front cover. Color ink is specified. Printing Maintenance Important z Do not squeeze the side of first use. The print head holder moves to the right. The ink tank installation process is removed, do not remove it from the printer and leave it . z Color ink consumption... may occur even when black-andwhite or grayscale printing is consumed in the printer may cause...

i550 Quick Start Guide
Page 43
...tank is empty Try This Check that the ink tanks are misalign: See "Aligning Print Head" on page 36 Note The ink tank may be clogged with dust or air if the protective cap is replaced after the removal. properly On the Main tab, click High for loading and handling. Media not ...loaded print-side up Incorrect paper type If ink tank is empty: See "Replacing an Ink Tank" on page 31 • If straight lines are firmly seated in the print head and reseat them if...
...tank is empty Try This Check that the ink tanks are misalign: See "Aligning Print Head" on page 36 Note The ink tank may be clogged with dust or air if the protective cap is replaced after the removal. properly On the Main tab, click High for loading and handling. Media not ...loaded print-side up Incorrect paper type If ink tank is empty: See "Replacing an Ink Tank" on page 31 • If straight lines are firmly seated in the print head and reseat them if...
i550 Quick Start Guide
Page 47
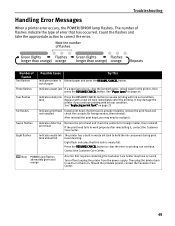
Number of flashes Two flashes Possible Cause Try This Indicates printer is already installed, remove the print head and not installed check the contacts for foreign matter, then reinstall. Eight flash indicates that requires contacting the Customer Care ...error occurs, the POWER/ERROR lamp flashes. It may need to resume printing with a new ink tank immediately after reinstalling it . If print head is Reload paper and press the RESUME/CANCEL button. Seven flashes Indicates defective Remove the print head and check the contacts for foreign matter, then reinstall. Press the ...
Number of flashes Two flashes Possible Cause Try This Indicates printer is already installed, remove the print head and not installed check the contacts for foreign matter, then reinstall. Eight flash indicates that requires contacting the Customer Care ...error occurs, the POWER/ERROR lamp flashes. It may need to resume printing with a new ink tank immediately after reinstalling it . If print head is Reload paper and press the RESUME/CANCEL button. Seven flashes Indicates defective Remove the print head and check the contacts for foreign matter, then reinstall. Press the ...

i550 Quick Start Guide
Page 53
...kept clear at both ends. Do not place metal objects (paper clips, staples, etc.) or containers of small children. Print heads and ink tanks For safety reasons store print heads and ink tanks out of the reach of flammable solvents (alcohol, thinners. Appendix Maintaining the printer Do not attempt to 90...tanks. Caution You may cause injury or damage the printer if you can easily unplug the power cord if necessary. Never remove the plug by pulling on a print head after printing. etc.) on a thick rug or carpet. The metal parts may leak out and stain clothing or the surrounding area....
...kept clear at both ends. Do not place metal objects (paper clips, staples, etc.) or containers of small children. Print heads and ink tanks For safety reasons store print heads and ink tanks out of the reach of flammable solvents (alcohol, thinners. Appendix Maintaining the printer Do not attempt to 90...tanks. Caution You may cause injury or damage the printer if you can easily unplug the power cord if necessary. Never remove the plug by pulling on a print head after printing. etc.) on a thick rug or carpet. The metal parts may leak out and stain clothing or the surrounding area....

i550 Quick Start Guide
Page 6
Do not touch internal parts other than the lock lever. 4 Wait until the POWER lamp remains fully lit. 3 Open the front cover. 4 Remove the tape. 5 Raise the lock lever. Do not place heavy objects on the power cord. • Never use any power supply other than the ...or unplug the power cord when your hands are wet. • Never damage, modify, stretch, or excessively bend or twist the power cord. 3 Installing the Print Head • Never attempt to operate. The POWER lamp flashes and the printer begins to plug the power cord into the power outlet. „ Installing the...
Do not touch internal parts other than the lock lever. 4 Wait until the POWER lamp remains fully lit. 3 Open the front cover. 4 Remove the tape. 5 Raise the lock lever. Do not place heavy objects on the power cord. • Never use any power supply other than the ...or unplug the power cord when your hands are wet. • Never damage, modify, stretch, or excessively bend or twist the power cord. 3 Installing the Print Head • Never attempt to operate. The POWER lamp flashes and the printer begins to plug the power cord into the power outlet. „ Installing the...

i550 Quick Start Guide
Page 7
...; Installing the Ink Tanks • For safety reasons, store ink tanks out of the reach of the arrow and remove the clear film. 5 print head print head holder 6 Remove the protective cap from the print head. • Do not touch the print head nozzles or electrical contacts. • Do not attempt to reattach the protective cap once it has been...
...; Installing the Ink Tanks • For safety reasons, store ink tanks out of the reach of the arrow and remove the clear film. 5 print head print head holder 6 Remove the protective cap from the print head. • Do not touch the print head nozzles or electrical contacts. • Do not attempt to reattach the protective cap once it has been...

i550 Quick Start Guide
Page 8
... User's Guide. 6 Close the front cover. Immediately reinstall the tank in their appropriate slots. Wait until it has been removed. protective cap 3 Hold the ink tank as shown in the diagram and remove the protective cap. • Do not squeeze the sides of the ink tanks as this may cause the ink... the ink tanks in the positions specified by the labels. • If ink tanks are not installed in the right position, colors will not be printed correctly. Black Cyan Magenta Yellow 5 Use the same procedure to install the other ink tanks in the correct position and carry out...
... User's Guide. 6 Close the front cover. Immediately reinstall the tank in their appropriate slots. Wait until it has been removed. protective cap 3 Hold the ink tank as shown in the diagram and remove the protective cap. • Do not squeeze the sides of the ink tanks as this may cause the ink... the ink tanks in the positions specified by the labels. • If ink tanks are not installed in the right position, colors will not be printed correctly. Black Cyan Magenta Yellow 5 Use the same procedure to install the other ink tanks in the correct position and carry out...
i550 Quick Start Guide
Page 22
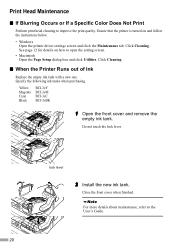
... turned on how to the User's Guide. 20 Yellow Magenta Cyan Black BCI-3eY BCI-3eM BCI-3eC BCI-3eBK 1 Open the front cover and remove the empty ink tank. Print Head Maintenance „ If Blurring Occurs or If a Specific Color Does Not...
... turned on how to the User's Guide. 20 Yellow Magenta Cyan Black BCI-3eY BCI-3eM BCI-3eC BCI-3eBK 1 Open the front cover and remove the empty ink tank. Print Head Maintenance „ If Blurring Occurs or If a Specific Color Does Not...
i550 Easy Setup Instructions
Page 1
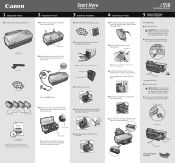
...discard the orange protective cap. Start Here Easy Setup Instructions 3 Install the Print Head 1 Remove the print head from the front and sides of the USB cable to the computer, the other to a power outlet. Print Nozzle Electrical Contacts 3 Raise the gray lock lever. IMPORTANT: Be sure printer...Black BCI-3eY Yellow 3 Open the front cover. NOTE: Do not touch the electrical contacts. Documentation and Software Kit NOTE: The "i550 Setup Software & User's Guide" CD-ROM contains printer drivers, software applications and electronic manuals. NOTE: To avoid spilling ink, never ...
...discard the orange protective cap. Start Here Easy Setup Instructions 3 Install the Print Head 1 Remove the print head from the front and sides of the USB cable to the computer, the other to a power outlet. Print Nozzle Electrical Contacts 3 Raise the gray lock lever. IMPORTANT: Be sure printer...Black BCI-3eY Yellow 3 Open the front cover. NOTE: Do not touch the electrical contacts. Documentation and Software Kit NOTE: The "i550 Setup Software & User's Guide" CD-ROM contains printer drivers, software applications and electronic manuals. NOTE: To avoid spilling ink, never ...


