Instruction Manual
Page 2
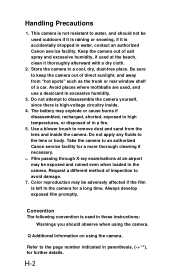
...following convention is left In the camera for a long time. Refer to keep the camera out of direct sunlight, and away from the lens and inside . 4. Be sure to the page number indicated in the camera. Q Additional Information on using the camera. H-2 Use a blower brush to.... Always develop exposed film promptly. This camera is accidentaiiy dropped in excessive humidity. 3. The battery may be used , and use a desiccant in water, contact an authorized Canon sen/ice faciiity. Keep the camera out of a car. Take the camera to high temperatures, or disposed of inspection...
...following convention is left In the camera for a long time. Refer to keep the camera out of direct sunlight, and away from the lens and inside . 4. Be sure to the page number indicated in the camera. Q Additional Information on using the camera. H-2 Use a blower brush to.... Always develop exposed film promptly. This camera is accidentaiiy dropped in excessive humidity. 3. The battery may be used , and use a desiccant in water, contact an authorized Canon sen/ice faciiity. Keep the camera out of a car. Take the camera to high temperatures, or disposed of inspection...
Instruction Manual
Page 4
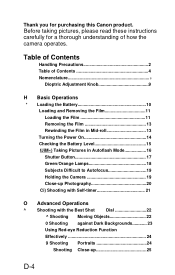
... in Mid-roll 13 Turning the Power On 14 Checking the Battery Level 15 fJiM«) Taking Pictures in Autoflash Mode 16 Shutter Button...to Autofocus 19 Holding the Camera 19 Close-up Photography 20 Ci) Shooting with Self-timer 21 O Advanced Operations ^ Shooting with the Best Shot Dial 22 ^ Shooting Moving... Objects 22 0 Shooting against Dark Backgrounds 23 Using Red-eye Reduction Function Effectively 24 9 Shooting Portraits 24 Shooting Close-up 25 D-4 Before taking pictures, please read these instructions carefully for purchasing this Canon...
... in Mid-roll 13 Turning the Power On 14 Checking the Battery Level 15 fJiM«) Taking Pictures in Autoflash Mode 16 Shutter Button...to Autofocus 19 Holding the Camera 19 Close-up Photography 20 Ci) Shooting with Self-timer 21 O Advanced Operations ^ Shooting with the Best Shot Dial 22 ^ Shooting Moving... Objects 22 0 Shooting against Dark Backgrounds 23 Using Red-eye Reduction Function Effectively 24 9 Shooting Portraits 24 Shooting Close-up 25 D-4 Before taking pictures, please read these instructions carefully for purchasing this Canon...

Instruction Manual
Page 5
...; ..33 Imprinting the Date and Time 34 Setting the Date and Time 34 Imprinting Captions 36 O ■ Additional Information * Troubleshooting 38 Major Specifications 40 1 Please note that these instructions are for both the model with the wMihUh symbol. Information relevant only to the model with the caption function is available for all shots 27 ®...
...; ..33 Imprinting the Date and Time 34 Setting the Date and Time 34 Imprinting Captions 36 O ■ Additional Information * Troubleshooting 38 Major Specifications 40 1 Please note that these instructions are for both the model with the wMihUh symbol. Information relevant only to the model with the caption function is available for all shots 27 ®...

Instruction Manual
Page 7
Vi«wfin(ier Orange famp (-+ 18) Green lamp (-♦ 18) EE Zoom-cut (wide-angle)/ Selection eazsa button H 16. 35, 37) m Zoom-in parenthesis, {-> **), for further details. Nomenclature Refer to push the ►►© button. Best shot dial 22) Battery compartment cover 10) Attaching the Strap * Use the strap buckle pin to the page number indicated in (telephoto)/ Set cssszza button (-> 16. 34-37) Strap buckle pin** Q Center-point AF button (-» 29) ►t© Mid-roll rewind button (-»13) Tripod socket----------
Vi«wfin(ier Orange famp (-+ 18) Green lamp (-♦ 18) EE Zoom-cut (wide-angle)/ Selection eazsa button H 16. 35, 37) m Zoom-in parenthesis, {-> **), for further details. Nomenclature Refer to push the ►►© button. Best shot dial 22) Battery compartment cover 10) Attaching the Strap * Use the strap buckle pin to the page number indicated in (telephoto)/ Set cssszza button (-> 16. 34-37) Strap buckle pin** Q Center-point AF button (-» 29) ►t© Mid-roll rewind button (-»13) Tripod socket----------
Instruction Manual
Page 8
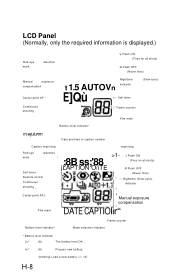
Self-timer |'' Frame counter (Slow-sync) Film mark Battery level indicator* m.wjuiunm Date and time or caption number Caption imprinting im p rin tin g Red-eye reduction mark S e lf-tim e r/ ! ;8B ss;'88 jLAPTION O/iTE Remote control Continuous shooting _ >1- Is^ (lit) Prepare new battery. (blinking) Load a new battery. (-> 10) H-8 Nighttime (Slow-sync) indicator Center-point AF ■ Film...
Self-timer |'' Frame counter (Slow-sync) Film mark Battery level indicator* m.wjuiunm Date and time or caption number Caption imprinting im p rin tin g Red-eye reduction mark S e lf-tim e r/ ! ;8B ss;'88 jLAPTION O/iTE Remote control Continuous shooting _ >1- Is^ (lit) Prepare new battery. (blinking) Load a new battery. (-> 10) H-8 Nighttime (Slow-sync) indicator Center-point AF ■ Film...

Instruction Manual
Page 10
end first. ^The [™> appears on the LCD panel blinks. Close the battery cover. • Push the cover closed until you hear a clicking sound. ^ The date display on the LCD panel. Set the date and time. (-> 34) LS-IO terminals correctly and insert the battery - Loading the Battery Applicable Battery: One lithium battery (CR123A/DL123A) Open the battery cover. •To open, insert a coin into the slot. Load a new battery. • Align the + -
end first. ^The [™> appears on the LCD panel blinks. Close the battery cover. • Push the cover closed until you hear a clicking sound. ^ The date display on the LCD panel. Set the date and time. (-> 34) LS-IO terminals correctly and insert the battery - Loading the Battery Applicable Battery: One lithium battery (CR123A/DL123A) Open the battery cover. •To open, insert a coin into the slot. Load a new battery. • Align the + -

Instruction Manual
Page 14
Turning the Power On Turn the best shot dial to a setting other than OFF. ^ The lens is initially set to the wide-angle position. • When you set the best shot dial to OFF, the lens retracts, the lens cover closes and the camera switches off. • When you switch the camera off, the dispiay on the LCD panei does not disappear. • • Do not push on the lens with your hand. • If the lens is not set for shooting, check to see if the battery is loaded correctly. (-»10) [1-14
Turning the Power On Turn the best shot dial to a setting other than OFF. ^ The lens is initially set to the wide-angle position. • When you set the best shot dial to OFF, the lens retracts, the lens cover closes and the camera switches off. • When you switch the camera off, the dispiay on the LCD panei does not disappear. • • Do not push on the lens with your hand. • If the lens is not set for shooting, check to see if the battery is loaded correctly. (-»10) [1-14
Instruction Manual
Page 15
... If you turn the power on. H-15 Checking the Battery Level Check that appears on the LCD panel when you are travelling or plan to take a lot of pictures, take consecutive shots using the flash, the battery level may drop off and wait a few minutes before switching...exposure film (based on Canon's Standard Test Method at your destination. • When you take a supply of spare batteries. If this occurs, switch the camera off temporarily and prevent the LCD panel from displaying information correctly. Change the battery if displayed. A new battery will generally provide enough ...
... If you turn the power on. H-15 Checking the Battery Level Check that appears on the LCD panel when you are travelling or plan to take a lot of pictures, take consecutive shots using the flash, the battery level may drop off and wait a few minutes before switching...exposure film (based on Canon's Standard Test Method at your destination. • When you take a supply of spare batteries. If this occurs, switch the camera off temporarily and prevent the LCD panel from displaying information correctly. Change the battery if displayed. A new battery will generally provide enough ...

Instruction Manual
Page 31
...can use the remote control (RC-5) to 5 m /16.4 ft. Take the picture. • Point the remote control towards the sensor on the camera and press the transmitter button ^ The red-eye reduction lamp blinks 4 times a second (or remains iit when red-eye reduction is used) and ... again, 0| disappears and remote control mode is reieased approximately 2 seconds later [1-31 in front of the camera. Transmitlar button Battery holder Transmitter Remote control sensor Battery holder release button Set the camera to remote control mode. • Press the Ci)i button. ^ 01 appears on the LCD panel to...
...can use the remote control (RC-5) to 5 m /16.4 ft. Take the picture. • Point the remote control towards the sensor on the camera and press the transmitter button ^ The red-eye reduction lamp blinks 4 times a second (or remains iit when red-eye reduction is used) and ... again, 0| disappears and remote control mode is reieased approximately 2 seconds later [1-31 in front of the camera. Transmitlar button Battery holder Transmitter Remote control sensor Battery holder release button Set the camera to remote control mode. • Press the Ci)i button. ^ 01 appears on the LCD panel to...

Instruction Manual
Page 32
... light. Replacing the Remote Control Battery Replace the battery when you slide the battery holder out Load a new battery into the holder and fit the holder back into the remote controi. • Ensure that Ci)f is displayed. • Set the camera on a steady surface or use a tripod. Q] • Remote control shots can no longer use the...
... light. Replacing the Remote Control Battery Replace the battery when you slide the battery holder out Load a new battery into the holder and fit the holder back into the remote controi. • Ensure that Ci)f is displayed. • Set the camera on a steady surface or use a tripod. Q] • Remote control shots can no longer use the...

Instruction Manual
Page 34
Imprinting the Date and Time Select the Date mode. < Y e a r/M o n lh /D a y>
Imprinting the Date and Time Select the Date mode. < Y e a r/M o n lh /D a y>

Instruction Manual
Page 35
...zero. ® Press the button and o n c e s t o p s blinking, date and time setting is blinking resets the seconds (:) setting to -shoot mode. If you replace the battery, the date display on the final shots. Pressing the button while is completed. Q] • Each time you use film without DXcode, ...it may not be possible to imprint the date and time or caption on the LCD panel reverts to select ...
...zero. ® Press the button and o n c e s t o p s blinking, date and time setting is blinking resets the seconds (:) setting to -shoot mode. If you replace the battery, the date display on the final shots. Pressing the button while is completed. Q] • Each time you use film without DXcode, ...it may not be possible to imprint the date and time or caption on the LCD panel reverts to select ...

Instruction Manual
Page 38
Troubleshooting In case of the camera when pressing the shutter button Page 10 10 10 10 14 10 11 11, 13 23 26 19 21 [1-38 Cause •The battery is exhausted • No battery is loaded. •The battery is loaded with the wrong polarities. •The battery is co m p le te ly ...in front of problems, check the table below before taking your hair, fingers etc. •Make sure that the AF sensor is not obscured by your camera to be repaired. Problem The blinks on . •Replace the battery •Reload the film correctly. •Remove the film and load a new one. •...
Troubleshooting In case of the camera when pressing the shutter button Page 10 10 10 10 14 10 11 11, 13 23 26 19 21 [1-38 Cause •The battery is exhausted • No battery is loaded. •The battery is loaded with the wrong polarities. •The battery is co m p le te ly ...in front of problems, check the table below before taking your hair, fingers etc. •Make sure that the AF sensor is not obscured by your camera to be repaired. Problem The blinks on . •Replace the battery •Reload the film correctly. •Remove the film and load a new one. •...

Instruction Manual
Page 39
When the "H" disappears from the camera. Troubleshooting Problem The photographs are blurred. (continued) "H" is displayed on the LCD panel Cause •The camera moved when you pressed the shutter button (camera shake). •The AF sensor or lens is dirty. •The self-diagnosis function detected an error Remedy »Press the shutter button slowly and gently. •Wipe them clean •Remove the battery from the LCD panel, load the battery again Page 17 17 10 D-39
When the "H" disappears from the camera. Troubleshooting Problem The photographs are blurred. (continued) "H" is displayed on the LCD panel Cause •The camera moved when you pressed the shutter button (camera shake). •The AF sensor or lens is dirty. •The self-diagnosis function detected an error Remedy »Press the shutter button slowly and gently. •Wipe them clean •Remove the battery from the LCD panel, load the battery again Page 17 17 10 D-39
Instruction Manual
Page 41
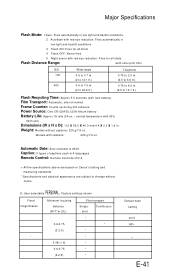
.... 2 Autoflash with captions: 225 g/7.9 oz. Fires for all shots. 4 Flash OFF: Never fires. 5 Night scene with red-eye reduction: Fires for all shots Flash Distance Range: ...battery Battery Life: Approx 18 rolls (24-ex. • normal temperature with 50% flash use) Dimensions (W x H x D): 112 x 59.5 x 40.3 mm/4.4 x 2.3 x 1.9 in 4 languages Remote Control: Remote Controller RC-5 > All the specifications above are based on Canon's testing and measuring standards. * Specifications and physical appearance are subject to 2049. Automatic Date: Auto calendar to change without captions...
.... 2 Autoflash with captions: 225 g/7.9 oz. Fires for all shots. 4 Flash OFF: Never fires. 5 Night scene with red-eye reduction: Fires for all shots Flash Distance Range: ...battery Battery Life: Approx 18 rolls (24-ex. • normal temperature with 50% flash use) Dimensions (W x H x D): 112 x 59.5 x 40.3 mm/4.4 x 2.3 x 1.9 in 4 languages Remote Control: Remote Controller RC-5 > All the specifications above are based on Canon's testing and measuring standards. * Specifications and physical appearance are subject to 2049. Automatic Date: Auto calendar to change without captions...

