Instruction Manual
Page 2
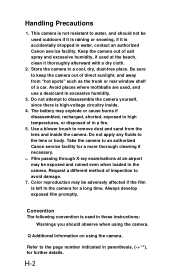
... inspection to the lens or body. Always develop exposed film promptly. This camera is not resistant to an authorized Canon service facility for further details. The battery may be used outdoors if it is raining or snowing, if it thoroughiy afterward with a dry cioth. 2. Do not apply any fluids to avoid damage. 7. Request a different method of direct sunlight, and away...
... inspection to the lens or body. Always develop exposed film promptly. This camera is not resistant to an authorized Canon service facility for further details. The battery may be used outdoors if it is raining or snowing, if it thoroughiy afterward with a dry cioth. 2. Do not apply any fluids to avoid damage. 7. Request a different method of direct sunlight, and away...
Instruction Manual
Page 4
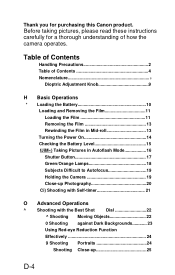
... Adjustment Knob 9 H Basic Operations * Loading the Battery 10 Loading and Removing the Film 11 Loading the Film 11 Removing the Film 13 Rewinding the Film in Mid-roll 13 Turning the Power On 14 Checking the Battery Level 15 fJiM«) Taking Pictures in Autoflash Mode 16 Shutter Button 17 Green/Orange Lamps 18 Subjects Difficult to Autofocus 19 Holding the Camera 19 Close-up Photography 20 Ci) Shooting with Self-timer 21 O Advanced Operations ^ Shooting with the Best Shot Dial...
... Adjustment Knob 9 H Basic Operations * Loading the Battery 10 Loading and Removing the Film 11 Loading the Film 11 Removing the Film 13 Rewinding the Film in Mid-roll 13 Turning the Power On 14 Checking the Battery Level 15 fJiM«) Taking Pictures in Autoflash Mode 16 Shutter Button 17 Green/Orange Lamps 18 Subjects Difficult to Autofocus 19 Holding the Camera 19 Close-up Photography 20 Ci) Shooting with Self-timer 21 O Advanced Operations ^ Shooting with the Best Shot Dial...

Instruction Manual
Page 5
... the Date and Time 34 Setting the Date and Time 34 Imprinting Captions 36 O ■ Additional Information * Troubleshooting 38 Major Specifications 40 1 Please note that these instructions are for both the model with Remote Control «sia 31 Replacing the Remote Control Battery 32 IMODEI Imprinting the Date and Time etc. SPOT Shooting Very Bright or Very Dark Subjects 25 I PEBSONAL Shooting with Customized Mode Functions 25 Changing the Flash Mode 26...
... the Date and Time 34 Setting the Date and Time 34 Imprinting Captions 36 O ■ Additional Information * Troubleshooting 38 Major Specifications 40 1 Please note that these instructions are for both the model with Remote Control «sia 31 Replacing the Remote Control Battery 32 IMODEI Imprinting the Date and Time etc. SPOT Shooting Very Bright or Very Dark Subjects 25 I PEBSONAL Shooting with Customized Mode Functions 25 Changing the Flash Mode 26...

Instruction Manual
Page 7
Nomenclature Refer to push the ►►© button. Best shot dial 22) Battery compartment cover 10) Attaching the Strap * Use the strap buckle pin to the page number indicated in (telephoto)/ Set cssszza button (-> 16. 34-37) Strap buckle pin** Q Center-point AF button (-» 29) ►t© Mid-roll rewind button (-»13) Tripod socket---------- Vi«wfin(ier Orange famp (-+ 18) Green lamp (-♦ 18) EE Zoom-cut (wide-angle)/ Selection eazsa button H 16. 35, 37) m Zoom-in parenthesis, {-> **), for further details.
Nomenclature Refer to push the ►►© button. Best shot dial 22) Battery compartment cover 10) Attaching the Strap * Use the strap buckle pin to the page number indicated in (telephoto)/ Set cssszza button (-> 16. 34-37) Strap buckle pin** Q Center-point AF button (-» 29) ►t© Mid-roll rewind button (-»13) Tripod socket---------- Vi«wfin(ier Orange famp (-+ 18) Green lamp (-♦ 18) EE Zoom-cut (wide-angle)/ Selection eazsa button H 16. 35, 37) m Zoom-in parenthesis, {-> **), for further details.
Instruction Manual
Page 8
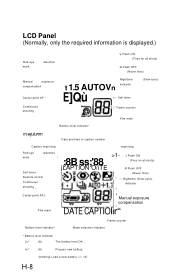
... new battery. (blinking) Load a new battery. (-> 10) H-8 Self-timer |'' Frame counter (Slow-sync) Film mark Battery level indicator* m.wjuiunm Date and time or caption number Caption imprinting im p rin tin g Red-eye reduction mark S e lf-tim e r/ ! ;8B ss;'88 jLAPTION O/iTE Remote control Continuous shooting _ >1- J Flash ON (Fires lor all shots) ® Flash OFF (Never fires) Manual exposure- Nighttime (Slow-sync) indicator Center-point AF ■ Film mark Battery level indicator* Manual exposure compensation DATE CAPTIOlir" Frame counter Mode...
... new battery. (blinking) Load a new battery. (-> 10) H-8 Self-timer |'' Frame counter (Slow-sync) Film mark Battery level indicator* m.wjuiunm Date and time or caption number Caption imprinting im p rin tin g Red-eye reduction mark S e lf-tim e r/ ! ;8B ss;'88 jLAPTION O/iTE Remote control Continuous shooting _ >1- J Flash ON (Fires lor all shots) ® Flash OFF (Never fires) Manual exposure- Nighttime (Slow-sync) indicator Center-point AF ■ Film mark Battery level indicator* Manual exposure compensation DATE CAPTIOlir" Frame counter Mode...

Instruction Manual
Page 14
Turning the Power On Turn the best shot dial to a setting other than OFF. ^ The lens is initially set to the wide-angle position. • When you set the best shot dial to OFF, the lens retracts, the lens cover closes and the camera switches off. • When you switch the camera off, the dispiay on the LCD panei does not disappear. • • Do not push on the lens with your hand. • If the lens is not set for shooting, check to see if the battery is loaded correctly. (-»10) [1-14
Turning the Power On Turn the best shot dial to a setting other than OFF. ^ The lens is initially set to the wide-angle position. • When you set the best shot dial to OFF, the lens retracts, the lens cover closes and the camera switches off. • When you switch the camera off, the dispiay on the LCD panei does not disappear. • • Do not push on the lens with your hand. • If the lens is not set for shooting, check to see if the battery is loaded correctly. (-»10) [1-14
Instruction Manual
Page 15
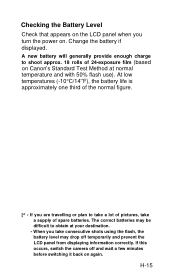
...-exposure film (based on Canon's Standard Test Method at normal temperature and with 50% flash use). The correct batteries may drop off and wait a few minutes before switching it back on . Change the battery if displayed. A new battery will generally provide enough charge to obtain at your destination. • When you are travelling or plan to take a lot of pictures, take consecutive shots using...
...-exposure film (based on Canon's Standard Test Method at normal temperature and with 50% flash use). The correct batteries may drop off and wait a few minutes before switching it back on . Change the battery if displayed. A new battery will generally provide enough charge to obtain at your destination. • When you are travelling or plan to take a lot of pictures, take consecutive shots using...
Instruction Manual
Page 17
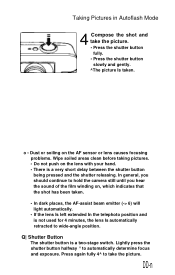
... hand. • There is a two-stage switch. Lightly press the shutter button halfway ^ to take the picture. • Press the shutter button fully. • Press the shutter button slowly and gently. ^The picture Is taken. In general, you should continue to wide-angle position. DD-n Taking Pictures in Autoflash Mode 4 Compose the shot and take the picture. Press again fully 4^ to automatically determine focus and exposure.
... hand. • There is a two-stage switch. Lightly press the shutter button halfway ^ to take the picture. • Press the shutter button fully. • Press the shutter button slowly and gently. ^The picture Is taken. In general, you should continue to wide-angle position. DD-n Taking Pictures in Autoflash Mode 4 Compose the shot and take the picture. Press again fully 4^ to automatically determine focus and exposure.

Instruction Manual
Page 19
... recompose the shot. animals in a cage • Subjects with the following characferistics thaf cannot be brought into contact with the lens, the AF sensor or the flash. ■ Place the tip of which are in the distance, e.g. If this happens, lock the focus on the shutter button. Taking Pictures in Autofiash Mode Subjects Difficult to Autofocus The green lamp blinks 16 times per...
... recompose the shot. animals in a cage • Subjects with the following characferistics thaf cannot be brought into contact with the lens, the AF sensor or the flash. ■ Place the tip of which are in the distance, e.g. If this happens, lock the focus on the shutter button. Taking Pictures in Autofiash Mode Subjects Difficult to Autofocus The green lamp blinks 16 times per...
Instruction Manual
Page 20
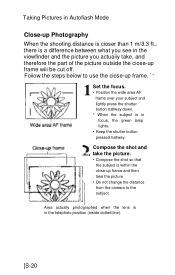
... the subject is in the viewfinder and the picture you see in focus, the green lamp lights. • Keep the shutter button pressed halfway. Taking Pictures in Autofiash Mode Close-up Photography When the shooting distance is cioser than 1 m/3.3 ft., there is a difference between what you actuaiiy take the picture • Do not change the distance from the camera to use the ciose-up frame...
... the subject is in the viewfinder and the picture you see in focus, the green lamp lights. • Keep the shutter button pressed halfway. Taking Pictures in Autofiash Mode Close-up Photography When the shooting distance is cioser than 1 m/3.3 ft., there is a difference between what you actuaiiy take the picture • Do not change the distance from the camera to use the ciose-up frame...
Instruction Manual
Page 22
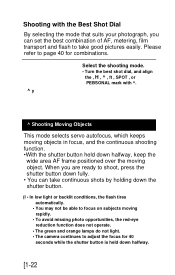
... the shooting mode. • Turn the best shot dial, and align the , H , ^ , ft , SPOT , or PEBSONAL mark with the Best Shot Dial By selecting the mode that suits your photograph, you are ready to shoot, press the shutter button down fully. • You can set the best combination of AF, metering, film transport and flash to take continuous shots by holding down the shutter button. (I • In low light or...
... the shooting mode. • Turn the best shot dial, and align the , H , ^ , ft , SPOT , or PEBSONAL mark with the Best Shot Dial By selecting the mode that suits your photograph, you are ready to shoot, press the shutter button down fully. • You can set the best combination of AF, metering, film transport and flash to take continuous shots by holding down the shutter button. (I • In low light or...
Instruction Manual
Page 23
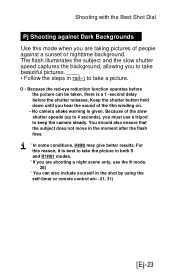
...;1И81 modes. ' If you must use the ® mode. 26) ' You can be taken, there is given. Keep the shutter button held down until you are shooting a night scene only, use a tripod to keep the camera steady. Because of peopie against Dark Backgrounds Use this reason, it is best to take a picture. The flash illuminates the subject and the slow shutter speed captures the...
...;1И81 modes. ' If you must use the ® mode. 26) ' You can be taken, there is given. Keep the shutter button held down until you are shooting a night scene only, use a tripod to keep the camera steady. Because of peopie against Dark Backgrounds Use this reason, it is best to take a picture. The flash illuminates the subject and the slow shutter speed captures the...
Instruction Manual
Page 24
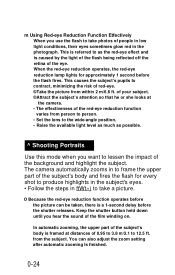
.... Keep the shutter button held down until you use the flash to lessen the impact of the background and highlight the subject. You can be taken, there is referred to as possible. ^ Shooting Portraits Use this mode when you want to take a picture. O Because the red-eye reduction function operates before the picture can also adjust the zoom setting after automatic zooming Is finished...
.... Keep the shutter button held down until you use the flash to lessen the impact of the background and highlight the subject. You can be taken, there is referred to as possible. ^ Shooting Portraits Use this mode when you want to take a picture. O Because the red-eye reduction function operates before the picture can also adjust the zoom setting after automatic zooming Is finished...

Instruction Manual
Page 25
... PERSONAL mode are stored In memory. to the subject to 48 cm/1.6 ft. Shooting with the Best Shot Dial ^ Shooting Close-up Use this mode when you want to take close-up . 26, 29). •When you turn the best shot dial to a mode other than PERSONAL, the functions you can get as close to take pictures using these functions simply by setting the best shot dial...
... PERSONAL mode are stored In memory. to the subject to 48 cm/1.6 ft. Shooting with the Best Shot Dial ^ Shooting Close-up Use this mode when you want to take close-up . 26, 29). •When you turn the best shot dial to a mode other than PERSONAL, the functions you can get as close to take pictures using these functions simply by setting the best shot dial...
Instruction Manual
Page 28
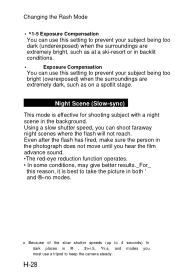
... dark places in ® , $)+i.5, ^hi.s, and modes you can use a tripod to take the picture in both ' and ®«no modes. Using a slow shutter speed, you must use this reason, it is effective for shooting subject with a night scene in the background. Night Scene (Slow-sync) This mode is best to keep the camera steady. Changing the Rash Mode • ^1-5 Exposure Compensation You can use this setting to...
... dark places in ® , $)+i.5, ^hi.s, and modes you can use a tripod to take the picture in both ' and ®«no modes. Using a slow shutter speed, you must use this reason, it is effective for shooting subject with a night scene in the background. Night Scene (Slow-sync) This mode is best to keep the camera steady. Changing the Rash Mode • ^1-5 Exposure Compensation You can use this setting to...

Instruction Manual
Page 32
...)f is displayed. • Set the camera on the camera is close to a fluorescent light during signal reception. Battery: one CR2032 lithium battery • 1 Pull out the battery holder. • CD Use a pen or other pointed implement to push in the release button (D as you can be possibie if the remote controi sensor on a steady surface or use the self-timer to sunlight or...
...)f is displayed. • Set the camera on the camera is close to a fluorescent light during signal reception. Battery: one CR2032 lithium battery • 1 Pull out the battery holder. • CD Use a pen or other pointed implement to push in the release button (D as you can be possibie if the remote controi sensor on a steady surface or use the self-timer to sunlight or...

Instruction Manual
Page 35
... you replace the battery, the date display on the final shots. Setting position cycles through in the order year-month-dayhour-minute-(:). ® Press the button to set all digits of the date and time. If kept pressed, the number increases continuously. Q] • Each time you use film without DXcode, it may not be possible to -shoot mode. o Use only film with DX-code. lE-35 Csi} Set the date and time. ©...
... you replace the battery, the date display on the final shots. Setting position cycles through in the order year-month-dayhour-minute-(:). ® Press the button to set all digits of the date and time. If kept pressed, the number increases continuously. Q] • Each time you use film without DXcode, it may not be possible to -shoot mode. o Use only film with DX-code. lE-35 Csi} Set the date and time. ©...

Instruction Manual
Page 38
... battery. •Reload the battery correctly. ■Replace the battery •Turn the power on. •Replace the battery •Reload the film correctly. •Remove the film and load a new one. •Hold the shutter button down until the shutter releases. •Change the flash mode •Ensure that the AF sensor is not displayed on the LCD panel. The 119 is not obscured by your camera to be repaired. Problem The blinks...
... battery. •Reload the battery correctly. ■Replace the battery •Turn the power on. •Replace the battery •Reload the film correctly. •Remove the film and load a new one. •Hold the shutter button down until the shutter releases. •Change the flash mode •Ensure that the AF sensor is not displayed on the LCD panel. The 119 is not obscured by your camera to be repaired. Problem The blinks...
Instruction Manual
Page 40
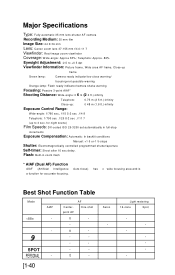
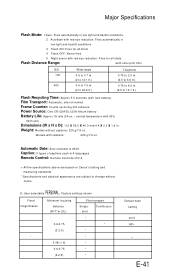
...: Automatic: In backlit conditions Manual: +1 5 or-1 5-stops Shutter: Electromagnetically controlled programmed shutter/aperture Self-timer: Shoot after 10 sec delay. Major Specifications Type: Fully-automatic 35 mm lens-shutter AF camera Recording Medium: 35 mm film Image Size: 24 x 36 mm Lens: Canon zoom lens 37-155 mm f/4.0-11 7 Viewfinder: Real-image zoom viewfinder Coverage: W ide-angle: Approx 83% ; Best Shot Function Table Mode f/25 8-2 sec , f/11 7 (up : Exposure Control Range: 0 48 m (1.6 ft,)-infinity Wide-angle: 1/790...
...: Automatic: In backlit conditions Manual: +1 5 or-1 5-stops Shutter: Electromagnetically controlled programmed shutter/aperture Self-timer: Shoot after 10 sec delay. Major Specifications Type: Fully-automatic 35 mm lens-shutter AF camera Recording Medium: 35 mm film Image Size: 24 x 36 mm Lens: Canon zoom lens 37-155 mm f/4.0-11 7 Viewfinder: Real-image zoom viewfinder Coverage: W ide-angle: Approx 83% ; Best Shot Function Table Mode f/25 8-2 sec , f/11 7 (up : Exposure Control Range: 0 48 m (1.6 ft,)-infinity Wide-angle: 1/790...
Instruction Manual
Page 41
.... * Specifications and physical appearance are subject to 2049. User-selectable : Factory settings shown Fixed m a g n ifica iio n • Minimum focusing distance (W-T*m (ft.)) 0.6-0.75 (2-2.5) 0.48 (1 6) 0.6-0.75 (2-2.5) Film transport Single shot Ccnitlnuous • • • • • • • Default flash setting ennii HP» » E-41 Models with 50% flash use) Dimensions (W x H x D): 112 x 59.5 x 40.3 mm/4.4 x 2.3 x 1.9 in low light and backlit conditions 3 Flash ON; Automatic Date: Auto...
.... * Specifications and physical appearance are subject to 2049. User-selectable : Factory settings shown Fixed m a g n ifica iio n • Minimum focusing distance (W-T*m (ft.)) 0.6-0.75 (2-2.5) 0.48 (1 6) 0.6-0.75 (2-2.5) Film transport Single shot Ccnitlnuous • • • • • • • Default flash setting ennii HP» » E-41 Models with 50% flash use) Dimensions (W x H x D): 112 x 59.5 x 40.3 mm/4.4 x 2.3 x 1.9 in low light and backlit conditions 3 Flash ON; Automatic Date: Auto...

