
VIXIA HF R20 / HF R21 / HF R200 Instruction Manual
Page 10
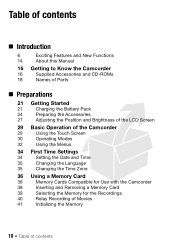
... of the Camcorder 29 Using the Touch Screen 30 Operating Modes 32 Using the Menus 34 First Time Settings 34 Setting the Date and Time 35 Changing the Language 35 Changing the Time Zone 36 Using a Memory Card 36 Memory Cards Compatible for Use with the Camcorder 38 Inserting and Removing a Memory Card...
... of the Camcorder 29 Using the Touch Screen 30 Operating Modes 32 Using the Menus 34 First Time Settings 34 Setting the Date and Time 35 Changing the Language 35 Changing the Time Zone 36 Using a Memory Card 36 Memory Cards Compatible for Use with the Camcorder 38 Inserting and Removing a Memory Card...
VIXIA HF R20 / HF R21 / HF R200 Instruction Manual
Page 34
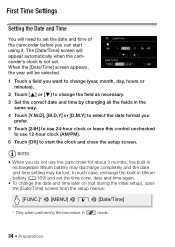
...-in lithium battery (0 169) and set the time zone, date and time again. • To change the field as necessary. 3 Set the correct date and time by changing all the fields in mode. 34 Š Preparations The [Date/Time] screen will appear automatically when the camcorder's clock is not... be selected. 1 Touch a field you want to change (year, month, day, hours or minutes). 2 Touch [Z] or [O] to change the date and time later on (not during the initial setup), open the [Date/Time] screen from the setup menus: [FUNC.]* 8 [MENU] 8 6 8 [Date/Time] * Only when performing the procedure in the ...
...-in lithium battery (0 169) and set the time zone, date and time again. • To change the field as necessary. 3 Set the correct date and time by changing all the fields in mode. 34 Š Preparations The [Date/Time] screen will appear automatically when the camcorder's clock is not... be selected. 1 Touch a field you want to change (year, month, day, hours or minutes). 2 Touch [Z] or [O] to change the date and time later on (not during the initial setup), open the [Date/Time] screen from the setup menus: [FUNC.]* 8 [MENU] 8 6 8 [Date/Time] * Only when performing the procedure in the ...

VIXIA HF R20 / HF R21 / HF R200 Instruction Manual
Page 51
... a different index screen to display the playback controls for a few seconds. F 3D Flip View (0 54) G [Edit] panel H Timeline (0 80) I Divider indicating a change of recording date. * While browsing through index pages, a scroll bar will start from a different memory (0 54). Video Š 51 A Memory being read different content or from the scene ...
... a different index screen to display the playback controls for a few seconds. F 3D Flip View (0 54) G [Edit] panel H Timeline (0 80) I Divider indicating a change of recording date. * While browsing through index pages, a scroll bar will start from a different memory (0 54). Video Š 51 A Memory being read different content or from the scene ...
VIXIA HF R20 / HF R21 / HF R200 Instruction Manual
Page 57
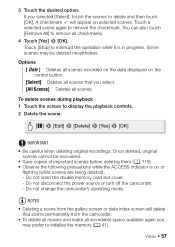
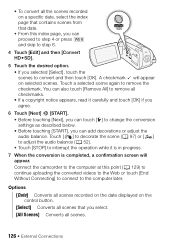
...in progress. Touch [Stop] to delete and then touch [OK]. To delete scenes during playback 1 Touch the screen to initialize the memory (0 41). Do not change the camcorder's operating mode. Some scenes may prefer to display the playback controls. 2 Delete the scene. [C] 8 [Edit] 8 [Delete] 8 [Yes] ...turn off the camcorder. - Once deleted, original scenes cannot be deleted nevertheless. NOTES • Deleting a scene from the gallery screen or date index screen will appear on selected scenes. 3 Touch the desired option. A checkmark O will delete that you select. [All Scenes] Deletes...
...in progress. Touch [Stop] to delete and then touch [OK]. To delete scenes during playback 1 Touch the screen to initialize the memory (0 41). Do not change the camcorder's operating mode. Some scenes may prefer to display the playback controls. 2 Delete the scene. [C] 8 [Edit] 8 [Delete] 8 [Yes] ...turn off the camcorder. - Once deleted, original scenes cannot be deleted nevertheless. NOTES • Deleting a scene from the gallery screen or date index screen will appear on selected scenes. 3 Touch the desired option. A checkmark O will delete that you select. [All Scenes] Deletes...

VIXIA HF R20 / HF R21 / HF R200 Instruction Manual
Page 81
ous 5 frames. E Scene's recording mode and length. H Currently selected interval between frames [6 sec] 8 Desired interval 8 [f] Video Š 81 F Recording date and time. To change the interval between frames. A Touch twice to return to display the previ- B Previous/next scene. C Drag your finger right along the ruler to display the next 5 frames. G Drag your finger left along the ruler to the index screen. D Current scene / Total number of scenes.
ous 5 frames. E Scene's recording mode and length. H Currently selected interval between frames [6 sec] 8 Desired interval 8 [f] Video Š 81 F Recording date and time. To change the interval between frames. A Touch twice to return to display the previ- B Previous/next scene. C Drag your finger right along the ruler to display the next 5 frames. G Drag your finger left along the ruler to the index screen. D Current scene / Total number of scenes.
VIXIA HF R20 / HF R21 / HF R200 Instruction Manual
Page 100
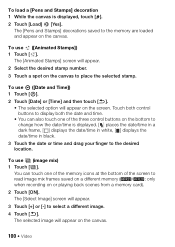
... memory are loaded and appear on the screen. The selected image will appear. 2 Select the desired stamp number. 3 Touch a spot on the bottom to change how the date/time is displayed, touch [ ]. 2 Touch [Load] 8 [Yes]. To use (image mix) 1 Touch [ ]. You can also touch one of the memory icons at ... mix frames saved on a different memory ( / : only when recording on the canvas. 100 Š Video Touch both control buttons to display both the date and time. • You can touch one of the screen to place the selected stamp. The [Animated Stamps] screen will appear on or playing back...
... memory are loaded and appear on the screen. The selected image will appear. 2 Select the desired stamp number. 3 Touch a spot on the bottom to change how the date/time is displayed, touch [ ]. 2 Touch [Load] 8 [Yes]. To use (image mix) 1 Touch [ ]. You can also touch one of the memory icons at ... mix frames saved on a different memory ( / : only when recording on the canvas. 100 Š Video Touch both control buttons to display both the date and time. • You can touch one of the screen to place the selected stamp. The [Animated Stamps] screen will appear on or playing back...
VIXIA HF R20 / HF R21 / HF R200 Instruction Manual
Page 102
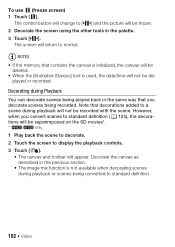
The screen will change to a scene during playback or scenes being recorded. Decorating during Playback You can decorate scenes being played back in the palette. 3 Touch [ ]. The control button ... and toolbar will be recorded with the scene. Decorate the canvas as described in the previous section. • The image mix function is used, the date/time will not be frozen. 2 Decorate the screen using the other tools in the same way that contains the canvas is initialized, the canvas will...
The screen will change to a scene during playback or scenes being recorded. Decorating during Playback You can decorate scenes being played back in the palette. 3 Touch [ ]. The control button ... and toolbar will be recorded with the scene. Decorate the canvas as described in the previous section. • The image mix function is used, the date/time will not be frozen. 2 Decorate the screen using the other tools in the same way that contains the canvas is initialized, the canvas will...
VIXIA HF R20 / HF R21 / HF R200 Instruction Manual
Page 126
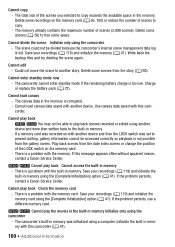
... the camcorder to the computer at this index page, you can add decorations or adjust the audio balance. Touch a selected scene again to change the conversion settings as described below. • Before touching [START], you can proceed to step 4 or press Z and skip to step...] 8 [START]. • Before touching [Next], you can touch [5] to remove the checkmark. • To convert all the scenes recorded on a specific date, select the index page that contains scenes from that you select. [All Scenes] Converts all scenes. 126 Š External Connections A checkmark O will appear....
... the camcorder to the computer at this index page, you can add decorations or adjust the audio balance. Touch a selected scene again to change the conversion settings as described below. • Before touching [START], you can proceed to step 4 or press Z and skip to step...] 8 [START]. • Before touching [Next], you can touch [5] to remove the checkmark. • To convert all the scenes recorded on a specific date, select the index page that contains scenes from that you select. [All Scenes] Converts all scenes. 126 Š External Connections A checkmark O will appear....
VIXIA HF R20 / HF R21 / HF R200 Instruction Manual
Page 160
...scenes you selected to free some recordings on the memory card. - Cannot edit - If this message appears often without apparent reason, contact a Canon Service Center. / Cannot play the movies in the built-in the memory. The camcorder's built-in memory. - Cannot divide the scene. ...recordings (0 119) and initialize the built-in memory. If the problem persists, contact a Canon Service Center. There is a problem with the memory card. Delete some scenes from the date index screen or change the position of the LOCK switch on the memory card (0 56, 105) or reduce ...
...scenes you selected to free some recordings on the memory card. - Cannot edit - If this message appears often without apparent reason, contact a Canon Service Center. / Cannot play the movies in the built-in the memory. The camcorder's built-in memory. - Cannot divide the scene. ...recordings (0 119) and initialize the built-in memory. If the problem persists, contact a Canon Service Center. There is a problem with the memory card. Delete some scenes from the date index screen or change the position of the LOCK switch on the memory card (0 56, 105) or reduce ...

VIXIA HF R20 / HF R21 / HF R200 Instruction Manual
Page 163
...the same recording date but different file control information. Change the position of the LOCK switch on the memory card (0 56, 105) or select the [3 Mbps] bit rate for example when you turn on the camcorder if power supply was accidentally interrupted while the camcorder was changed to prevent erasure... card all the way into the camcorder (0 38). - Not enough available space - Select a number to recover files from the memory card. Change the position of scenes (3,999 scenes) has been reached. Have fun taking some space or replace the memory card. The maximum number of the LOCK...
...the same recording date but different file control information. Change the position of the LOCK switch on the memory card (0 56, 105) or select the [3 Mbps] bit rate for example when you turn on the camcorder if power supply was accidentally interrupted while the camcorder was changed to prevent erasure... card all the way into the camcorder (0 38). - Not enough available space - Select a number to recover files from the memory card. Change the position of scenes (3,999 scenes) has been reached. Have fun taking some space or replace the memory card. The maximum number of the LOCK...

