Instruction Manual
Page 4
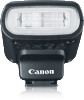
The Canon Speedlite 90EX is a compact flash unit for Canon EOS cameras, and works with the E-TTL II and E-TTL autoflash systems. All control is designed for optimum use with an EOS DIGITAL camera. Be sure to also read the description of flash shooting in the camera's instruction manual. * The menu screens used in flash. Use with an EOS DIGITAL camera • The 90EX is performed on the camera side, letting you for purchasing a Canon product. Thank you easily enjoy flash shooting in the same manner as a built-in this instruction manual are the EOS M menu screens. 2
The Canon Speedlite 90EX is a compact flash unit for Canon EOS cameras, and works with the E-TTL II and E-TTL autoflash systems. All control is designed for optimum use with an EOS DIGITAL camera. Be sure to also read the description of flash shooting in the camera's instruction manual. * The menu screens used in flash. Use with an EOS DIGITAL camera • The 90EX is performed on the camera side, letting you for purchasing a Canon product. Thank you easily enjoy flash shooting in the same manner as a built-in this instruction manual are the EOS M menu screens. 2
Instruction Manual
Page 17
... normal E-TTL II/E-TTL autoflash. Wireless Settings You can create various lighting effects with the 90EX attached to the camera are controlled by the master unit via wireless. The settings you input with the same ease as AF-assist beam. About Wireless Flash With multiple Canon Speedlites having the wireless flash feature, you can use the...
... normal E-TTL II/E-TTL autoflash. Wireless Settings You can create various lighting effects with the 90EX attached to the camera are controlled by the master unit via wireless. The settings you input with the same ease as AF-assist beam. About Wireless Flash With multiple Canon Speedlites having the wireless flash feature, you can use the...

Instruction Manual
Page 18
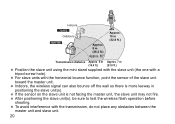
Positioning and Operation Range Indoors x Outdoors M Approx. 8m (26.2 ft.) Approx. 80° Approx. 10 m (32.8 ft.) Transmission distance Approx. 5 m Approx. 7 m (16.4 ft.) (23.0 ft.) The settings of the flash exposure compensation, high-speed sync (FP flash), FE lock, and manual flash set on the master unit are wirelessly and automatically set on the slave unit. Even with multiple slave units, all of them will be controlled in the same way via wireless. 16
Positioning and Operation Range Indoors x Outdoors M Approx. 8m (26.2 ft.) Approx. 80° Approx. 10 m (32.8 ft.) Transmission distance Approx. 5 m Approx. 7 m (16.4 ft.) (23.0 ft.) The settings of the flash exposure compensation, high-speed sync (FP flash), FE lock, and manual flash set on the master unit are wirelessly and automatically set on the slave unit. Even with multiple slave units, all of them will be controlled in the same way via wireless. 16
Instruction Manual
Page 20
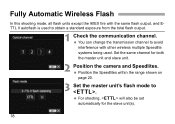
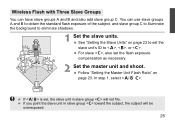
... both the master unit and slave unit. 2 Position the camera and Speedlites. Position the Speedlites within the range shown on page 20. 3 Set the master unit's flash mode to avoid interference with other wireless multiple Speedlite systems being used. Fully Automatic Wireless Flash In this shooting mode, all flash units except the 90EX fire with the same flash output, and ETTL...
... both the master unit and slave unit. 2 Position the camera and Speedlites. Position the Speedlites within the range shown on page 20. 3 Set the master unit's flash mode to avoid interference with other wireless multiple Speedlite systems being used. Fully Automatic Wireless Flash In this shooting mode, all flash units except the 90EX fire with the same flash output, and ETTL...

Instruction Manual
Page 21
4 Check that the flash is ready. When the slave unit is fully charged, its flash-ready lamp lights or its AF-assist beam (LED) blinks at 1-second intervals. 5 Take the picture. Set the camera in the same way as with normal flash shooting. 19
4 Check that the flash is ready. When the slave unit is fully charged, its flash-ready lamp lights or its AF-assist beam (LED) blinks at 1-second intervals. 5 Take the picture. Set the camera in the same way as with normal flash shooting. 19
Instruction Manual
Page 22
....4 ft.) (23.0 ft.) Position the slave unit using the mini stand supplied with the slave unit (the one with a tripod screw hole). For slave units with the horizontal bounce function, point the sensor of the slave unit toward the master unit. Indoors, the wireless signal can also bounce off...there is more leeway in positioning the slave unit(s). If the sensor on the slave unit is not facing the master unit, the slave unit may not fire. After positioning the slave unit(s), be sure to test the wireless flash operation before shooting. To avoid ...
....4 ft.) (23.0 ft.) Position the slave unit using the mini stand supplied with the slave unit (the one with a tripod screw hole). For slave units with the horizontal bounce function, point the sensor of the slave unit toward the master unit. Indoors, the wireless signal can also bounce off...there is more leeway in positioning the slave unit(s). If the sensor on the slave unit is not facing the master unit, the slave unit may not fire. After positioning the slave unit(s), be sure to test the wireless flash operation before shooting. To avoid ...
Instruction Manual
Page 23
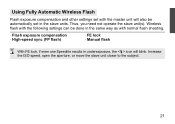
..., the icon will also be automatically set with normal flash shooting. · Flash exposure compensation · High-speed sync (FP flash) · FE lock · Manual flash With FE lock, if even one Speedlite results in the slave units. Thus, you need not operate the slave unit(s). Wireless flash with the following settings can be done in the...
..., the icon will also be automatically set with normal flash shooting. · Flash exposure compensation · High-speed sync (FP flash) · FE lock · Manual flash With FE lock, if even one Speedlite results in the slave units. Thus, you need not operate the slave unit(s). Wireless flash with the following settings can be done in the...

Instruction Manual
Page 24
Flash Ratio with E-TTL II You can use two slave units together and perform E-TTL II autoflash shooting while changing the flash ratio. This is described using two slave units. B A 22
Flash Ratio with E-TTL II You can use two slave units together and perform E-TTL II autoflash shooting while changing the flash ratio. This is described using two slave units. B A 22

Instruction Manual
Page 25
Set one unit to and the other to divide the two slave units into different groups. Setting the Master Unit Flash Ratio 1 Set the firing group. Select . 23 Setting the Slave Units Set the firing groups so as to .
Set one unit to and the other to divide the two slave units into different groups. Setting the Master Unit Flash Ratio 1 Set the firing group. Select . 23 Setting the Slave Units Set the firing groups so as to .
Instruction Manual
Page 27
... select . If is set the flash exposure C B compensation as necessary. A 2 Set the master unit and shoot. Follow "Setting the Master Unit Flash Ratio" on page 23 to set the slave unit's ID to , , or . For slave , also set , the slave unit in slave group will not fire. ... If you point the slave unit in slave group toward the ...
... select . If is set the flash exposure C B compensation as necessary. A 2 Set the master unit and shoot. Follow "Setting the Master Unit Flash Ratio" on page 23 to set the slave unit's ID to , , or . For slave , also set , the slave unit in slave group will not fire. ... If you point the slave unit in slave group toward the ...

Instruction Manual
Page 28
For example, if you want to perform advanced lighting, you can increase the number of units. About Slave Group Control Firing group A ID = A ID = A ID = A If you need more flash output or want to increase. There is no restriction on the number of slave units. Set an additional slave unit to the firing group (A, B or C) whose flash output you set a firing group with three slave units to , the three units are controlled as a single firing group A with a large flash output. 26
For example, if you want to perform advanced lighting, you can increase the number of units. About Slave Group Control Firing group A ID = A ID = A ID = A If you need more flash output or want to increase. There is no restriction on the number of slave units. Set an additional slave unit to the firing group (A, B or C) whose flash output you set a firing group with three slave units to , the three units are controlled as a single firing group A with a large flash output. 26
Instruction Manual
Page 29
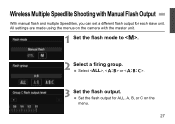
All settings are made using the menus on the camera with Manual Flash Output With manual flash and multiple Speedlites, you can set a different flash output for ALL, A, B, or C on the menu. 27 Wireless Multiple Speedlite Shooting with the master unit. 1 Set the flash mode to . 2 Select a firing group. Select , or . 3 Set the flash output. Set the flash output for each slave unit.
All settings are made using the menus on the camera with Manual Flash Output With manual flash and multiple Speedlites, you can set a different flash output for ALL, A, B, or C on the menu. 27 Wireless Multiple Speedlite Shooting with the master unit. 1 Set the flash mode to . 2 Select a firing group. Select , or . 3 Set the flash output. Set the flash output for each slave unit.

Instruction Manual
Page 31
The power turns off by itself. • The Speedlite's auto power off has activated. Press and hold the Speedlite's power button for at least 1 second. The slave unit flash does not fire. • Check that the slave unit is underexposed or overexposed. • If there was a highly reflective object (glass window, etc.) in the picture, use FE lock. • If the subject looks very dark or very bright, set flash exposure compensation. 29 The picture is ready. • Move the slave unit closer to this flash. • Point the sensor of the slave unit toward this flash.
The power turns off by itself. • The Speedlite's auto power off has activated. Press and hold the Speedlite's power button for at least 1 second. The slave unit flash does not fire. • Check that the slave unit is underexposed or overexposed. • If there was a highly reflective object (glass window, etc.) in the picture, use FE lock. • If the subject looks very dark or very bright, set flash exposure compensation. 29 The picture is ready. • Move the slave unit closer to this flash. • Point the sensor of the slave unit toward this flash.
Instruction Manual
Page 33
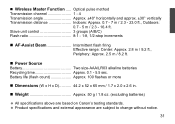
... Approx. 50 g / 1.8 oz. (excluding batteries) All specifications above are based on Canon's testing standards. Product specifications and external appearance are subject to change without notice. 31 Slave unit control 3 groups (A/B/C) Flash ratio 8:1 - 1:8, 1/2-stop increments AF-Assist Beam Intermittent flash firing Effective range: Center: Approx. 2.8 m / 9.2 ft., Periphery: Approx. 2.5 m / 8.2 ft. Power Source...
... Approx. 50 g / 1.8 oz. (excluding batteries) All specifications above are based on Canon's testing standards. Product specifications and external appearance are subject to change without notice. 31 Slave unit control 3 groups (A/B/C) Flash ratio 8:1 - 1:8, 1/2-stop increments AF-Assist Beam Intermittent flash firing Effective range: Center: Approx. 2.8 m / 9.2 ft., Periphery: Approx. 2.5 m / 8.2 ft. Power Source...


