
Photo Application Guide(Mac)
Page 14
... more information on the desktop. Then the Browser window appears. Starting ImageBrowser 14 Starting ImageBrowser manually As with other applications, ImageBrowser can select the option to create the Canon ImageBrowser icon (alias) on this window. When the Canon ImageBrowser alias icon is not displayed on the desktop will start ImageBrowser, and the initial...
... more information on the desktop. Then the Browser window appears. Starting ImageBrowser 14 Starting ImageBrowser manually As with other applications, ImageBrowser can select the option to create the Canon ImageBrowser icon (alias) on this window. When the Canon ImageBrowser alias icon is not displayed on the desktop will start ImageBrowser, and the initial...
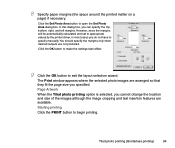
Photo Application Guide(Mac)
Page 94
... necessary. Click the OK button to make the settings take effect. 9 Click the OK button to specify manually. However, since the margins will be automatically calculated and set to appropriate values by the printer driver, in most cases you cannot change the location and size of the images although the image cropping...
... necessary. Click the OK button to make the settings take effect. 9 Click the OK button to specify manually. However, since the margins will be automatically calculated and set to appropriate values by the printer driver, in most cases you cannot change the location and size of the images although the image cropping...

Photo Application Guide(Mac)
Page 95
Canon perforated paper printing 95 See your printer manuals for more information. Refer to quickly print images on Canon perforated paper. Note ➤ Some printer models may not support the printing on Canon perforated paper. Canon perforated paper printing • Selecting a layout • Starting printing The Canon perforated paper printing feature allows you to About Canon perforated paper for more information on the types of Canon perforated paper.
Canon perforated paper printing 95 See your printer manuals for more information. Refer to quickly print images on Canon perforated paper. Note ➤ Some printer models may not support the printing on Canon perforated paper. Canon perforated paper printing • Selecting a layout • Starting printing The Canon perforated paper printing feature allows you to About Canon perforated paper for more information on the types of Canon perforated paper.

Photo Application Guide(Mac)
Page 105
Starting printing 105 In this dialog box, click the Special Effects button on the left side to display the Detailed Setting dialog box. If you should choose the Photo option when printing photos. Normally, you click the Manual button, the Details button becomes active as shown below: Click the Details button to activate photo color correction features such as Vivid Photo and Photo Optimizer PRO. 3 Specify a print mode.
Starting printing 105 In this dialog box, click the Special Effects button on the left side to display the Detailed Setting dialog box. If you should choose the Photo option when printing photos. Normally, you click the Manual button, the Details button becomes active as shown below: Click the Details button to activate photo color correction features such as Vivid Photo and Photo Optimizer PRO. 3 Specify a print mode.

Photo Application Guide(Windows)
Page 97
5 Click the Next button to proceed to use the Index Printing feature. Custom Layout Printing (Artwork/Layout Album) 97 Select Index layout to the next step. 6 Specify how the photos should be arranged on the album page. Select Manual layout to have the photos automatically arranged by PhotoRecord. Select Automatic layout to position the photos temporarily so that you may freely rearrange them.
5 Click the Next button to proceed to use the Index Printing feature. Custom Layout Printing (Artwork/Layout Album) 97 Select Index layout to the next step. 6 Specify how the photos should be arranged on the album page. Select Manual layout to have the photos automatically arranged by PhotoRecord. Select Automatic layout to position the photos temporarily so that you may freely rearrange them.

Photo Application Guide(Windows)
Page 125
Note ³ If the switch is set at MANUAL. If you have selected Layout from the PRINT button pop-up submenu in the Artwork/Layout album mode, you can re-position (move the photos to a new position by drag-and-dropping in the window. Steps 1 Set the LAYOUT slide switch at AUTO, dragging a photo moves not only the selected photo but also all the other photos. Changing Layout 125 Re-positioning the Photos You can freely move ) the photos within the PhotoRecord window.
Note ³ If the switch is set at MANUAL. If you have selected Layout from the PRINT button pop-up submenu in the Artwork/Layout album mode, you can re-position (move the photos to a new position by drag-and-dropping in the window. Steps 1 Set the LAYOUT slide switch at AUTO, dragging a photo moves not only the selected photo but also all the other photos. Changing Layout 125 Re-positioning the Photos You can freely move ) the photos within the PhotoRecord window.

Photo Application Guide(Windows)
Page 127
You cannot resize the photos when working in other photos. Steps 1 Set the LAYOUT slide switch at AUTO, dragging a photo resizes not only the selected photo but also the other print modes. Changing Layout 127 Note ³ If the switch is set at MANUAL. Resizing the Photos When you are working in the Artwork/Layout album mode, you can enlarge or reduce the photos using the mouse-dragging technique.
You cannot resize the photos when working in other photos. Steps 1 Set the LAYOUT slide switch at AUTO, dragging a photo resizes not only the selected photo but also the other print modes. Changing Layout 127 Note ³ If the switch is set at MANUAL. Resizing the Photos When you are working in the Artwork/Layout album mode, you can enlarge or reduce the photos using the mouse-dragging technique.

Photo Application Guide(Windows)
Page 129
Changing Layout 129 Steps 1 Set the LAYOUT slide switch at AUTO, dragging a photo rotates not only the selected photo but also all the other print modes. Rotating the Photos When you are working in the Artwork/Layout album mode, you can only specify a 180-degree rotation when working in the other photos. Note ³ If the switch is set at MANUAL. You can rotate the photos to any desired angles using the mouse-dragging technique.
Changing Layout 129 Steps 1 Set the LAYOUT slide switch at AUTO, dragging a photo rotates not only the selected photo but also all the other print modes. Rotating the Photos When you are working in the Artwork/Layout album mode, you can only specify a 180-degree rotation when working in the other photos. Note ³ If the switch is set at MANUAL. You can rotate the photos to any desired angles using the mouse-dragging technique.

S520 User's Guide
Page 2
Table of Contents Table of Contents Introduction ...4 How to Use This Manual 5 Safety Precautions 7 Printer Parts and Their Functions 12 Front View 13 Rear View ...14 Inside the Printer 15 Operation Panel 16 Printer Driver Functions (Windows 17 Opening the Printer Properties Dialog Box 18 Printer Properties Dialog Box Description 20 BJ Status Monitor Functions 34 Canceling a Print Job 37 Uninstalling Printer Drivers 38 Printer Driver Functions (Macintosh 39 Description of Print Settings 40 BJ Print Monitor 56 Canceling a Print Job 58 Using the Printer with a Network 59 1
Table of Contents Table of Contents Introduction ...4 How to Use This Manual 5 Safety Precautions 7 Printer Parts and Their Functions 12 Front View 13 Rear View ...14 Inside the Printer 15 Operation Panel 16 Printer Driver Functions (Windows 17 Opening the Printer Properties Dialog Box 18 Printer Properties Dialog Box Description 20 BJ Status Monitor Functions 34 Canceling a Print Job 37 Uninstalling Printer Drivers 38 Printer Driver Functions (Macintosh 39 Description of Print Settings 40 BJ Print Monitor 56 Canceling a Print Job 58 Using the Printer with a Network 59 1

S520 User's Guide
Page 6
Displays the next page. Returns to the page you use Acrobat Reader 3.0 or later. Click to jump straight to enlarge the viewing screen. Please note that you were previously viewing. Use this button to this page. 5 Displays the previous page. How to Use This Manual How to Use This Manual To view this User's Guide, we recommend that screens displayed by Acrobat Reader 3.0 or 5.0 are for Acrobat Reader 4.0. Click this button in the tool bar, then click within the screen. The screens shown below are slightly different.
Displays the next page. Returns to the page you use Acrobat Reader 3.0 or later. Click to jump straight to enlarge the viewing screen. Please note that you were previously viewing. Use this button to this page. 5 Displays the previous page. How to Use This Manual How to Use This Manual To view this User's Guide, we recommend that screens displayed by Acrobat Reader 3.0 or 5.0 are for Acrobat Reader 4.0. Click this button in the tool bar, then click within the screen. The screens shown below are slightly different.

S520 User's Guide
Page 7
Displays the table of contents. Click the heading to jump to close the headings. 6 Click the " " symbol to see the headings for a word. Click the " " symbol to the topic. How to Use This Manual Use this button to search for each chapter.
Displays the table of contents. Click the heading to jump to close the headings. 6 Click the " " symbol to see the headings for a word. Click the " " symbol to the topic. How to Use This Manual Use this button to search for each chapter.

S520 User's Guide
Page 8
... solvents such as alcohol or thinners. ■ Power supply Never attempt to ensure that you ignore any way not described in this manual to plug in or unplug the printer from the power supply when your hands are wet. Always push the plug all the way into the power outlet. Never damage..., modify, stretch or excessively bend or twist the power cord. Safety Precautions Safety Precautions Please read the safety warnings and cautions provided in this manual. Do not attempt to use the printer safely. Do not place heavy objects on the power cord. 7
... solvents such as alcohol or thinners. ■ Power supply Never attempt to ensure that you ignore any way not described in this manual to plug in or unplug the printer from the power supply when your hands are wet. Always push the plug all the way into the power outlet. Never damage..., modify, stretch or excessively bend or twist the power cord. Safety Precautions Safety Precautions Please read the safety warnings and cautions provided in this manual. Do not attempt to use the printer safely. Do not place heavy objects on the power cord. 7
S520 User's Guide
Page 19
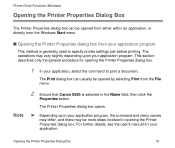
...your application program. The Print dialog box can be opened by selecting Print from your application. Printer Driver Functions (Windows) Opening the Printer Properties Dialog Box The Printer Properties dialog box can usually be opened from either within an application, or directly from the Windows... Start menu. ■ Opening the Printer Properties dialog box from the File menu. For further details, see the user's manual for opening the Printer Properties dialog box. Note 2 Ensure that Canon S520 is generally used to print a document. The operations may...
...your application program. The Print dialog box can be opened by selecting Print from your application. Printer Driver Functions (Windows) Opening the Printer Properties Dialog Box The Printer Properties dialog box can usually be opened from either within an application, or directly from the Windows... Start menu. ■ Opening the Printer Properties dialog box from the File menu. For further details, see the user's manual for opening the Printer Properties dialog box. Note 2 Ensure that Canon S520 is generally used to print a document. The operations may...

S520 User's Guide
Page 23
... To see a description of any item in the Printer Properties dialog box, click the mark, then click the desired item. Printer Driver Functions (Windows) (3) Color Adjustment Select the method of the printer driver. To make detailed color adjustments, select Manual, then click the Set button. (4) Grayscale Printing .... By having the user answer a series of a color document. (5) Print Advisor Click to start the Print Advisor. If the button does not appear when using Windows XP, Windows 2000 or Windows NT 4.0, click the Start button, then select Programs, then Canon S520, then Guide.
... To see a description of any item in the Printer Properties dialog box, click the mark, then click the desired item. Printer Driver Functions (Windows) (3) Color Adjustment Select the method of the printer driver. To make detailed color adjustments, select Manual, then click the Set button. (4) Grayscale Printing .... By having the user answer a series of a color document. (5) Print Advisor Click to start the Print Advisor. If the button does not appear when using Windows XP, Windows 2000 or Windows NT 4.0, click the Start button, then select Programs, then Canon S520, then Guide.

S520 User's Guide
Page 42
To enter the size manually, select Custom 1 to Custom 3, then click Custom. (2) Banner Printing Select this check box when printing on banner paper. (3) Borderless Printing The image is printed on ... the size of the print media used and the image printed. For all other media types, the print quality may decrease. Description of the paper. Printer Driver Functions (Macintosh) Page Setup Dialog Box The Page Setup dialog box contains settings for borderless printing are left on the File menu in your...
To enter the size manually, select Custom 1 to Custom 3, then click Custom. (2) Banner Printing Select this check box when printing on banner paper. (3) Borderless Printing The image is printed on ... the size of the print media used and the image printed. For all other media types, the print quality may decrease. Description of the paper. Printer Driver Functions (Macintosh) Page Setup Dialog Box The Page Setup dialog box contains settings for borderless printing are left on the File menu in your...

S520 User's Guide
Page 47
Description of Print Settings 46 Printer Driver Functions (Macintosh) (4) Details Manually set the print quality and color settings in the Detailed Setting Dialog Box. (This option is only available if Manual print mode is selected.) (5) Options Specify the output destination, print order and page layout for the document you are printing. (6) Apply Allows you to register print settings or implement a previously saved print setting.
Description of Print Settings 46 Printer Driver Functions (Macintosh) (4) Details Manually set the print quality and color settings in the Detailed Setting Dialog Box. (This option is only available if Manual print mode is selected.) (5) Options Specify the output destination, print order and page layout for the document you are printing. (6) Apply Allows you to register print settings or implement a previously saved print setting.

S520 User's Guide
Page 48
Description of Print Settings 47 in the Print dialog box, then (2) (1) (3) (1) Panel display icons Click these icons to switch between panels in the Detailed Setting dialog box. Printer Driver Functions (Macintosh) Detailed Setting Dialog Box To open the Detailed Setting dialog box, select Manual click Details.
Description of Print Settings 47 in the Print dialog box, then (2) (1) (3) (1) Panel display icons Click these icons to switch between panels in the Detailed Setting dialog box. Printer Driver Functions (Macintosh) Detailed Setting Dialog Box To open the Detailed Setting dialog box, select Manual click Details.

S520 User's Guide
Page 97
Printing Media ■ Printer Driver Settings • Media Type: Glossy Photo Paper • Page Size: Ensure that the setting matches the size set the left, right, top and bottom margins to the application's user manual. For instructions on setting margins, refer to 0 in the application. ■ ...■ Printable Area With some images, the trailing edge of the image may be blurred if printing extends into the printable area. Canon recommends that you print within the printing area. ➡ Printing Area Note ➤ For photos and illustrations that you are using the...
Printing Media ■ Printer Driver Settings • Media Type: Glossy Photo Paper • Page Size: Ensure that the setting matches the size set the left, right, top and bottom margins to the application's user manual. For instructions on setting margins, refer to 0 in the application. ■ ...■ Printable Area With some images, the trailing edge of the image may be blurred if printing extends into the printable area. Canon recommends that you print within the printing area. ➡ Printing Area Note ➤ For photos and illustrations that you are using the...

S520 User's Guide
Page 104
...in. Printing Media ■ Printable Area With some images, the trailing edge of the image may be blurred if printing extends into the printable area. Canon recommends that you print within the printing area. ➡ Printing Area Note ➤ For photos and illustrations that allows you want to the application's... user manual. Photo Paper Pro PR-101 103 If you are using the same size as the paper size, and paste the data so that it ...
...in. Printing Media ■ Printable Area With some images, the trailing edge of the image may be blurred if printing extends into the printable area. Canon recommends that you print within the printing area. ➡ Printing Area Note ➤ For photos and illustrations that allows you want to the application's... user manual. Photo Paper Pro PR-101 103 If you are using the same size as the paper size, and paste the data so that it ...

S520 User's Guide
Page 124
Troubleshooting ■ In the printer driver settings, select a higher print quality setting. Macintosh 1 Open the Print dialog box. 2 For Print Mode, select Manual, then click Details. 3 Click the Quality icon, then drag the Print Quality slider to the Fine end. Windows 1 Open the Printer Properties dialog box. 2 On the Main tab, click High for the Print Quality setting. Print Quality is Poor or Contains Errors 123
Troubleshooting ■ In the printer driver settings, select a higher print quality setting. Macintosh 1 Open the Print dialog box. 2 For Print Mode, select Manual, then click Details. 3 Click the Quality icon, then drag the Print Quality slider to the Fine end. Windows 1 Open the Printer Properties dialog box. 2 On the Main tab, click High for the Print Quality setting. Print Quality is Poor or Contains Errors 123


