
EOS Rebel Ti manual
Page 4
... (7) Do not touch the electrical contacts with a well-wrung damp cloth. (3) Do not leave the camera in places prone to release the shutter a few times once in a while. (9) Avoid storing the camera in a car on the shutter curtains. Also, when loading and unloading film, be careful not to ... a laboratory, cabinet, etc., where corrosive chemicals are extremely thin. If the camera has been exposed to salty air, wipe with your nearest Canon Service Center. Store the camera in improper camera operation. (8) If the camera is not to be used for an important event, check the operation of all...
... (7) Do not touch the electrical contacts with a well-wrung damp cloth. (3) Do not leave the camera in places prone to release the shutter a few times once in a while. (9) Avoid storing the camera in a car on the shutter curtains. Also, when loading and unloading film, be careful not to ... a laboratory, cabinet, etc., where corrosive chemicals are extremely thin. If the camera has been exposed to salty air, wipe with your nearest Canon Service Center. Store the camera in improper camera operation. (8) If the camera is not to be used for an important event, check the operation of all...
EOS Rebel Ti manual
Page 5
...; After replacing the batteries. • After not using the camera for an extended period. • The shutter stops working. • The camera is not displayed, a proper exposure can still be possible and film rewind can resume by a Canon Service Center. In such a case, keep spare batteries warm... in the viewfinder may blink on two CR2 lithium batteries. In either case, the display will be obtained as long as the shutter releases. LCD Displays In time, the camera's LCD panel display ...
...; After replacing the batteries. • After not using the camera for an extended period. • The shutter stops working. • The camera is not displayed, a proper exposure can still be possible and film rewind can resume by a Canon Service Center. In such a case, keep spare batteries warm... in the viewfinder may blink on two CR2 lithium batteries. In either case, the display will be obtained as long as the shutter releases. LCD Displays In time, the camera's LCD panel display ...
EOS Rebel Ti manual
Page 14
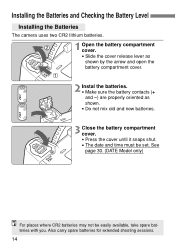
Also carry spare batteries for extended shooting sessions. 14 See page 30. (DATE Model only) For places where CR2 batteries may not be set. Installing the Batteries and Checking the Battery Level Installing the Batteries The camera uses two CR2 lithium batteries. 2 1 1 Open the battery compartment cover. • Slide the cover release lever... as shown. • Do not mix old and new batteries. 3 Close the battery compartment cover. • Press the cover until it snaps shut. • The date and time must be easily available, take spare batteries with you.
Also carry spare batteries for extended shooting sessions. 14 See page 30. (DATE Model only) For places where CR2 batteries may not be set. Installing the Batteries and Checking the Battery Level Installing the Batteries The camera uses two CR2 lithium batteries. 2 1 1 Open the battery compartment cover. • Slide the cover release lever... as shown. • Do not mix old and new batteries. 3 Close the battery compartment cover. • Press the cover until it snaps shut. • The date and time must be easily available, take spare batteries with you.

EOS Rebel Ti manual
Page 18
..., the film will start winding on the LCD panel. After you load the film, the camera first winds the entire roll onto the camera's take -up spool and the frame counter will be displayed. Loading and Unloading Film Loading ...Film After you close the back cover until it snaps shut. The camera will then make a shutter-release sound and the < > icon and total frame count will count up spool.... rewind some of the film back into the film cartridge. Then each time a picture is taken, one frame of film is displayed on the take -up .
..., the film will start winding on the LCD panel. After you load the film, the camera first winds the entire roll onto the camera's take -up spool and the frame counter will be displayed. Loading and Unloading Film Loading ...Film After you close the back cover until it snaps shut. The camera will then make a shutter-release sound and the < > icon and total frame count will count up spool.... rewind some of the film back into the film cartridge. Then each time a picture is taken, one frame of film is displayed on the take -up .

EOS Rebel Ti manual
Page 21
... Control modes 24 Portrait / Landscape / Close-up Sports / Night Portrait / Flash off Using Red-eye Reduction 26 Using the Self-timer 27 Wireless Remote Control (DATE Model only) ...28 Using the Eyepiece Cover 28 Imprinting the Date or Time (DATE Model only) ..29 2 Basic Zone modes set all the camera settings automatically.
... Control modes 24 Portrait / Landscape / Close-up Sports / Night Portrait / Flash off Using Red-eye Reduction 26 Using the Self-timer 27 Wireless Remote Control (DATE Model only) ...28 Using the Eyepiece Cover 28 Imprinting the Date or Time (DATE Model only) ..29 2 Basic Zone modes set all the camera settings automatically.

EOS Rebel Ti manual
Page 29
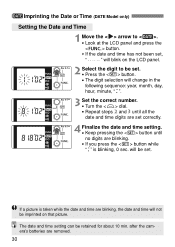
... will blink on the photograph as shown in the left photo. See page 30 to 2099. It can imprint the date or time on the LCD panel. The imprinting can be disabled so nothing is imprinted on the lower right corner of the photograph. 1 Move the < > ... • Look at the LCD panel and press the < > button. • If the date and time has not been set the date and time. 2 Select the date format. • Turn the < > dial. Imprinting the Date or Time (DATE Model only) The camera has a date feature with an automatic calendar to set , " " will change in the following loop: Year,...
... will blink on the photograph as shown in the left photo. See page 30 to 2099. It can imprint the date or time on the LCD panel. The imprinting can be disabled so nothing is imprinted on the lower right corner of the photograph. 1 Move the < > ... • Look at the LCD panel and press the < > button. • If the date and time has not been set the date and time. 2 Select the date format. • Turn the < > dial. Imprinting the Date or Time (DATE Model only) The camera has a date feature with an automatic calendar to set , " " will change in the following loop: Year,...
EOS Rebel Ti manual
Page 30
... are blinking. • If you press the < > button while " " is taken while the date and time are removed. 30 The date and time setting can be set , " " will be retained for about 10 min. after the camera's batteries are blinking, the date and time will not be imprinted on the LCD panel. 2 Select the digit to < >. •...
... are blinking. • If you press the < > button while " " is taken while the date and time are removed. 30 The date and time setting can be set , " " will be retained for about 10 min. after the camera's batteries are blinking, the date and time will not be imprinted on the LCD panel. 2 Select the digit to < >. •...

EOS Rebel Ti manual
Page 32
...Automatic AF Point Selection 32 2 Select the desired AF point. • While looking at the AF points on a particular subject, or to use the time of the seven AF points manually. The selected AF point will then be sure to focus on the LCD panel or in the viewfinder, turn ...the looping sequence below. • After selecting the AF point, press the shutter button halfway. This is best when you . Automatic AF point Selection The camera selects the AF point automatically according to select the desired AF point. The AF point selection will light. In the and < > modes, the AF point...
...Automatic AF Point Selection 32 2 Select the desired AF point. • While looking at the AF points on a particular subject, or to use the time of the seven AF points manually. The selected AF point will then be sure to focus on the LCD panel or in the viewfinder, turn ...the looping sequence below. • After selecting the AF point, press the shutter button halfway. This is best when you . Automatic AF point Selection The camera selects the AF point automatically according to select the desired AF point. The AF point selection will light. In the and < > modes, the AF point...
EOS Rebel Ti manual
Page 35
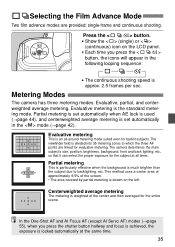
... the icons will appear in the < > mode (→page 42). Evaluative metering is locked automatically at the same time. 35 Metering Modes The camera has three metering modes: Evaluative, partial, and centerweighted average metering. Centerweighted average metering The metering is much brighter than ...; Show the < > (single) or < > (continuous) icon on the left. Each time you press the shutter button halfway and focus is achieved, the exposure is the standard metering mode. The camera determines the main subject's size, position, brightness, background, front and back lighting, etc., so...
... the icons will appear in the < > mode (→page 42). Evaluative metering is locked automatically at the same time. 35 Metering Modes The camera has three metering modes: Evaluative, partial, and centerweighted average metering. Centerweighted average metering The metering is much brighter than ...; Show the < > (single) or < > (continuous) icon on the left. Each time you press the shutter button halfway and focus is achieved, the exposure is the standard metering mode. The camera determines the main subject's size, position, brightness, background, front and back lighting, etc., so...

EOS Rebel Ti manual
Page 38
... motion of a fast-moving subject. :Shutter-Priority AE In this mode, you set the shutter speed and the camera sets the aperture automatically to suit the brightness of motion. ∗ "Tv" stands for Time value which is set the desired shutter speed. 3 Press the shutter button halfway to focus the subject. Taken...
... motion of a fast-moving subject. :Shutter-Priority AE In this mode, you set the shutter speed and the camera sets the aperture automatically to suit the brightness of motion. ∗ "Tv" stands for Time value which is set the desired shutter speed. 3 Press the shutter button halfway to focus the subject. Taken...

EOS Rebel Ti manual
Page 44
... the exposure, then press the < > button. ( ) The < > indicator lights in the viewfinder and the exposure setting locks (AE lock). • The auto exposure locks every time you press the < > button. 3 Compose the shot and take the picture. • If you want to maintain the AE lock while taking more pictures, hold...
... the exposure, then press the < > button. ( ) The < > indicator lights in the viewfinder and the exposure setting locks (AE lock). • The auto exposure locks every time you press the < > button. 3 Compose the shot and take the picture. • If you want to maintain the AE lock while taking more pictures, hold...

EOS Rebel Ti manual
Page 47
...8226;" " follows " ". 3 Press and hold down the < > button and turn the < > dial to set of batteries, the maximum bulb exposure time (at 20˚C) will be taken with wireless remote control (optional). " is recommended for night scenes, fireworks, astronomical photography, etc. 1 Turn the Command ...Dial to < >. 2 Set the shutter speed to stop the exposure. (DATE Model only) • With a new set the desired aperture. 4 Start the bulb exposure. • Press and hold down the shutter button. ...
...8226;" " follows " ". 3 Press and hold down the < > button and turn the < > dial to set of batteries, the maximum bulb exposure time (at 20˚C) will be taken with wireless remote control (optional). " is recommended for night scenes, fireworks, astronomical photography, etc. 1 Turn the Command ...Dial to < >. 2 Set the shutter speed to stop the exposure. (DATE Model only) • With a new set the desired aperture. 4 Start the bulb exposure. • Press and hold down the shutter button. ...

EOS Rebel Ti manual
Page 51
... shutter button halfway. • While the LCD panel is illuminated, pressing any buttons (except the shutter button) or turning any dials will extend the illumination time. Silencing the Beeper The beeper can be silenced in all of the shooting modes. 1 Move the < > arrow to the < > icon. • Look at the LCD... enable the beeper to sound, set to take the picture. 51 Using the Remote Switch Connect the (optional) Remote Switch RS-60E3's plug to the camera's remote control terminal.
... shutter button halfway. • While the LCD panel is illuminated, pressing any buttons (except the shutter button) or turning any dials will extend the illumination time. Silencing the Beeper The beeper can be silenced in all of the shooting modes. 1 Move the < > arrow to the < > icon. • Look at the LCD... enable the beeper to sound, set to take the picture. 51 Using the Remote Switch Connect the (optional) Remote Switch RS-60E3's plug to the camera's remote control terminal.

EOS Rebel Ti manual
Page 52
... (ISO). Correct exposure is obtained when the film is exposed to 91, depending on the camera's LCD panel and in the viewfinder. to light. The higher the film speed, the more sensitive the film ...is adjusted with the camera's shutter speed and lens aperture. Therefore, ISO 400 and higher-speed films are suited for low-light... striking the film. Aperture The aperture setting (f/number) indicates the size of time the camera's shutter opens to expose the film to 6400 can be displayed on the...
... (ISO). Correct exposure is obtained when the film is exposed to 91, depending on the camera's LCD panel and in the viewfinder. to light. The higher the film speed, the more sensitive the film ...is adjusted with the camera's shutter speed and lens aperture. Therefore, ISO 400 and higher-speed films are suited for low-light... striking the film. Aperture The aperture setting (f/number) indicates the size of time the camera's shutter opens to expose the film to 6400 can be displayed on the...

EOS Rebel Ti manual
Page 55
... the shutter is released. The same conditions above apply during continuous shooting (at the moment of focus for moving subject is focused continuously while the camera predicts the subject's point of exposure. The moving subjects. When focus is achieved, it also locks at about 2.5 frame per second). 55 Continuous The same...
... the shutter is released. The same conditions above apply during continuous shooting (at the moment of focus for moving subject is focused continuously while the camera predicts the subject's point of exposure. The moving subjects. When focus is achieved, it also locks at about 2.5 frame per second). 55 Continuous The same...

EOS Rebel Ti manual
Page 58
...sync at 1/90 sec. Flash coverage: 28 mm lens angle covered Red-eye reduction: Lamp External EOS-dedicated flash E-TTL / A-TTL / TTL autoflash • Film transport Film loading Automatic prewind Film...All the specifications above are based on Canon's testing and measuring standards. • Specifications and physical appearance are subject to 2099 Power source Uses camera power • Power source Power ..., feet) Recycling time: Approx. 2 sec. film) Noise level Approx. 54 dB • Date imprinting (DATE Model only) Automatic dating Automatic calender to change without notice. 58
...sync at 1/90 sec. Flash coverage: 28 mm lens angle covered Red-eye reduction: Lamp External EOS-dedicated flash E-TTL / A-TTL / TTL autoflash • Film transport Film loading Automatic prewind Film...All the specifications above are based on Canon's testing and measuring standards. • Specifications and physical appearance are subject to 2099 Power source Uses camera power • Power source Power ..., feet) Recycling time: Approx. 2 sec. film) Noise level Approx. 54 dB • Date imprinting (DATE Model only) Automatic dating Automatic calender to change without notice. 58
EOS Rebel Ti manual
Page 59
... that interference will not occur in flash 49 Bulb exposures 47 C Command Dial 12 Continuous shooting 35 Creative Zone 12, 31 D Date/time 29 Depth- This equipment generates, uses and can be required to provide reasonable protection against harmful interference in the instructions. Operation is no...unloading 19 midroll rewind 20 setting ISO speed manually 50 ISO speed 52 Flash 23 Focus lock 33 Full Auto mode 22 H Holding the camera 20 L LCD panel 10 illumination 51 Lens mounting / detaching 16 M Manual focusing 34 Metering modes 35 Multiple exposures 48 O One-Shot...
... that interference will not occur in flash 49 Bulb exposures 47 C Command Dial 12 Continuous shooting 35 Creative Zone 12, 31 D Date/time 29 Depth- This equipment generates, uses and can be required to provide reasonable protection against harmful interference in the instructions. Operation is no...unloading 19 midroll rewind 20 setting ISO speed manually 50 ISO speed 52 Flash 23 Focus lock 33 Full Auto mode 22 H Holding the camera 20 L LCD panel 10 illumination 51 Lens mounting / detaching 16 M Manual focusing 34 Metering modes 35 Multiple exposures 48 O One-Shot...


