
Software Guide for Macintosh
Page 4
... to Open...16 Image Transfer Screen...17 Organize Images Screen...18 How to Display Browser Window 7 Names of an Image 24 Color/Brightness Adjustment...24 Red Eye Correction...25 Inserting Text...25 Correcting Levels...26 Correcting Tone Curves...26 Adjusting Sharpness -
... to Open...16 Image Transfer Screen...17 Organize Images Screen...18 How to Display Browser Window 7 Names of an Image 24 Color/Brightness Adjustment...24 Red Eye Correction...25 Inserting Text...25 Correcting Levels...26 Correcting Tone Curves...26 Adjusting Sharpness -

Software Guide for Macintosh
Page 24
... and selecting [Edit still image]. RGB Adjustment Table of the image and leave only the necessary portions. Color/Brightness Adjustment Adjusts the images' RGB values (red, green, blue) and the saturation and brightness. Trimming - Saturation, Brightness Procedures 1 Double-click an image. 2 [Edit] and [Color/ Brightness Adjustment]. • Movies and RAW images...
... and selecting [Edit still image]. RGB Adjustment Table of the image and leave only the necessary portions. Color/Brightness Adjustment Adjusts the images' RGB values (red, green, blue) and the saturation and brightness. Trimming - Saturation, Brightness Procedures 1 Double-click an image. 2 [Edit] and [Color/ Brightness Adjustment]. • Movies and RAW images...

Software Guide for Macintosh
Page 25
.... Table of the eye to correct. Things to Remember Mastering the Basics More Advanced Techniques Appendices Red Eye Correction Restores eye appearance to the original color when light reflected from the flash makes them appear red. • Click [Start] when Auto Mode is selected. • Switch to Manual Mode if Auto Mode... message to insert text onto the image. You can freely adjust the font, size, color and text attributes. Procedures 1 Double-click an image. 2 [Edit] and [Red Eye Correction]. • Movies and RAW images cannot be edited.
.... Table of the eye to correct. Things to Remember Mastering the Basics More Advanced Techniques Appendices Red Eye Correction Restores eye appearance to the original color when light reflected from the flash makes them appear red. • Click [Start] when Auto Mode is selected. • Switch to Manual Mode if Auto Mode... message to insert text onto the image. You can freely adjust the font, size, color and text attributes. Procedures 1 Double-click an image. 2 [Edit] and [Red Eye Correction]. • Movies and RAW images cannot be edited.
Software Guide for Windows
Page 4
......19 Display Modes ...20 Display Control Panel...20 Browser Area Tasks...21 Properties Window...22 Viewer Window...23 More Advanced Techniques 24 Editing Images...24 Red Eye Correction...24 Auto Adjustment...24 Color/Brightness Adjustment...25 Adjusting Sharpness - Emphasizing Outlines 25 Trimming - PhotoStitch 29 Editing Movies...30 Converting RAW Images...
......19 Display Modes ...20 Display Control Panel...20 Browser Area Tasks...21 Properties Window...22 Viewer Window...23 More Advanced Techniques 24 Editing Images...24 Red Eye Correction...24 Auto Adjustment...24 Color/Brightness Adjustment...25 Adjusting Sharpness - Emphasizing Outlines 25 Trimming - PhotoStitch 29 Editing Movies...30 Converting RAW Images...

Software Guide for Windows
Page 24
... window: [Edit] and [Edit Image]. 2 Select an image. 3 [2. Select Editing Tool] 4 [Auto Adjustment] 5 [3. Table of Contents 24 Red Eye Correction Restores eye appearance to correct. Finish] • Movies and RAW images cannot be edited. Automatically adjusts the image color balance and brightness. Select... Editing Tool] 4 [Red Eye Correction] 5 [3. To preserve the original image intact, change the file name when saving the edited image. • This section ...
... window: [Edit] and [Edit Image]. 2 Select an image. 3 [2. Select Editing Tool] 4 [Auto Adjustment] 5 [3. Table of Contents 24 Red Eye Correction Restores eye appearance to correct. Finish] • Movies and RAW images cannot be edited. Automatically adjusts the image color balance and brightness. Select... Editing Tool] 4 [Red Eye Correction] 5 [3. To preserve the original image intact, change the file name when saving the edited image. • This section ...

Software Guide for Windows
Page 55
...various effects. Connects to the appropriate size for transmission by e-mail. You can also use it to YouTube. Converts the selected images to CANON iMAGE GATEWAY and opens the registration page. Allows you to a CD-R/RW disk for use with My Camera Settings. Extracts still images from...movie size or type, and export it as cropping, image correction, inserting comments, and red-eye correction. Connects to the top of the page. Connects to CANON iMAGE GATEWAY and goes to CANON iMAGE GATEWAY and downloads images and sounds for backup. Connects to change the image size ...
...various effects. Connects to the appropriate size for transmission by e-mail. You can also use it to YouTube. Converts the selected images to CANON iMAGE GATEWAY and opens the registration page. Allows you to a CD-R/RW disk for use with My Camera Settings. Extracts still images from...movie size or type, and export it as cropping, image correction, inserting comments, and red-eye correction. Connects to the top of the page. Connects to CANON iMAGE GATEWAY and goes to CANON iMAGE GATEWAY and downloads images and sounds for backup. Connects to change the image size ...
PowerShot SX230 HS / SX220 HS Camera User Guide
Page 7
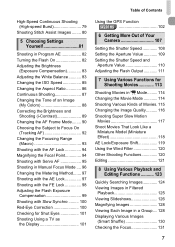
... with the FE Lock 98 Adjusting the Flash Exposure Compensation 99 Shooting with Slow Synchro ......... 100 Red-Eye Correction 100 Checking for Shut Eyes 101 Shooting Using a TV as the Display 101 Using the GPS Function SX230 HS 102 6 Getting More Out of Your Camera 107 Setting the Shutter Speed 108 Setting the...
... with the FE Lock 98 Adjusting the Flash Exposure Compensation 99 Shooting with Slow Synchro ......... 100 Red-Eye Correction 100 Checking for Shut Eyes 101 Shooting Using a TV as the Display 101 Using the GPS Function SX230 HS 102 6 Getting More Out of Your Camera 107 Setting the Shutter Speed 108 Setting the...
PowerShot SX230 HS / SX220 HS Camera User Guide
Page 8
... Category 141 Rotating Images 145 Resizing Images 146 Trimming 147 Adding Effects with the My Colors Function 148 Correcting the Brightness (i-Contrast 149 Correcting the Red-Eye Effect .......150 9 Printing 151 Printing Images 152 Choosing Images for Printing (DPOF 159 10 Customizing Camera Settings 163 Changing Camera Settings 164 Changing Shooting...
... Category 141 Rotating Images 145 Resizing Images 146 Trimming 147 Adding Effects with the My Colors Function 148 Correcting the Brightness (i-Contrast 149 Correcting the Red-Eye Effect .......150 9 Printing 151 Printing Images 152 Choosing Images for Printing (DPOF 159 10 Customizing Camera Settings 163 Changing Camera Settings 164 Changing Shooting...
PowerShot SX230 HS / SX220 HS Camera User Guide
Page 15
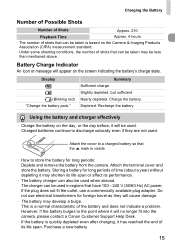
...and charger effectively • Charge the battery on the day, or the day before, it will no longer fit into the camera, please contact a Canon Customer Support Help Desk. • If the battery is quickly depleted even after charging, it has reached the end of its performance. • The... battery charger can also be used when abroad. Attach the cover to the point where it may be less than mentioned above. Display (Blinking red) "Change the battery pack." Charge the battery. Attach the terminal cover and store the battery. However, if the battery bulges to a charged battery...
...and charger effectively • Charge the battery on the day, or the day before, it will no longer fit into the camera, please contact a Canon Customer Support Help Desk. • If the battery is quickly depleted even after charging, it has reached the end of its performance. • The... battery charger can also be used when abroad. Attach the cover to the point where it may be less than mentioned above. Display (Blinking red) "Change the battery pack." Charge the battery. Attach the terminal cover and store the battery. However, if the battery bulges to a charged battery...

PowerShot SX230 HS / SX220 HS Camera User Guide
Page 26
... right of the screen? The subject is at maximum telephoto (i). • What if the lamp lights when the shutter button is pressed halfway? To reduce red-eye and to display a blue frame where focus and exposure will appear in focusing, the lamp may appear on the subject you want to shoot...
... right of the screen? The subject is at maximum telephoto (i). • What if the lamp lights when the shutter button is pressed halfway? To reduce red-eye and to display a blue frame where focus and exposure will appear in focusing, the lamp may appear on the subject you want to shoot...
PowerShot SX230 HS / SX220 HS Camera User Guide
Page 88
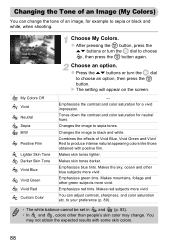
... Vivid Neutral Sepia B/W Positive Film Lighter Skin Tone Darker Skin Tone Vivid Blue Vivid Green Vivid Red Custom Color Choose My Colors. Combines the effects of Vivid Blue, Vivid Green and Vivid Red to black and white. You can change . to your preference (p. 89). • The ...or turn the  dial to sepia tones. Choose an option. Makes skin tones darker. Emphasizes blue tints. Emphasizes green tints. Makes red subjects more vivid. Tones down the contrast and color saturation for a vivid impression. Makes mountains, foliage and other blue subjects more vivid. ...
... Vivid Neutral Sepia B/W Positive Film Lighter Skin Tone Darker Skin Tone Vivid Blue Vivid Green Vivid Red Custom Color Choose My Colors. Combines the effects of Vivid Blue, Vivid Green and Vivid Red to black and white. You can change . to your preference (p. 89). • The ...or turn the  dial to sepia tones. Choose an option. Makes skin tones darker. Emphasizes blue tints. Emphasizes green tints. Makes red subjects more vivid. Tones down the contrast and color saturation for a vivid impression. Makes mountains, foliage and other blue subjects more vivid. ...

PowerShot SX230 HS / SX220 HS Camera User Guide
Page 89
...] from the 4 tab, then press the qr buttons to complete the setting. Correcting the Brightness and Shooting (i-Contrast) Custom Color The contrast, sharpness, color saturation, red, green, blue, and skin tones in an image can be corrected properly. • You can detect areas in contrast, the camera will appear on p. 88...
...] from the 4 tab, then press the qr buttons to complete the setting. Correcting the Brightness and Shooting (i-Contrast) Custom Color The contrast, sharpness, color saturation, red, green, blue, and skin tones in an image can be corrected properly. • You can detect areas in contrast, the camera will appear on p. 88...

PowerShot SX230 HS / SX220 HS Camera User Guide
Page 100
z Even if the flash fires, ensure that the light from moving and blurring the image. Red-Eye Correction You can automatically correct red-eye that occurs in images taken with the flash. Choose the setting. X Once set , Œ will appear on the screen. 100 will appear on the ...; dial to prevent the camera from the flash cannot reach. After pressing the r button, press the qr buttons or turn the  dial to choose [Red-Eye Corr.], then press the qr buttons to brighten the background that the main subject does not move until the shutter sound ends. Shooting with...
z Even if the flash fires, ensure that the light from moving and blurring the image. Red-Eye Correction You can automatically correct red-eye that occurs in images taken with the flash. Choose the setting. X Once set , Œ will appear on the screen. 100 will appear on the ...; dial to prevent the camera from the flash cannot reach. After pressing the r button, press the qr buttons or turn the  dial to choose [Red-Eye Corr.], then press the qr buttons to brighten the background that the main subject does not move until the shutter sound ends. Shooting with...

PowerShot SX230 HS / SX220 HS Camera User Guide
Page 101
..., the screen in Step 2 will appear. z Press the n button to choose [Blink Detection] from the 4 tab, then press the qr buttons to areas other than red eyes. TV display is only available for Shut Eyes When the camera detects the possibility that people have set the camera to a TV, follow the... Steps in W, or mode. For example, when red make-up has been used around eyes. • You can use a TV to display the camera screen content while shooting. • To connect the camera...
..., the screen in Step 2 will appear. z Press the n button to choose [Blink Detection] from the 4 tab, then press the qr buttons to areas other than red eyes. TV display is only available for Shut Eyes When the camera detects the possibility that people have set the camera to a TV, follow the... Steps in W, or mode. For example, when red make-up has been used around eyes. • You can use a TV to display the camera screen content while shooting. • To connect the camera...
PowerShot SX230 HS / SX220 HS Camera User Guide
Page 132
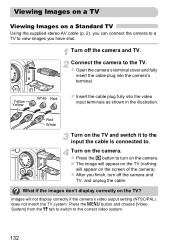
... correctly on the TV and switch it to the input the cable is connected to. Turn off the camera and TV, and unplug the cable. Red White Turn on the TV? X The image will appear on the TV (nothing will not display correctly if the camera's video output setting (NTSC/PAL...) does not match the TV system. Images will appear on the camera. Yellow Yellow White Red z Insert the cable plug fully into the camera's terminal. z Press the 1 button to view images you have shot. z After you finish, turn on a Standard TV...
... correctly on the TV and switch it to the input the cable is connected to. Turn off the camera and TV, and unplug the cable. Red White Turn on the TV? X The image will appear on the TV (nothing will not display correctly if the camera's video output setting (NTSC/PAL...) does not match the TV system. Images will appear on the camera. Yellow Yellow White Red z Insert the cable plug fully into the camera's terminal. z Press the 1 button to view images you have shot. z After you finish, turn on a Standard TV...

PowerShot SX230 HS / SX220 HS Camera User Guide
Page 150
... the n button to choose [New File], then press the m button. X Red-eye detected by the camera will appear around the corrected portion. Eye Correction] from...m button. X The image will be corrected and a frame will be saved as a new file. Correcting the Red-Eye Effect You can magnify or reduce the size of the image using the procedures in images and save them as ...new files. z Press the qr buttons or turn the  dial to choose [Red- z Follow Step 5 on p. 146. • Some images may not be corrected properly. • When [Overwrite]...
... the n button to choose [New File], then press the m button. X Red-eye detected by the camera will appear around the corrected portion. Eye Correction] from...m button. X The image will be corrected and a frame will be saved as a new file. Correcting the Red-Eye Effect You can magnify or reduce the size of the image using the procedures in images and save them as ...new files. z Press the qr buttons or turn the  dial to choose [Red- z Follow Step 5 on p. 146. • Some images may not be corrected properly. • When [Overwrite]...

PowerShot SX230 HS / SX220 HS Camera User Guide
Page 154
.... Off - of Copies Choose the number of copies. Default Follows the printer's settings. Paper Settings - File No. Trimming - NR* Reduces image noise. Red-Eye 2* Uses [NR], [Face image. ] and [Red-Eye 1] to be more vivid. Face * Corrects brightness for printing (p. 155). Off - Sets the paper size and layout (p. 156). * Only appears when...
.... Off - of Copies Choose the number of copies. Default Follows the printer's settings. Paper Settings - File No. Trimming - NR* Reduces image noise. Red-Eye 2* Uses [NR], [Face image. ] and [Red-Eye 1] to be more vivid. Face * Corrects brightness for printing (p. 155). Off - Sets the paper size and layout (p. 156). * Only appears when...

PowerShot SX230 HS / SX220 HS Camera User Guide
Page 172
...z Choose [Review], then press the qr buttons to choose [Off]. z Choose [Review Info], then press the qr buttons to reduce the red-eye effect that occurs when shooting in dark conditions with the flash. Off Images will not display. Changing Shooting Function Settings Turning Off the... Red-Eye Reduction Function The red-eye reduction lamp lights in order to choose an option. You can change the way the image displays right after shooting. ...
...z Choose [Review], then press the qr buttons to choose [Off]. z Choose [Review Info], then press the qr buttons to reduce the red-eye effect that occurs when shooting in dark conditions with the flash. Off Images will not display. Changing Shooting Function Settings Turning Off the... Red-Eye Reduction Function The red-eye reduction lamp lights in order to choose an option. You can change the way the image displays right after shooting. ...
PowerShot SX230 HS / SX220 HS Camera User Guide
Page 180
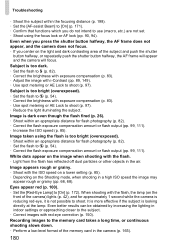
...on the image when shooting with i-Contrast (pp. 89, 149). • Use spot metering or AE Lock to shoot (p. 97). Eyes appear red (p. 100). • Set the [Red-Eye Lamp] to shoot (p. 97). • Reduce the light illuminating the subject. Recording images to ! (p. 54). • Correct the ...set. • Shoot using the flash is too bright (overexposed). • Shoot within an appropriate distance for approximately 1 second while the camera is reducing red-eye, it is too dark. • Set the flash to shoot. Subject is not possible to h (p. 82). • Correct the brightness with ...
...on the image when shooting with i-Contrast (pp. 89, 149). • Use spot metering or AE Lock to shoot (p. 97). Eyes appear red (p. 100). • Set the [Red-Eye Lamp] to shoot (p. 97). • Reduce the light illuminating the subject. Recording images to ! (p. 54). • Correct the ...set. • Shoot using the flash is too bright (overexposed). • Shoot within an appropriate distance for approximately 1 second while the camera is reducing red-eye, it is too dark. • Set the flash to shoot. Subject is not possible to h (p. 82). • Correct the brightness with ...
PowerShot SX230 HS / SX220 HS Camera User Guide
Page 184
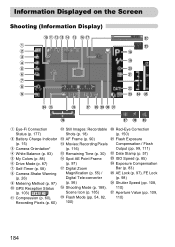
... My Colors (p. 88) Drive Mode (p. 87) Self-Timer (p. 58) Camera Shake Warning (p. 26) Metering Method (p. 97) GPS Reception Status (p. 103) SX230 HS Compression (p. 60), Recording Pixels (p. 60) Still Images: Recordable Shots (p. 18) AF Frame (p. 90) Movies: Recording Pixels (p. 116) Remaining Time (p. 30... Zoom Magnification (p. 55) / Digital Tele-converter (p. 56) Shooting Mode (p. 188), Scene Icon (p. 185) Flash Mode (pp. 54, 82, 100) Red-Eye Correction (p. 150) Flash Exposure Compensation / Flash Output (pp. 99, 111) Date Stamp (p. 57) ISO Speed (p. 85) Exposure Compensation Bar (p. ...
... My Colors (p. 88) Drive Mode (p. 87) Self-Timer (p. 58) Camera Shake Warning (p. 26) Metering Method (p. 97) GPS Reception Status (p. 103) SX230 HS Compression (p. 60), Recording Pixels (p. 60) Still Images: Recordable Shots (p. 18) AF Frame (p. 90) Movies: Recording Pixels (p. 116) Remaining Time (p. 30... Zoom Magnification (p. 55) / Digital Tele-converter (p. 56) Shooting Mode (p. 188), Scene Icon (p. 185) Flash Mode (pp. 54, 82, 100) Red-Eye Correction (p. 150) Flash Exposure Compensation / Flash Output (pp. 99, 111) Date Stamp (p. 57) ISO Speed (p. 85) Exposure Compensation Bar (p. ...


