Camera User Guide
Page 3
...9679;● The following camera buttons and controls are simply referred to make sure the images were recorded correctly. Please note that Canon Inc., its subsidiaries and affiliates, and its distributors are produced under default settings. ●● For convenience, all supported ...page number) ●● Instructions in parentheses indicate the numbers of purchase. Preliminary Notes and Legal Information ●● Take and review some test shots initially to as red or black dots. Conventions in This Guide ●● In this guide apply to represent ...
...9679;● The following camera buttons and controls are simply referred to make sure the images were recorded correctly. Please note that Canon Inc., its subsidiaries and affiliates, and its distributors are produced under default settings. ●● For convenience, all supported ...page number) ●● Instructions in parentheses indicate the numbers of purchase. Preliminary Notes and Legal Information ●● Take and review some test shots initially to as red or black dots. Conventions in This Guide ●● In this guide apply to represent ...

Camera User Guide
Page 56
...Flash Control] on the [ 2] tab, and then press the [ ] button. 2 Configure the setting. Changing the Image Display Period after Shots 1 Access the [Review image after shooting] on the [ 5] tab, and then press the [ ] button. 2 Configure the setting. zzChoose [Display Time], and then choose the desired ...shot is displayed, you can take another shot by pressing the shutter button halfway again. zzPress the [ ] button, choose [Review image after shooting] screen. Preventing the Red-Eye Reduction Lamp from Lighting Up Still Images Movies You can change how long images...
...Flash Control] on the [ 2] tab, and then press the [ ] button. 2 Configure the setting. Changing the Image Display Period after Shots 1 Access the [Review image after shooting] on the [ 5] tab, and then press the [ ] button. 2 Configure the setting. zzChoose [Display Time], and then choose the desired ...shot is displayed, you can take another shot by pressing the shutter button halfway again. zzPress the [ ] button, choose [Review image after shooting] screen. Preventing the Red-Eye Reduction Lamp from Lighting Up Still Images Movies You can change how long images...

Camera User Guide
Page 63
... effect. Images resemble old photos, with subdued contrast. Movies 1 Choose [ ]. zzTurn the [ ] ring to make sure you obtain the desired results. Images resemble vivid illustrations. Review the image in old photographs. zzA preview is not shown in "Specific Scenes" (=60) and choose [ ]. Choose from five effect levels. 1 Choose [ ]. Before Use Basic...
... effect. Images resemble old photos, with subdued contrast. Movies 1 Choose [ ]. zzTurn the [ ] ring to make sure you obtain the desired results. Images resemble vivid illustrations. Review the image in old photographs. zzA preview is not shown in "Specific Scenes" (=60) and choose [ ]. Choose from five effect levels. 1 Choose [ ]. Before Use Basic...

Camera User Guide
Page 105
... possible to browse through images quickly. zzPress and hold the [ ][ ] buttons to single-image display, press the [ ] button. zzPress the [ ] button. Playback Mode Have fun reviewing your shots, and browse or edit them on a computer, or images from other cameras.
... possible to browse through images quickly. zzPress and hold the [ ][ ] buttons to single-image display, press the [ ] button. zzPress the [ ] button. Playback Mode Have fun reviewing your shots, and browse or edit them on a computer, or images from other cameras.

Camera User Guide
Page 108
... Play back Creative Shot movies recorded in [ day of still image shooting is not available for images that lack this information. ●● You can review this information in the GPS information display. zzThe movie recorded automatically on the camera, adding information such as follows. zzPress the [ ] button and choose [Play...
... Play back Creative Shot movies recorded in [ day of still image shooting is not available for images that lack this information. ●● You can review this information in the GPS information display. zzThe movie recorded automatically on the camera, adding information such as follows. zzPress the [ ] button and choose [Play...

Camera User Guide
Page 123
... then press the [ ] button. 3 Choose an image size. zzPress the [ ] button. 2 Save the new image. zzAfter [Save new image?] is now saved as a new file. 3 Review the new image. Before Use Basic Guide Advanced Guide Camera Basics Auto Mode / Hybrid Auto Mode Other Shooting Modes P Mode Tv, Av, M, and C Mode Playback...
... then press the [ ] button. 3 Choose an image size. zzPress the [ ] button. 2 Save the new image. zzAfter [Save new image?] is now saved as a new file. 3 Review the new image. Before Use Basic Guide Advanced Guide Camera Basics Auto Mode / Hybrid Auto Mode Other Shooting Modes P Mode Tv, Av, M, and C Mode Playback...

Camera User Guide
Page 124
... [ ], and then press the [ ] button. zzPress the [ ] button and follow step 3 in "Resizing Images" (= 123). 4 Save as a new image and review. zzFollow step 2 in "Resizing Images" (= 123). zzTo change the frame orientation, turn the [ ] dial to save as a separate image file. 1 Access the setting screen.... To switch between the cropped image and the cropping frame, press the [ ] button repeatedly. 4 Save as a new image and review. Before Use Basic Guide Advanced Guide Camera Basics Auto Mode / Hybrid Auto Mode Other Shooting Modes P Mode Tv, Av, M, and C Mode ...
... [ ], and then press the [ ] button. zzPress the [ ] button and follow step 3 in "Resizing Images" (= 123). 4 Save as a new image and review. zzFollow step 2 in "Resizing Images" (= 123). zzTo change the frame orientation, turn the [ ] dial to save as a separate image file. 1 Access the setting screen.... To switch between the cropped image and the cropping frame, press the [ ] button repeatedly. 4 Save as a new image and review. Before Use Basic Guide Advanced Guide Camera Basics Auto Mode / Hybrid Auto Mode Other Shooting Modes P Mode Tv, Av, M, and C Mode ...

Camera User Guide
Page 125
... choose [i-Contrast] on the [ 3] tab (= 31). 2 Choose an image. Correcting Image Brightness (i-Contrast) Still Images Movies Excessively dark image areas (such as a new image and review. zzFollow step 2 in step 3 and then touching it on each time, and you may vary slightly from four correction levels, and then save the edited...
... choose [i-Contrast] on the [ 3] tab (= 31). 2 Choose an image. Correcting Image Brightness (i-Contrast) Still Images Movies Excessively dark image areas (such as a new image and review. zzFollow step 2 in step 3 and then touching it on each time, and you may vary slightly from four correction levels, and then save the edited...

Camera User Guide
Page 126
...also save the corrected image as a separate file. 1 Choose [Red-Eye Correction]. 4 Save as needed. zzEnlarge or reduce images as a new image and review. zzPress the [ ] button and follow step 3 in "Resizing Images" (= 123). ●● Some images may look grainy after repeated editing using [.... ●● RAW images cannot be overwritten. ●● You can save images by the camera is now saved as a new image and review. zzFollow step 2 in step 4. zzPress the [ ] button and follow step 3 in "Resizing Images" (= 123). ●● For some ...
...also save the corrected image as a separate file. 1 Choose [Red-Eye Correction]. 4 Save as needed. zzEnlarge or reduce images as a new image and review. zzPress the [ ] button and follow step 3 in "Resizing Images" (= 123). ●● Some images may look grainy after repeated editing using [.... ●● RAW images cannot be overwritten. ●● You can save images by the camera is now saved as a new image and review. zzFollow step 2 in step 4. zzPress the [ ] button and follow step 3 in "Resizing Images" (= 123). ●● For some ...

Camera User Guide
Page 127
...(1) is the movie editing panel, and (2) is now played. zzPress the [ ][ ] buttons to choose [ ], and then press the [ ] button. zzIf you move [ ] or [ ] to cut . 3 Review the edited movie. zzPress the buttons or turn the [ ] dial), and then press the [ ] button. 4 Save the edited movie. Editing Movies Still Images Movies You...
...(1) is the movie editing panel, and (2) is now played. zzPress the [ ][ ] buttons to choose [ ], and then press the [ ] button. zzIf you move [ ] or [ ] to cut . 3 Review the edited movie. zzPress the buttons or turn the [ ] dial), and then press the [ ] button. 4 Save the edited movie. Editing Movies Still Images Movies You...

Camera User Guide
Page 201
[ 2] Tab Review image after shooting (=56) Display Time Off/Quick *1 2 sec./4 sec./8 sec. *1 Hold *1 Display Info Off *1 Detailed *1 Touch Shutter (=43) Enable *1 Disable *1 Face ID Settings (=45) ...
[ 2] Tab Review image after shooting (=56) Display Time Off/Quick *1 2 sec./4 sec./8 sec. *1 Hold *1 Display Info Off *1 Detailed *1 Touch Shutter (=43) Enable *1 Disable *1 Face ID Settings (=45) ...

PowerShot G-Series Brochure
Page 9
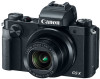
... to a minimum when recording video. THE PRECISION OF FINE CONTROL 16 Built-in Electronic Viewfinder The PowerShot G5 X camera's 2.36 million dot electronic viewfinder adds flexibility in how you use customizable dials and a quiet control ring, the PowerShot G5 X camera lets you adjust the camera's settings without searching, and keep the information you want... see it. 175° 270° 17 Intuitively Easy With easy-to-use the camera. Customize the image information you can easily compose, adjust and review.
... to a minimum when recording video. THE PRECISION OF FINE CONTROL 16 Built-in Electronic Viewfinder The PowerShot G5 X camera's 2.36 million dot electronic viewfinder adds flexibility in how you use customizable dials and a quiet control ring, the PowerShot G5 X camera lets you adjust the camera's settings without searching, and keep the information you want... see it. 175° 270° 17 Intuitively Easy With easy-to-use the camera. Customize the image information you can easily compose, adjust and review.
