User Guide
Page 1
... jump to access other pages. : Next page : Previous page : Page before you can access topics by clicking their titles. 6 Setting Menu 7 Accessories 8 Appendix Index © CANON INC. 2013 CEL-ST9EA210 1 Cover Preliminary Notes and Legal Information Contents: Basic Operations Basic Guide Advanced Guide Camera User Guide 1 Camera Basics 2 Smart Auto Mode...
... jump to access other pages. : Next page : Previous page : Page before you can access topics by clicking their titles. 6 Setting Menu 7 Accessories 8 Appendix Index © CANON INC. 2013 CEL-ST9EA210 1 Cover Preliminary Notes and Legal Information Contents: Basic Operations Basic Guide Advanced Guide Camera User Guide 1 Camera Basics 2 Smart Auto Mode...
User Guide
Page 2
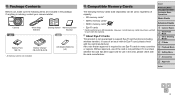
..., regardless of capacity. • SD memory cards* • SDHC memory cards* • SDXC memory cards* • Eye-Fi cards * Cards conforming to SD standards. Camera A2600 Wrist Strap WS-800 Getting Started Warranty System Booklet A1400 Battery Pack NB-11L Battery Charger CB-2LF/CB-2LFE • A memory card is missing...
..., regardless of capacity. • SD memory cards* • SDHC memory cards* • SDXC memory cards* • Eye-Fi cards * Cards conforming to SD standards. Camera A2600 Wrist Strap WS-800 Getting Started Warranty System Booklet A1400 Battery Pack NB-11L Battery Charger CB-2LF/CB-2LFE • A memory card is missing...
User Guide
Page 3
...• The LCD monitor may appear as red or black dots. Please note that even for protection against scratches during shipment. For Canon Customer Support, please refer to the warranty information for contact information. • Although the LCD monitor is machine readable. •...recorded by the camera are not liable for any consequential damages arising from unauthorized recording that infringes on copyright law, and note that Canon Inc., its subsidiaries and affiliates, and its distributors are intended for personal use , photography may become warm. If covered, remove...
...• The LCD monitor may appear as red or black dots. Please note that even for protection against scratches during shipment. For Canon Customer Support, please refer to the warranty information for contact information. • Although the LCD monitor is machine readable. •...recorded by the camera are not liable for any consequential damages arising from unauthorized recording that infringes on copyright law, and note that Canon Inc., its subsidiaries and affiliates, and its distributors are intended for personal use , photography may become warm. If covered, remove...
User Guide
Page 4
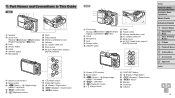
Part Names and Conventions in This Guide A2600 Speaker Zoom lever Shooting: / Playback: / Lens Shutter button Lamp ON/OFF button Microphone Flash Tripod socket Memory card/battery cover Indicator DC coupler cable port ...
Part Names and Conventions in This Guide A2600 Speaker Zoom lever Shooting: / Playback: / Lens Shutter button Lamp ON/OFF button Microphone Flash Tripod socket Memory card/battery cover Indicator DC coupler cable port ...
User Guide
Page 5
... Mode 6 Setting Menu 7 Accessories 8 Appendix Index 5 Still Images : Indicates that differ depending on the camera model: A2600 : Functions and precautions for the PowerShot A2600 only A1400 : Functions and precautions for the PowerShot A1400 only • This guide uses PowerShot A2600 illustrations and screenshots for all supported memory cards are simply referred to as the "memory card...
... Mode 6 Setting Menu 7 Accessories 8 Appendix Index 5 Still Images : Indicates that differ depending on the camera model: A2600 : Functions and precautions for the PowerShot A2600 only A1400 : Functions and precautions for the PowerShot A1400 only • This guide uses PowerShot A2600 illustrations and screenshots for all supported memory cards are simply referred to as the "memory card...
User Guide
Page 6
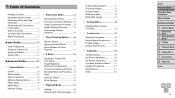
Menu 30 MENU Menu 31 Indicator Display 32 Specific Scenes 46 Applying Special Effects 48 Special Modes for Other Purposes 51 4 P Mode 53 Shooting in This Guide 4 Table of Contents 6 Contents: Basic Operations ...........7 Safety Precautions 8 2 Smart Auto Mode 33 Shooting (Smart Auto 34 Common, Convenient Features...38 Image Customization Features....42 Helpful Shooting Features ...........44 Customizing Camera Operation 44 3 Other Shooting Modes........45 Basic Guide 11 Initial Preparations 12 Trying the Camera Out 18 Using the Software 21 System Map 26 Advanced Guide...
Menu 30 MENU Menu 31 Indicator Display 32 Specific Scenes 46 Applying Special Effects 48 Special Modes for Other Purposes 51 4 P Mode 53 Shooting in This Guide 4 Table of Contents 6 Contents: Basic Operations ...........7 Safety Precautions 8 2 Smart Auto Mode 33 Shooting (Smart Auto 34 Common, Convenient Features...38 Image Customization Features....42 Helpful Shooting Features ...........44 Customizing Camera Operation 44 3 Other Shooting Modes........45 Basic Guide 11 Initial Preparations 12 Trying the Camera Out 18 Using the Software 21 System Map 26 Advanced Guide...
User Guide
Page 7
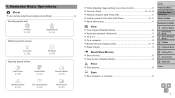
Contents: Basic Operations 4 Shoot Use camera-determined settings (Auto Mode 34 Shooting people well I Portraits (= 46) P Against Snow (= 46) Matching specific scenes Low Light (= 46) Applying special effects t Fireworks (= 46) Vivid Colors (= 48) Poster Effect (= 48) Fish-Eye Effect (= 48) Miniature Effect (= 49) Toy Camera Effect (= 50) Monochrome (= 50) While adjusting image settings (Live View Control 47 Focus on faces 34, 46, 59 Without using the flash (Flash Off 41 Include yourself in the shot...
Contents: Basic Operations 4 Shoot Use camera-determined settings (Auto Mode 34 Shooting people well I Portraits (= 46) P Against Snow (= 46) Matching specific scenes Low Light (= 46) Applying special effects t Fireworks (= 46) Vivid Colors (= 48) Poster Effect (= 48) Fish-Eye Effect (= 48) Miniature Effect (= 49) Toy Camera Effect (= 50) Monochrome (= 50) While adjusting image settings (Live View Control 47 Focus on faces 34, 46, 59 Without using the flash (Flash Off 41 Include yourself in the shot...
User Guide
Page 8
... immediately if it from infants when using a dry cloth, wipe away any separately sold accessories you read the safety precautions described below. A2600 • Unplug the power cord periodically, and using the flash. • Store this equipment out of the reach of children and ...the equipment. • Be sure to people's eyes. The electromagnetic waves emitted by the flash could damage your camera retailer or a Canon Customer Support Help Desk. Exercise adequate caution when using the product, please ensure that exceeds the rated capacity of the power outlet, and...
... immediately if it from infants when using a dry cloth, wipe away any separately sold accessories you read the safety precautions described below. A2600 • Unplug the power cord periodically, and using the flash. • Store this equipment out of the reach of children and ...the equipment. • Be sure to people's eyes. The electromagnetic waves emitted by the flash could damage your camera retailer or a Canon Customer Support Help Desk. Exercise adequate caution when using the product, please ensure that exceeds the rated capacity of the power outlet, and...
User Guide
Page 9
...Other Shooting Modes 4 P Mode 5 Playback Mode 6 Setting Menu 7 Accessories 8 Appendix Index 9 This is complete, or when you are not using the camera. A2600 • Unplug the battery charger from the power outlet after charging is due to the high intensity of the flash burning dust and foreign materials...the unit. • Remove and store the battery/batteries when you discard the battery/batteries, cover the terminals with your fingers or clothing. A2600 • Do not place the battery near pets. This may occur. • Before you are left inside the camera, damage caused by...
...Other Shooting Modes 4 P Mode 5 Playback Mode 6 Setting Menu 7 Accessories 8 Appendix Index 9 This is complete, or when you are not using the camera. A2600 • Unplug the battery charger from the power outlet after charging is due to the high intensity of the flash burning dust and foreign materials...the unit. • Remove and store the battery/batteries when you discard the battery/batteries, cover the terminals with your fingers or clothing. A2600 • Do not place the battery near pets. This may occur. • Before you are left inside the camera, damage caused by...

User Guide
Page 10
Doing so may cause malfunctions or damage the screen. Doing so may cause malfunctions or damage the screen. • When putting the camera in your bag, ensure that hard objects do not come into contact with the camera in your pocket. Cover Preliminary Notes and Legal Information Contents: Basic Operations Basic Guide Advanced Guide 1 Camera Basics 2 Smart Auto Mode 3 Other Shooting Modes 4 P Mode 5 Playback Mode 6 Setting Menu 7 Accessories 8 Appendix Index 10 • Do not sit down with the screen. • Do not attach any hard objects to the camera.
Doing so may cause malfunctions or damage the screen. Doing so may cause malfunctions or damage the screen. • When putting the camera in your bag, ensure that hard objects do not come into contact with the camera in your pocket. Cover Preliminary Notes and Legal Information Contents: Basic Operations Basic Guide Advanced Guide 1 Camera Basics 2 Smart Auto Mode 3 Other Shooting Modes 4 P Mode 5 Playback Mode 6 Setting Menu 7 Accessories 8 Appendix Index 10 • Do not sit down with the screen. • Do not attach any hard objects to the camera.

User Guide
Page 11
4 Basic Guide Gives basic instructions, from initial preparations to shooting, playback, and saving on a computer Initial Preparations 12 Trying the Camera Out 18 Using the Software 21 System Map 26 Cover Preliminary Notes and Legal Information Contents: Basic Operations Basic Guide Advanced Guide 1 Camera Basics 2 Smart Auto Mode 3 Other Shooting Modes 4 P Mode 5 Playback Mode 6 Setting Menu 7 Accessories 8 Appendix Index 11
4 Basic Guide Gives basic instructions, from initial preparations to shooting, playback, and saving on a computer Initial Preparations 12 Trying the Camera Out 18 Using the Software 21 System Map 26 Cover Preliminary Notes and Legal Information Contents: Basic Operations Basic Guide Advanced Guide 1 Camera Basics 2 Smart Auto Mode 3 Other Shooting Modes 4 P Mode 5 Playback Mode 6 Setting Menu 7 Accessories 8 Appendix Index 11
User Guide
Page 12
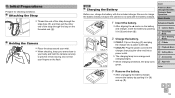
... 6 Setting Menu 7 Accessories 8 Appendix Index 3 Remove the battery. After unplugging the battery charger, remove the battery by pushing it in ( ) and up ( ). 12 A2600 Charging the Battery Before use, charge the battery with the battery charged. 1 Insert the battery. After aligning the marks on the battery...
... 6 Setting Menu 7 Accessories 8 Appendix Index 3 Remove the battery. After unplugging the battery charger, remove the battery by pushing it in ( ) and up ( ). 12 A2600 Charging the Battery Before use, charge the battery with the battery charged. 1 Insert the battery. After aligning the marks on the battery...
User Guide
Page 13
... in malfunction or damage to other objects. For power outlets in a different format, use an electrical transformer designed for traveling, which may damage the battery. A2600 Inserting the Battery Insert the included battery. 1 Open the cover. Slide the cover ( ) and open it ( ). Terminals Battery Lock 2 Insert the battery. ...
... in malfunction or damage to other objects. For power outlets in a different format, use an electrical transformer designed for traveling, which may damage the battery. A2600 Inserting the Battery Insert the included battery. 1 Open the cover. Slide the cover ( ) and open it ( ). Terminals Battery Lock 2 Insert the battery. ...

User Guide
Page 14
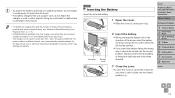
... recording are possible with various batteries, see "Number of the arrow. The battery will pop up. Compatible Batteries Use AA alkaline batteries or Canon AA NiMH batteries (sold separately, = 88). • Due to the variations in performance of other batteries, use of specified batteries only is recommended. • NiMH...
... recording are possible with various batteries, see "Number of the arrow. The battery will pop up. Compatible Batteries Use AA alkaline batteries or Canon AA NiMH batteries (sold separately, = 88). • Due to the variations in performance of other batteries, use of specified batteries only is recommended. • NiMH...

User Guide
Page 15
Note that before using a new memory card (or a memory card formatted in another device), you should format the memory card with this camera (= 82). 1 Check the card's write-protect tab. Recording is not possible on one memory card, see "Number of Shots per Memory Card" (=118). Label 3 Insert the memory card. Insert the memory card facing as you insert it ( ). Inserting memory cards facing the wrong way may damage the camera. 4 Close the cover. Lower the cover ( ) and hold it down as shown until it clicks into the locked position. &#...
Note that before using a new memory card (or a memory card formatted in another device), you should format the memory card with this camera (= 82). 1 Check the card's write-protect tab. Recording is not possible on one memory card, see "Number of Shots per Memory Card" (=118). Label 3 Insert the memory card. Insert the memory card facing as you insert it ( ). Inserting memory cards facing the wrong way may damage the camera. 4 Close the cover. Lower the cover ( ) and hold it down as shown until it clicks into the locked position. &#...

User Guide
Page 16
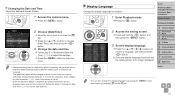
Setting the Date and Time Set the current date and time correctly as follows if the [Date/Time] screen is displayed when you wish (=41). 1 Turn the camera on. Press the ON/OFF button. The [Date/Time] screen is displayed. 2 Set the date and time. Press the buttons to choose an option. Press the buttons to specify the date and time. When finished, press the button. 3 Set the home time zone. Press the buttons to choose your home time zone. 4 Finish the setup process. Press the ...
Setting the Date and Time Set the current date and time correctly as follows if the [Date/Time] screen is displayed when you wish (=41). 1 Turn the camera on. Press the ON/OFF button. The [Date/Time] screen is displayed. 2 Set the date and time. Press the buttons to choose an option. Press the buttons to specify the date and time. When finished, press the button. 3 Set the home time zone. Press the buttons to choose your home time zone. 4 Finish the setup process. Press the ...
User Guide
Page 17
Display Language Change the display language as follows. 1 Access the camera menu. Press the button. 2 Choose [Date/Time]. Move the zoom lever to choose the [3] tab. Press the buttons to choose [Date/Time], and then press the button. 3 Change the date and time. Follow step 2 in "Setting the Date and Time" (=16) to adjust the settings. Press the button to close the menu. • Date/time settings can also change the display language by the camera's built-in date/time battery (backup battery) after the ...
Display Language Change the display language as follows. 1 Access the camera menu. Press the button. 2 Choose [Date/Time]. Move the zoom lever to choose the [3] tab. Press the buttons to choose [Date/Time], and then press the button. 3 Change the date and time. Follow step 2 in "Setting the Date and Time" (=16) to adjust the settings. Press the button to close the menu. • Date/time settings can also change the display language by the camera's built-in date/time battery (backup battery) after the ...
User Guide
Page 18
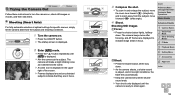
The camera will make a slight clicking noise as it determines the scene. A scene icon is displayed in the upper right of the screen. Frames displayed around any detected subjects indicate that they are displayed to indicate image areas in and enlarge the subject, move it toward (wide angle). 4 Shoot. Cover Preliminary Notes and Legal Information Contents: Basic Operations Basic Guide Advanced Guide 1 Camera Basics 2 Smart Auto Mode 3 Other Shooting Modes 4 P Mode 5 Playback Mode 6 Setting Menu 7 Accessories 8 Appendix Index 18 Shoot. ...
The camera will make a slight clicking noise as it determines the scene. A scene icon is displayed in the upper right of the screen. Frames displayed around any detected subjects indicate that they are displayed to indicate image areas in and enlarge the subject, move it toward (wide angle). 4 Shoot. Cover Preliminary Notes and Legal Information Contents: Basic Operations Basic Guide Advanced Guide 1 Camera Basics 2 Smart Auto Mode 3 Other Shooting Modes 4 P Mode 5 Playback Mode 6 Setting Menu 7 Accessories 8 Appendix Index 18 Shoot. ...
User Guide
Page 19
A2600 Frames displayed around any detected faces indicate that they are identified by a [ To play movies, go to step 3. ] icon. To view the next ...
A2600 Frames displayed around any detected faces indicate that they are identified by a [ To play movies, go to step 3. ] icon. To view the next ...
User Guide
Page 20
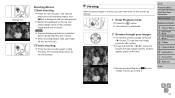
3 Play movies. Press the button, press the buttons to choose [ ], and then press the button again. Playback now begins, and after the movie is finished, [ ] is now erased. To cancel erasure, press the buttons to Shooting mode from Playback mode, press the shutter button halfway. Cover Preliminary Notes and Legal Information Contents: Basic Operations Basic Guide Advanced Guide 1 Camera Basics 2 Smart Auto Mode 3 Other Shooting Modes 4 P Mode 5 Playback Mode 6 Setting Menu 7 Accessories 8 Appendix Index 20 Erasing the Images You ...
3 Play movies. Press the button, press the buttons to choose [ ], and then press the button again. Playback now begins, and after the movie is finished, [ ] is now erased. To cancel erasure, press the buttons to Shooting mode from Playback mode, press the shutter button halfway. Cover Preliminary Notes and Legal Information Contents: Basic Operations Basic Guide Advanced Guide 1 Camera Basics 2 Smart Auto Mode 3 Other Shooting Modes 4 P Mode 5 Playback Mode 6 Setting Menu 7 Accessories 8 Appendix Index 20 Erasing the Images You ...
