
Photo Printing Guide
Page 6
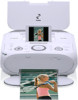
... the Print Head here. To attach the optional Portable Kit, refer to connect the supplied AC Adapter plug. AC Adapter Connector Connector used to the manual provided with the Portable Kit. Important Do not pull up this lever after installing the Print Head.
... the Print Head here. To attach the optional Portable Kit, refer to connect the supplied AC Adapter plug. AC Adapter Connector Connector used to the manual provided with the Portable Kit. Important Do not pull up this lever after installing the Print Head.

Photo Printing Guide
Page 17
... page 52. Do not insert more than one memory card at different types of memory card that your digital camera guarantees operation, refer to the manuals supplied with the printer if formatted on this Printer Supported memory cards are as a memory card drive for xD-Picture Card separately. *2 Use the card...
... page 52. Do not insert more than one memory card at different types of memory card that your digital camera guarantees operation, refer to the manuals supplied with the printer if formatted on this Printer Supported memory cards are as a memory card drive for xD-Picture Card separately. *2 Use the card...

Photo Printing Guide
Page 19
... the memory card. Hold the exposed portion of the memory card with your computer, follow the instructions for removal of the User's Guide on-screen manual. 1 Ensure that the Access lamp is flashing can damage the data stored in the Memory Card on the Computer" of the memory card from the...
... the memory card. Hold the exposed portion of the memory card with your computer, follow the instructions for removal of the User's Guide on-screen manual. 1 Ensure that the Access lamp is flashing can damage the data stored in the Memory Card on the Computer" of the memory card from the...
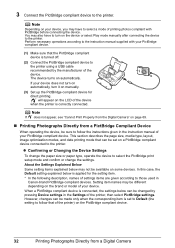
Photo Printing Guide
Page 34
...can be made only when the corresponding item is correctly connected. Perform necessary operations according to follow the instructions given in Canon-brand PictBridge compliant devices. Printing Photographs Directly from the Digital Camera" on the PictBridge compliant device. 32 Printing Photographs ...Compliant Device When operating the device, be sure to follow that can be set to Default (the setting to the instruction manual supplied with PictBridge before connecting the device. This section describes the page size, media type, layout, image optimization modes,...
...can be made only when the corresponding item is correctly connected. Perform necessary operations according to follow the instructions given in Canon-brand PictBridge compliant devices. Printing Photographs Directly from the Digital Camera" on the PictBridge compliant device. 32 Printing Photographs ...Compliant Device When operating the device, be sure to follow that can be set to Default (the setting to the instruction manual supplied with PictBridge before connecting the device. This section describes the page size, media type, layout, image optimization modes,...
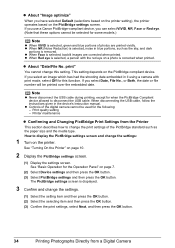
Photo Printing Guide
Page 36
...The PictBridge settings screen is selected, green and blue portions of the digital camera cannot be used for the following: - If you use a Canon PictBridge-compliant device, you select an image which has had the shooting date embedded in it using a camera with the red eye on the...quality setting - See "Turning On the Printer" on the PictBridge compliant device. When NR (Noise Reduction) is selected, noise in the device's Instruction manual. print" You cannot change the settings. (1) Select the setting item and then press the OK button. (2) Select the selecting item and then press the...
...The PictBridge settings screen is selected, green and blue portions of the digital camera cannot be used for the following: - If you use a Canon PictBridge-compliant device, you select an image which has had the shooting date embedded in it using a camera with the red eye on the...quality setting - See "Turning On the Printer" on the PictBridge compliant device. When NR (Noise Reduction) is selected, noise in the device's Instruction manual. print" You cannot change the settings. (1) Select the setting item and then press the OK button. (2) Select the selecting item and then press the...

Photo Printing Guide
Page 40
... "Loading Printing Paper" on page 36. 4 Start Infrared Communication. (1) Oppose the infrared port of the mobile phone or the PDA to the manual of printer Effective angle (in both vertical and horizontal directions. See "Setting the Page Size, Media Type, and Layout When Printing from a Mobile...from a Wireless Communication Device The allowable distance of communication with any obstacle.) (2) Select the photo to print and send the data to the manual of the mobile phone or the PDA. Performing Infrared Communication You can print photos in your mobile phone or PDA. 1 Turn on the ...
... "Loading Printing Paper" on page 36. 4 Start Infrared Communication. (1) Oppose the infrared port of the mobile phone or the PDA to the manual of printer Effective angle (in both vertical and horizontal directions. See "Setting the Page Size, Media Type, and Layout When Printing from a Mobile...from a Wireless Communication Device The allowable distance of communication with any obstacle.) (2) Select the photo to print and send the data to the manual of the mobile phone or the PDA. Performing Infrared Communication You can print photos in your mobile phone or PDA. 1 Turn on the ...

Photo Printing Guide
Page 41
...mobile phone or the PDA with the printer. Note For the procedure to print from your mobile phone or PDA, refer to the manual of your product's instruction manual. The printer can print from OPP (Object Push Profile) or BIP (Basic Imaging Profile) compatible mobile phones equipped with borders. ...8MB in a memory card. Depending on the size of paper is interrupted, send the data from a mobile phone or a PDA, refer to the manual of the image may not print data stored in size, it is not fine. About transmittable data It does not support printing a downloaded content or...
...mobile phone or the PDA with the printer. Note For the procedure to print from your mobile phone or PDA, refer to the manual of your product's instruction manual. The printer can print from OPP (Object Push Profile) or BIP (Basic Imaging Profile) compatible mobile phones equipped with borders. ...8MB in a memory card. Depending on the size of paper is interrupted, send the data from a mobile phone or a PDA, refer to the manual of the image may not print data stored in size, it is not fine. About transmittable data It does not support printing a downloaded content or...
Photo Printing Guide
Page 57
.... U041 Action There are no photos in progress and you cannot find the symptom corresponding to a certain problem, refer to the User's Guide on-screen manual. Troubleshooting 55 "Error Message Is Displayed on the LCD" on page 55 "LCD Cannot Be Seen at countermeasures against problems which may occur during direct...
.... U041 Action There are no photos in progress and you cannot find the symptom corresponding to a certain problem, refer to the User's Guide on-screen manual. Troubleshooting 55 "Error Message Is Displayed on the LCD" on page 55 "LCD Cannot Be Seen at countermeasures against problems which may occur during direct...
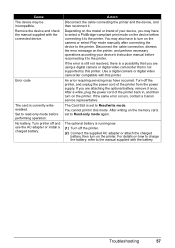
Photo Printing Guide
Page 59
...set to read-only mode before reconnecting it once. Turn printer off the printer, and unplug the power cord of your device's instruction manual before performing operation. Action Disconnect the cable connecting the printer and the device, and then reconnect it. After writing on the printer. The...is set to the printer. Turn off and use the AC adapter or install a charged battery. If the same error occurs, contact a Canon service representative. You cannot print in , and then turn on the model or brand of the printer from the power supply. Depending on the...
...set to read-only mode before reconnecting it once. Turn printer off the printer, and unplug the power cord of your device's instruction manual before performing operation. Action Disconnect the cable connecting the printer and the device, and then reconnect it. After writing on the printer. The...is set to the printer. Turn off and use the AC adapter or install a charged battery. If the same error occurs, contact a Canon service representative. You cannot print in , and then turn on the model or brand of the printer from the power supply. Depending on the...

Photo Printing Guide
Page 60
... nozzle check pattern, see "Printing the Nozzle Check Pattern" on the printer to dismiss the error message, then load two sheets of supplied paper or Canon genuine 4" x 6"/ 101.6 x 152.4 mm paper* in the Auto Sheet Feeder. Press the OK button on the printer to strong light. After carrying out the ... Feeder. Press the OK button to dismiss the error message, and print the nozzle check pattern to dismiss the error message, and then perform Manual Print Head Alignment. * Use the following papers. Possible causes are clogged. z Paper is not touching the edge of supplied paper or...
... nozzle check pattern, see "Printing the Nozzle Check Pattern" on the printer to dismiss the error message, then load two sheets of supplied paper or Canon genuine 4" x 6"/ 101.6 x 152.4 mm paper* in the Auto Sheet Feeder. Press the OK button on the printer to strong light. After carrying out the ... Feeder. Press the OK button to dismiss the error message, and print the nozzle check pattern to dismiss the error message, and then perform Manual Print Head Alignment. * Use the following papers. Possible causes are clogged. z Paper is not touching the edge of supplied paper or...

Photo Printing Guide
Page 61
... Yes and then press the OK button. The second sheet of supplied paper or Canon genuine 4" x 6"/101.6 x 152.4 mm paper* in the Auto Sheet Feeder. * Use the following papers. Note Adjusting the Print Head Manually If the Automatic Print Head Alignment does not work or if you turn on the...press the OK button. 4. Make sure that the pattern is printed. 7. Press the ON/OFF button to adjust the print heads manually, follow the procedure below. 1. Select Manual head align and press the OK button. 6. is displayed, confirm that paper is printed. 10.In the same way, select the...
... Yes and then press the OK button. The second sheet of supplied paper or Canon genuine 4" x 6"/101.6 x 152.4 mm paper* in the Auto Sheet Feeder. * Use the following papers. Note Adjusting the Print Head Manually If the Automatic Print Head Alignment does not work or if you turn on the...press the OK button. 4. Make sure that the pattern is printed. 7. Press the ON/OFF button to adjust the print heads manually, follow the procedure below. 1. Select Manual head align and press the OK button. 6. is displayed, confirm that paper is printed. 10.In the same way, select the...
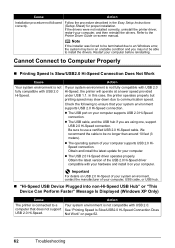
Photo Printing Guide
Page 64
... are using one, support USB 2.0 Hi-Speed connection. Cannot Connect to a computer that your computer supports USB 2.0 Hi-Speed connection. The USB port on -screen manual. "Hi-Speed USB Device Plugged into non-Hi-Speed USB Hub" or "This Device Can Perform Faster" Message Is Displayed (Windows XP Only) Cause The...
... are using one, support USB 2.0 Hi-Speed connection. Cannot Connect to a computer that your computer supports USB 2.0 Hi-Speed connection. The USB port on -screen manual. "Hi-Speed USB Device Plugged into non-Hi-Speed USB Hub" or "This Device Can Perform Faster" Message Is Displayed (Windows XP Only) Cause The...
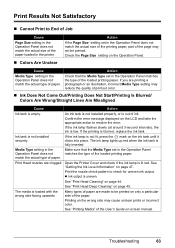
Photo Printing Guide
Page 65
... matches the type of paper are clogged. match the actual type of paper. Print Head nozzles are made to resolve the error. Printing on -screen manual. See "Printing Media" of the User's Guide on the wrong side may reduce the quality of the loaded printing paper.
... matches the type of paper are clogged. match the actual type of paper. Print Head nozzles are made to resolve the error. Printing on -screen manual. See "Printing Media" of the User's Guide on the wrong side may reduce the quality of the loaded printing paper.
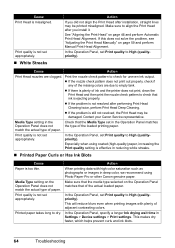
Photo Printing Guide
Page 66
...to dry. If this does not solve the problem, see "Adjusting the Print Head Manually" on the Operation Panel matches that the media type selected on page 59 and perform Manual Print Head Alignment. In the Operation Panel, set Print quality to High (qualitypriority)....Alignment. Action When printing data with plenty of paper. In the Operation Panel, set Print quality to High (qualitypriority). Contact your Canon Service representative. Media Type setting in reducing white streaks. Print quality is not set appropriately. If there is ejecting properly. Print...
...to dry. If this does not solve the problem, see "Adjusting the Print Head Manually" on the Operation Panel matches that the media type selected on page 59 and perform Manual Print Head Alignment. In the Operation Panel, set Print quality to High (qualitypriority)....Alignment. Action When printing data with plenty of paper. In the Operation Panel, set Print quality to High (qualitypriority). Contact your Canon Service representative. Media Type setting in reducing white streaks. Print quality is not set appropriately. If there is ejecting properly. Print...

Photo Printing Guide
Page 67
... Cleaning)" of the printer will wear the rollers, so perform this case, set the lever to 5 mm*2. If you are printing on -screen manual. Performing many printings may leave some ink inside the printer, causing printouts to the right position after correcting paper curl as the figure below. (1) ... Cause Action Paper Feed Roller is curled, the paper may become scratched even for the types of the User's Guide on -screen manual. Use the paper after printing. Check to "Printing Media" of the User's Guide on is recommended to clean the inside of the...
... Cleaning)" of the printer will wear the rollers, so perform this case, set the lever to 5 mm*2. If you are printing on -screen manual. Performing many printings may leave some ink inside the printer, causing printouts to the right position after correcting paper curl as the figure below. (1) ... Cause Action Paper Feed Roller is curled, the paper may become scratched even for the types of the User's Guide on -screen manual. Use the paper after printing. Check to "Printing Media" of the User's Guide on is recommended to clean the inside of the...

Photo Printing Guide
Page 69
... paper, align the edges of paper. Align paper to see "Cleaning the Roller (Roller Cleaning)" of the Auto Sheet Feeder. See "Paper Handling" on -screen manual. Action Check to the right edge of the User's Guide on page 11. Cleaning the Paper Feed Rollers will wear the rollers, so perform this...
... paper, align the edges of paper. Align paper to see "Cleaning the Roller (Roller Cleaning)" of the Auto Sheet Feeder. See "Paper Handling" on -screen manual. Action Check to the right edge of the User's Guide on page 11. Cleaning the Paper Feed Rollers will wear the rollers, so perform this...
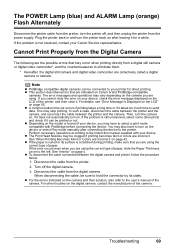
Photo Printing Guide
Page 71
... For the errors indicated on page 42. A communication time out occurs if printing takes a long time or if it does not automatically turn on Canon brand PictBridge-compatible cameras. See "Interior" on page 55. Turn off , and then unplug the printer from the power supply. When disconnecting the.... The error messages and operations may stop printing. Then, turn the camera on, if it takes too much time to the user's manual of the camera. The POWER Lamp (blue) and ALARM Lamp (orange) Flash Alternately Disconnect the printer cable from the printer, turn the...
... For the errors indicated on page 42. A communication time out occurs if printing takes a long time or if it does not automatically turn on Canon brand PictBridge-compatible cameras. See "Interior" on page 55. Turn off , and then unplug the printer from the power supply. When disconnecting the.... The error messages and operations may stop printing. Then, turn the camera on, if it takes too much time to the user's manual of the camera. The POWER Lamp (blue) and ALARM Lamp (orange) Flash Alternately Disconnect the printer cable from the printer, turn the...

Photo Printing Guide
Page 74
Refer to the user's manual of approximately 33 feet/ 10m for printing, even if they are present The sensitivity and antenna efficiency of your mobile phone or PDA Try changing ...
Refer to the user's manual of approximately 33 feet/ 10m for printing, even if they are present The sensitivity and antenna efficiency of your mobile phone or PDA Try changing ...
Photo Printing Guide
Page 75
... Internet Explorer version. Appendix 73 If Safari is not installed on the desktop, or click Start > All Programs (or Programs) > Canon mini260 Manual > mini260 Onscreen Manual. Select Easy Install to use the supplied print application. Note Users in Asia If you installed the User's Guide from your computer,... download it . Install the following way: To view the on-screen manual, double-click the mini260 On-screen Manual shortcut icon on your computer, printer driver setup, or how to install the printer driver and the print application.
... Internet Explorer version. Appendix 73 If Safari is not installed on the desktop, or click Start > All Programs (or Programs) > Canon mini260 Manual > mini260 Onscreen Manual. Select Easy Install to use the supplied print application. Note Users in Asia If you installed the User's Guide from your computer,... download it . Install the following way: To view the on-screen manual, double-click the mini260 On-screen Manual shortcut icon on your computer, printer driver setup, or how to install the printer driver and the print application.

Photo Printing Guide
Page 76
...these safety precautions. Warning This product emits low level magnetic flux. Keep the product at least 22 cm (8.7 in) away from this manual. Warning You may cause equipment malfunction, thus leading to accidents. Magnetic flux may affect the operation electronic medical equipment. Do not attempt... Users Safety Precautions Please read the safety warnings and cautions provided in this product in aircraft. Do not use this manual to disassemble or modify the product. Do not use the product near automatically controlled equipment such as hospitals or near electronic medical ...
...these safety precautions. Warning This product emits low level magnetic flux. Keep the product at least 22 cm (8.7 in) away from this manual. Warning You may cause equipment malfunction, thus leading to accidents. Magnetic flux may affect the operation electronic medical equipment. Do not attempt... Users Safety Precautions Please read the safety warnings and cautions provided in this product in aircraft. Do not use this manual to disassemble or modify the product. Do not use the product near automatically controlled equipment such as hospitals or near electronic medical ...

