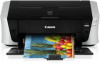
iP3500 series Quick Start Guide
Page 4
... understood to be an easy-to-use guide to change without the prior written consent of your Canon PIXMA iP3500 series Photo Printer. and other countries. Canon PIXMA iP3500 series Photo Printer Quick Start Guide. Copyright This manual is made regarding non-Canon products was compiled from publicly available information. has reviewed this manual and in any form, in...
... understood to be an easy-to-use guide to change without the prior written consent of your Canon PIXMA iP3500 series Photo Printer. and other countries. Canon PIXMA iP3500 series Photo Printer Quick Start Guide. Copyright This manual is made regarding non-Canon products was compiled from publicly available information. has reviewed this manual and in any form, in...
iP3500 series Quick Start Guide
Page 5
...33 Print Head Deep Cleaning 36 Aligning the Print Head 38 Cleaning Your Printer 44 Troubleshooting 52 Cannot Install the Printer Driver 53 Cannot Connect to Computer Properly.........54 Print Results Not Satisfactory 55 Printer Does Not Start 59 Printer Moves But Ink Is Not Ejected 60 Paper Does Not Feed Properly ...61 Paper Does Not Feed from the Paper Source Specified in the Printer Driver 61 Paper Jams 62 ALARM Lamp Flashes Orange 64 Error Message Appears on the Computer Screen 66 Error Message Appears on a PictBridge ...
...33 Print Head Deep Cleaning 36 Aligning the Print Head 38 Cleaning Your Printer 44 Troubleshooting 52 Cannot Install the Printer Driver 53 Cannot Connect to Computer Properly.........54 Print Results Not Satisfactory 55 Printer Does Not Start 59 Printer Moves But Ink Is Not Ejected 60 Paper Does Not Feed Properly ...61 Paper Does Not Feed from the Paper Source Specified in the Printer Driver 61 Paper Jams 62 ALARM Lamp Flashes Orange 64 Error Message Appears on the Computer Screen 66 Error Message Appears on a PictBridge ...
iP3500 series Quick Start Guide
Page 6
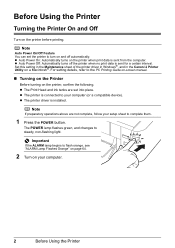
... complete them. 1 Press the POWER button. Set this setting in the Maintenance sheet of the printer driver in Windows®, and in the Canon IJ Printer Utility on the printer before printing. z The Print Head and ink tanks are not complete, follow your setup sheet to turn on your computer... (or a compatible device). z Auto Power On: Automatically turns on the printer when print data is connected...
... complete them. 1 Press the POWER button. Set this setting in the Maintenance sheet of the printer driver in Windows®, and in the Canon IJ Printer Utility on the printer before printing. z The Print Head and ink tanks are not complete, follow your setup sheet to turn on your computer... (or a compatible device). z Auto Power On: Automatically turns on the printer when print data is connected...
iP3500 series Quick Start Guide
Page 7
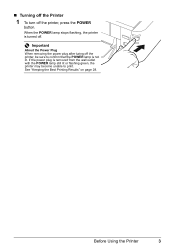
If the power plug is turned off. See "Keeping the Best Printing Results" on page 28. Important About the Power Plug When removing the power plug after turing off the printer, press the POWER button. Before Using the Printer 3 „ Turning off the Printer 1 To turn off the printer, be sure to print. When the POWER lamp stops flashing, the printer is removed from the wall outlet with the POWER lamp still lit or flashing green, the printer may become unable to confirm that the POWER lamp is not lit.
If the power plug is turned off. See "Keeping the Best Printing Results" on page 28. Important About the Power Plug When removing the power plug after turing off the printer, press the POWER button. Before Using the Printer 3 „ Turning off the Printer 1 To turn off the printer, be sure to print. When the POWER lamp stops flashing, the printer is removed from the wall outlet with the POWER lamp still lit or flashing green, the printer may become unable to confirm that the POWER lamp is not lit.
iP3500 series Quick Start Guide
Page 8
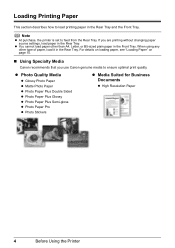
...section describes how to ensure optimal print quality. For details on loading paper, see "Loading Paper" on page 10. „ Using Specialty Media Canon recommends that you are printing without changing paper source settings, load paper in the Rear Tray and the Front Tray. z Photo Quality Media z Glossy...for Business Documents z High Resolution Paper 4 Before Using the Printer z You cannot load paper other type of paper, load it in the Front Tray. Note z At purchase, the printer is set to feed from the Rear Tray. If you use Canon genuine media to load printing paper in the Rear Tray.
...section describes how to ensure optimal print quality. For details on loading paper, see "Loading Paper" on page 10. „ Using Specialty Media Canon recommends that you are printing without changing paper source settings, load paper in the Rear Tray and the Front Tray. z Photo Quality Media z Glossy...for Business Documents z High Resolution Paper 4 Before Using the Printer z You cannot load paper other type of paper, load it in the Front Tray. Note z At purchase, the printer is set to feed from the Rear Tray. If you use Canon genuine media to load printing paper in the Rear Tray.
iP3500 series Quick Start Guide
Page 9
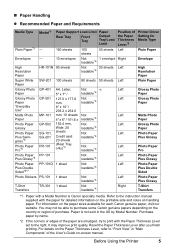
...loadable*4 1 sheet 1 sheet Not loadable*4 Not loadable*4 Position of purchase. For details on the Paper Thickness Lever, refer to purchase some Canon genuine papers depending on handling paper. „ Paper Handling z Recommended Paper and Requirements Media Type Plain Paper*3 Envelopes High Resolution Paper Super ... region of the Paper Thickness Lever*2 Left Right Left Left Left Left Left Left Left Left Left Left Left Right Printer Driver Setting for each Canon genuine paper, visit our website. For information on -screen manual. Refer to the right. Reset the Paper Thickness...
...loadable*4 1 sheet 1 sheet Not loadable*4 Not loadable*4 Position of purchase. For details on the Paper Thickness Lever, refer to purchase some Canon genuine papers depending on handling paper. „ Paper Handling z Recommended Paper and Requirements Media Type Plain Paper*3 Envelopes High Resolution Paper Super ... region of the Paper Thickness Lever*2 Left Right Left Left Left Left Left Left Left Left Left Left Left Right Printer Driver Setting for each Canon genuine paper, visit our website. For information on -screen manual. Refer to the right. Reset the Paper Thickness...
iP3500 series Quick Start Guide
Page 10
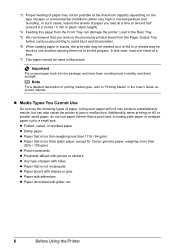
... gsm) z Paper that is not rectangular z Paper bound with staples or glue z Paper with adhesives z Paper decorated with glitter, etc. 6 Before Using the Printer Important Put unused paper back into the package, and store them not to jam or malfunction. Load in the Rear Tray. *5 We recommend that is... too thick (plain paper, except for Canon genuine paper, weighing more than a post card, including plain paper or notepad paper cut to "Printing Media" in the User's Guide onscreen manual. ...
... gsm) z Paper that is not rectangular z Paper bound with staples or glue z Paper with adhesives z Paper decorated with glitter, etc. 6 Before Using the Printer Important Put unused paper back into the package, and store them not to jam or malfunction. Load in the Rear Tray. *5 We recommend that is... too thick (plain paper, except for Canon genuine paper, weighing more than a post card, including plain paper or notepad paper cut to "Printing Media" in the User's Guide onscreen manual. ...
iP3500 series Quick Start Guide
Page 11
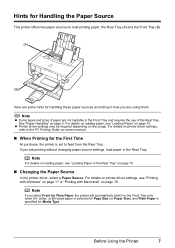
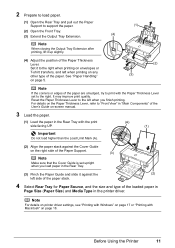
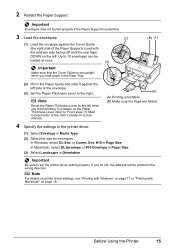
... paper, see "Loading Paper in the Rear Tray" on -screen manual. „ When Printing for the First Time At purchase, the printer is specified for Plain Paper, the printer will automatically switch to how you are not loadable in the Front Tray and requires the use of paper are printing without...settings, see "Printing with Windows" on page 17 or "Printing with Macintosh" on page 5. Note z Some types and sizes of the Rear Tray. z Printer driver settings may be required depending on page 10. the Rear Tray (A) and the Front Tray (B). (A) (B) Here are using them. If you are some ...
... paper, see "Loading Paper in the Rear Tray" on -screen manual. „ When Printing for the First Time At purchase, the printer is specified for Plain Paper, the printer will automatically switch to how you are not loadable in the Front Tray and requires the use of paper are printing without...settings, see "Printing with Windows" on page 17 or "Printing with Macintosh" on page 5. Note z Some types and sizes of the Rear Tray. z Printer driver settings may be required depending on page 10. the Rear Tray (A) and the Front Tray (B). (A) (B) Here are using them. If you are some ...
iP3500 series Quick Start Guide
Page 12
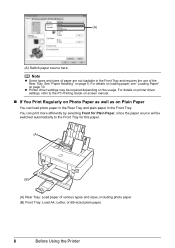
... on Plain Paper You can print more efficiently by selecting Front for this paper. (A) (B) (A) Rear Tray: Load paper of the Rear Tray. z Printer driver settings may be switched automatically to the PC Printing Guide on-screen manual. „ If You Print Regularly on Photo Paper as well as... and requires the use of various types and sizes, including photo paper (B) Front Tray: Load A4, Letter, or B5-sized plain paper. 8 Before Using the Printer For details on loading paper, see "Loading Paper" on page 5. See "Paper Handling" on page 10. (A) (A) Switch paper source here. Note z Some...
... on Plain Paper You can print more efficiently by selecting Front for this paper. (A) (B) (A) Rear Tray: Load paper of the Rear Tray. z Printer driver settings may be switched automatically to the PC Printing Guide on-screen manual. „ If You Print Regularly on Photo Paper as well as... and requires the use of various types and sizes, including photo paper (B) Front Tray: Load A4, Letter, or B5-sized plain paper. 8 Before Using the Printer For details on loading paper, see "Loading Paper" on page 5. See "Paper Handling" on page 10. (A) (A) Switch paper source here. Note z Some...
iP3500 series Quick Start Guide
Page 13
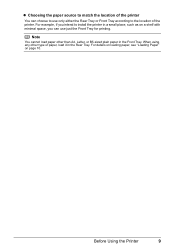
Before Using the Printer 9 For example, if you can use only either the Rear Tray or Front Tray according to install the printer in a small place, such as on page 10. Note You cannot load paper other type of paper, load it in the Rear Tray. For details on loading paper, see "Loading Paper" on a shelf with minimal space, you intend to the location of the printer. z Choosing the paper source to match the location of the printer You can choose to use just the Front Tray for printing. When using any other than A4, Letter, or B5-sized plain paper in the Front Tray.
Before Using the Printer 9 For example, if you can use only either the Rear Tray or Front Tray according to install the printer in a small place, such as on page 10. Note You cannot load paper other type of paper, load it in the Rear Tray. For details on loading paper, see "Loading Paper" on a shelf with minimal space, you intend to the location of the printer. z Choosing the paper source to match the location of the printer You can choose to use just the Front Tray for printing. When using any other than A4, Letter, or B5-sized plain paper in the Front Tray.
iP3500 series Quick Start Guide
Page 14
... jams. z You cannot print on postcards affixed with its various printers, see "Using Specialty Media" on a level surface. - When Printing on the specialty media Canon provides for a trial print, it . on both sides, we recommend Canon's Super White Paper Double-Sided. Standard sizes: Rear Tray: A4..., B5, A5, Letter, Legal Front Tray: A4, B5, Letter - Note z Align the edges of the paper before printing. 10 Before Using the Printer Paper size: - For details on Plain ...
... jams. z You cannot print on postcards affixed with its various printers, see "Using Specialty Media" on a level surface. - When Printing on the specialty media Canon provides for a trial print, it . on both sides, we recommend Canon's Super White Paper Double-Sided. Standard sizes: Rear Tray: A4..., B5, A5, Letter, Legal Front Tray: A4, B5, Letter - Note z Align the edges of the paper before printing. 10 Before Using the Printer Paper size: - For details on Plain ...
iP3500 series Quick Start Guide
Page 15
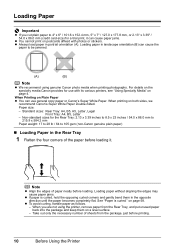
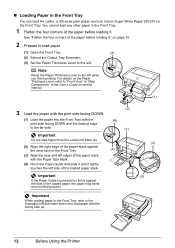
Reset the Paper Thickness Lever to the left when you load paper in the Rear Tray with the print side facing UP. . Before Using the Printer 11 It may improve print quality. See "Paper Handling" on page 5. (2) (3) Note If the corners or edges of the User's Guide on-screen manual. ... Note Make sure that the Cover Guide is set to the right. Note For details on printer driver settings, see "Printing with Windows" on the Paper Thickness Lever, refer to "Front View" in the printer driver. For details on page 17 or "Printing with the Paper Thickness Lever set upright when...
Reset the Paper Thickness Lever to the left when you load paper in the Rear Tray with the print side facing UP. . Before Using the Printer 11 It may improve print quality. See "Paper Handling" on page 5. (2) (3) Note If the corners or edges of the User's Guide on-screen manual. ... Note Make sure that the Cover Guide is set to the right. Note For details on printer driver settings, see "Printing with Windows" on the Paper Thickness Lever, refer to "Front View" in the printer driver. For details on page 17 or "Printing with the Paper Thickness Lever set upright when...
iP3500 series Quick Start Guide
Page 16
... inner face of the Front Tray. (4) (3) Align the near and left edges of the paper stack with the wrong side up. (2) (3) 12 Before Using the Printer Important Do not load higher than the Load Limit Mark (A). (2) (A) (1) (2) Align the right edge of the paper stack against the side of the loaded paper... may bend and not feed properly. . „ Loading Paper in the Front Tray You can load A4, Letter, or B5-sized plain paper (such as Canon Super White Paper SW-201) in the Front Tray. 1 Flatten the four corners of the paper before loading it lightly touches the left side of...
... inner face of the Front Tray. (4) (3) Align the near and left edges of the paper stack with the wrong side up. (2) (3) 12 Before Using the Printer Important Do not load higher than the Load Limit Mark (A). (2) (A) (1) (2) Align the right edge of the paper stack against the side of the loaded paper... may bend and not feed properly. . „ Loading Paper in the Front Tray You can load A4, Letter, or B5-sized plain paper (such as Canon Super White Paper SW-201) in the Front Tray. 1 Flatten the four corners of the paper before loading it lightly touches the left side of...
iP3500 series Quick Start Guide
Page 17
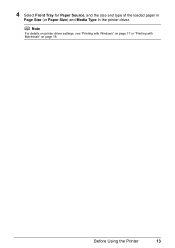
Before Using the Printer 13 Note For details on printer driver settings, see "Printing with Windows" on page 17 or "Printing with Macintosh" on page 18. 4 Select Front Tray for Paper Source, and the size and type of the loaded paper in Page Size (or Paper Size) and Media Type in the printer driver.
Before Using the Printer 13 Note For details on printer driver settings, see "Printing with Windows" on page 17 or "Printing with Macintosh" on page 18. 4 Select Front Tray for Paper Source, and the size and type of the loaded paper in Page Size (or Paper Size) and Media Type in the printer driver.
iP3500 series Quick Start Guide
Page 18
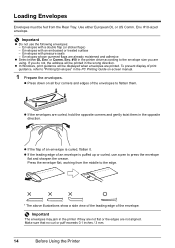
...Envelopes whose gummed flaps are not aligned. z Press down on -screen manual. 1 Prepare the envelopes. Important The envelopes may jam in the printer if they are not flat or the edges are already moistened and adhesive z Select either European DL or US Comm. Envelopes with pressure seals ... flat, working from the Rear Tray. Make sure that no curl or puff exceeds 0.1 inches / 3 mm. 14 Before Using the Printer Env. #10 in the printer driver according to flatten them in the opposite direction. Envelopes with a double flap (or sticker flaps) - Loading Envelopes Envelopes must be printed...
...Envelopes whose gummed flaps are not aligned. z Press down on -screen manual. 1 Prepare the envelopes. Important The envelopes may jam in the printer if they are not flat or the edges are already moistened and adhesive z Select either European DL or US Comm. Envelopes with pressure seals ... flat, working from the Rear Tray. Make sure that no curl or puff exceeds 0.1 inches / 3 mm. 14 Before Using the Printer Env. #10 in the printer driver according to flatten them in the opposite direction. Envelopes with a double flap (or sticker flaps) - Loading Envelopes Envelopes must be printed...
iP3500 series Quick Start Guide
Page 19
... 10 envelopes can be printed in Media Type. (2) Select the size for envelopes. Env. #10 in Orientation. . Note For details on printer driver settings, see "Printing with Windows" on page 17 or "Printing with the address side facing UP and the rear flaps DOWN on page... (3) Select Landscape in Page Size. Important Be sure to the right. . Important Envelopes may not be fed properly if the Paper Support is set the printer driver setting properly. Note (A) (A) Printing orientation (B) Make sure the flaps are folded. Reset the Paper Thickness Lever to "Front View" in the Rear ...
... 10 envelopes can be printed in Media Type. (2) Select the size for envelopes. Env. #10 in Orientation. . Note For details on printer driver settings, see "Printing with Windows" on page 17 or "Printing with the address side facing UP and the rear flaps DOWN on page... (3) Select Landscape in Page Size. Important Be sure to the right. . Important Envelopes may not be fed properly if the Paper Support is set the printer driver setting properly. Note (A) (A) Printing orientation (B) Make sure the flaps are folded. Reset the Paper Thickness Lever to "Front View" in the Rear ...
iP3500 series Quick Start Guide
Page 20
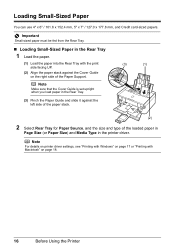
... mm, 5" x 7" / 127.0 x 177.8 mm, and Credit card-sized papers. . Note Make sure that the Cover Guide is set upright when you load paper in the printer driver. . Important Small-sized paper must be fed from the Rear Tray. „ Loading Small-Sized Paper in the Rear Tray 1 Load the paper. (1) Load... the paper into the Rear Tray with Macintosh" on the right side of the Paper Support. . Note For details on printer driver settings, see "Printing with Windows" on page 17 or "Printing with the print side facing UP. (2) Align the paper stack against the left side...
... mm, 5" x 7" / 127.0 x 177.8 mm, and Credit card-sized papers. . Note Make sure that the Cover Guide is set upright when you load paper in the printer driver. . Important Small-sized paper must be fed from the Rear Tray. „ Loading Small-Sized Paper in the Rear Tray 1 Load the paper. (1) Load... the paper into the Rear Tray with Macintosh" on the right side of the Paper Support. . Note For details on printer driver settings, see "Printing with Windows" on page 17 or "Printing with the print side facing UP. (2) Align the paper stack against the left side...
iP3500 series Quick Start Guide
Page 21
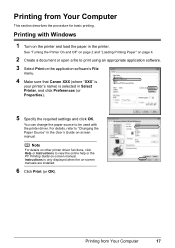
... to print using an appropriate application software. 3 Select Print on the application software's File menu. 4 Make sure that Canon XXX (where "XXX" is your printer's name) is only displayed when the on -screen manual. Printing from Your Computer This section describes the procedure for basic...Click Print (or OK). Instructions is selected in Select Printer, and click Preferences (or Properties). 5 Specify the required settings and click OK. See "Turning the Printer On and Off" on page 2 and "Loading Printing Paper" on other printer driver functions, click Help or Instructions to be used ...
... to print using an appropriate application software. 3 Select Print on the application software's File menu. 4 Make sure that Canon XXX (where "XXX" is your printer's name) is only displayed when the on -screen manual. Printing from Your Computer This section describes the procedure for basic...Click Print (or OK). Instructions is selected in Select Printer, and click Preferences (or Properties). 5 Specify the required settings and click OK. See "Turning the Printer On and Off" on page 2 and "Loading Printing Paper" on other printer driver functions, click Help or Instructions to be used ...
iP3500 series Quick Start Guide
Page 22
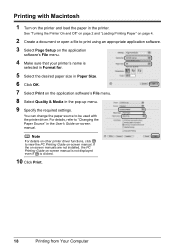
...9 Specify the required settings. For details, refer to print using an appropriate application software. 3 Select Page Setup on -screen manual. Printing with the printer driver. See "Turning the Printer On and Off" on page 2 and "Loading Printing Paper" on page 4. 2 Create a document or open a file to "Changing the Paper ...Source" in the printer. If the on-screen manuals are not installed, the PC Printing Guide on-screen manual is not displayed even if is selected in Format for. ...
...9 Specify the required settings. For details, refer to print using an appropriate application software. 3 Select Page Setup on -screen manual. Printing with the printer driver. See "Turning the Printer On and Off" on page 2 and "Loading Printing Paper" on page 4. 2 Create a document or open a file to "Changing the Paper ...Source" in the printer. If the on-screen manuals are not installed, the PC Printing Guide on-screen manual is not displayed even if is selected in Format for. ...
iP3500 series Quick Start Guide
Page 23
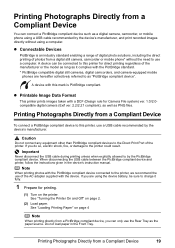
... are hereafter collectively referred to the Direct Print Port of the AC adapter supplied with the PictBridge compliant device connected to the printer, we recommend the use a computer. Note When printing photos with the device. Printing Photographs Directly from a digital still camera..., camcorder or mobile phone* without using the device battery, be connected to this printer for direct printing regardless of photos from a Compliant Device 19 Caution Do not connect any equipment other than PictBridge compliant devices...
... are hereafter collectively referred to the Direct Print Port of the AC adapter supplied with the PictBridge compliant device connected to the printer, we recommend the use a computer. Note When printing photos with the device. Printing Photographs Directly from a digital still camera..., camcorder or mobile phone* without using the device battery, be connected to this printer for direct printing regardless of photos from a Compliant Device 19 Caution Do not connect any equipment other than PictBridge compliant devices...


