Quick Start Guide
Page 26
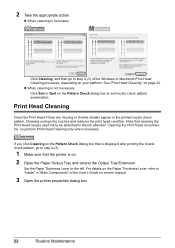
... nozzle check pattern. Print Head Cleaning Clean the Print Head if lines are missing or if white streaks appear in the ink absorber. Cleaning the Print Head consumes ink, so perform Print Head Cleaning only when necessary. 2 Take the appropriate action. For details on the Paper Thickness Lever,... refer to step 4-(3). 1 Make sure that cleaning the Print Head causes used ink to step 4-(3) of the User's Guide on your platform. z When cleaning is necessary Click Cleaning, and then go to "Inside" in "Main ...
... nozzle check pattern. Print Head Cleaning Clean the Print Head if lines are missing or if white streaks appear in the ink absorber. Cleaning the Print Head consumes ink, so perform Print Head Cleaning only when necessary. 2 Take the appropriate action. For details on the Paper Thickness Lever,... refer to step 4-(3). 1 Make sure that cleaning the Print Head causes used ink to step 4-(3) of the User's Guide on your platform. z When cleaning is necessary Click Cleaning, and then go to "Inside" in "Main ...
Quick Start Guide
Page 29
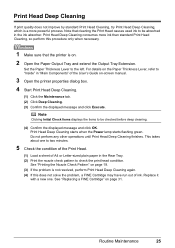
... resolved, perform Print Head Deep Cleaning again. (4) If this procedure only when necessary. 1 Make sure that cleaning the Print Head causes used ink to "Inside" in the ink absorber. See "Replacing a FINE Cartridge" on -screen manual. 3 Open the printer properties dialog box. 4 Start Print Head Deep Cleaning. (1) Click..., try Print Head Deep Cleaning, which is a more ink than standard Print Head Cleaning, so perform this does not solve the problem, a FINE Cartridge may have run out of ink. Set the Paper Thickness Lever to be absorbed in "Main Components" of the User's Guide on page...
... resolved, perform Print Head Deep Cleaning again. (4) If this procedure only when necessary. 1 Make sure that cleaning the Print Head causes used ink to "Inside" in the ink absorber. See "Replacing a FINE Cartridge" on -screen manual. 3 Open the printer properties dialog box. 4 Start Print Head Deep Cleaning. (1) Click..., try Print Head Deep Cleaning, which is a more ink than standard Print Head Cleaning, so perform this does not solve the problem, a FINE Cartridge may have run out of ink. Set the Paper Thickness Lever to be absorbed in "Main Components" of the User's Guide on page...
Quick Start Guide
Page 52
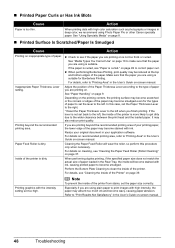
...Printing graphics with high intensity, the paper may also reduce print quality. Especially if you are printing on page 9. It may absorb too much ink and become stained with ink, causing printed paper to "Printing Area" in deep color, we recommend using is not too thick or curled. Resize your...set back to "Print Results Not Satisfactory" in the Rear Tray, the inside of paper you are using Photo Paper Pro or other Canon specialty paper. Adjust the position of the Paper Thickness Lever according to make sure that the paper you are using plain paper to "...
...Printing graphics with high intensity, the paper may also reduce print quality. Especially if you are printing on page 9. It may absorb too much ink and become stained with ink, causing printed paper to "Printing Area" in deep color, we recommend using is not too thick or curled. Resize your...set back to "Print Results Not Satisfactory" in the Rear Tray, the inside of paper you are using Photo Paper Pro or other Canon specialty paper. Adjust the position of the Paper Thickness Lever according to make sure that the paper you are using plain paper to "...
Quick Start Guide
Page 57
..." on page 52. Press the RESUME/CANCEL button to continue printing, press the RESUME/ CANCEL button for example. Before the ink absorber becomes completely full, contact a Canon service representative. (You will be compatible with this printer. Important Canon recommends that each FINE Cartridge is not satisfactory, carry out the Print Head Alignment. Troubleshooting 53
..." on page 52. Press the RESUME/CANCEL button to continue printing, press the RESUME/ CANCEL button for example. Before the ink absorber becomes completely full, contact a Canon service representative. (You will be compatible with this printer. Important Canon recommends that each FINE Cartridge is not satisfactory, carry out the Print Head Alignment. Troubleshooting 53
Quick Start Guide
Page 60
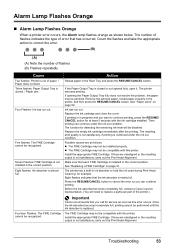
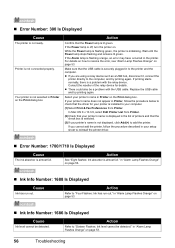
... name in the printer. Select your setup sheet to resolve the error, see "Alarm Lamp Flashes Orange" on . Action See "Eight flashes: Ink absorber is flashing orange, an error may have occurred in Printer on the Print dialog box. Action Refer to the computer, and try printing again. ... not connected properly. For details on how to reinstall the printer driver. „ Error Number: 1700/1710 Is Displayed Cause The ink absorber is selected. (3)If your computer. (1)Select Print & Fax Preferences from Printer. z There could also be detected. in to "Four Flashes...
... name in the printer. Select your setup sheet to resolve the error, see "Alarm Lamp Flashes Orange" on . Action See "Eight flashes: Ink absorber is flashing orange, an error may have occurred in Printer on the Print dialog box. Action Refer to the computer, and try printing again. ... not connected properly. For details on how to reinstall the printer driver. „ Error Number: 1700/1710 Is Displayed Cause The ink absorber is selected. (3)If your computer. (1)Select Print & Fax Preferences from Printer. z There could also be detected. in to "Four Flashes...


