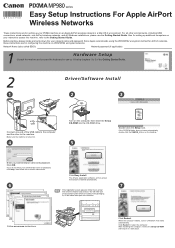
Easy Setup Instructions For Apple AirPort Wireless Networks
Page 1
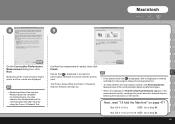
...CD-ROM folder does not open automatically, double-click the CANON_IJ icon on -screen instructions. Follow on the desktop. 5 Enter your administrator name and password. When the computer restarts, Canon IJ Network Tool starts automatically. After restarting the computer, remove the Setup CD-ROM ...and keep it in a Mac OS X environment. series Easy Setup Instructions For Apple AirPort Wireless Networks These instructions are for setting up your PIXMA machine on an Apple...
...CD-ROM folder does not open automatically, double-click the CANON_IJ icon on -screen instructions. Follow on the desktop. 5 Enter your administrator name and password. When the computer restarts, Canon IJ Network Tool starts automatically. After restarting the computer, remove the Setup CD-ROM ...and keep it in a Mac OS X environment. series Easy Setup Instructions For Apple AirPort Wireless Networks These instructions are for setting up your PIXMA machine on an Apple...
Easy Setup Instructions For Apple AirPort Wireless Networks
Page 2
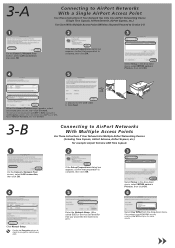
... With Multiple Access Points Use These Instructions if Your Network Has Multiple AirPort Networking Devices (Including Time Capsule, AirPort Extreme, AirPort Express, etc.) For example: Airport Extreme AND Time Capsule 2 3 On the Canon IJ Network Tool screen, select LAN...MP980 series in Printers, then click OK. 6 Click Manual Setup. • Confirm the Encryption column to check the encryption method being used. b. 3-A 1 On the Canon IJ Network Tool screen, select LAN connection, then click OK. 4 Connecting to AirPort Networks With a Single AirPort Access Point Use These Instructions...
... With Multiple Access Points Use These Instructions if Your Network Has Multiple AirPort Networking Devices (Including Time Capsule, AirPort Extreme, AirPort Express, etc.) For example: Airport Extreme AND Time Capsule 2 3 On the Canon IJ Network Tool screen, select LAN...MP980 series in Printers, then click OK. 6 Click Manual Setup. • Confirm the Encryption column to check the encryption method being used. b. 3-A 1 On the Canon IJ Network Tool screen, select LAN connection, then click OK. 4 Connecting to AirPort Networks With a Single AirPort Access Point Use These Instructions...
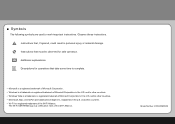
Getting Started
Page 2
Instructions that , if ignored, could result in personal injury or material damage. and/or other countries. • Macintosh, Mac, and AirPort are used to complete. • ...; Symbols The following symbols are trademarks of Microsoft Corporation in the U.S. Descriptions for safe operation. Additional explanations. Model Number: K10327(MP980) Instructions that must be observed for operations that take some time to mark important instructions. and/or other countries. • Wi-Fi is a certification mark of the Wi-Fi Alliance. Observe these...
Instructions that , if ignored, could result in personal injury or material damage. and/or other countries. • Macintosh, Mac, and AirPort are used to complete. • ...; Symbols The following symbols are trademarks of Microsoft Corporation in the U.S. Descriptions for safe operation. Additional explanations. Model Number: K10327(MP980) Instructions that must be observed for operations that take some time to mark important instructions. and/or other countries. • Wi-Fi is a certification mark of the Wi-Fi Alliance. Observe these...
Getting Started
Page 14
... a USB flash drive is attempting to restart your environment. Follow the on your computer during installation. • It may appear that Canon software is supported. 12 In addition, configure the machine's LAN settings to connect to the connection method. The screens below are required to...• If a screen not specified in addition to as your access point's instruction manual or contact its manufacturer. • If the firewall function of the network device vary depending on -screen instructions and click OK, and do not remove the Setup CDROM during setup" in the...
... a USB flash drive is attempting to restart your environment. Follow the on your computer during installation. • It may appear that Canon software is supported. 12 In addition, configure the machine's LAN settings to connect to the connection method. The screens below are required to...• If a screen not specified in addition to as your access point's instruction manual or contact its manufacturer. • If the firewall function of the network device vary depending on -screen instructions and click OK, and do not remove the Setup CDROM during setup" in the...

Getting Started
Page 18
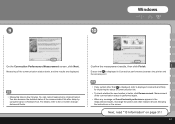
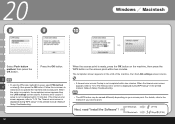
G User Account Control screen appears, click Continue. The drivers, application software, and on -screen instructions to proceed with the installation. 16 If the same screen reappears in subsequent steps, click Continue. Click Easy Install. I J • If you want to select particular items to install, click Custom Install and follow the on -screen manuals are installed automatically. 8 3 Windows Vista 4 Windows Vista 5 A C E AutoPlay screen appears, click Run Msetup4.exe.
G User Account Control screen appears, click Continue. The drivers, application software, and on -screen instructions to proceed with the installation. 16 If the same screen reappears in subsequent steps, click Continue. Click Easy Install. I J • If you want to select particular items to install, click Custom Install and follow the on -screen manuals are installed automatically. 8 3 Windows Vista 4 Windows Vista 5 A C E AutoPlay screen appears, click Run Msetup4.exe.
Getting Started
Page 19
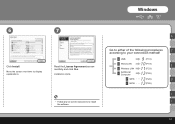
A Go to either of the following procedures C according to install the software. Installation starts. • Follow any on-screen instructions to your connection method! Move the cursor over items to display explanations. A USB 9 (P.18) C Wired LAN 1 0 (P.19) E E Wireless LAN 1 1 (P.23) J Additional Computer 1 2 (P.28) G WPS 1 2 (P.28) G I WCN 1 2 (P.28) I J 17 Read the License Agreement screen carefully and click Yes. Windows 6 7 Click Install.
A Go to either of the following procedures C according to install the software. Installation starts. • Follow any on-screen instructions to your connection method! Move the cursor over items to display explanations. A USB 9 (P.18) C Wired LAN 1 0 (P.19) E E Wireless LAN 1 1 (P.23) J Additional Computer 1 2 (P.28) G WPS 1 2 (P.28) G I WCN 1 2 (P.28) I J 17 Read the License Agreement screen carefully and click Yes. Windows 6 7 Click Install.
Getting Started
Page 29
...comments and Help for improving the status of the communication status is performed again. • When any symbol other network devices following the instructions on page 31! 27 Measuring of the communication link after setup by clicking Cancel. Next, read "13 Information" on the screen. ...You can cancel measuring by using the Canon IJ Network Tool. E Ensure that is better, click Remesurement. Confirm the measurement results, then click Finish. For details, refer to the on...
...comments and Help for improving the status of the communication status is performed again. • When any symbol other network devices following the instructions on page 31! 27 Measuring of the communication link after setup by clicking Cancel. Next, read "13 Information" on the screen. ...You can cancel measuring by using the Canon IJ Network Tool. E Ensure that is better, click Remesurement. Confirm the measurement results, then click Finish. For details, refer to the on...

Getting Started
Page 34
... no effect on the machine's functionality.) I • Internet connection is located on the inside of the machine. For details, refer to "Solution Menu" on -screen instructions to the Internet, the user registration page appears. If you click Do not agree, the Extended Survey Program will need your product. Follow the on...
... no effect on the machine's functionality.) I • Internet connection is located on the inside of the machine. For details, refer to "Solution Menu" on -screen instructions to the Internet, the user registration page appears. If you click Do not agree, the Extended Survey Program will need your product. Follow the on...
Getting Started
Page 37
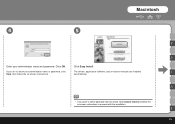
If you want to select particular items to install, click Custom Install and follow the on -screen instructions to proceed with the installation. K 35 Click OK. Macintosh 4 5 B D Enter your administrator name or password, click The drivers, application software, and on-screen manuals are installed F Help, then follow the on -screen instructions. H • If you do not know your administrator name and password. Click Easy Install. automatically.
If you want to select particular items to install, click Custom Install and follow the on -screen instructions to proceed with the installation. K 35 Click OK. Macintosh 4 5 B D Enter your administrator name or password, click The drivers, application software, and on-screen manuals are installed F Help, then follow the on -screen instructions. H • If you do not know your administrator name and password. Click Easy Install. automatically.
Getting Started
Page 38
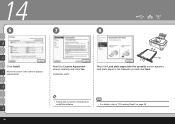
F Move the cursor over items to "22 Loading Paper" on -screen instructions to install the software. • For details, refer to display explanations. K 36 Read the License Agreement screen carefully and click Yes. 14 6 7 8 B D Click Install. H (A) When the Load plain paper into the cassette screen appears, load plain paper in the Cassette (A) and click Next. • Follow any on page 58. Installation starts.
F Move the cursor over items to "22 Loading Paper" on -screen instructions to install the software. • For details, refer to display explanations. K 36 Read the License Agreement screen carefully and click Yes. 14 6 7 8 B D Click Install. H (A) When the Load plain paper into the cassette screen appears, load plain paper in the Cassette (A) and click Next. • Follow any on page 58. Installation starts.

Getting Started
Page 39
H • Internet connection is located on the inside of the machine. For details, refer to "Solution Menu" on -screen instructions to the Internet, the user registration page appears. K 37 If connected to register your product serial number, which is required. (Connection fees apply.) • To register later, click Cancel. F Follow the on page 62. User Registration can be started from the Solution Menu icon. 9 Click Next. You will need your product. Macintosh 10 Serial Number B S*e*ria*l *N*um*b*er D Click Next.
H • Internet connection is located on the inside of the machine. For details, refer to "Solution Menu" on -screen instructions to the Internet, the user registration page appears. K 37 If connected to register your product serial number, which is required. (Connection fees apply.) • To register later, click Cancel. F Follow the on page 62. User Registration can be started from the Solution Menu icon. 9 Click Next. You will need your product. Macintosh 10 Serial Number B S*e*ria*l *N*um*b*er D Click Next.
Getting Started
Page 47
...the communication status starts, and the results are displayed. • Measuring takes a few minutes. Measuring can be cancelled by using the Canon IJ Network Tool. F Ensure that is displayed in Connection performance between the printer and the access point. • If any symbol other...performance appears in the measurement results, rearrange the printer and other network devices following the instructions on page 47! Mac OS X v.10.4.x/v.10.3.9 Go to Step . The Printer Setup Utility and Canon IJ Network Scanner Selector will start up. • To check whether the new location...
...the communication status starts, and the results are displayed. • Measuring takes a few minutes. Measuring can be cancelled by using the Canon IJ Network Tool. F Ensure that is displayed in Connection performance between the printer and the access point. • If any symbol other...performance appears in the measurement results, rearrange the printer and other network devices following the instructions on page 47! Mac OS X v.10.4.x/v.10.3.9 Go to Step . The Printer Setup Utility and Canon IJ Network Scanner Selector will start up. • To check whether the new location...
Getting Started
Page 54
When the timeout error screen appears, refer to "5.12 The Timeout error screen is instructions to operate the machine and access point. Next, read "Install the Software" ! Windows Macintosh 8 (P.15) 1 4 Step (P.34) 20 8 9 10 Windows / Macintosh Select Push button ...
When the timeout error screen appears, refer to "5.12 The Timeout error screen is instructions to operate the machine and access point. Next, read "Install the Software" ! Windows Macintosh 8 (P.15) 1 4 Step (P.34) 20 8 9 10 Windows / Macintosh Select Push button ...
Network Setup Troubleshooting
Page 7
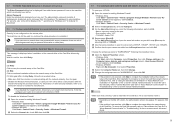
...Make sure that is not protected with the Card Slot failed is displayed during setup (continued) To open the other security software, refer to its instruction manual or contact its manufacturer. • If you did in TCP/UDP. The machine can still be displayed by "*" (asterisks) for Windows...message is displayed when installation of the network drive of the Card Slot. After installation is complete, to mount the Card Slot using the Canon IJ Network Tool, refer to "Using the Card Slot over a Network" in "About Network Communication" in "Troubleshooting" of alphanumeric characters and...
...Make sure that is not protected with the Card Slot failed is displayed during setup (continued) To open the other security software, refer to its instruction manual or contact its manufacturer. • If you did in TCP/UDP. The machine can still be displayed by "*" (asterisks) for Windows...message is displayed when installation of the network drive of the Card Slot. After installation is complete, to mount the Card Slot using the Canon IJ Network Tool, refer to "Using the Card Slot over a Network" in "About Network Communication" in "Troubleshooting" of alphanumeric characters and...


