Easy Setup Instructions For Apple AirPort Wireless Networks
Page 1
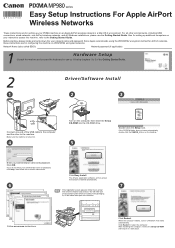
For all Windows installations, please use by following chapters 1 to 5 of...CANON_IJ icon on the desktop. 5 Enter your network to access the machine, refer to register your product. Also for setting up your PIXMA machine on an Apple AirPort wireless network in a safe place. Network Name (also called SSID): Network password (if applicable): 1 ...• If the registration screen appears, follow the on-screen instructions. When the computer restarts, Canon IJ Network Tool starts automatically. series Easy Setup Instructions For Apple AirPort Wireless Networks These instructions are...
For all Windows installations, please use by following chapters 1 to 5 of...CANON_IJ icon on the desktop. 5 Enter your network to access the machine, refer to register your product. Also for setting up your PIXMA machine on an Apple AirPort wireless network in a safe place. Network Name (also called SSID): Network password (if applicable): 1 ...• If the registration screen appears, follow the on-screen instructions. When the computer restarts, Canon IJ Network Tool starts automatically. series Easy Setup Instructions For Apple AirPort Wireless Networks These instructions are...
Getting Started
Page 2
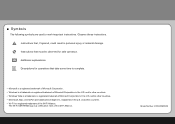
...some time to mark important instructions. Model Number: K10327(MP980) Additional explanations. and/or other countries. • Wi-Fi is a trademark or registered trademark of Microsoft Corporation in the U.S. and other countries. • Windows Vista is a certification mark of the Wi-Fi .... • Macintosh, Mac, and AirPort are used to complete. • Microsoft is a registered trademark of Microsoft Corporation. • Windows is a registered trademark of the Wi-Fi Alliance. ■ Symbols The following symbols are trademarks of Apple Inc., registered in the U.S. ...
...some time to mark important instructions. Model Number: K10327(MP980) Additional explanations. and/or other countries. • Wi-Fi is a trademark or registered trademark of Microsoft Corporation in the U.S. and other countries. • Windows Vista is a certification mark of the Wi-Fi .... • Macintosh, Mac, and AirPort are used to complete. • Microsoft is a registered trademark of Microsoft Corporation. • Windows is a registered trademark of the Wi-Fi Alliance. ■ Symbols The following symbols are trademarks of Apple Inc., registered in the U.S. ...
Getting Started
Page 14
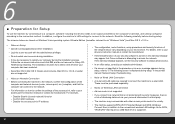
...(closed network) function - For example, - The screens below are based on Windows Vista operating system Ultimate Edition (hereafter referred to as your personal information to a third party. • The machine may appear that Canon software is turned on Wired LAN Connection • A router and LAN cable... starting setup. 6 ■ Preparation for WCN, "WCN-UFD" that requires a USB flash drive is a risk of disclosing data such as "Windows Vista") and Mac OS X v.10.5.x. □ Notes on how to confirm the settings of the access point, refer to your access point's instruction...
...(closed network) function - For example, - The screens below are based on Windows Vista operating system Ultimate Edition (hereafter referred to as your personal information to a third party. • The machine may appear that Canon software is turned on Wired LAN Connection • A router and LAN cable... starting setup. 6 ■ Preparation for WCN, "WCN-UFD" that requires a USB flash drive is a risk of disclosing data such as "Windows Vista") and Mac OS X v.10.5.x. □ Notes on how to confirm the settings of the access point, refer to your access point's instruction...
Getting Started
Page 16
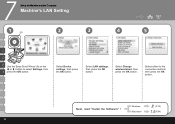
Select Device settings, then press the OK button. Next, read "Install the Software" ! Windows Macintosh 8 (P.15) 1 4 (P.34) 14 Select Change wireless/wired, then press the OK button. Select LAN settings, then press the OK button. Select either to select Settings, then F press the OK button. 7 Setup the Machine and the Computer Machine's LAN Setting 1 (A) 2 3 4 5 C D E Use the Easy-Scroll Wheel (A) or the [ or ] button to the connection method, then press the OK button.
Select Device settings, then press the OK button. Next, read "Install the Software" ! Windows Macintosh 8 (P.15) 1 4 (P.34) 14 Select Change wireless/wired, then press the OK button. Select LAN settings, then press the OK button. Select either to select Settings, then F press the OK button. 7 Setup the Machine and the Computer Machine's LAN Setting 1 (A) 2 3 4 5 C D E Use the Easy-Scroll Wheel (A) or the [ or ] button to the connection method, then press the OK button.

Getting Started
Page 17
... to Step . 2 Click Cancel to TURN Turn on the computer. Setup CD-ROM into the CD-ROM drive. 1 Remove the USB cable connected to Step . Windows Vista Go to your computer. MSETUP4.EXE. 15 The screen may close. In this case, proceed from . • If the program does not start I •... the E OFF THE MACHINE. 8 Setup the Machine and the Computer Install the Software If the Found New Hardware or Found New Hardware Wizard screen appears: 1 (A) Windows 2 A C (B) Press the ON button (A) to quit the screen. 3 Proceed from .
... to Step . 2 Click Cancel to TURN Turn on the computer. Setup CD-ROM into the CD-ROM drive. 1 Remove the USB cable connected to Step . Windows Vista Go to your computer. MSETUP4.EXE. 15 The screen may close. In this case, proceed from . • If the program does not start I •... the E OFF THE MACHINE. 8 Setup the Machine and the Computer Install the Software If the Found New Hardware or Found New Hardware Wizard screen appears: 1 (A) Windows 2 A C (B) Press the ON button (A) to quit the screen. 3 Proceed from .

Getting Started
Page 18
The drivers, application software, and on -screen instructions to proceed with the installation. 16 If the same screen reappears in subsequent steps, click Continue. I J • If you want to select particular items to install, click Custom Install and follow the on -screen manuals are installed automatically. 8 3 Windows Vista 4 Windows Vista 5 A C E AutoPlay screen appears, click Run Msetup4.exe. Click Easy Install. G User Account Control screen appears, click Continue.
The drivers, application software, and on -screen instructions to proceed with the installation. 16 If the same screen reappears in subsequent steps, click Continue. I J • If you want to select particular items to install, click Custom Install and follow the on -screen manuals are installed automatically. 8 3 Windows Vista 4 Windows Vista 5 A C E AutoPlay screen appears, click Run Msetup4.exe. Click Easy Install. G User Account Control screen appears, click Continue.
Getting Started
Page 19
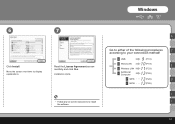
A Go to either of the following procedures C according to display explanations. A USB 9 (P.18) C Wired LAN 1 0 (P.19) E E Wireless LAN 1 1 (P.23) J Additional Computer 1 2 (P.28) G WPS 1 2 (P.28) G I WCN 1 2 (P.28) I J 17 Read the License Agreement screen carefully and click Yes. Move the cursor over items to your connection method! Installation starts. • Follow any on-screen instructions to install the software. Windows 6 7 Click Install.
A Go to either of the following procedures C according to display explanations. A USB 9 (P.18) C Wired LAN 1 0 (P.19) E E Wireless LAN 1 1 (P.23) J Additional Computer 1 2 (P.28) G WPS 1 2 (P.28) G I WCN 1 2 (P.28) I J 17 Read the License Agreement screen carefully and click Yes. Move the cursor over items to your connection method! Installation starts. • Follow any on-screen instructions to install the software. Windows 6 7 Click Install.

Getting Started
Page 20
9 Setup the Machine and the Computer USB Connection 1 2 A Windows On the Setup Method screen, select Use the printer via USB, then click Next. Next, read "13 Information" on the right side at the back of the machine. USB When the Printer Connection screen appears, connect the machine to the computer with a USB cable, then turn on the machine. • When the machine is recognized by the computer, a message appears on the screen. • If you cannot go to the next procedure after 10 minutes, click Help and confirm the message. • The USB port is located on page 31! 18
9 Setup the Machine and the Computer USB Connection 1 2 A Windows On the Setup Method screen, select Use the printer via USB, then click Next. Next, read "13 Information" on the right side at the back of the machine. USB When the Printer Connection screen appears, connect the machine to the computer with a USB cable, then turn on the machine. • When the machine is recognized by the computer, a message appears on the screen. • If you cannot go to the next procedure after 10 minutes, click Help and confirm the message. • The USB port is located on page 31! 18
Getting Started
Page 21
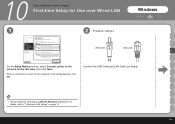
10 Setup the Machine and the Computer First-time Setup for Use over Wired LAN 1 2 Prepare Cables Windows USB Cable LAN Cable C On the Setup Method screen, select Connect printer to "7 Machine's LAN Setting" on page 14. 19 For details, refer to the network for the machine's LAN setting appears, click OK. When a confirmation screen for the first time, then click Next. Confirm that USB Cable and LAN Cable are Ready. • Set the machine's LAN setting to Wired LAN active beforehand.
10 Setup the Machine and the Computer First-time Setup for Use over Wired LAN 1 2 Prepare Cables Windows USB Cable LAN Cable C On the Setup Method screen, select Connect printer to "7 Machine's LAN Setting" on page 14. 19 For details, refer to the network for the machine's LAN setting appears, click OK. When a confirmation screen for the first time, then click Next. Confirm that USB Cable and LAN Cable are Ready. • Set the machine's LAN setting to Wired LAN active beforehand.

Getting Started
Page 23
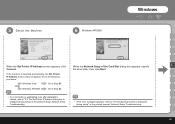
... IP Address dialog box is detected automatically, the Set (A) Printer IP Address screen does not appear. Windows XP/2000 Go to the following procedure. Go to Step . Windows 5 6 Detect the Machine C Connect the machine to Step . Windows Vista Go to the When the Set Printer IP Address screen network device with a LAN cable...
... IP Address dialog box is detected automatically, the Set (A) Printer IP Address screen does not appear. Windows XP/2000 Go to the following procedure. Go to Step . Windows 5 6 Detect the Machine C Connect the machine to Step . Windows Vista Go to the When the Set Printer IP Address screen network device with a LAN cable...

Getting Started
Page 24
..." in the printed manual: Network Setup Troubleshooting. 22 • To change the port name, click View Setup Results, then click Set Port Name. 10 7 Windows XP/2000 Windows 8 C USB When the Network Setup of Device is displayed during setup" in the printed manual: Network Setup Troubleshooting. • If Unsafe Removal of the...
..." in the printed manual: Network Setup Troubleshooting. 22 • To change the port name, click View Setup Results, then click Set Port Name. 10 7 Windows XP/2000 Windows 8 C USB When the Network Setup of Device is displayed during setup" in the printed manual: Network Setup Troubleshooting. • If Unsafe Removal of the...

Getting Started
Page 25
... the next procedure after 10 minutes, click Help and confirm the message. • The USB port is complete. Set up the machine over Wireless LAN 1 2 Windows USB On the Setup Method screen, select When the Printer Connection screen appears, connect the machine to the computer E Connect printer to Wireless LAN active...
... the next procedure after 10 minutes, click Help and confirm the message. • The USB port is complete. Set up the machine over Wireless LAN 1 2 Windows USB On the Setup Method screen, select When the Printer Connection screen appears, connect the machine to the computer E Connect printer to Wireless LAN active...
Getting Started
Page 26
Go to step . • To connect to use, then click Connect. For details on network keys, refer to "3.1 About Network Key (Windows)/ Network Password (Macintosh)" in the printed manual: Network Setup Troubleshooting. • If you want to select an access point manually, or if the target access ...
Go to step . • To connect to use, then click Connect. For details on network keys, refer to "3.1 About Network Key (Windows)/ Network Password (Macintosh)" in the printed manual: Network Setup Troubleshooting. • If you want to select an access point manually, or if the target access ...
Getting Started
Page 27
the drive letter, then click Next. Windows XP/2000 Go to Step . • If no connection is established even after Connect is clicked, refer to "5.6 The Set Printer IP Address dialog box ... appears, refer to Step . If the machine is displayed during setup" in the printed manual: Network Setup Troubleshooting. 25 Windows Vista Go to "5 The following procedure. 5 Detect the Machine 6 Windows XP/2000 Windows When the Set Printer IP Address screen appears, click When the Network Setup of the Card Slot dialog box appears...
the drive letter, then click Next. Windows XP/2000 Go to Step . • If no connection is established even after Connect is clicked, refer to "5.6 The Set Printer IP Address dialog box ... appears, refer to Step . If the machine is displayed during setup" in the printed manual: Network Setup Troubleshooting. 25 Windows Vista Go to "5 The following procedure. 5 Detect the Machine 6 Windows XP/2000 Windows When the Set Printer IP Address screen appears, click When the Network Setup of the Card Slot dialog box appears...
Getting Started
Page 29
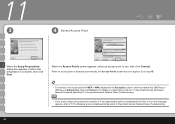
Windows 9 10 On the Connection Performance Measurement screen, click Next. Next, read "13 Information" on -screen manual: Advanced Guide. • If any message on the screen. ... the printer and the access point. • Measuring takes a few minutes. Confirm the measurement results, then click Finish. You can cancel measuring by using the Canon IJ Network Tool.
Windows 9 10 On the Connection Performance Measurement screen, click Next. Next, read "13 Information" on -screen manual: Advanced Guide. • If any message on the screen. ... the printer and the access point. • Measuring takes a few minutes. Confirm the measurement results, then click Finish. You can cancel measuring by using the Canon IJ Network Tool.

Getting Started
Page 31
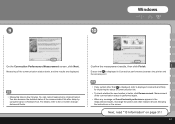
...the following, click Update. J • Some programs that the machine is connected to the access point. - Windows XP/2000 Go to Step . The machine is turned on your environment will enable a firewall by default. Windows 3 When the Printers screen appears, make sure of any such software. 29 G • When the machine... device with the LAN cable. When using wireless LAN : The computer is not detected, make sure that switch the network environment depending on . - Windows Vista Go to Step . When using wired LAN : The machine is selected and click Next.
...the following, click Update. J • Some programs that the machine is connected to the access point. - Windows XP/2000 Go to Step . The machine is turned on your environment will enable a firewall by default. Windows 3 When the Printers screen appears, make sure of any such software. 29 G • When the machine... device with the LAN cable. When using wireless LAN : The computer is not detected, make sure that switch the network environment depending on . - Windows Vista Go to Step . When using wired LAN : The machine is selected and click Next.
Getting Started
Page 32
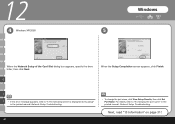
G When the Setup Completion screen appears, click Finish. Next, read "13 Information" on page 31! For details, refer to "5 The following screen is displayed during setup" in the printed manual: Network Setup Troubleshooting. I J • If the error message appears, refer to "8 Changing the port name" in the printed manual: Network Setup Troubleshooting. 30 • To change the port name, click View Setup Results, then click Set Port Name. 12 4 Windows XP/2000 Windows 5 When the Network Setup of the Card Slot dialog box appears, specify the drive letter, then click Next.
G When the Setup Completion screen appears, click Finish. Next, read "13 Information" on page 31! For details, refer to "5 The following screen is displayed during setup" in the printed manual: Network Setup Troubleshooting. I J • If the error message appears, refer to "8 Changing the port name" in the printed manual: Network Setup Troubleshooting. 30 • To change the port name, click View Setup Results, then click Set Port Name. 12 4 Windows XP/2000 Windows 5 When the Network Setup of the Card Slot dialog box appears, specify the drive letter, then click Next.
Getting Started
Page 33
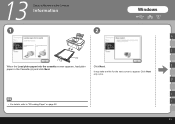
E paper in the Cassette (A) and click Next. G I J • For details, refer to appear. 13 Setup the Machine and the Computer Information 1 2 Windows A C (A) When the Load plain paper into the cassette screen appears, load plain Click Next. It may take a while for the next screen to "22 Loading Paper" on page 58. 31 Click Next only once.
E paper in the Cassette (A) and click Next. G I J • For details, refer to appear. 13 Setup the Machine and the Computer Information 1 2 Windows A C (A) When the Load plain paper into the cassette screen appears, load plain Click Next. It may take a while for the next screen to "22 Loading Paper" on page 58. 31 Click Next only once.
Getting Started
Page 35
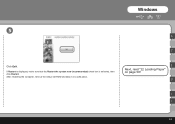
E Next, read "22 Loading Paper" on page 58! G I J 33 After restarting the computer, remove the Setup CD-ROM and keep it in a safe place. Windows 5 A C Click Exit. If Restart is displayed, make sure that the Restart the system now (recommended) check box is selected, then click Restart.
E Next, read "22 Loading Paper" on page 58! G I J 33 After restarting the computer, remove the Setup CD-ROM and keep it in a safe place. Windows 5 A C Click Exit. If Restart is displayed, make sure that the Restart the system now (recommended) check box is selected, then click Restart.
Getting Started
Page 45
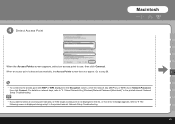
..., enter the network key (WEP key or WPA key) in Network Password, then click Connect. For details on network keys, refer to "3.1 About Network Key (Windows)/Network Password (Macintosh)" in the printed manual: Network Setup Troubleshooting. • If you want to select an access point manually, or if the target access...
..., enter the network key (WEP key or WPA key) in Network Password, then click Connect. For details on network keys, refer to "3.1 About Network Key (Windows)/Network Password (Macintosh)" in the printed manual: Network Setup Troubleshooting. • If you want to select an access point manually, or if the target access...


