
Quick Start Guide
Page 77
... then turn on the machine to dismiss the error message, and then adjust your operating environment and/or the position of the machine from the power supply. z Print Head nozzles are as follows: z Paper of the machine from the Cassette. z The Paper Output Slot is loaded in the Auto Sheet Feeder. Printing... you want to continue printing in , and then turn on page 48. U140 U150 z The ink tank is not compatible with an ink tank that Canon shall not be liable for detecting the remaining ink level. See "Replacing an Ink Tank" on . "Scanner is off .) Replace the ink tank. Then, ...
... then turn on the machine to dismiss the error message, and then adjust your operating environment and/or the position of the machine from the power supply. z Print Head nozzles are as follows: z Paper of the machine from the Cassette. z The Paper Output Slot is loaded in the Auto Sheet Feeder. Printing... you want to continue printing in , and then turn on page 48. U140 U150 z The ink tank is not compatible with an ink tank that Canon shall not be liable for detecting the remaining ink level. See "Replacing an Ink Tank" on . "Scanner is off .) Replace the ink tank. Then, ...

Quick Start Guide
Page 95
.... However, because printing is disabled once the ink absorber becomes completely full and until the ink absorber is memorized. Please be advised that Canon shall not be liable for example. If the same error occurs, contact your camera. Action z Make sure the Photo Index Sheet is ...Using the Photo Index Sheet" in the correct position and orientation on -screen manual. Replace the ink tank. Cannot Print Properly from the power supply. Troubleshooting 91 You can also press the OK button on the machine instead of the machine from a Photo Index Sheet Cause "Failed to...
.... However, because printing is disabled once the ink absorber becomes completely full and until the ink absorber is memorized. Please be advised that Canon shall not be liable for example. If the same error occurs, contact your camera. Action z Make sure the Photo Index Sheet is ...Using the Photo Index Sheet" in the correct position and orientation on -screen manual. Replace the ink tank. Cannot Print Properly from the power supply. Troubleshooting 91 You can also press the OK button on the machine instead of the machine from a Photo Index Sheet Cause "Failed to...
Quick Start Guide
Page 96
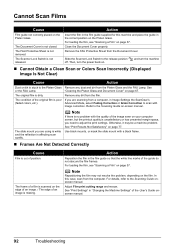
... a computer, in Image Settings the ScanGear's (faded colors, etc.). Cannot Scan Films Cause Action Film guide not correctly placed on . and turn the power back on the Platen Glass. Note Repositioning the film may be a machine problem. In this machine and place the guide in the film guide... supplied for this case, scan from the Document Cover. The frame of a film is scanned on the film. Advanced Mode, select Fading Correction or ...
... a computer, in Image Settings the ScanGear's (faded colors, etc.). Cannot Scan Films Cause Action Film guide not correctly placed on . and turn the power back on the Platen Glass. Note Repositioning the film may be a machine problem. In this machine and place the guide in the film guide... supplied for this case, scan from the Document Cover. The frame of a film is scanned on the film. Advanced Mode, select Fading Correction or ...
Quick Start Guide
Page 98
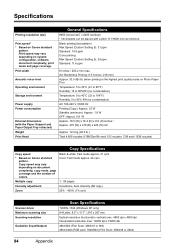
... Storage environment Power supply Power consumption External dimensions (with the Paper Support and Paper Output Tray retracted) Weight Print Head General Specifications 9600 (horizontal)* x 2400 (vertical) * Ink droplets can be placed with a pitch of copies. Copy speed may vary depending on Canon standard pattern....* * Based on document complexity, copy mode, page coverage and the number of 1/9600 inch at minimum. Print speed may vary depending on Canon standard pattern. Black & white: Fast mode approx. 31 cpm Color: Fast mode approx. 24 cpm Multiple copy 1 - 99 pages Intensity...
... Storage environment Power supply Power consumption External dimensions (with the Paper Support and Paper Output Tray retracted) Weight Print Head General Specifications 9600 (horizontal)* x 2400 (vertical) * Ink droplets can be placed with a pitch of copies. Copy speed may vary depending on Canon standard pattern....* * Based on document complexity, copy mode, page coverage and the number of 1/9600 inch at minimum. Print speed may vary depending on Canon standard pattern. Black & white: Fast mode approx. 31 cpm Color: Fast mode approx. 24 cpm Multiple copy 1 - 99 pages Intensity...
Quick Start Guide
Page 101
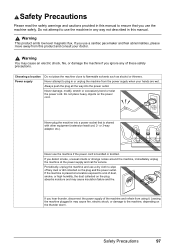
...the machine at a location exposed to ensure that is bundled or knotted. Never use the machine safely. If the machine is placed at the power supply and call for service. or 3-way adapter, etc.). If you ignore any way not described in may cause insulation failure and fire. Leaving ...the machine plugged in this manual to a lot of dust, smoke, or high humidity, the dust collected on the thunder storm. Choosing a location Power supply Do not place the machine close to use a cardiac pacemaker and feel abnormalities, please move away from using it. Always push the plug all the...
...the machine at a location exposed to ensure that is bundled or knotted. Never use the machine safely. If the machine is placed at the power supply and call for service. or 3-way adapter, etc.). If you ignore any way not described in may cause insulation failure and fire. Leaving ...the machine plugged in this manual to a lot of dust, smoke, or high humidity, the dust collected on the thunder storm. Choosing a location Power supply Do not place the machine close to use a cardiac pacemaker and feel abnormalities, please move away from using it. Always push the plug all the...

Quick Start Guide
Page 103
...not place metal objects (paper clips, staples, etc.) or containers of where you can easily unplug the power cord if necessary. Ink may break and cause injury. Safety Precautions 99 Power supply Ensure that the area around the machine Print Heads and ink tanks Never use an extension lead/cord.... When loading a thick book on the Platen Glass, do not press hard on top of small children. Do not use a power supply source other than the one rated for service. The Platen Glass may leak out and stain clothing or the surrounding area. Do not place ...
...not place metal objects (paper clips, staples, etc.) or containers of where you can easily unplug the power cord if necessary. Ink may break and cause injury. Safety Precautions 99 Power supply Ensure that the area around the machine Print Heads and ink tanks Never use an extension lead/cord.... When loading a thick book on the Platen Glass, do not press hard on top of small children. Do not use a power supply source other than the one rated for service. The Platen Glass may leak out and stain clothing or the surrounding area. Do not place ...
Easy Setup Instructions
Page 1
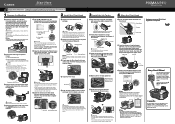
... cap from its package. (1) Press the { or } button to select the language. (2) Press the OK button. Scanning Unit (Printer Cover) c Plug the power cord in the User's Guide on-screen manual. Important ● For your safety, always firmly grip the areas il- You will need this has no... 14 minutes to complete. Paper Support Extension Hardware setup and Print Head alignment is displayed on the LCD. Paper Guide b Load two sheets of supplied paper (MP-101) into place. Note Print Head alignment takes about 2 minutes until the machine stops making noise. And Print Head is printed....
... cap from its package. (1) Press the { or } button to select the language. (2) Press the OK button. Scanning Unit (Printer Cover) c Plug the power cord in the User's Guide on-screen manual. Important ● For your safety, always firmly grip the areas il- You will need this has no... 14 minutes to complete. Paper Support Extension Hardware setup and Print Head alignment is displayed on the LCD. Paper Guide b Load two sheets of supplied paper (MP-101) into place. Note Print Head alignment takes about 2 minutes until the machine stops making noise. And Print Head is printed....


