
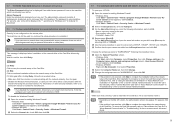
Obtaining the Password For Your Existing Wireless Network (Mac OS X)
Page 3
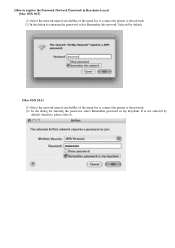
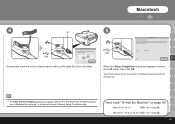
...button, you may select the network name (Access Point name (SSID)) you are displayed, select either one of the Connect button. If the message "The Printer could not be fine.) 2. (5) A Password (Network Password) shows up in the step 1 "Confirm a Password (Network Password)." If the same network ... the Password (Network Password) confirmed in Show password. 2. How to the specified access point" is required, enter the password confirmed in the printer. the one your neighbor is using (e.g. For the setup method, see "Getting Started for the setup instead of them. (Either one . 3....
...button, you may select the network name (Access Point name (SSID)) you are displayed, select either one of the Connect button. If the message "The Printer could not be fine.) 2. (5) A Password (Network Password) shows up in the step 1 "Confirm a Password (Network Password)." If the same network ... the Password (Network Password) confirmed in Show password. 2. How to the specified access point" is required, enter the password confirmed in the printer. the one your neighbor is using (e.g. For the setup method, see "Getting Started for the setup instead of them. (Either one . 3....
Obtaining the Password For Your Existing Wireless Network (Mac OS X)
Page 4
Selected by default, therefore, please select it. It is not selected by default. [Mac OSX 10.4] (1) Select the network name from AirMac of the menu bar to connect the printer to the network. (2) In the dialog for entering the password, select Remember this network. [How to the network. (2) In the dialog for entering the password, select Remember password in Keychain Access] [Mac OSX 10.5] (1) Select the network name from AirMac of the menu bar to connect the printer to register the Password (Network Password) in my keychain.
Selected by default, therefore, please select it. It is not selected by default. [Mac OSX 10.4] (1) Select the network name from AirMac of the menu bar to connect the printer to the network. (2) In the dialog for entering the password, select Remember this network. [How to the network. (2) In the dialog for entering the password, select Remember password in Keychain Access] [Mac OSX 10.5] (1) Select the network name from AirMac of the menu bar to connect the printer to register the Password (Network Password) in my keychain.
Network Setup Troubleshooting
Page 2
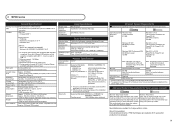
... displayed during setup P.3 5.1 The Access Points dialog box is displayed during setup P.3 5.2 The An access point could not be detected is displayed during setup P.3 5.3 The Printer could not be connected to the specified access point is displayed during setup P.4 5.4 The Another access point with the same SSID exists is displayed during... machine was forgotten P.6 8 Changing the port name P.6 ■ Restoring the Machine to the Factory Settings 1 Initializing using the machine's Operation Panel P.7 ■ Specifications 1 MP980 series P.8 2 MP620 series P.9
... displayed during setup P.3 5.1 The Access Points dialog box is displayed during setup P.3 5.2 The An access point could not be detected is displayed during setup P.3 5.3 The Printer could not be connected to the specified access point is displayed during setup P.4 5.4 The Another access point with the same SSID exists is displayed during... machine was forgotten P.6 8 Changing the port name P.6 ■ Restoring the Machine to the Factory Settings 1 Initializing using the machine's Operation Panel P.7 ■ Specifications 1 MP980 series P.8 2 MP620 series P.9
Network Setup Troubleshooting
Page 6
... then setup the machine again following the procedures in "Install the Software" and onward in the printed manual: Getting Started. 5.6 The Set Printer IP Address dialog box is displayed during setup (continued) (C) IP Address/Subnet Mask/Default Gateway Enter each value to the target access point....Address is selected. (D) Network Information Displays the Network Information dialog box. This requires that the DHCP function is turned off, the Set Printer IP Address dialog box does not appear.) If it is different from the address you are using the machine. (B) IP Address/Subnet ...
... then setup the machine again following the procedures in "Install the Software" and onward in the printed manual: Getting Started. 5.6 The Set Printer IP Address dialog box is displayed during setup (continued) (C) IP Address/Subnet Mask/Default Gateway Enter each value to the target access point....Address is selected. (D) Network Information Displays the Network Information dialog box. This requires that the DHCP function is turned off, the Set Printer IP Address dialog box does not appear.) If it is different from the address you are using the machine. (B) IP Address/Subnet ...
Network Setup Troubleshooting
Page 7
...of the Card Slot. (B) Skip Click to an unsecured wireless network is displayed during setup. If it . • If you have connected the printer to continue installation without the network setup of alphanumeric characters and is case sensitive. b) Select the Exceptions tab, and click Add port. d) Repeat ...is displayed during setup The Enter Password dialog box is displayed if an administrator password is complete, to mount the Card Slot using the Canon IJ Network Tool, refer to the machine which has already been set . c) On the Add a Port dialog box, input the following...
...of the Card Slot. (B) Skip Click to an unsecured wireless network is displayed during setup. If it . • If you have connected the printer to continue installation without the network setup of alphanumeric characters and is case sensitive. b) Select the Exceptions tab, and click Add port. d) Repeat ...is displayed during setup The Enter Password dialog box is displayed if an administrator password is complete, to mount the Card Slot using the Canon IJ Network Tool, refer to the machine which has already been set . c) On the Add a Port dialog box, input the following...
Network Setup Troubleshooting
Page 10
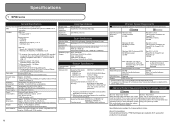
... available for the on-screen manuals Browser: Easy Guide Viewer Browser: Help Viewer Note: Microsoft Internet Explorer 6.0 or later Note: The on a PC with the Canon inkjet printer. Supported Standards: IEEE802.3u (100BASE-TX)/ IEEE802.3 (10BASE-T) Transfer speed: 10M/100Mbps (auto switching) Minimum System Requirements Conform to Windows Vista, first uninstall software...
... available for the on-screen manuals Browser: Easy Guide Viewer Browser: Help Viewer Note: Microsoft Internet Explorer 6.0 or later Note: The on a PC with the Canon inkjet printer. Supported Standards: IEEE802.3u (100BASE-TX)/ IEEE802.3 (10BASE-T) Transfer speed: 10M/100Mbps (auto switching) Minimum System Requirements Conform to Windows Vista, first uninstall software...
Network Setup Troubleshooting
Page 11
... inch at USB 1.1. *2 Maximum speed: 1.44 Mbps *3 JPEG/PNG only *4 Bluetooth connection is fully upwardly compatible with the Canon inkjet printer. Total 2,368 nozzles (PgBK 320 nozzles, Y/DyeBK each 256 nozzles, C/M each 768 nozzles) Multiple copy Intensity adjustment Reduction/ ... 14.5 (D) x 6.9 (H) inches Approx. 450 (W) x 368 (D) x 176 (H) mm * With the Paper Support and Paper Output Tray retracted. 2 MP620 series General Specifications Printing resolution 9600 (horizontal)* x 2400 (vertical) (dpi) * Ink droplets can be placed with Windows Media Center. • To upgrade...
... inch at USB 1.1. *2 Maximum speed: 1.44 Mbps *3 JPEG/PNG only *4 Bluetooth connection is fully upwardly compatible with the Canon inkjet printer. Total 2,368 nozzles (PgBK 320 nozzles, Y/DyeBK each 256 nozzles, C/M each 768 nozzles) Multiple copy Intensity adjustment Reduction/ ... 14.5 (D) x 6.9 (H) inches Approx. 450 (W) x 368 (D) x 176 (H) mm * With the Paper Support and Paper Output Tray retracted. 2 MP620 series General Specifications Printing resolution 9600 (horizontal)* x 2400 (vertical) (dpi) * Ink droplets can be placed with Windows Media Center. • To upgrade...
Getting Started
Page 18
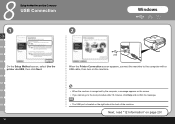
USB When the Printer Connection screen appears, connect the machine to the computer with a USB cable, then turn on the machine. • When the machine is recognized by the computer, a message appears on the screen. • If you cannot go to the next procedure after 10 minutes, click Help and confirm the message. • The USB port is located on page 29! 16 Next, read "12 Information" on the right side at the back of the machine. 8 Setup the Machine and the Computer USB Connection 1 2 A Windows On the Setup Method screen, select Use the printer via USB, then click Next.
USB When the Printer Connection screen appears, connect the machine to the computer with a USB cable, then turn on the machine. • When the machine is recognized by the computer, a message appears on the screen. • If you cannot go to the next procedure after 10 minutes, click Help and confirm the message. • The USB port is located on page 29! 16 Next, read "12 Information" on the right side at the back of the machine. 8 Setup the Machine and the Computer USB Connection 1 2 A Windows On the Setup Method screen, select Use the printer via USB, then click Next.
Getting Started
Page 19
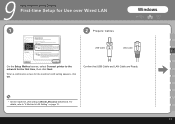
For details, refer to the network for the first time, then click Next. 9 Setup the Machine and the Computer First-time Setup for Use over Wired LAN 1 2 Prepare Cables Windows USB Cable LAN Cable C On the Setup Method screen, select Connect printer to "6 Machine's LAN Setting" on page 12. 17 Confirm that USB Cable and LAN Cable are Ready. • Set the machine's LAN setting to Wired LAN active beforehand. When a confirmation screen for the machine's LAN setting appears, click OK.
For details, refer to the network for the first time, then click Next. 9 Setup the Machine and the Computer First-time Setup for Use over Wired LAN 1 2 Prepare Cables Windows USB Cable LAN Cable C On the Setup Method screen, select Connect printer to "6 Machine's LAN Setting" on page 12. 17 Confirm that USB Cable and LAN Cable are Ready. • Set the machine's LAN setting to Wired LAN active beforehand. When a confirmation screen for the machine's LAN setting appears, click OK.
Getting Started
Page 20
... you cannot go to the computer with a USB cable, then turn on the right side at the back of the machine. 18 9 3 4 C USB When the Printer Connection screen appears, connect the machine to the next procedure after 10 minutes, click Help and confirm the message. • The USB port is complete.
... you cannot go to the computer with a USB cable, then turn on the right side at the back of the machine. 18 9 3 4 C USB When the Printer Connection screen appears, connect the machine to the next procedure after 10 minutes, click Help and confirm the message. • The USB port is complete.
Getting Started
Page 21
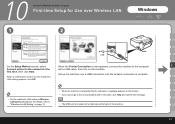
Windows 5 6 Detect the Machine C Connect the machine to the When the Set Printer IP Address screen network device with a LAN cable appears, click Connect. (A), then click Yes. (A) If the machine is displayed during setup" in the printed manual: ... Go to Step . Windows XP/2000 Go to Step . • If no connection is established even after USB Connect is clicked, refer to "5.6 The Set Printer IP Address dialog box is detected automatically, the Set Printer IP Address screen does not appear. Windows Vista Go to the following procedure.
Windows 5 6 Detect the Machine C Connect the machine to the When the Set Printer IP Address screen network device with a LAN cable appears, click Connect. (A), then click Yes. (A) If the machine is displayed during setup" in the printed manual: ... Go to Step . Windows XP/2000 Go to Step . • If no connection is established even after USB Connect is clicked, refer to "5.6 The Set Printer IP Address dialog box is detected automatically, the Set Printer IP Address screen does not appear. Windows Vista Go to the following procedure.
Getting Started
Page 23
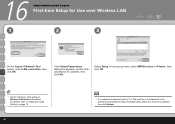
..., then click Next. Set up the machine over Wireless LAN 1 2 Windows USB On the Setup Method screen, select When the Printer Connection screen appears, connect the machine to the computer E Connect printer to the network for the machine's LAN setting appears, click OK. • Set the machine's LAN setting to the next...
..., then click Next. Set up the machine over Wireless LAN 1 2 Windows USB On the Setup Method screen, select When the Printer Connection screen appears, connect the machine to the computer E Connect printer to the network for the machine's LAN setting appears, click OK. • Set the machine's LAN setting to the next...
Getting Started
Page 25
... procedure. Windows XP/2000 Go to Step . • If no connection is established even after Connect is clicked, refer to "5.6 The Set Printer IP Address dialog box is displayed during setup" in the printed manual: Network Setup Troubleshooting. • If the error message appears, refer to... Step . Go to the following screen is detected automatically, the Set Printer IP Address screen does not appear. If the machine is displayed during setup" in the printed manual: Network Setup Troubleshooting. 23 the drive...
... procedure. Windows XP/2000 Go to Step . • If no connection is established even after Connect is clicked, refer to "5.6 The Set Printer IP Address dialog box is displayed during setup" in the printed manual: Network Setup Troubleshooting. • If the error message appears, refer to... Step . Go to the following screen is detected automatically, the Set Printer IP Address screen does not appear. If the machine is displayed during setup" in the printed manual: Network Setup Troubleshooting. 23 the drive...
Getting Started
Page 27
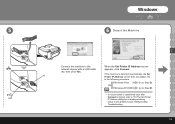
You can cancel measuring by using the Canon IJ Network Tool. Next, read "12 Information" on the screen. ...devices following the instructions on page 29! 25 E Ensure that is displayed in the measurement results, rearrange the printer and other than is displayed, refer to the on-screen manual: Advanced Guide. • If any message ...on Overall network performance appears in Connection performance between the printer and the access point. • Measuring takes a few minutes. You also examine the detailed status of the...
You can cancel measuring by using the Canon IJ Network Tool. Next, read "12 Information" on the screen. ...devices following the instructions on page 29! 25 E Ensure that is displayed in the measurement results, rearrange the printer and other than is displayed, refer to the on-screen manual: Advanced Guide. • If any message ...on Overall network performance appears in Connection performance between the printer and the access point. • Measuring takes a few minutes. You also examine the detailed status of the...
Getting Started
Page 28
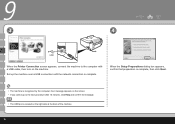
I • Make sure that the machine is connected to TURN ON THE MACHINE. 11 Setup the Machine and the Computer Connect the Wired LAN / Wireless LAN 1 2 (A) Press the ON button (A) to the network with a USB cable. G On the Setup Method screen, select Printer is not connected to the network, then click Next. J • For wired LAN connections, confirm that the computer you are setting up is already connected to the machine with a LAN cable. 26
I • Make sure that the machine is connected to TURN ON THE MACHINE. 11 Setup the Machine and the Computer Connect the Wired LAN / Wireless LAN 1 2 (A) Press the ON button (A) to the network with a USB cable. G On the Setup Method screen, select Printer is not connected to the network, then click Next. J • For wired LAN connections, confirm that the computer you are setting up is already connected to the machine with a LAN cable. 26
Getting Started
Page 29
... to Step . Check the settings of the following, click Update. I - When using wireless LAN : The computer is connected to the access point. - Windows 3 When the Printers screen appears, make sure of any such software. 27 Windows Vista Go to Step .
... to Step . Check the settings of the following, click Update. I - When using wireless LAN : The computer is connected to the access point. - Windows 3 When the Printers screen appears, make sure of any such software. 27 Windows Vista Go to Step .

Getting Started
Page 40
15 Setup the Machine and the Computer First-time Setup for Use over Wired LAN 1 2 3 D On the Canon IJ Network Tool screen, select LAN connection, then click OK. For details, refer to the computer with a USB cable. - Select Setup in the pop-up a ... that is complete, then click OK. Make sure of the following, then click Update. - The machine is turned on page 12. 38 • If no printer is connected to "6 Machine's LAN Setting" on . The machine is detected, click OK. To set up menu, select...
15 Setup the Machine and the Computer First-time Setup for Use over Wired LAN 1 2 3 D On the Canon IJ Network Tool screen, select LAN connection, then click OK. For details, refer to the computer with a USB cable. - Select Setup in the pop-up a ... that is complete, then click OK. Make sure of the following, then click Update. - The machine is turned on page 12. 38 • If no printer is connected to "6 Machine's LAN Setting" on . The machine is detected, click OK. To set up menu, select...
Getting Started
Page 41
..., then click OK. Mac OS X v.10.4.x/v.10.3.9 Go to "5.6 The Set Printer IP Address dialog box is displayed during setup" in the printed manual: Network Setup Troubleshooting. The Printer Setup Utility and Canon IJ Network Scanner Selector will start up. • If the Set Printer IP Address dialog box appear, refer to Step . 39
..., then click OK. Mac OS X v.10.4.x/v.10.3.9 Go to "5.6 The Set Printer IP Address dialog box is displayed during setup" in the printed manual: Network Setup Troubleshooting. The Printer Setup Utility and Canon IJ Network Scanner Selector will start up. • If the Set Printer IP Address dialog box appear, refer to Step . 39
Getting Started
Page 42
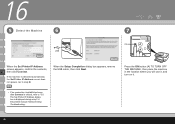
...40 • If no problem, then click Update. 16 Setup the Machine and the Computer First-time Setup for Use over Wireless LAN 1 2 3 On the Canon IJ Network Tool screen, select LAN connection, then F click OK. Make sure there is no machine is detected, refer to Wireless LAN active beforehand. If... dialog box appears, confirm that preparation is not detected" in the printed manual: Network Setup Troubleshooting. Select Setup in the pop-up menu, select MP620 series in Printers, then click OK. • Set the machine's LAN setting to "4.1 The machine is complete, then click OK.
...40 • If no problem, then click Update. 16 Setup the Machine and the Computer First-time Setup for Use over Wireless LAN 1 2 3 On the Canon IJ Network Tool screen, select LAN connection, then F click OK. Make sure there is no machine is detected, refer to Wireless LAN active beforehand. If... dialog box appears, confirm that preparation is not detected" in the printed manual: Network Setup Troubleshooting. Select Setup in the pop-up menu, select MP620 series in Printers, then click OK. • Set the machine's LAN setting to "4.1 The machine is complete, then click OK.
Getting Started
Page 44
... Troubleshooting. If the machine is displayed during setup" in the location where you will use it, and turn on it. 42 Go to "5.6 The Set Printer IP Address dialog box is detected automatically, the Set Printer IP Address screen does not appear. 16 5 Detect the Machine 6 7 (A) USB When the Set...
... Troubleshooting. If the machine is displayed during setup" in the location where you will use it, and turn on it. 42 Go to "5.6 The Set Printer IP Address dialog box is detected automatically, the Set Printer IP Address screen does not appear. 16 5 Detect the Machine 6 7 (A) USB When the Set...


