
MP210 series Quick Start Guide
Page 4
Canon PIXMA MP210 series Photo All-in order that this product meets the ENERGY STAR® guidelines for 5 years after production has stopped. Under the copyright laws, this manual may not be reproduced in any guides or related documents are ...manual thoroughly in -One Quick Start Guide. Specifications are available for energy efficiency. has determined that it will be , representation or warranties concerning the products described. All information regarding the accuracy thereof. About Consumables Consumables (ink tanks / FINE Cartridges) are subject to your Canon PIXMA MP210...
Canon PIXMA MP210 series Photo All-in order that this product meets the ENERGY STAR® guidelines for 5 years after production has stopped. Under the copyright laws, this manual may not be reproduced in any guides or related documents are ...manual thoroughly in -One Quick Start Guide. Specifications are available for energy efficiency. has determined that it will be , representation or warranties concerning the products described. All information regarding the accuracy thereof. About Consumables Consumables (ink tanks / FINE Cartridges) are subject to your Canon PIXMA MP210...

MP210 series Quick Start Guide
Page 5
... 55 Error Message Appears on a PictBridge Compliant Device 57 Scanning Problems 58 Appendix 59 How to Use the Documentation Provided.....59 Reading the On-screen Manuals 60 Specifications 61 Safety Precautions 64 Legal Limitations on Use of Your Product and Use of Images 67 Users in the U.S.A 68 Index 72 1
... 55 Error Message Appears on a PictBridge Compliant Device 57 Scanning Problems 58 Appendix 59 How to Use the Documentation Provided.....59 Reading the On-screen Manuals 60 Specifications 61 Safety Precautions 64 Legal Limitations on Use of Your Product and Use of Images 67 Users in the U.S.A 68 Index 72 1
MP210 series Quick Start Guide
Page 6
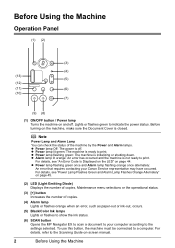
... Power lamp Off: The power is initializing or shutting down. For details, see "An Error Code Is Displayed on the LED" on -screen manual. 2 Before Using the Machine For details, see "Power Lamp Flashes Green and Alarm Lamp Flashes Orange Alternately" on page 45. (2) LED ..., occurs. (5) Black/Color Ink lamps Lights or flashes to show the ink status. (6) SCAN button Opens the MP Navigator EX to scan a document to your Canon Service representative may have occurred. Before Using the Machine Operation Panel (1) (2) (3) (4) (13) (5) (12) (11) (6) (10) (7) (9) (8) (1) ON/OFF ...
... Power lamp Off: The power is initializing or shutting down. For details, see "An Error Code Is Displayed on the LED" on -screen manual. 2 Before Using the Machine For details, see "Power Lamp Flashes Green and Alarm Lamp Flashes Orange Alternately" on page 45. (2) LED ..., occurs. (5) Black/Color Ink lamps Lights or flashes to show the ink status. (6) SCAN button Opens the MP Navigator EX to scan a document to your Canon Service representative may have occurred. Before Using the Machine Operation Panel (1) (2) (3) (4) (13) (5) (12) (11) (6) (10) (7) (9) (8) (1) ON/OFF ...
MP210 series Quick Start Guide
Page 7
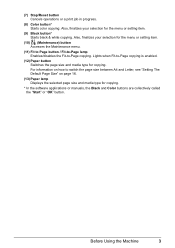
Also, finalizes your selection for copying. * In the software applications or manuals, the Black and Color buttons are collectively called the "Start" or "OK" button. Lights when Fit-to -Page copying. For information on how to switch ...
Also, finalizes your selection for copying. * In the software applications or manuals, the Black and Color buttons are collectively called the "Start" or "OK" button. Lights when Fit-to -Page copying. For information on how to switch ...
MP210 series Quick Start Guide
Page 12
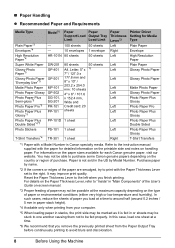
...*5 Photo Paper Pro*5 Photo Paper Plus Glossy*5 Photo Paper Plus Double Sided*4*7 Photo Stickers T-Shirt Transfers*4 Model*1 - - Refer to the instruction manual supplied with the Paper Thickness Lever set to be fed properly. Purchase paper by Model Number. For details on handling paper. In such cases, reduce...sheet 1 sheet 1 sheet Paper Thickness Lever*2 Left Right Left Left Left Left Left Left Left Left Left Left Left Right Printer Driver Setting for each Canon genuine paper, visit our website. Paper is fed in the US by name. *2 If the corners or edges of paper you load at a time...
...*5 Photo Paper Pro*5 Photo Paper Plus Glossy*5 Photo Paper Plus Double Sided*4*7 Photo Stickers T-Shirt Transfers*4 Model*1 - - Refer to the instruction manual supplied with the Paper Thickness Lever set to be fed properly. Purchase paper by Model Number. For details on handling paper. In such cases, reduce...sheet 1 sheet 1 sheet Paper Thickness Lever*2 Left Right Left Left Left Left Left Left Left Left Left Left Left Right Printer Driver Setting for each Canon genuine paper, visit our website. Paper is fed in the US by name. *2 If the corners or edges of paper you load at a time...

MP210 series Quick Start Guide
Page 13
z Media Types You Cannot Use Do not use the following paper types for Canon genuine paper, weighing more than 28 lb / 105 gsm) z Picture postcards z Postcards affixed with photos or stickers z Any type of paper with holes z Paper that ..., do not use the following types of printing media types, refer to jam or malfunction. *7 This paper cannot be used in the User's Guide onscreen manual. z If you select "Photo Paper" when copying, use paper thinner than 17 lb / 64 gsm) z Paper that is too thin (weighing less than a post card...
z Media Types You Cannot Use Do not use the following paper types for Canon genuine paper, weighing more than 28 lb / 105 gsm) z Picture postcards z Postcards affixed with photos or stickers z Any type of paper with holes z Paper that ..., do not use the following types of printing media types, refer to jam or malfunction. *7 This paper cannot be used in the User's Guide onscreen manual. z If you select "Photo Paper" when copying, use paper thinner than 17 lb / 64 gsm) z Paper that is too thin (weighing less than a post card...
MP210 series Quick Start Guide
Page 15
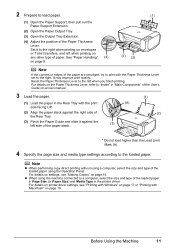
... Rear Tray. (3) Pinch the Paper Guide and slide it to the right when printing on envelopes or T-shirt transfers, and left when printing on -screen manual. 3 Load the paper. (1) Load the paper in the printer driver. For details on printer driver settings, see "Making Copies" on page 18. 2 Prepare to load...
... Rear Tray. (3) Pinch the Paper Guide and slide it to the right when printing on envelopes or T-shirt transfers, and left when printing on -screen manual. 3 Load the paper. (1) Load the paper in the printer driver. For details on printer driver settings, see "Making Copies" on page 18. 2 Prepare to load...
MP210 series Quick Start Guide
Page 17
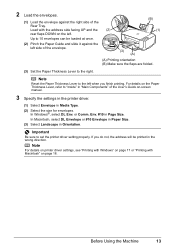
... printer driver settings, see "Printing with Windows" on page 17 or "Printing with the address side facing UP and the (2) rear flaps DOWN on -screen manual. 3 Specify the settings in the printer driver. (1) Select Envelope in "Main Components" of the User's Guide on the left.
... printer driver settings, see "Printing with Windows" on page 17 or "Printing with the address side facing UP and the (2) rear flaps DOWN on -screen manual. 3 Specify the settings in the printer driver. (1) Select Envelope in "Main Components" of the User's Guide on the left.
MP210 series Quick Start Guide
Page 20
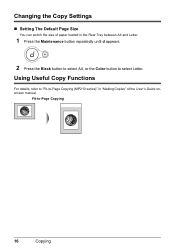
Fit-to select Letter. Changing the Copy Settings „ Setting The Default Page Size You can switch the size of paper loaded in "Making Copies" of the User's Guide onscreen manual. Using Useful Copy Functions For details, refer to "Fit-to-Page Copying (MP210 series)" in the Rear Tray between A4 and Letter. 1 Press the Maintenance button repeatedly until d appears. 2 Press the Black button to select A4, or the Color button to -Page Copying 16 Copying
Fit-to select Letter. Changing the Copy Settings „ Setting The Default Page Size You can switch the size of paper loaded in "Making Copies" of the User's Guide onscreen manual. Using Useful Copy Functions For details, refer to "Fit-to-Page Copying (MP210 series)" in the Rear Tray between A4 and Letter. 1 Press the Maintenance button repeatedly until d appears. 2 Press the Black button to select A4, or the Color button to -Page Copying 16 Copying
MP210 series Quick Start Guide
Page 21
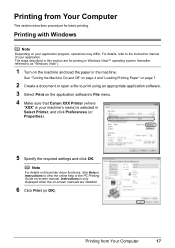
... Turn on the application software's File menu. 4 Make sure that Canon XXX Printer (where "XXX" is your machine's name) is only displayed when the on-screen manuals are for basic printing. Printing with Windows Note Depending on -screen manual. Note For details on the printer driver functions, click Help or... are installed. 6 Click Print (or OK). The steps described in Windows Vista™ operating system (hereafter referred to the instruction manual of your application program, operations may differ. Printing from Your Computer 17 Instructions is selected in the machine.
... Turn on the application software's File menu. 4 Make sure that Canon XXX Printer (where "XXX" is your machine's name) is only displayed when the on-screen manuals are for basic printing. Printing with Windows Note Depending on -screen manual. Note For details on the printer driver functions, click Help or... are installed. 6 Click Print (or OK). The steps described in Windows Vista™ operating system (hereafter referred to the instruction manual of your application program, operations may differ. Printing from Your Computer 17 Instructions is selected in the machine.
MP210 series Quick Start Guide
Page 22
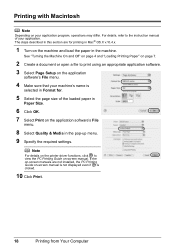
.... 3 Select Page Setup on the application software's File menu. 4 Make sure that your application program, operations may differ. If the on-screen manuals are for . 5 Select the page size of your application. Printing with Macintosh Note Depending on your machine's name is clicked. 10 Click Print....X v.10.4.x. 1 Turn on the machine and load the paper in the machine. Note For details on the printer driver functions, click to the instruction manual of the loaded paper in Paper Size. 6 Click OK. 7 Select Print on the application software's File menu. 8 Select Quality & Media in this...
.... 3 Select Page Setup on the application software's File menu. 4 Make sure that your application program, operations may differ. If the on-screen manuals are for . 5 Select the page size of your application. Printing with Macintosh Note Depending on your machine's name is clicked. 10 Click Print....X v.10.4.x. 1 Turn on the machine and load the paper in the machine. Note For details on the printer driver functions, click to the instruction manual of the loaded paper in Paper Size. 6 Click OK. 7 Select Print on the application software's File menu. 8 Select Quality & Media in this...
MP210 series Quick Start Guide
Page 23
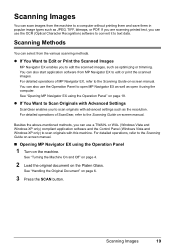
... above-mentioned methods, you to edit the scanned images, such as the resolution. For detailed operations, refer to the Scanning Guide on-screen manual. „ Opening MP Navigator EX using the computer. For detailed operations of ScanGear, refer to the Scanning Guide on the Platen Glass. You...scanning methods. Scanning Images You can use the OCR (Optical Character Recognition) software to convert it using the Operation Panel 1 Turn on -screen manual. For detailed operations of MP Navigator EX, refer to the Scanning Guide on the machine. If you are scanning printed text, you to ...
... above-mentioned methods, you to edit the scanned images, such as the resolution. For detailed operations, refer to the Scanning Guide on-screen manual. „ Opening MP Navigator EX using the computer. For detailed operations of ScanGear, refer to the Scanning Guide on the Platen Glass. You...scanning methods. Scanning Images You can use the OCR (Optical Character Recognition) software to convert it using the Operation Panel 1 Turn on -screen manual. For detailed operations of MP Navigator EX, refer to the Scanning Guide on the machine. If you are scanning printed text, you to ...
MP210 series Quick Start Guide
Page 24
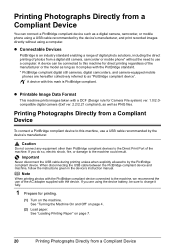
... to as "PictBridge compliant device". When disconnecting the USB cable between the PictBridge compliant device and machine, follow the instructions given in the device's instruction manual. See "Turning the Machine On and Off" on page 7. 20 Printing Photographs Directly from a Compliant Device Note When printing photos with the PictBridge standard. * PictBridge...
... to as "PictBridge compliant device". When disconnecting the USB cable between the PictBridge compliant device and machine, follow the instructions given in the device's instruction manual. See "Turning the Machine On and Off" on page 7. 20 Printing Photographs Directly from a Compliant Device Note When printing photos with the PictBridge standard. * PictBridge...

MP210 series Quick Start Guide
Page 25
.... You may have to select a print mode compliant with PictBridge before connecting it on the device or select Play mode manually after connecting the device to instructions given in the machine. Perform necessary operations on the PictBridge compliant device before connecting the ...compliant device. See "About PictBridge Print Settings" on page 24. 4 Start printing from your device, you loaded in the device's instruction manual. (1) Make sure that the PictBridge compliant device is correctly connected. (2) 3 Specify the print settings such as paper type and layout. ...
.... You may have to select a print mode compliant with PictBridge before connecting it on the device or select Play mode manually after connecting the device to instructions given in the machine. Perform necessary operations on the PictBridge compliant device before connecting the ...compliant device. See "About PictBridge Print Settings" on page 24. 4 Start printing from your device, you loaded in the device's instruction manual. (1) Make sure that the PictBridge compliant device is correctly connected. (2) 3 Specify the print settings such as paper type and layout. ...

MP210 series Quick Start Guide
Page 26
... paper, select 10 x 15 cm/ 4" x 6" in Paper size and Photo for Paper type only when Paper size is set to those used in the instruction manual of your device. In this case, the settings made on Photo Paper Plus Semi-gloss 8" x 10" / 203.2 x 254.0 mm (SG-201), select 20 ... Paper "Everyday Use" Photo Paper Glossy Photo Paper Plus Semi-gloss*4 Photo Stickers*5 Photo Paper Pro The available page sizes vary depending on certain Canon-brand PictBridge compliant devices. *2 Plain Paper can be selected for Paper type. Note z In the following sizes and types of your PictBridge compliant ...
... paper, select 10 x 15 cm/ 4" x 6" in Paper size and Photo for Paper type only when Paper size is set to those used in the instruction manual of your device. In this case, the settings made on Photo Paper Plus Semi-gloss 8" x 10" / 203.2 x 254.0 mm (SG-201), select 20 ... Paper "Everyday Use" Photo Paper Glossy Photo Paper Plus Semi-gloss*4 Photo Stickers*5 Photo Paper Pro The available page sizes vary depending on certain Canon-brand PictBridge compliant devices. *2 Plain Paper can be selected for Paper type. Note z In the following sizes and types of your PictBridge compliant ...
MP210 series Quick Start Guide
Page 31
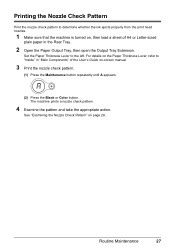
... ink ejects properly from the print head nozzles. 1 Make sure that the machine is turned on, then load a sheet of the User's Guide on-screen manual. 3 Print the nozzle check pattern. (1) Press the Maintenance button repeatedly until A appears. (2) Press the Black or Color button. For details on page 28. Routine Maintenance...
... ink ejects properly from the print head nozzles. 1 Make sure that the machine is turned on, then load a sheet of the User's Guide on-screen manual. 3 Print the nozzle check pattern. (1) Press the Maintenance button repeatedly until A appears. (2) Press the Black or Color button. For details on page 28. Routine Maintenance...

MP210 series Quick Start Guide
Page 35
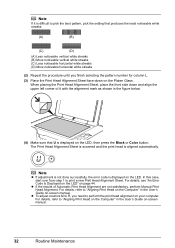
.... (1) Check the printed patterns and fill in the Rear Tray. 2 Open the Paper Output Tray, then open the Output Tray Extension. For details on -screen manual. 3 Print the Print Head Alignment Sheet. (1) Press the Maintenance button repeatedly until P appears. Routine Maintenance 31 Aligning the Print Head If ruled lines are printed...
.... (1) Check the printed patterns and fill in the Rear Tray. 2 Open the Paper Output Tray, then open the Output Tray Extension. For details on -screen manual. 3 Print the Print Head Alignment Sheet. (1) Press the Maintenance button repeatedly until P appears. Routine Maintenance 31 Aligning the Print Head If ruled lines are printed...
MP210 series Quick Start Guide
Page 36
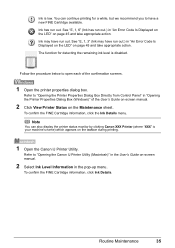
... L. (3) Place the Print Head Alignment Sheet face-down and align the upper left corner of Automatic Print Head Alignment are not satisfactory, perform Manual Print Head Alignment. z To adjust columns M to "Aligning Print Head on the Computer" in the User's Guide on-screen.... Note z If adjustment is not done successfully, the error code is difficult to "Aligning Print Head on the Computer" in the User's Guide on-screen manual. Note If it with the alignment mark as shown in the figure below. (4) Make sure that produces the least noticeable white streaks. (A) (B) (C) (D) (A) Less ...
... L. (3) Place the Print Head Alignment Sheet face-down and align the upper left corner of Automatic Print Head Alignment are not satisfactory, perform Manual Print Head Alignment. z To adjust columns M to "Aligning Print Head on the Computer" in the User's Guide on-screen.... Note z If adjustment is not done successfully, the error code is difficult to "Aligning Print Head on the Computer" in the User's Guide on-screen manual. Note If it with the alignment mark as shown in the figure below. (4) Make sure that produces the least noticeable white streaks. (A) (B) (C) (D) (A) Less ...
MP210 series Quick Start Guide
Page 39
...the Printer Properties Dialog Box Directly from Control Panel" in "An Error Code Is Displayed on the LED" on the taskbar during printing. 1 Open the Canon IJ Printer Utility. Refer to have a new FINE Cartridge available. See "E, 1, 3" (Ink may have run out.) in "Opening the Printer Properties ...the Ink Details menu. Ink is disabled. The function for a while, but we recommend you to "Opening the Canon IJ Printer Utility (Macintosh)" in the User's Guide on-screen manual. 2 Select Ink Level Information in "An Error Code Is Displayed on the LED" on the Maintenance sheet. To ...
...the Printer Properties Dialog Box Directly from Control Panel" in "An Error Code Is Displayed on the LED" on the taskbar during printing. 1 Open the Canon IJ Printer Utility. Refer to have a new FINE Cartridge available. See "E, 1, 3" (Ink may have run out.) in "Opening the Printer Properties ...the Ink Details menu. Ink is disabled. The function for a while, but we recommend you to "Opening the Canon IJ Printer Utility (Macintosh)" in the User's Guide on-screen manual. 2 Select Ink Level Information in "An Error Code Is Displayed on the LED" on the Maintenance sheet. To ...
MP210 series Quick Start Guide
Page 40
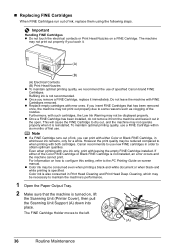
...Printer Cover), then pull the Scanning Unit Support (A) down into place. The machine may be necessary to the PC Printing Guide on-screen manual. Refilling ink is specified. This will cause the FINE Cartridge to when printing with both cartridges. If either Color or Black FINE Cartridge,... installed. The FINE Cartridge Holder moves to obtain optimum qualities. z Once you remove a FINE Cartridge, replace it out in the open. Canon recommends to use new FINE cartridges in order to the left. (A) 36 Routine Maintenance Do not leave the machine with such cartridges, the ...
...Printer Cover), then pull the Scanning Unit Support (A) down into place. The machine may be necessary to the PC Printing Guide on-screen manual. Refilling ink is specified. This will cause the FINE Cartridge to when printing with both cartridges. If either Color or Black FINE Cartridge,... installed. The FINE Cartridge Holder moves to obtain optimum qualities. z Once you remove a FINE Cartridge, replace it out in the open. Canon recommends to use new FINE cartridges in order to the left. (A) 36 Routine Maintenance Do not leave the machine with such cartridges, the ...


