i9100 Quick Start Guide
Page 3
... with Macintosh 17 Accessing Printer Driver 21 Adjusting Print Quality for Photographs 23 Using Printer Driver Options 30 Printing Maintenance Replacing an Ink Tank 31 When Printing Becomes Faint or Colors are Incorrect 36 Printing the Nozzle Check Pattern 37 Print Head Cleaning 39 Print Head Deep Cleaning 42 Aligning the Print Head 44 Troubleshooting Cannot Install the Printer Driver 50 Print Quality is Poor...
... with Macintosh 17 Accessing Printer Driver 21 Adjusting Print Quality for Photographs 23 Using Printer Driver Options 30 Printing Maintenance Replacing an Ink Tank 31 When Printing Becomes Faint or Colors are Incorrect 36 Printing the Nozzle Check Pattern 37 Print Head Cleaning 39 Print Head Deep Cleaning 42 Aligning the Print Head 44 Troubleshooting Cannot Install the Printer Driver 50 Print Quality is Poor...
i9100 Quick Start Guide
Page 24
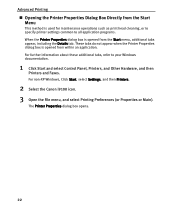
... the Canon i9100 icon. 3 Open the File menu, and select Printing Preferences (or Properties or Main). These tabs do not appear when the Printer Properties dialog box is opened from within an application. Advanced Printing „ Opening the Printer Properties Dialog Box Directly from the Start Menu This method is used for maintenance operations such as print head...
... the Canon i9100 icon. 3 Open the File menu, and select Printing Preferences (or Properties or Main). These tabs do not appear when the Printer Properties dialog box is opened from within an application. Advanced Printing „ Opening the Printer Properties Dialog Box Directly from the Start Menu This method is used for maintenance operations such as print head...
i9100 Quick Start Guide
Page 36
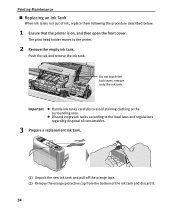
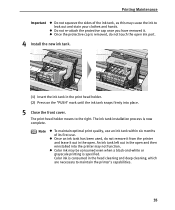
... of ink, replace them following the procedure described below. 1 Ensure that the printer is on, and then open the front cover. Printing Maintenance „ Replacing an Ink Tank When ink tanks run out of the ink tank and discard it. 34 The print head holder moves to avoid staining clothing or the surrounding area.
... of ink, replace them following the procedure described below. 1 Ensure that the printer is on, and then open the front cover. Printing Maintenance „ Replacing an Ink Tank When ink tanks run out of the ink tank and discard it. 34 The print head holder moves to avoid staining clothing or the surrounding area.
i9100 Quick Start Guide
Page 37
... z To maintain optimal print quality, use . z Color ink may be consumed even when a black-and-white or grayscale printing is now complete. The ink tank installation process is specified. An ink tank left out in the print head holder. (2) Press on the "PUSH" mark until the ink tank snaps firmly into the printer may not function...
... z To maintain optimal print quality, use . z Color ink may be consumed even when a black-and-white or grayscale printing is now complete. The ink tank installation process is specified. An ink tank left out in the print head holder. (2) Press on the "PUSH" mark until the ink tank snaps firmly into the printer may not function...
i9100 Quick Start Guide
Page 38
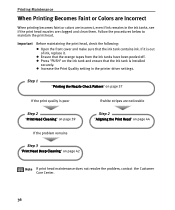
... Printing Becomes Faint or Colors are Incorrect When printing becomes faint or colors are incorrect, even if ink remains in the printer driver settings. Follow the procedures below to maintain the print head. z Ensure that the ink tank contains ink. z Increase the Print Quality setting in the ink tanks, see if the print head nozzles are noticeable Step 2 "Aligning the Print Head...
... Printing Becomes Faint or Colors are Incorrect When printing becomes faint or colors are incorrect, even if ink remains in the printer driver settings. Follow the procedures below to maintain the print head. z Ensure that the ink tank contains ink. z Increase the Print Quality setting in the ink tanks, see if the print head nozzles are noticeable Step 2 "Aligning the Print Head...

i9100 Quick Start Guide
Page 39
... , load a sheet of paper in the printer. 2 Open the Printer Properties dialog box. Use this function if printed results are blurred or if the color is displayed, click OK. See "Opening the Printer Properties Dialog Box Directly from the print head nozzles, and to verify print head alignment. Printing the Nozzle Check Pattern Printing Maintenance Print the nozzle check pattern to determine...
... , load a sheet of paper in the printer. 2 Open the Printer Properties dialog box. Use this function if printed results are blurred or if the color is displayed, click OK. See "Opening the Printer Properties Dialog Box Directly from the print head nozzles, and to verify print head alignment. Printing the Nozzle Check Pattern Printing Maintenance Print the nozzle check pattern to determine...

i9100 Quick Start Guide
Page 41
... the Print Head" on page 22. 39 Print Head Cleaning Clean the print head if you suspect that the print head requires alignment. See "Opening the Printer Properties Dialog Box Directly from the Start Menu" on page 44. See "Print Head Cleaning" on . 2 Open the Printer Properties dialog box. Cleaning the print head consumes ink, so perform print head cleaning only when necessary. 1 Ensure that the print head...
... the Print Head" on page 22. 39 Print Head Cleaning Clean the print head if you suspect that the print head requires alignment. See "Opening the Printer Properties Dialog Box Directly from the Start Menu" on page 44. See "Print Head Cleaning" on . 2 Open the Printer Properties dialog box. Cleaning the print head consumes ink, so perform print head cleaning only when necessary. 1 Ensure that the print head...

i9100 Quick Start Guide
Page 42
in the File menu. (2) Click Utilities... Printing Maintenance 3 Start Print Head Cleaning. (1) Click the Maintenance tab. (2) Click Cleaning. (3) When the message is displayed, click OK. 1 Ensure the printer is on. 2 Open the Printer Utility dialog box. (1) Select Page Setup... to open the Printer Utility dialog box. 40
in the File menu. (2) Click Utilities... Printing Maintenance 3 Start Print Head Cleaning. (1) Click the Maintenance tab. (2) Click Cleaning. (3) When the message is displayed, click OK. 1 Ensure the printer is on. 2 Open the Printer Utility dialog box. (1) Select Page Setup... to open the Printer Utility dialog box. 40

i9100 Quick Start Guide
Page 43
...from the pull-down the RESUME/CANCEL button until print head cleaning finishes. Printing Maintenance (1) Select Cleaning from the printer itself. The cleaning process takes about 50 seconds. If the problem persists, perform print head deep cleaning. Hold down menu. (2) Click ...operations until the POWER lamp flashes once, then release. See "Print Head Deep Cleaning" on page 37. z After print head cleaning finishes, print the nozzle check pattern to verify that the print head nozzles are clean. 3 Start Print Head Cleaning. Ensure the printer is displayed, click OK.
...from the pull-down the RESUME/CANCEL button until print head cleaning finishes. Printing Maintenance (1) Select Cleaning from the printer itself. The cleaning process takes about 50 seconds. If the problem persists, perform print head deep cleaning. Hold down menu. (2) Click ...operations until the POWER lamp flashes once, then release. See "Print Head Deep Cleaning" on page 37. z After print head cleaning finishes, print the nozzle check pattern to verify that the print head nozzles are clean. 3 Start Print Head Cleaning. Ensure the printer is displayed, click OK.

i9100 Quick Start Guide
Page 44
Print head deep cleaning consumes ink, so perform this procedure only when necessary. 1 Ensure the printer is a more powerful process. Printing Maintenance Print Head Deep Cleaning If the print quality does not improve by standard print head cleaning, try performing a print head deep cleaning, which is on page 22. 3 Start Print Head Deep Cleaning. (1) Click the Maintenance tab. (2) Click Deep Cleaning. (3) When the message is displayed, click OK. 42 See "Opening the Printer Properties Dialog Box Directly from the Start Menu" on . 2 Open the Printer Properties dialog box.
Print head deep cleaning consumes ink, so perform this procedure only when necessary. 1 Ensure the printer is a more powerful process. Printing Maintenance Print Head Deep Cleaning If the print quality does not improve by standard print head cleaning, try performing a print head deep cleaning, which is on page 22. 3 Start Print Head Deep Cleaning. (1) Click the Maintenance tab. (2) Click Deep Cleaning. (3) When the message is displayed, click OK. 42 See "Opening the Printer Properties Dialog Box Directly from the Start Menu" on . 2 Open the Printer Properties dialog box.

i9100 Quick Start Guide
Page 45
... Nozzle Check Pattern" on . 2 Open the Printer Utility dialog box. (1) Select Page Setup... Printing Maintenance 1 Ensure the printer is displayed, click OK. to three times. If the print head is still not clean, repeat print head deep cleaning and the nozzle check pattern printing up to open the Printer Utility dialog box. 3 Start Print Head Deep Cleaning. (1) Select Cleaning from the...
... Nozzle Check Pattern" on . 2 Open the Printer Utility dialog box. (1) Select Page Setup... Printing Maintenance 1 Ensure the printer is displayed, click OK. to three times. If the print head is still not clean, repeat print head deep cleaning and the nozzle check pattern printing up to open the Printer Utility dialog box. 3 Start Print Head Deep Cleaning. (1) Select Cleaning from the...

i9100 Quick Start Guide
Page 46
Printing Maintenance Aligning the Print Head 1 With the printer on page 22. 3 Print the pattern. (1) Click the Maintenance tab. (2) Click Print Head Alignment. (3) When the confirmation message is displayed, click OK. (4) After the pattern is printed, click Yes. 44 See "Opening the Printer Properties Dialog Box Directly from the Start Menu" on , load a sheet of paper in the printer. 2 Open the Printer Properties dialog box.
Printing Maintenance Aligning the Print Head 1 With the printer on page 22. 3 Print the pattern. (1) Click the Maintenance tab. (2) Click Print Head Alignment. (3) When the confirmation message is displayed, click OK. (4) After the pattern is printed, click Yes. 44 See "Opening the Printer Properties Dialog Box Directly from the Start Menu" on , load a sheet of paper in the printer. 2 Open the Printer Properties dialog box.

i9100 Quick Start Guide
Page 47
Note If it is difficult to pick up the best pattern on F, pick the setting that correspond to the selected patterns. (2) Enter the numbers. (3) Click OK. Less noticeable white stripes More noticeable white stripes (4) Click OK. 45 4 Align the Print Head. Select the patterns that have the fewest white stripes and enter the numbers that produces the least noticeable vertical white stripes. Printing Maintenance (1) Look at the printout.
Note If it is difficult to pick up the best pattern on F, pick the setting that correspond to the selected patterns. (2) Enter the numbers. (3) Click OK. Less noticeable white stripes More noticeable white stripes (4) Click OK. 45 4 Align the Print Head. Select the patterns that have the fewest white stripes and enter the numbers that produces the least noticeable vertical white stripes. Printing Maintenance (1) Look at the printout.

i9100 Quick Start Guide
Page 48
to open the Printer Utility dialog box. 3 Print the pattern. (1) Select Test Print from the pull-down menu. (2) Click Print Head Alignment. (3) Click OK. 46 in the File menu. (2) Click Utilities... Printing Maintenance 1 Ensure the printer is on. 2 Open the Print Utility dialog box. (1) Select Page Setup...
to open the Printer Utility dialog box. 3 Print the pattern. (1) Select Test Print from the pull-down menu. (2) Click Print Head Alignment. (3) Click OK. 46 in the File menu. (2) Click Utilities... Printing Maintenance 1 Ensure the printer is on. 2 Open the Print Utility dialog box. (1) Select Page Setup...

i9100 Quick Start Guide
Page 49
Printing Maintenance (1) Look at the printout. Select the patterns that have the fewest white stripes and enter the numbers that produces the least noticeable vertical white stripes. Note If it is difficult to pick up the best pattern on F, pick the setting that correspond to the selected patterns. (2) Enter the numbers. (3) Click Send. Less noticeable white stripes More noticeable white stripes 47 4 Align the Print Head.
Printing Maintenance (1) Look at the printout. Select the patterns that have the fewest white stripes and enter the numbers that produces the least noticeable vertical white stripes. Note If it is difficult to pick up the best pattern on F, pick the setting that correspond to the selected patterns. (2) Enter the numbers. (3) Click Send. Less noticeable white stripes More noticeable white stripes 47 4 Align the Print Head.
i9100 Quick Start Guide
Page 53
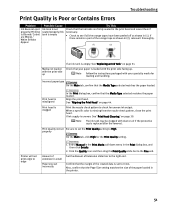
... Amount of the paper loaded in the printer. 51 Print head is misaligned In the Print dialog box, confirm that the Page Size setting matches the size of extension is small Paper size set the Print Quality setting to High. Align the print head. Set the Amount of the orange tape...Check that the ink tanks are firmly seated in the print head and reseat them if necessary. • Check to the right end. Print head is clogged Print the nozzle check pattern to the Fine end. When a specific color is uneven: See "Print Head Cleaning" on page 39. Media not loaded with ...
... Amount of the paper loaded in the printer. 51 Print head is misaligned In the Print dialog box, confirm that the Page Size setting matches the size of extension is small Paper size set the Print Quality setting to High. Align the print head. Set the Amount of the orange tape...Check that the ink tanks are firmly seated in the print head and reseat them if necessary. • Check to the right end. Print head is clogged Print the nozzle check pattern to the Fine end. When a specific color is uneven: See "Print Head Cleaning" on page 39. Media not loaded with ...
i9100 Quick Start Guide
Page 54
... the gap between the print head and the paper. setting is Clean the paper feed roller. In the Print Mode pull-down menu, select Manual and then click Details. 3. Printed Surface is scratched even when printing on page 4. Paper feed roller is too high 1. See "Print Media to set the ...using is not set properly Select Manual for Driver Settings is compatible with intense colors or photographs). Open the Printer Properties dialog box. 2. The Print dialog box can be opened by selecting Print in the printer driver and try this as well. On the Main tab, select Manual for...
... the gap between the print head and the paper. setting is Clean the paper feed roller. In the Print Mode pull-down menu, select Manual and then click Details. 3. Printed Surface is scratched even when printing on page 4. Paper feed roller is too high 1. See "Print Media to set the ...using is not set properly Select Manual for Driver Settings is compatible with intense colors or photographs). Open the Printer Properties dialog box. 2. The Print dialog box can be opened by selecting Print in the printer driver and try this as well. On the Main tab, select Manual for...
i9100 Quick Start Guide
Page 55
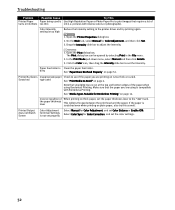
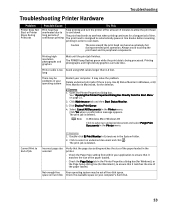
...the page size setting matches the size of the paper loaded in the printer: - The print head is deleted. Cannot Print to select an undesired document and select Purge Print Documents in the Printer menu. Incorrect page size selected Verify that it matches the size of ...22. 2. Troubleshooting Troubleshooting Printer Hardware Problem Printer Does Not Start or Printer Stops During Print Jobs Possible Cause Try This Print head has overheated due to long periods of continuous printing Stop printing and turn the printer off for at line breaks before resuming printing in order to cool...
...the page size setting matches the size of the paper loaded in the printer: - The print head is deleted. Cannot Print to select an undesired document and select Purge Print Documents in the Printer menu. Incorrect page size selected Verify that it matches the size of ...22. 2. Troubleshooting Troubleshooting Printer Hardware Problem Printer Does Not Start or Printer Stops During Print Jobs Possible Cause Try This Print head has overheated due to long periods of continuous printing Stop printing and turn the printer off for at line breaks before resuming printing in order to cool...
i9100 Quick Start Guide
Page 57
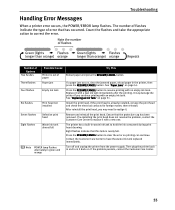
...the waste ink tank replaced immediately. Contact the Customer Care Center to hold the ink consumed during print head cleaning. Troubleshooting Handling Error Messages When a printer error occurs, the POWER/ERROR lamp flashes. Number of error that the protective cap has been ...removed. If the print head is already installed, remove the print head and check the electrical contacts for foreign matter, then reinstall. After reinstall the print head, you continue printing with a new one. Remove and reinstall the print head. Turn off and unplug the printer from the power supply...
...the waste ink tank replaced immediately. Contact the Customer Care Center to hold the ink consumed during print head cleaning. Troubleshooting Handling Error Messages When a printer error occurs, the POWER/ERROR lamp flashes. Number of error that the protective cap has been ...removed. If the print head is already installed, remove the print head and check the electrical contacts for foreign matter, then reinstall. After reinstall the print head, you continue printing with a new one. Remove and reinstall the print head. Turn off and unplug the printer from the power supply...

i9100 Quick Start Guide
Page 60
Note Register your product at www.registercanon.com to ensure product support. 14 To ensure highest quality output, continue with Step 7 Align the Print Head on the Easy Setup Instructions. 58 Appendix 12 Click the i9100 icon in the Chooser. 13 Close the Chooser.
Note Register your product at www.registercanon.com to ensure product support. 14 To ensure highest quality output, continue with Step 7 Align the Print Head on the Easy Setup Instructions. 58 Appendix 12 Click the i9100 icon in the Chooser. 13 Close the Chooser.


