User Manual
Page 2
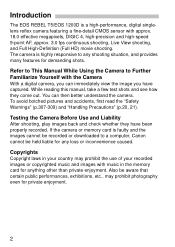
...-309) and "Handling Precautions" (p.20, 21). Introduction The EOS REBEL T5/EOS 1200D is a high-performance, digital singlelens reflex camera featuring a fine-detail CMOS sensor with the Camera With a digital camera, you can then better understand the camera. The camera is faulty and the images cannot be aware that certain public ...check whether they come out. If the camera or memory card is highly responsive to a computer, Canon cannot be held liable for any shooting situation, and provides many features for demanding shots. While reading this manual, take a few test shots and ...
...-309) and "Handling Precautions" (p.20, 21). Introduction The EOS REBEL T5/EOS 1200D is a high-performance, digital singlelens reflex camera featuring a fine-detail CMOS sensor with the Camera With a digital camera, you can then better understand the camera. The camera is faulty and the images cannot be aware that certain public ...check whether they come out. If the camera or memory card is highly responsive to a computer, Canon cannot be held liable for any shooting situation, and provides many features for demanding shots. While reading this manual, take a few test shots and ...

User Manual
Page 4
... Camera Instruction Manual on page 313. Software CD-ROM (EOS DIGITAL Solution Disk) Contains various software. Camera Basic Instruction Manual Camera Instruction Manual CD-ROM Contains the following manuals in PDF format: • Camera Instruction Manual • Quick Reference Guide Software Instruction Manual CD-ROM Contains instruction manuals in electronic form (provided on the CD-ROM disc). For more detailed instructions, see pages 318320. 4 For more information and installation procedures for viewing the Instruction Manual...
... Camera Instruction Manual on page 313. Software CD-ROM (EOS DIGITAL Solution Disk) Contains various software. Camera Basic Instruction Manual Camera Instruction Manual CD-ROM Contains the following manuals in PDF format: • Camera Instruction Manual • Quick Reference Guide Software Instruction Manual CD-ROM Contains instruction manuals in electronic form (provided on the CD-ROM disc). For more detailed instructions, see pages 318320. 4 For more information and installation procedures for viewing the Instruction Manual...

User Manual
Page 6
Quick Start Guide 1 Insert the battery (p.32). To charge the battery, see page 37. When the LCD monitor displays the date/time/zone setting screens, see page 30. 2 Insert a card (p.32). With the card's label facing toward the back of the camera, insert it into the card slot. 3 White index Red index Attach the lens (p.40). Align the lens's white or red index with the camera's index in the matching color. 4 Set the lens's focus mode switch to (p.40). 5 6 Set the power switch to (p.35).
Quick Start Guide 1 Insert the battery (p.32). To charge the battery, see page 37. When the LCD monitor displays the date/time/zone setting screens, see page 30. 2 Insert a card (p.32). With the card's label facing toward the back of the camera, insert it into the card slot. 3 White index Red index Attach the lens (p.40). Align the lens's white or red index with the camera's index in the matching color. 4 Set the lens's focus mode switch to (p.40). 5 6 Set the power switch to (p.35).
User Manual
Page 9
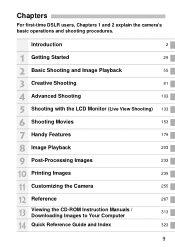
... 179 8 Image Playback 203 9 Post-Processing Images 233 10 Printing Images 239 11 Customizing the Camera 255 12 Reference 267 13 Viewing the CD-ROM Instruction Manuals / Downloading Images to Your Computer 313 14 Quick Reference Guide and Index 323 9 Chapters For first-time DSLR users, Chapters 1 and 2 explain the camera's basic operations and shooting procedures.
... 179 8 Image Playback 203 9 Post-Processing Images 233 10 Printing Images 239 11 Customizing the Camera 255 12 Reference 267 13 Viewing the CD-ROM Instruction Manuals / Downloading Images to Your Computer 313 14 Quick Reference Guide and Index 323 9 Chapters For first-time DSLR users, Chapters 1 and 2 explain the camera's basic operations and shooting procedures.

User Manual
Page 13
...Î p.138 Movie Shooting Movie shooting Sound recording Grid display Manual exposure Still photo shooting Quick Control Video snapshot Î p.153 Î...; p.161 Î p.163 Î p.166 Playback Image review time Single-image display Shooting information display Index display Î ...Editing out movie's first/last scene Slide show Viewing images on a TV set Protect Erase Quick Control Î p.205 Î p.206 Î...Resize Î p.234 Î p.237 Printing PictBridge Print Order (DPOF) Photobook Set-up Î p.242 Î p.249 Î p.253 Customization Custom Functions ...
...Î p.138 Movie Shooting Movie shooting Sound recording Grid display Manual exposure Still photo shooting Quick Control Video snapshot Î p.153 Î...; p.161 Î p.163 Î p.166 Playback Image review time Single-image display Shooting information display Index display Î ...Editing out movie's first/last scene Slide show Viewing images on a TV set Protect Erase Quick Control Î p.205 Î p.206 Î...Resize Î p.234 Î p.237 Printing PictBridge Print Order (DPOF) Photobook Set-up Î p.242 Î p.249 Î p.253 Customization Custom Functions ...
User Manual
Page 14
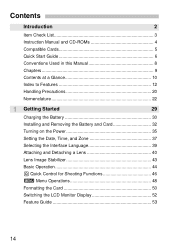
... 2 Item Check List 3 Instruction Manual and CD-ROMs 4 Compatible Cards 5 Quick Start Guide 6 Conventions Used in this Manual 8 Chapters 9 Contents at a Glance 10 Index to Features 12 Handling Precautions 20 Nomenclature 22 1 Getting Started 29 Charging the Battery 30 Installing and Removing the Battery and Card 32 Turning on the Power 35 Setting the Date, Time...
... 2 Item Check List 3 Instruction Manual and CD-ROMs 4 Compatible Cards 5 Quick Start Guide 6 Conventions Used in this Manual 8 Chapters 9 Contents at a Glance 10 Index to Features 12 Handling Precautions 20 Nomenclature 22 1 Getting Started 29 Charging the Battery 30 Installing and Removing the Battery and Card 32 Turning on the Power 35 Setting the Date, Time...

User Manual
Page 40
Attaching and Detaching a Lens The camera is set to the camera. Turn the lens as shown by the arrow until it quickly in place. Minimizing Dust When changing lenses, do it clicks in a place with all Canon EF and EF-S lenses. Remove dust on the body cap before attaching it is ...compatible with minimal dust. The camera cannot be sure to attach the body cap to (manual focus), autofocus will not operate. 4 Remove the front lens cap...
Attaching and Detaching a Lens The camera is set to the camera. Turn the lens as shown by the arrow until it quickly in place. Minimizing Dust When changing lenses, do it clicks in a place with all Canon EF and EF-S lenses. Remove dust on the body cap before attaching it is ...compatible with minimal dust. The camera cannot be sure to attach the body cap to (manual focus), autofocus will not operate. 4 Remove the front lens cap...

User Manual
Page 87
... a computer without the use of Digital Photo Professional compatible with this camera from the Canon Web site. Older versions of EOS software, such as 73. 1 is made into 73 or other image types such as Digital Photo Professional (provided, p.318). If an older version of Digital Photo Professional is installed on your computer, update (overwrite) it is effective...
... a computer without the use of Digital Photo Professional compatible with this camera from the Canon Web site. Older versions of EOS software, such as 73. 1 is made into 73 or other image types such as Digital Photo Professional (provided, p.318). If an older version of Digital Photo Professional is installed on your computer, update (overwrite) it is effective...
User Manual
Page 88
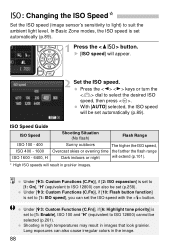
Under [53: Custom Functions (C.Fn)], if [6: Highlight tone priority] is set automatically (p.89). Press the keys or turn the dial to suit the ambient light level. ISO Speed Guide ISO Speed Shooting Situation (No flash) Flash Range ISO 100 - 400 ISO 400 - 1600 ISO 1600 - 6400, H... ISO 12800) can also be selected (p.261). X [ISO speed] will be set automatically (p.89). 1 Press the button. Under [53: Custom Functions (C.Fn)], if [2: ISO expansion] is set to [1: ISO speed], you can also cause irregular colors in the image. 88 With [AUTO] selected, the ISO speed will appear...
Under [53: Custom Functions (C.Fn)], if [6: Highlight tone priority] is set automatically (p.89). Press the keys or turn the dial to suit the ambient light level. ISO Speed Guide ISO Speed Shooting Situation (No flash) Flash Range ISO 100 - 400 ISO 400 - 1600 ISO 1600 - 6400, H... ISO 12800) can also be selected (p.261). X [ISO speed] will be set automatically (p.89). 1 Press the button. Under [53: Custom Functions (C.Fn)], if [2: ISO expansion] is set to [1: ISO speed], you can also cause irregular colors in the image. 88 With [AUTO] selected, the ISO speed will appear...

User Manual
Page 109
... level exceeds ±2 stops from the standard exposure level. 5 Set the exposure and take the picture. Therefore, you can set both the shutter speed and aperture manually as desired. This method is set, the ISO speed setting will be Exposure level mark displayed in the viewfinder, you may ... and aperture in the viewfinder. (On the LCD monitor, if the exposure level is set to obtain a standard exposure. Set the shutter speed and aperture as desired. a: Manual Exposure You can set the exposure as desired. The exposure level mark indicates how far the current exposure level ...
... level exceeds ±2 stops from the standard exposure level. 5 Set the exposure and take the picture. Therefore, you can set both the shutter speed and aperture manually as desired. This method is set, the ISO speed setting will be Exposure level mark displayed in the viewfinder, you may ... and aperture in the viewfinder. (On the LCD monitor, if the exposure level is set to obtain a standard exposure. Set the shutter speed and aperture as desired. a: Manual Exposure You can set the exposure as desired. The exposure level mark indicates how far the current exposure level ...

User Manual
Page 121
... taken. With EOS Utility (EOS software, p.318), you can check which lenses have distance information, the correction amount will be lower. Corrections can also register the correction data for any lens whose correction data has been registered in the camera. 3 Correcting ... not be slightly lower than the maximum correction amount settable with Digital Photo Professional (EOS software). Depending on shooting conditions, noise may appear on the Software Instruction Manual CD-ROM. When using a non-Canon lens, setting the corrections to [Disable] is recommended, even if [Correction ...
... taken. With EOS Utility (EOS software, p.318), you can check which lenses have distance information, the correction amount will be lower. Corrections can also register the correction data for any lens whose correction data has been registered in the camera. 3 Correcting ... not be slightly lower than the maximum correction amount settable with Digital Photo Professional (EOS software). Depending on shooting conditions, noise may appear on the Software Instruction Manual CD-ROM. When using a non-Canon lens, setting the corrections to [Disable] is recommended, even if [Correction ...

User Manual
Page 192
... AF method FlexiZone - Handy Features Camera Settings Auto power off /on button Date/Time/Zone Language Shutter button Unchanged Unchanged Screen color 1 Feature guide Enable Copyright information Unchanged Control over HDMI...review time 2 sec. Single AF with 6 e (10 images) Auto rotate OnzD LCD brightness LCD off 30 sec. Grid display Off Video snapshot Disable Video system Unchanged Exposure compensation Canceled Auto Lighting Optimizer Standard Custom White Balance Picture Style Canceled Auto Regarding GPS settings, refer to the GPS unit's instruction manual...
... AF method FlexiZone - Handy Features Camera Settings Auto power off /on button Date/Time/Zone Language Shutter button Unchanged Unchanged Screen color 1 Feature guide Enable Copyright information Unchanged Control over HDMI...review time 2 sec. Single AF with 6 e (10 images) Auto rotate OnzD LCD brightness LCD off 30 sec. Grid display Off Video snapshot Disable Video system Unchanged Exposure compensation Canceled Auto Lighting Optimizer Standard Custom White Balance Picture Style Canceled Auto Regarding GPS settings, refer to the GPS unit's instruction manual...

User Manual
Page 240
For details, refer to the printer's instruction manual. 3 Connect the Camera to . 2 Set up the printer. Use the interface cable provided with the camera while you look at the camera's LCD monitor. Connecting the Camera to a Printer 1 Set the camera's power switch to the Printer. X Some printers ...Print The direct printing procedure can be performed entirely with the camera. To connect to the printer, refer to the printer's instruction manual. 4 Turn on the printer. 5 Set the camera's power switch to the camera's digital terminal with the cable plug's icon facing the front of ...
For details, refer to the printer's instruction manual. 3 Connect the Camera to . 2 Set up the printer. Use the interface cable provided with the camera while you look at the camera's LCD monitor. Connecting the Camera to a Printer 1 Set the camera's power switch to the Printer. X Some printers ...Print The direct printing procedure can be performed entirely with the camera. To connect to the printer, refer to the printer's instruction manual. 4 Turn on the printer. 5 Set the camera's power switch to the camera's digital terminal with the cable plug's icon facing the front of ...
User Manual
Page 248
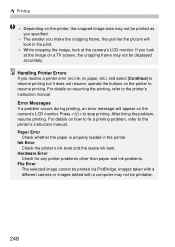
...printer, the cropped image area may not be printed as you look at the camera's LCD monitor. For details on how to fix a printing problem, refer to the printer's instruction manual. After fixing the problem, resume printing. While cropping the image, look in the printer. If you...smaller you resolve a printer error (no ink, no paper, etc.) and select [Continue] to the printer's instruction manual. Press to resume printing. Paper Error Check whether the paper is properly loaded in the print. Error Messages If a problem occurs during printing, an error message will look at the...
...printer, the cropped image area may not be printed as you look at the camera's LCD monitor. For details on how to fix a printing problem, refer to the printer's instruction manual. After fixing the problem, resume printing. While cropping the image, look in the printer. If you...smaller you resolve a printer error (no ink, no paper, etc.) and select [Continue] to the printer's instruction manual. Press to resume printing. Paper Error Check whether the paper is properly loaded in the print. Error Messages If a problem occurs during printing, an error message will look at the...
User Manual
Page 250
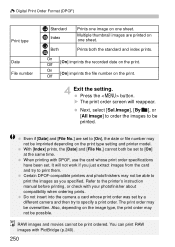
...set to print the images as you just extract images from the card and try to specify a print order. Refer to be printed. Also, depending on one sheet. W Digital... setting and printer model. Next, select [Sel.Image], [Byn], or [All image] to order the images to the printer's instruction manual ...before printing, or check with PictBridge (p.240). 250 Certain DPOF-compatible printers and photofinishers may be print ordered. RAW images and movies cannot be overwritten. Do not insert into the camera a card whose print order specifications have been set...
...set to print the images as you just extract images from the card and try to specify a print order. Refer to be printed. Also, depending on one sheet. W Digital... setting and printer model. Next, select [Sel.Image], [Byn], or [All image] to order the images to the printer's instruction manual ...before printing, or check with PictBridge (p.240). 250 Certain DPOF-compatible printers and photofinishers may be print ordered. RAW images and movies cannot be overwritten. Do not insert into the camera a card whose print order specifications have been set...

User Manual
Page 313
Camera Instruction Manual EOS DIGITAL Solution Disk (Software) Software Instruction Manual 313 13 Viewing the CD-ROM Instruction Manuals / Downloading Images to Your Computer This chapter explains how to install the Camera Instruction Manual (on the Software Instruction Manual CD-ROM. It also explains how to install the software on your computer, gives an overview of the software in the EOS DIGITAL Solution Disk (CD-ROM), and explains how to view the PDF files on the CD-ROM provided) to your computer and download images from the camera to your computer.
Camera Instruction Manual EOS DIGITAL Solution Disk (Software) Software Instruction Manual 313 13 Viewing the CD-ROM Instruction Manuals / Downloading Images to Your Computer This chapter explains how to install the Camera Instruction Manual (on the Software Instruction Manual CD-ROM. It also explains how to install the software on your computer, gives an overview of the software in the EOS DIGITAL Solution Disk (CD-ROM), and explains how to view the PDF files on the CD-ROM provided) to your computer and download images from the camera to your computer.

User Manual
Page 315
... INSTRUCTION MANUAL Camera Instruction Manual Quick Reference Guide If the Instruction Manual does not open when you want to view. The icon displayed will appear. To learn how to use Adobe Reader, refer to open the "PDF" folder, the "English" folder, and then the Instruction Manual PDF file...del manual, abra la carpeta "PDF", la carpeta "Spanish" y, a continuación, el archivo PDF Manual de instrucciones. ࡥุᇏ໓ o͓͑͝p໓ࡱࡃao p b © CANON INC. 2014 X The manual will appear. All the instruction manuals (PDF files)...
... INSTRUCTION MANUAL Camera Instruction Manual Quick Reference Guide If the Instruction Manual does not open when you want to view. The icon displayed will appear. To learn how to use Adobe Reader, refer to open the "PDF" folder, the "English" folder, and then the Instruction Manual PDF file...del manual, abra la carpeta "PDF", la carpeta "Spanish" y, a continuación, el archivo PDF Manual de instrucciones. ࡥุᇏ໓ o͓͑͝p໓ࡱࡃao p b © CANON INC. 2014 X The manual will appear. All the instruction manuals (PDF files)...

User Manual
Page 316
... 1 Install the software (p.320). 2 Use the provided interface cable to connect the camera to your computer. Connect the cord's plug to the computer's USB terminal. 3 Use EOS Utility to the Software Instruction Manual on the CD-ROM (p.321). 316 For details, refer to download the images. Connect the cable to the camera's digital terminal with the camera. There...
... 1 Install the software (p.320). 2 Use the provided interface cable to connect the camera to your computer. Connect the cord's plug to the computer's USB terminal. 3 Use EOS Utility to the Software Instruction Manual on the CD-ROM (p.321). 316 For details, refer to download the images. Connect the cable to the camera's digital terminal with the camera. There...

User Manual
Page 320
... your computer before you install the software. For software other EOS software included on -screen instructions to install. When the computer has restarted, the installation is complete. 320 For Macintosh, double-click to open the CD-ROM icon displayed on the desktop, then double-click on [Canon EOS Digital Installer]. 2 Click [Easy Installation] and follow the on the EOS DIGITAL Solution Disk.
... your computer before you install the software. For software other EOS software included on -screen instructions to install. When the computer has restarted, the installation is complete. 320 For Macintosh, double-click to open the CD-ROM icon displayed on the desktop, then double-click on [Canon EOS Digital Installer]. 2 Click [Easy Installation] and follow the on the EOS DIGITAL Solution Disk.

User Manual
Page 337
Index Clearing the camera settings ........190 Close-ups 67 Color space (color reproduction range 131 Color temperature 127 Color tone 123 Continuous file numbering 184 Continuous shooting 98 Contrast 123 Copyright information 186 ...Digital Print Order Format)...........249 Drive mode 24, 64, 98 Dust Delete Data 198 E Erasing images 227 Error codes 296 Evaluative metering 111 Exposure compensation 112 Exposure level increments............258 External flash 270 Custom Functions 197 Eyecup 269 Eye-Fi card 272 Eyepiece cover 29, 269 F Faithful 92 FE lock 117 Feature guide...
Index Clearing the camera settings ........190 Close-ups 67 Color space (color reproduction range 131 Color temperature 127 Color tone 123 Continuous file numbering 184 Continuous shooting 98 Contrast 123 Copyright information 186 ...Digital Print Order Format)...........249 Drive mode 24, 64, 98 Dust Delete Data 198 E Erasing images 227 Error codes 296 Evaluative metering 111 Exposure compensation 112 Exposure level increments............258 External flash 270 Custom Functions 197 Eyecup 269 Eye-Fi card 272 Eyepiece cover 29, 269 F Faithful 92 FE lock 117 Feature guide...
