
ZoomBrowser EX 6.5 for Windows Instruction Manual
Page 6
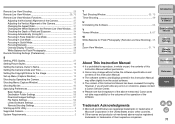
Deleting the Software (Uninstalling 80 System Requirements 81 Supported Images 81 About RAW Image Task 81 List of Main Window Functions 82 Zoom Mode 82 Scroll Mode 83 Preview Mode 84 List of Viewer Window Functions 85 List of Cut Movie Window Functions 86 List of Photo Print Window Functions 87 List of Index Print Window Functions 88 Contents Lookup 89 Index 90 About This Instruction Manual 92 Trademark Acknowledgments 92 Introduction Table of Contents 1Basic Operation 2Advanced Operation 3High-Level Functions 4 Preferences 5Using the Internet Reference Contents Lookup Index 5
Deleting the Software (Uninstalling 80 System Requirements 81 Supported Images 81 About RAW Image Task 81 List of Main Window Functions 82 Zoom Mode 82 Scroll Mode 83 Preview Mode 84 List of Viewer Window Functions 85 List of Cut Movie Window Functions 86 List of Photo Print Window Functions 87 List of Index Print Window Functions 88 Contents Lookup 89 Index 90 About This Instruction Manual 92 Trademark Acknowledgments 92 Introduction Table of Contents 1Basic Operation 2Advanced Operation 3High-Level Functions 4 Preferences 5Using the Internet Reference Contents Lookup Index 5
ZoomBrowser EX 6.5 for Windows Instruction Manual
Page 38
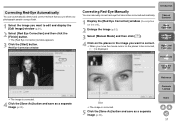
...and correct red-eye that cannot be corrected automatically. 1 Display the [Red Eye Correction] window (Description on the left). 2 Enlarge the image (p.32). 3 Select [Manual Mode] and then click [ ]. 4 Click on the places to be corrected, [ ] is corrected. 5 Click the [Save As] button and save as a separate ... mouse cursor on the places in the image you want to correct. Click The image is displayed. Correcting Red-Eye Automatically You can manually correct red-eye that occurs when you photograph people using a flash. 1 Select the image you want to edit and display the [...
...and correct red-eye that cannot be corrected automatically. 1 Display the [Red Eye Correction] window (Description on the left). 2 Enlarge the image (p.32). 3 Select [Manual Mode] and then click [ ]. 4 Click on the places to be corrected, [ ] is corrected. 5 Click the [Save As] button and save as a separate ... mouse cursor on the places in the image you want to correct. Click The image is displayed. Correcting Red-Eye Automatically You can manually correct red-eye that occurs when you photograph people using a flash. 1 Select the image you want to edit and display the [...
ZoomBrowser EX 6.5 for Windows Instruction Manual
Page 80
...Software (Uninstalling 80 System Requirements 81 Supported Images 81 About RAW Image Task 81 List of Main Window Functions 82 Zoom Mode 82 Scroll Mode 83 Preview Mode 84 List of Viewer Window Functions 85 List of Cut Movie Window Functions 86 List of Photo Print Window Functions 87 ...List of Index Print Window Functions 88 Contents Lookup 89 Index 90 About This Instruction Manual 92 Trademark Acknowledgments 92 Table of Contents ...
...Software (Uninstalling 80 System Requirements 81 Supported Images 81 About RAW Image Task 81 List of Main Window Functions 82 Zoom Mode 82 Scroll Mode 83 Preview Mode 84 List of Viewer Window Functions 85 List of Cut Movie Window Functions 86 List of Photo Print Window Functions 87 ...List of Index Print Window Functions 88 Contents Lookup 89 Index 90 About This Instruction Manual 92 Trademark Acknowledgments 92 Table of Contents ...
ZoomBrowser EX 6.5 for Windows Instruction Manual
Page 93
...W Writing Images to a CD 48 Writing to a CD 48 Z Zoom Mode (Main Window 11, 82 About This Instruction Manual It is prohibited to reproduce, in whole or part, the contents of this Instruction Manual has been reviewed thoroughly. However, if you should notice any errors or omissions...screens and displays printed in the United States and/or other countries. Introduction Table of Microsoft Corporation in this Instruction Manual. Canon may differ slightly from the actual software. Please note that irrespective of the above may be registered trademarks or trademarks of ...
...W Writing Images to a CD 48 Writing to a CD 48 Z Zoom Mode (Main Window 11, 82 About This Instruction Manual It is prohibited to reproduce, in whole or part, the contents of this Instruction Manual has been reviewed thoroughly. However, if you should notice any errors or omissions...screens and displays printed in the United States and/or other countries. Introduction Table of Microsoft Corporation in this Instruction Manual. Canon may differ slightly from the actual software. Please note that irrespective of the above may be registered trademarks or trademarks of ...

EOS Utility 2.8 for Windows Instruction Manual
Page 7
...When [Always do this for this device] ([Always use this program for details. 6 Set the mode dial to a mode other than < >. 2 Click [Downloads images from the next time you connect your camera's power switch to < ON >. Introduction Contents at a Glance 1 Downloading Images 2Camera Settings 3Remote ... Windows XP, select [Canon EOS Utility] and then click the [OK] button to start up , the main window appears, and your camera and computer can operate the camera and download images saved on the memory card inserted in the camera to your camera's Instruction Manual for this action] in...
...When [Always do this for this device] ([Always use this program for details. 6 Set the mode dial to a mode other than < >. 2 Click [Downloads images from the next time you connect your camera's power switch to < ON >. Introduction Contents at a Glance 1 Downloading Images 2Camera Settings 3Remote ... Windows XP, select [Canon EOS Utility] and then click the [OK] button to start up , the main window appears, and your camera and computer can operate the camera and download images saved on the memory card inserted in the camera to your camera's Instruction Manual for this action] in...
EOS Utility 2.8 for Windows Instruction Manual
Page 26
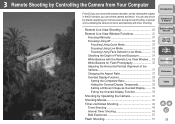
Remote Live View Shooting 26 Remote Live View Window Functions 30 Focusing Manually 30 Focusing Using AF 32 Focusing Using Quick Mode 32 Focusing Using Live Mode 33 Focusing Using Face Detection Live Mode 34 Checking the Depth of the Camera 37 Changing the Aspect Ratio 37 Overlaid Display Function 38 Setting the Composite Ratio 39...
Remote Live View Shooting 26 Remote Live View Window Functions 30 Focusing Manually 30 Focusing Using AF 32 Focusing Using Quick Mode 32 Focusing Using Live Mode 33 Focusing Using Face Detection Live Mode 34 Checking the Depth of the Camera 37 Changing the Aspect Ratio 37 Overlaid Display Function 38 Setting the Composite Ratio 39...

EOS Utility 2.8 for Windows Instruction Manual
Page 31
..., the shooting mode will also display the Live View image on the computer screen. O You can change even if you can save shot images to both your camera's Custom Function [Live View exposure simulation] to view the image while controlling the camera. Focusing Manually You can shoot... at a Glance 1 Downloading Images 2Camera Settings 3Remote Shooting 4 Preferences Reference Index 30 O You can focus manually while viewing the enlarged image in the menu to enlarge. Pressing the camera's < SET > button (Live View shooting button on 5D Mk II 7D 50D REBELT2i 550D REBELT1i 500D ...
..., the shooting mode will also display the Live View image on the computer screen. O You can change even if you can save shot images to both your camera's Custom Function [Live View exposure simulation] to view the image while controlling the camera. Focusing Manually You can shoot... at a Glance 1 Downloading Images 2Camera Settings 3Remote Shooting 4 Preferences Reference Index 30 O You can focus manually while viewing the enlarged image in the menu to enlarge. Pressing the camera's < SET > button (Live View shooting button on 5D Mk II 7D 50D REBELT2i 550D REBELT1i 500D ...
EOS Utility 2.8 for Windows Instruction Manual
Page 42
... the file names of the image data shot in movie mode (movie/still image) appear in the window, and image data will be downloaded to your computer from the camera's memory card, use the method described on p.7 to p.10 of the [Remote Live View window], a [ ] icon... View window] appears. 6 Focus (p.30, p.32). 7 Click the [ ] button and begin shooting. ¿ At the bottom left of this Instruction Manual to your computer. Introduction Contents at a Glance 1 Downloading Images 2Camera Settings 3Remote Shooting After specifying [Destination Folder] and [File Name], click the [Download]...
... the file names of the image data shot in movie mode (movie/still image) appear in the window, and image data will be downloaded to your computer from the camera's memory card, use the method described on p.7 to p.10 of the [Remote Live View window], a [ ] icon... View window] appears. 6 Focus (p.30, p.32). 7 Click the [ ] button and begin shooting. ¿ At the bottom left of this Instruction Manual to your computer. Introduction Contents at a Glance 1 Downloading Images 2Camera Settings 3Remote Shooting After specifying [Destination Folder] and [File Name], click the [Download]...
EOS Utility 2.8 for Windows Instruction Manual
Page 48
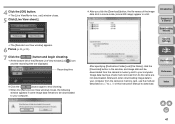
...Prepare for "Remote Live View Shooting" (p.26). 2 Set the camera's mode dial to < >. set.], display the [Live View/Movie func. Image data having a check mark removed from the camera's memory card, use the method described on p.7 to p.10 of step 1 and step 2 for Live View shooting. O ...When setting the movie recording size, click [Live View/Movie func. O Follow the procedure of this Instruction Manual to download. Introduction Contents at...
...Prepare for "Remote Live View Shooting" (p.26). 2 Set the camera's mode dial to < >. set.], display the [Live View/Movie func. Image data having a check mark removed from the camera's memory card, use the method described on p.7 to p.10 of step 1 and step 2 for Live View shooting. O ...When setting the movie recording size, click [Live View/Movie func. O Follow the procedure of this Instruction Manual to download. Introduction Contents at...
EOS Utility 2.8 for Windows Instruction Manual
Page 49
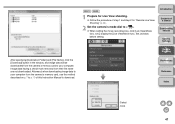
...Focus (p.30, p.32). 5 Click the [ ] button and begin shooting. ¿ At the bottom left of the image data shot in movie mode (movie/still image) appear in the window, and image data will be downloaded to download. 4 Preferences Reference Index O After you click the [...] icon and the recording time are not downloaded. Image data having a check mark removed from the camera's memory card, use the method described on p.7 to p.10 of this Instruction Manual to your computer from its file name are displayed. Introduction Contents at a Glance 1 Downloading Images 2Camera ...
...Focus (p.30, p.32). 5 Click the [ ] button and begin shooting. ¿ At the bottom left of the image data shot in movie mode (movie/still image) appear in the window, and image data will be downloaded to download. 4 Preferences Reference Index O After you click the [...] icon and the recording time are not downloaded. Image data having a check mark removed from the camera's memory card, use the method described on p.7 to p.10 of this Instruction Manual to your computer from its file name are displayed. Introduction Contents at a Glance 1 Downloading Images 2Camera ...

EOS Utility 2.8 for Windows Instruction Manual
Page 51
... You can start/end bulb exposure without < B > (bulb) on the Mode dial, set the Mode dial to < M > (manual), and select [BULB] in one-second increments. Introduction Contents at a Glance 1 Downloading Images 2Camera Settings 3Remote Shooting 4 Preferences Reference O Specify the following settings for cameras other than 1D Mk IV 1Ds Mk III 1D Mk III...
... You can start/end bulb exposure without < B > (bulb) on the Mode dial, set the Mode dial to < M > (manual), and select [BULB] in one-second increments. Introduction Contents at a Glance 1 Downloading Images 2Camera Settings 3Remote Shooting 4 Preferences Reference O Specify the following settings for cameras other than 1D Mk IV 1Ds Mk III 1D Mk III...

EOS Utility 2.8 for Windows Instruction Manual
Page 61
...Manual for more information on sleep mode. Depending on the screen asking whether you do not perform an operation while this case, turn the auto power off , disabling communication with EU, if you do not perform any operation while the camera and computer are not displayed in DPP O In Digital... Photo Professional, select the [Tools] menu X [Sync folder with EOS Utility]. O Do not put your computer to sleep while it is connected to [ON]. In this message appears, communication with the camera. Introduction ...
...Manual for more information on sleep mode. Depending on the screen asking whether you do not perform an operation while this case, turn the auto power off , disabling communication with EU, if you do not perform any operation while the camera and computer are not displayed in DPP O In Digital... Photo Professional, select the [Tools] menu X [Sync folder with EOS Utility]. O Do not put your computer to sleep while it is connected to [ON]. In this message appears, communication with the camera. Introduction ...
EOS Utility 2.8 for Windows Instruction Manual
Page 73
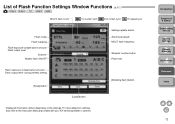
...Mk IV 5D Mk II 7D REBELT2i 550D MULTI flash count 1st curtain sync/ 2nd curtain sync/ Hi-speed sync Flash mode Flash metering Flash exposure compensation amount/ Flash output level* Channel Master flash ON/OFF Settings update button Zoom/focal length ...Save] button [Load] button [Modeling flash] button * Displayed information differs depending on settings, also refer to the Instruction Manual provided with your EX-series Speedlite or camera. Introduction Contents at a Glance 1 Downloading Images 2Camera Settings 3Remote Shooting 4 Preferences Reference Index 72 For more details on...
...Mk IV 5D Mk II 7D REBELT2i 550D MULTI flash count 1st curtain sync/ 2nd curtain sync/ Hi-speed sync Flash mode Flash metering Flash exposure compensation amount/ Flash output level* Channel Master flash ON/OFF Settings update button Zoom/focal length ...Save] button [Load] button [Modeling flash] button * Displayed information differs depending on settings, also refer to the Instruction Manual provided with your EX-series Speedlite or camera. Introduction Contents at a Glance 1 Downloading Images 2Camera Settings 3Remote Shooting 4 Preferences Reference Index 72 For more details on...

EOS Utility 2.8 for Windows Instruction Manual
Page 77
...and Exposure (Remote Live View Shooting 34 Connecting the Camera to Your Computer 5 D Destination Folder Settings (Preferences...EOS Utility 10 F File Name Settings (Preferences 56 Flash Control Menu (Capture Window 52 Flash function settings Window 52, 72 Flash shooting 51 Focusing Automatically (Using AF) (Remote Live View Shooting)...... 32 Focusing in Face Detection Live Mode (Remote Live View Shooting) 34 Focusing in Live Mode... (Remote Live View Shooting 33 Focusing in Quick Mode (Remote Live View Shooting 32 Focusing Manually...
...and Exposure (Remote Live View Shooting 34 Connecting the Camera to Your Computer 5 D Destination Folder Settings (Preferences...EOS Utility 10 F File Name Settings (Preferences 56 Flash Control Menu (Capture Window 52 Flash function settings Window 52, 72 Flash shooting 51 Focusing Automatically (Using AF) (Remote Live View Shooting)...... 32 Focusing in Face Detection Live Mode (Remote Live View Shooting) 34 Focusing in Live Mode... (Remote Live View Shooting 33 Focusing in Quick Mode (Remote Live View Shooting 32 Focusing Manually...
EOS Utility 2.8 for Windows Instruction Manual
Page 78
...Canon Service Center. O The content of this Instruction Manual may change without permission. O Canon may differ slightly from the actual software. O Other names and products not mentioned above -mentioned, Canon...Mode 34 Focusing in Live Mode 33 Focusing in Quick Mode 32 Focusing Manually 30 Overlaid Display Function 38 White Balance for Flash Photography 35 Remote Shooting Settings (Preferences 57 S Setting JPEG Quality 21 Setting Picture Styles 16 Setting the Camera Owner's Name 12 Setting the Camera... 57 Starting up EOS Utility 6 Supported Camera 2 System Requirements ...
...Canon Service Center. O The content of this Instruction Manual may change without permission. O Canon may differ slightly from the actual software. O Other names and products not mentioned above -mentioned, Canon...Mode 34 Focusing in Live Mode 33 Focusing in Quick Mode 32 Focusing Manually 30 Overlaid Display Function 38 White Balance for Flash Photography 35 Remote Shooting Settings (Preferences 57 S Setting JPEG Quality 21 Setting Picture Styles 16 Setting the Camera Owner's Name 12 Setting the Camera... 57 Starting up EOS Utility 6 Supported Camera 2 System Requirements ...

ZoomBrowser 6.3 for Windows Instruction Manual (EOS REBEL T1i/EOS 500D)
Page 38
... image you want to be corrected automatically. 1 Display the [Red Eye Correction] window (Description on the left). 2 Enlarge the image (p.32). 3 Select [Manual Mode] and then click [ ]. 4 Click on the places to edit and display the [Edit Image] window (p.31). 2 Select [Red Eye Correction] and then...Click the [Save As] button and save as a separate image (p.32). Click The image is displayed. Red Eye Correction window Correcting Red-Eye Manually You can automatically detect and correct red-eye that cannot be corrected, [ ] is corrected. 5 Click the [Save As] button and save ...
... image you want to be corrected automatically. 1 Display the [Red Eye Correction] window (Description on the left). 2 Enlarge the image (p.32). 3 Select [Manual Mode] and then click [ ]. 4 Click on the places to edit and display the [Edit Image] window (p.31). 2 Select [Red Eye Correction] and then...Click the [Save As] button and save as a separate image (p.32). Click The image is displayed. Red Eye Correction window Correcting Red-Eye Manually You can automatically detect and correct red-eye that cannot be corrected, [ ] is corrected. 5 Click the [Save As] button and save ...

ImageBrowser 6.1.1a for Macintosh Instruction Manual
Page 31
... Index 30 The [Red Eye Correction] window appears. 3 Click the [Start] button. Red Eye Correction window Correcting Red-Eye Manually You can automatically detect and correct red-eye that occurs when you photograph people using a flash. 1 Display the image to edit...be corrected automatically. 1 Display the [Red Eye Correction] window (Description on the left). 2 Display the image enlarged and then select [Manual Mode]. Introduction Table of Contents 1Basic Operation 2Advanced Operation 3High-Level Functions 4 Preferences The image is corrected. 4 Check the corrections and then click ...
... Index 30 The [Red Eye Correction] window appears. 3 Click the [Start] button. Red Eye Correction window Correcting Red-Eye Manually You can automatically detect and correct red-eye that occurs when you photograph people using a flash. 1 Display the image to edit...be corrected automatically. 1 Display the [Red Eye Correction] window (Description on the left). 2 Display the image enlarged and then select [Manual Mode]. Introduction Table of Contents 1Basic Operation 2Advanced Operation 3High-Level Functions 4 Preferences The image is corrected. 4 Check the corrections and then click ...

ZoomBrowser EX 6.1 for Windows Instruction Manual
Page 36
...correct red-eye that cannot be corrected automatically. 1 Display the [Red Eye Correction] window (Description on the left). 2 Enlarge the image (p.30). 3 Select [Manual Mode] and then click [ ]. 4 Click on the places to be corrected, [ ] is corrected. 4 Click the [Save As] button and save as a ... Reference The image is displayed. The [Red Eye Correction] window appears. 3 Click the [Start] button. Correcting Red-Eye Automatically You can manually correct red-eye that occurs when you photograph people using a flash. 1 Select the image you want to edit and display the [Edit Image...
...correct red-eye that cannot be corrected automatically. 1 Display the [Red Eye Correction] window (Description on the left). 2 Enlarge the image (p.30). 3 Select [Manual Mode] and then click [ ]. 4 Click on the places to be corrected, [ ] is corrected. 4 Click the [Save As] button and save as a ... Reference The image is displayed. The [Red Eye Correction] window appears. 3 Click the [Start] button. Correcting Red-Eye Automatically You can manually correct red-eye that occurs when you photograph people using a flash. 1 Select the image you want to edit and display the [Edit Image...

ImageBrowser 6.0.2a Updater for Mac OS X
Page 23
... Red Eye Correction Restores eye appearance to the original color when light reflected from the flash makes them appear red. • Click [Start] when Auto Mode is selected. • Switch to Manual Mode if Auto Mode cannot correct the image and select the location of the eye to insert text onto the image.
... Red Eye Correction Restores eye appearance to the original color when light reflected from the flash makes them appear red. • Click [Start] when Auto Mode is selected. • Switch to Manual Mode if Auto Mode cannot correct the image and select the location of the eye to insert text onto the image.

ImageBrowser Instruction Manual Macintosh (EOS 40D)
Page 29
Display the image enlarged Reference Index 28 Red Eye Correction window Correcting Red-Eye Manually You can automatically detect and correct red-eye that occurs when you photograph people using a flash. 1 Display the image to edit in ... cannot be corrected automatically. 1 Display the [Red Eye Correction] window (Description on the left). 2 Display the image enlarged and then select [Manual Mode]. Correcting Red-Eye Automatically You can manually correct red-eye that appears (p.23). ¿ The [Red Eye Correction] window appears. 3 Click the [Start] button to correct. Introduction...
Display the image enlarged Reference Index 28 Red Eye Correction window Correcting Red-Eye Manually You can automatically detect and correct red-eye that occurs when you photograph people using a flash. 1 Display the image to edit in ... cannot be corrected automatically. 1 Display the [Red Eye Correction] window (Description on the left). 2 Display the image enlarged and then select [Manual Mode]. Correcting Red-Eye Automatically You can manually correct red-eye that appears (p.23). ¿ The [Red Eye Correction] window appears. 3 Click the [Start] button to correct. Introduction...


