EOS-1D Instructions
Page 12
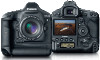
... power cord. Aim the Area AF over the subject and press the shutter button halfway to take the picture. (→p.29) 12 Press the shutter button fully to autofocus. (→p.59) 10Take the picture. Quick Start Guide For detailed instructions, see the reference page indicated in the battery. (→p.23) 5 Attach a lens...
... power cord. Aim the Area AF over the subject and press the shutter button halfway to take the picture. (→p.29) 12 Press the shutter button fully to autofocus. (→p.59) 10Take the picture. Quick Start Guide For detailed instructions, see the reference page indicated in the battery. (→p.23) 5 Attach a lens...

EOS-1D Instructions
Page 13
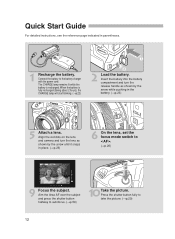
...; To review previous images, see "Playback Images" on page 116. • To erase an image, see "Erasing an Image" on page 122. 11 Review the picture on the LCD monitor. Quick Start Guide Introduction 3 Open the CF card slot cover. Flip up the cover handle and turn it as shown by...
...; To review previous images, see "Playback Images" on page 116. • To erase an image, see "Erasing an Image" on page 122. 11 Review the picture on the LCD monitor. Quick Start Guide Introduction 3 Open the CF card slot cover. Flip up the cover handle and turn it as shown by...
EOS-1D Instructions
Page 20
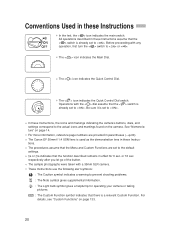
... these Instruc- tions. • The procedures assume that the Menu and Custom Functions are provided in effect for operating your camera or taking pictures. : The Custom Function symbol indicates that the < > switch is used as the demonstration lens in these Instructions • In the text.... • The sample photographs were taken with the < > dial assume that the function described remains in parentheses (→p.00). • The Canon EF 50mm f/1.4 USM lens is already set to the default settings. • or indicates that the < > switch is a relevant Custom Function....
... these Instruc- tions. • The procedures assume that the Menu and Custom Functions are provided in effect for operating your camera or taking pictures. : The Custom Function symbol indicates that the < > switch is used as the demonstration lens in these Instructions • In the text.... • The sample photographs were taken with the < > dial assume that the function described remains in parentheses (→p.00). • The Canon EF 50mm f/1.4 USM lens is already set to the default settings. • or indicates that the < > switch is a relevant Custom Function....

EOS-1D Instructions
Page 24
...shots will vary depending on , reviewing time of shots may actually be taken with a fully-charged battery at the specified temperature. It is based on Canon's testing conditions (w/EF 50mm f/1.4 USM lens, review turned on your shooting conditions. • Using the LCD monitor more frequently will reduce the number... of shots. •• Pressing the shutter button halfway for a prolonged period or activating the autofocus without taking a picture will also reduce the number of shots. • At 0˚C, the number of 2 sec., and " + " image quality).
...shots will vary depending on , reviewing time of shots may actually be taken with a fully-charged battery at the specified temperature. It is based on Canon's testing conditions (w/EF 50mm f/1.4 USM lens, review turned on your shooting conditions. • Using the LCD monitor more frequently will reduce the number... of shots. •• Pressing the shutter button halfway for a prolonged period or activating the autofocus without taking a picture will also reduce the number of shots. • At 0˚C, the number of 2 sec., and " + " image quality).
EOS-1D Instructions
Page 27
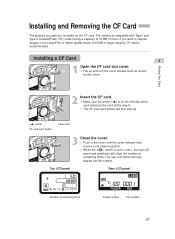
.... Top LCD panel Rear LCD panel Number of remaining shots Folder number File number 27 Before You Start Installing and Removing the CF Card The pictures you want to < >, the top LCD panel and viewfinder will show the number of remaining shots. The rear LCD panel will then pop-up and...
.... Top LCD panel Rear LCD panel Number of remaining shots Folder number File number 27 Before You Start Installing and Removing the CF Card The pictures you want to < >, the top LCD panel and viewfinder will show the number of remaining shots. The rear LCD panel will then pop-up and...
EOS-1D Instructions
Page 29
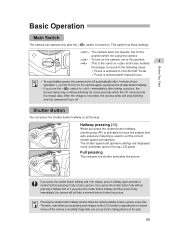
...on the LCD monitor or operating the on-screen menu or if the camera is recording image data, you can go back to taking a picture, the access lamp may continue blinking for a few seconds while the CF card records the image data. If you turn on the spot... shutter button halfway, autofocusing (AF) is activated to take a moment before pressing it takes the picture. Full pressing This releases the shutter and takes the picture. Pressing the shutter button halfway will still take a picture. This switch has three settings: < > : The camera does not operate. Before You Start ...
...on the LCD monitor or operating the on-screen menu or if the camera is recording image data, you can go back to taking a picture, the access lamp may continue blinking for a few seconds while the CF card records the image data. If you turn on the spot... shutter button halfway, autofocusing (AF) is activated to take a moment before pressing it takes the picture. Full pressing This releases the shutter and takes the picture. Pressing the shutter button halfway will still take a picture. This switch has three settings: < > : The camera does not operate. Before You Start ...
EOS-1D Instructions
Page 30
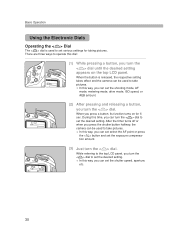
...Using the Electronic Dials Operating the < > Dial The < > dial is released, the respective setting takes effect and the camera can be used to take pictures. • In this way, you can set the shooting mode, AF mode, metering mode, drive mode, ISO speed, or AEB amount. (2) After ...pressing and releasing a button, you turn the < > dial. During this time, you turn the < > dial until the desired setting appears on for taking pictures. While referring to set the desired setting. • In this dial: (1) While pressing a button, you turn the < > dial to the top LCD panel, you...
...Using the Electronic Dials Operating the < > Dial The < > dial is released, the respective setting takes effect and the camera can be used to take pictures. • In this way, you can set the shooting mode, AF mode, metering mode, drive mode, ISO speed, or AEB amount. (2) After ...pressing and releasing a button, you turn the < > dial. During this time, you turn the < > dial until the desired setting appears on for taking pictures. While referring to set the desired setting. • In this dial: (1) While pressing a button, you turn the < > dial to the top LCD panel, you...
EOS-1D Instructions
Page 31
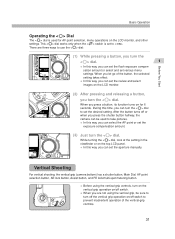
.../multi-spot metering button. • Before using the vertical grip, be used for 6 seconds. This < > dial works only when the < > switch is used to take pictures. • In this way, you can select the AF point or set the review and select images on /off or when you press the shutter...
.../multi-spot metering button. • Before using the vertical grip, be used for 6 seconds. This < > dial works only when the < > switch is used to take pictures. • In this way, you can select the AF point or set the review and select images on /off or when you press the shutter...

EOS-1D Instructions
Page 33
... and time. (→p.148) 33 The setting will be displayed in one of the button. Hold down the < > button and turn the < > dial to taking pictures by pressing the shutter button halfway. • The menu can immediately go back to select a tag, then let go of five languages (English, French, German...
... and time. (→p.148) 33 The setting will be displayed in one of the button. Hold down the < > button and turn the < > dial to taking pictures by pressing the shutter button halfway. • The menu can immediately go back to select a tag, then let go of five languages (English, French, German...

EOS-1D Instructions
Page 34
... quality (Large/Fine) White balance (Auto) White balance bracketing Image processing parameters Color Matrix Canceled Standard 1 The camera will be used as a viewfinder to take pictures. You can change the brightness of the camera enables you to review and select recorded images and set various menu settings. • With the LCD...
... quality (Large/Fine) White balance (Auto) White balance bracketing Image processing parameters Color Matrix Canceled Standard 1 The camera will be used as a viewfinder to take pictures. You can change the brightness of the camera enables you to review and select recorded images and set various menu settings. • With the LCD...

EOS-1D Instructions
Page 35
... Lens E (10 types) is -3 to +1 dpt. 1 •Remove the eyecup. The camera's adjustable dioptric range is recommended. (→p.167) Holding the Camera To obtain sharp pictures, hold the camera still to minimize camera shake. Horizontal shooting Vertical shooting • Firmly grasp the camera grip with or without eyeglasses), the viewfinder image...
... Lens E (10 types) is -3 to +1 dpt. 1 •Remove the eyecup. The camera's adjustable dioptric range is recommended. (→p.167) Holding the Camera To obtain sharp pictures, hold the camera still to minimize camera shake. Horizontal shooting Vertical shooting • Firmly grasp the camera grip with or without eyeglasses), the viewfinder image...

EOS-1D Instructions
Page 40
... explained on the LCD monitor menu. • When the image is convenient when you can undergo optimal processing, while the JPEG image enables you take a picture, it will have the same image file number but a different extension. While pressing the < > button, turn the < > dial to select < > displayed on the rear LCD...
... explained on the LCD monitor menu. • When the image is convenient when you can undergo optimal processing, while the JPEG image enables you take a picture, it will have the same image file number but a different extension. While pressing the < > button, turn the < > dial to select < > displayed on the rear LCD...

EOS-1D Instructions
Page 45
...; Use < > to set your own white balance with the driver software provided with a color temperature meter, take many pictures under the same lighting conditions such as in the image. For details, see the "EOS-1D Software Instructions." It is used to set the color temperature of the < > button. Select a registerd personal white balance...
...; Use < > to set your own white balance with the driver software provided with a color temperature meter, take many pictures under the same lighting conditions such as in the image. For details, see the "EOS-1D Software Instructions." It is used to set the color temperature of the < > button. Select a registerd personal white balance...

EOS-1D Instructions
Page 47
... bracketing will be canceled automatically after the self-timer delay of the following sequence: standard color temperature, bluish (minus), and reddish (plus ) compensation 3 Take the pictures. or 10 sec. elapses. Settings for the standard shot Bluish (minus) compensation Reddish (plus ). s The bracketed shots will also be taken in the following actions...
... bracketing will be canceled automatically after the self-timer delay of the following sequence: standard color temperature, bluish (minus), and reddish (plus ) compensation 3 Take the pictures. or 10 sec. elapses. Settings for the standard shot Bluish (minus) compensation Reddish (plus ). s The bracketed shots will also be taken in the following actions...

EOS-1D Instructions
Page 49
... the number of the following ISO speeds: ISO 200, 250, 320, 400, 500, 640, 800, 1000, 1250, or 1600. Settings for moving subjects or taking pictures in low light. On the top LCD panel, you can check the number of the buttons. However, the image will be 2 displayed on the CF...
... the number of the following ISO speeds: ISO 200, 250, 320, 400, 500, 640, 800, 1000, 1250, or 1600. Settings for moving subjects or taking pictures in low light. On the top LCD panel, you can check the number of the buttons. However, the image will be 2 displayed on the CF...

EOS-1D Instructions
Page 52
... the last shot will be displayed. While pressing the < > button, turn off the LCD monitor, press the < > button. 3 Take a picture. s The menu will be displayed on the LCD monitor immediately after you can protect it from deletion (→p.119), make a sound recording (→p.... number of the < > button. 2 •Set the desired Review setting. Then go of seconds the image is "On." For the displayed image, you take the picture. Press the < > button. 1 •• While pressing the < > button, turn the < > dial to select < >. • While pressing the < >...
... the last shot will be displayed. While pressing the < > button, turn off the LCD monitor, press the < > button. 3 Take a picture. s The menu will be displayed on the LCD monitor immediately after you can protect it from deletion (→p.119), make a sound recording (→p.... number of the < > button. 2 •Set the desired Review setting. Then go of seconds the image is "On." For the displayed image, you take the picture. Press the < > button. 1 •• While pressing the < > button, turn the < > dial to select < >. • While pressing the < >...

EOS-1D Instructions
Page 56
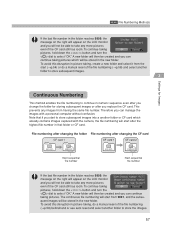
... 56 Thus, the images in the folder you selected. Note that if you change to XXX-0001 whenever you use . MENU File Numbering Methods The pictures you take are automatically assigned a file number from file number 0001. The initial setting is continuous numbering. Auto Reset This resets the file numbering to...
... 56 Thus, the images in the folder you selected. Note that if you change to XXX-0001 whenever you use . MENU File Numbering Methods The pictures you take are automatically assigned a file number from file number 0001. The initial setting is continuous numbering. Auto Reset This resets the file numbering to...
EOS-1D Instructions
Page 57
... folder reaches 9999, the message on the right will appear on the LCD monitor and you will not be able to take any more pictures even if the CF card still has room. Note that folder or CF card. The continuous file numbering will start after you replace the... CF card. To avoid this disruption in picture-taking pictures which already contains images captured with a personal computer without confusion. A new folder will then be created and you can manage the images with ...
... folder reaches 9999, the message on the right will appear on the LCD monitor and you will not be able to take any more pictures even if the CF card still has room. Note that folder or CF card. The continuous file numbering will start after you replace the... CF card. To avoid this disruption in picture-taking pictures which already contains images captured with a personal computer without confusion. A new folder will then be created and you can manage the images with ...
EOS-1D Instructions
Page 58
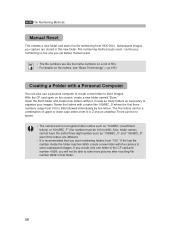
... new folders within it 999, you start numbering folders from 100 to 999 followed immediately by five letters. There can be able to take more pictures after reaching file number 9999 in that you will not recognize folder names such as necessary to organize your images. If the last file number...
... new folders within it 999, you start numbering folders from 100 to 999 followed immediately by five letters. There can be able to take more pictures after reaching file number 9999 in that you will not recognize folder names such as necessary to organize your images. If the last file number...
EOS-1D Instructions
Page 61
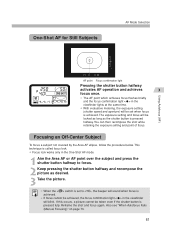
... and focus will be locked as long as desired. 3 Take the picture. • When the < > switch is set when focus is pressed fully. If this occurs, a picture cannot be set to focus. 2 Keep pressing the shutter button halfway and recompose the picture as the shutter button is called focus lock. • Focus lock...
... and focus will be locked as long as desired. 3 Take the picture. • When the < > switch is set when focus is pressed fully. If this occurs, a picture cannot be set to focus. 2 Keep pressing the shutter button halfway and recompose the picture as the shutter button is called focus lock. • Focus lock...


