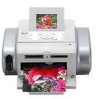
Photo Printing Guide
Page 24
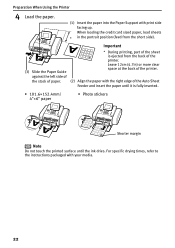
... against the left side of the stack of paper. * During printing, part of the printer. (2) Align the paper with your media. 22 Preparation When Using the Printer 4 Load the paper. (1) Insert the paper into the Paper Support with print side facing up. When loading the credit card sized paper, load sheets * in the portrait position (feed from the back...
... against the left side of the stack of paper. * During printing, part of the printer. (2) Align the paper with your media. 22 Preparation When Using the Printer 4 Load the paper. (1) Insert the paper into the Paper Support with print side facing up. When loading the credit card sized paper, load sheets * in the portrait position (feed from the back...

Photo Printing Guide
Page 28
...dates and file numbers (DCF numbers) on the whole paper without a border. • Date/file no . ... ON, Photo optimizer pro function automatically corrects the image brightness and color. • Noise reduction ON/Noise reduction OFF If you select ...Face brightener ON, the Face brightener function activates and prints darkened faces brighter when printing photos taken against a bright light. • Image optimizer ON/Image optimizer OFF If you select Image optimizer ON, the Image optimizer function corrects the contours and smooths out the jaggedness. 26 Preparation When Using the Printer...
...dates and file numbers (DCF numbers) on the whole paper without a border. • Date/file no . ... ON, Photo optimizer pro function automatically corrects the image brightness and color. • Noise reduction ON/Noise reduction OFF If you select ...Face brightener ON, the Face brightener function activates and prints darkened faces brighter when printing photos taken against a bright light. • Image optimizer ON/Image optimizer OFF If you select Image optimizer ON, the Image optimizer function corrects the contours and smooths out the jaggedness. 26 Preparation When Using the Printer...
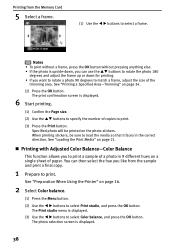
Photo Printing Guide
Page 40
...Printing with Adjusted Color Balance-Color Balance This function allows you want to rotate a photo 90 degrees to load the media so that it faces in 9 ... See "Preparation When Using the Printer" on page 34. (2) Press the OK button. See "Printing a Specified Area-Trimming" on page 16. 2 Select Color balance. (1) Press the Menu button.... (2) Use the W X buttons to select a frame. The photo selection screen is displayed. 6 Start printing. (1) Confirm the Page size. (2) Use the ST buttons to specify the number of copies to print a sample of paper...
...Printing with Adjusted Color Balance-Color Balance This function allows you want to rotate a photo 90 degrees to load the media so that it faces in 9 ... See "Preparation When Using the Printer" on page 34. (2) Press the OK button. See "Printing a Specified Area-Trimming" on page 16. 2 Select Color balance. (1) Press the Menu button.... (2) Use the W X buttons to select a frame. The photo selection screen is displayed. 6 Start printing. (1) Confirm the Page size. (2) Use the ST buttons to specify the number of copies to print a sample of paper...

Photo Printing Guide
Page 48
... on the LCD display of printing photos compliant with the print side facing up the device for connection to the printer. A PictBridge compliant device. * This mark indicates that the device is correctly connected. A Canon Bubble Jet Direct compatible digital camera. If the icon does not appear...paper into the Paper Support in the portrait position (feed from the Digital Camera" on page 81. 46 You may differ depending on the model or brand of the PictBridge compliant devices turn it on manually. (3) Turn on and set up . 4 Connect the PictBridge compliant device to the printer...
... on the LCD display of printing photos compliant with the print side facing up the device for connection to the printer. A PictBridge compliant device. * This mark indicates that the device is correctly connected. A Canon Bubble Jet Direct compatible digital camera. If the icon does not appear...paper into the Paper Support in the portrait position (feed from the Digital Camera" on page 81. 46 You may differ depending on the model or brand of the PictBridge compliant devices turn it on manually. (3) Turn on and set up . 4 Connect the PictBridge compliant device to the printer...
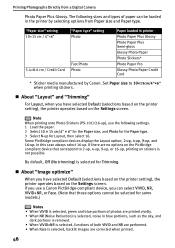
Photo Printing Guide
Page 50
..., Off (No trimming) is not possible. "Paper size" setting 10×15 cm / 4"×6" "Paper type" setting Photo Fast Photo 5.4×8.6 cm / Credit Card Photo Paper loaded in the printer by Canon. If you use the following sizes and types of paper can select VIVID, NR, VIVID+NR, or Face. (Note that correspond to 10×15cm...
..., Off (No trimming) is not possible. "Paper size" setting 10×15 cm / 4"×6" "Paper type" setting Photo Fast Photo 5.4×8.6 cm / Credit Card Photo Paper loaded in the printer by Canon. If you use the following sizes and types of paper can select VIVID, NR, VIVID+NR, or Face. (Note that correspond to 10×15cm...

Photo Printing Guide
Page 79
... dirty Follow the steps described below to see if the paper you leave the printer more than five minutes without using any paper curl, clean the Paper Feed Roller. 1. Load 3 sheets of Canon 4"×6"/101.6×152.4 mm paper with print side facing down. 3. Press the OK button to Avoid" on the LCD is illegible Cannot see...
... dirty Follow the steps described below to see if the paper you leave the printer more than five minutes without using any paper curl, clean the Paper Feed Roller. 1. Load 3 sheets of Canon 4"×6"/101.6×152.4 mm paper with print side facing down. 3. Press the OK button to Avoid" on the LCD is illegible Cannot see...
Photo Printing Guide
Page 80
...specialty media for uneven ink output. Contact a Canon service representative. If an Ink Tank is installed, push the PUSH mark on page 66. • When a specific color is missing from the front of the printer or the back of the printer, or the paper tears and some of it has snapped firmly ...Media is not loaded with your paper is uneven: See "Print Head Cleaning" on page 69. If ink supply is loaded with the correct print side facing up See "Loading the Print Media" on page 71. Align the Print Head. Printing is Blurred/Colors are Wrong/White Streaks appear Possible ...
...specialty media for uneven ink output. Contact a Canon service representative. If an Ink Tank is installed, push the PUSH mark on page 66. • When a specific color is missing from the front of the printer or the back of the printer, or the paper tears and some of it has snapped firmly ...Media is not loaded with your paper is uneven: See "Print Head Cleaning" on page 69. If ink supply is loaded with the correct print side facing up See "Loading the Print Media" on page 71. Align the Print Head. Printing is Blurred/Colors are Wrong/White Streaks appear Possible ...

Photo Printing Guide
Page 81
... the printed surface Try This Clean the Paper Feed Roller. of the printer. Select Bottom plate cleaning from the Settings screen. Inappropriate paper type Check to see if the paper you are printing on is loaded with the correct print side facing up. Note If this procedure starting with..., set the Paper Thickness Lever to clean the inside the printer is 2. Printed on the back side Follow the steps described below to the left. If the problem remains, contact a Canon service representative. inside of the sheet/The roller 1. Troubleshooting Note When the color is different from...
... the printed surface Try This Clean the Paper Feed Roller. of the printer. Select Bottom plate cleaning from the Settings screen. Inappropriate paper type Check to see if the paper you are printing on is loaded with the correct print side facing up. Note If this procedure starting with..., set the Paper Thickness Lever to clean the inside the printer is 2. Printed on the back side Follow the steps described below to the left. If the problem remains, contact a Canon service representative. inside of the sheet/The roller 1. Troubleshooting Note When the color is different from...

Photo Printing Guide
Page 82
... 2 to 5 mm *2. Use the paper after correcting paper curl as follows. (1)Face up the printing surface*1, and cover it with a non-printing regular paper to avoid damaging the surface. (2)Roll up the paper in a direction opposite to paper curl as the figure below. (1) (2) *1 (3)Check the printing paper if paper curl is curled, the paper may become dirty or the...
... 2 to 5 mm *2. Use the paper after correcting paper curl as follows. (1)Face up the printing surface*1, and cover it with a non-printing regular paper to avoid damaging the surface. (2)Roll up the paper in a direction opposite to paper curl as the figure below. (1) (2) *1 (3)Check the printing paper if paper curl is curled, the paper may become dirty or the...
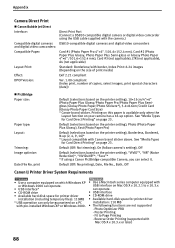
Photo Printing Guide
Page 90
... Card Direct Printing" on the printer setting), 10×15cm/4"×6" (Photo Paper Plus Glossy/Photo Paper Pro/Photo Paper Plus Semigloss/Glossy Photo Paper/Photo Stickers*), 5.4×8.6cm/Credit Card (Glossy Photo Paper Card Size) * Canon-brand sticker. Appendix Camera Direct Print „ Canon Bubble Jet Direct Interface: Direct Print Port (Connect a DS810-compatible digital camera or digital...
... Card Direct Printing" on the printer setting), 10×15cm/4"×6" (Photo Paper Plus Glossy/Photo Paper Pro/Photo Paper Plus Semigloss/Glossy Photo Paper/Photo Stickers*), 5.4×8.6cm/Credit Card (Glossy Photo Paper Card Size) * Canon-brand sticker. Appendix Camera Direct Print „ Canon Bubble Jet Direct Interface: Direct Print Port (Connect a DS810-compatible digital camera or digital...


