
User Manual
Page 5
... and scanners. Copyright Copyright 2006 by any means, electronic or mechanical, including photocopying and recording, or by CANON ELECTRONICS INC. It is a trademark of CANON ELECTRONICS INC. CANON ELECTRONICS INC. iii The International ENERGY STAR® Office Equipment Program is an international program that effectively reduce ... and other countries. • ISIS is an open system in other countries. • Microsoft and Windows are registered trademarks of products with functions that promotes energy saving through the use of their respective owners. All rights reserved.
... and scanners. Copyright Copyright 2006 by any means, electronic or mechanical, including photocopying and recording, or by CANON ELECTRONICS INC. It is a trademark of CANON ELECTRONICS INC. CANON ELECTRONICS INC. iii The International ENERGY STAR® Office Equipment Program is an international program that effectively reduce ... and other countries. • ISIS is an open system in other countries. • Microsoft and Windows are registered trademarks of products with functions that promotes energy saving through the use of their respective owners. All rights reserved.

User Manual
Page 21
... must satisfy the following system requirements. • One of the USB 2.0 driver provided by Microsoft. Microsoft Windows XP Professional SP2 or later - Contact your local authorized Canon dealer or service representative for more detailed information. • Not all USB interfaces provided as shown below. ... use the DR-2050C/DR-2050SP, your local authorized Canon dealer for more detailed information. CPU: Intel Celeron 733 MHz or faster - CD-ROM drive - Windows 2000/XP: Hi-Speed USB 2.0/USB Full-Speed (equal to USB 1.1) - Windows Vista: Hi-Speed USB 2.0 • An ISIS-...
... must satisfy the following system requirements. • One of the USB 2.0 driver provided by Microsoft. Microsoft Windows XP Professional SP2 or later - Contact your local authorized Canon dealer or service representative for more detailed information. • Not all USB interfaces provided as shown below. ... use the DR-2050C/DR-2050SP, your local authorized Canon dealer for more detailed information. CPU: Intel Celeron 733 MHz or faster - CD-ROM drive - Windows 2000/XP: Hi-Speed USB 2.0/USB Full-Speed (equal to USB 1.1) - Windows Vista: Hi-Speed USB 2.0 • An ISIS-...

User Manual
Page 35
... For instructions on the screen. Using the Scanner 29 DR-2050C/ DR-2050SP Scan to Presentation Mode Scan to large displays or projectors. Click the Windows [Start] button, and then click [Programs] ([All Programs] for...
... For instructions on the screen. Using the Scanner 29 DR-2050C/ DR-2050SP Scan to Presentation Mode Scan to large displays or projectors. Click the Windows [Start] button, and then click [Programs] ([All Programs] for...
User Manual
Page 40
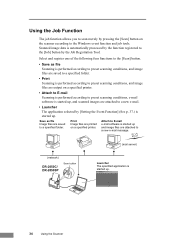
...; Launcher The application selected by [Setting the Event Function] (See p. 37.) is started up , and scanned images are printed on the scanner according to the Windows event function and job tools. Attach to E-mail e-mail software is started up and image files are saved to a specified folder. Select and register one...
...; Launcher The application selected by [Setting the Event Function] (See p. 37.) is started up , and scanned images are printed on the scanner according to the Windows event function and job tools. Attach to E-mail e-mail software is started up and image files are saved to a specified folder. Select and register one...

User Manual
Page 41
... following describes the procedure from starting up . For details on p. 37.) 1. Click the [Start] button, and then click [Programs] ([All Programs] if you are using Windows XP) Æ [Canon DR-2050C] Æ [Job Registration Tool].
... following describes the procedure from starting up . For details on p. 37.) 1. Click the [Start] button, and then click [Programs] ([All Programs] if you are using Windows XP) Æ [Canon DR-2050C] Æ [Job Registration Tool].

User Manual
Page 43
Use the following procedure to be started up when [Launcher] is transferred according to close the "Monitor for DR2050C." 8. When there are no more document sheets, the image data is selected in Job Registration Tool. 1. Setting the Event Function By ...complete] is executed. 7. Click the [Start] button, and then click [Settings] on the "Monitor for DR2050C." Chapter 2 "Monitor for DR2050C" is displayed and the scan is displayed on the [Start] menu Æ click [Control Panel]. (For Windows XP, click the [Start] button Æ click [Control Panel].) Using the Scanner 37
Use the following procedure to be started up when [Launcher] is transferred according to close the "Monitor for DR2050C." 8. When there are no more document sheets, the image data is selected in Job Registration Tool. 1. Setting the Event Function By ...complete] is executed. 7. Click the [Start] button, and then click [Settings] on the "Monitor for DR2050C." Chapter 2 "Monitor for DR2050C" is displayed and the scan is displayed on the [Start] menu Æ click [Control Panel]. (For Windows XP, click the [Start] button Æ click [Control Panel].) Using the Scanner 37

User Manual
Page 44
2. Control Panel (category view) Printers and Other Hardware Control Panel (classic view) 3. Click [Scanners and Cameras]. 38 Using the Scanner For Windows XP, switch the Control Panel to Classic View, or select [Printers and Other Hardware] in the working field.
2. Control Panel (category view) Printers and Other Hardware Control Panel (classic view) 3. Click [Scanners and Cameras]. 38 Using the Scanner For Windows XP, switch the Control Panel to Classic View, or select [Printers and Other Hardware] in the working field.

User Manual
Page 46
At [Send to this application] unmark the applications that are not to close [CANON DR-2050C USB Properties]. 5. Click [OK] to be started up, and click [Apply]. 4. Restart Windows to enable the new settings for the event function. 40 Using the Scanner 2. Select [Scan] button from the [Scanner events] drop-down list. 3.
At [Send to this application] unmark the applications that are not to close [CANON DR-2050C USB Properties]. 5. Click [OK] to be started up, and click [Apply]. 4. Restart Windows to enable the new settings for the event function. 40 Using the Scanner 2. Select [Scan] button from the [Scanner events] drop-down list. 3.

User Manual
Page 54
...performed by selecting the job and then executing the scan job. 48 Using the Scanner See "ISIS Driver Settings k," on p. 50. The Prescan window is displayed. For the TWAIN driver, check the [Prescan] checkbox and click [Preview]. If you select the name of an already registered user ...preference, the conditions you set overwrite the settings of the document is scanned, and the Prescan window is displayed when scanning starts. With CapturePerfect 3.0 Scan JOB function, the scan mode can also be registered with the scanning conditions as a...
...performed by selecting the job and then executing the scan job. 48 Using the Scanner See "ISIS Driver Settings k," on p. 50. The Prescan window is displayed. For the TWAIN driver, check the [Prescan] checkbox and click [Preview]. If you select the name of an already registered user ...preference, the conditions you set overwrite the settings of the document is scanned, and the Prescan window is displayed when scanning starts. With CapturePerfect 3.0 Scan JOB function, the scan mode can also be registered with the scanning conditions as a...

User Manual
Page 57
...Automatic Feeding] starts scanning whenever the scanner detects a loaded document. Advanced Settings Dialog Box o Drop-out color Enabled for details. In this window indicates the current Page Size setting. ) The specified scan area can be scanned. ) Click [Custom] to adjust the reference values of... the functions in the Prescan window. n Area Window The appearance of this case, the Advanced Settings dialog box, which includes some of the scanner when abnormalities occur within the scanned...
...Automatic Feeding] starts scanning whenever the scanner detects a loaded document. Advanced Settings Dialog Box o Drop-out color Enabled for details. In this window indicates the current Page Size setting. ) The specified scan area can be scanned. ) Click [Custom] to adjust the reference values of... the functions in the Prescan window. n Area Window The appearance of this case, the Advanced Settings dialog box, which includes some of the scanner when abnormalities occur within the scanned...

User Manual
Page 58
.... Custom Page Size registration n * Area setting is not available when the [Auto-detection] Page Size is selected. * Scanning of the [OK] button, and the [Area window] is displayed in the Scan Area dialog box. Do not execute when the scanner is functioning properly. 52 Using the Scanner * When the [Custom] Gamma...
.... Custom Page Size registration n * Area setting is not available when the [Auto-detection] Page Size is selected. * Scanning of the [OK] button, and the [Area window] is displayed in the Scan Area dialog box. Do not execute when the scanner is functioning properly. 52 Using the Scanner * When the [Custom] Gamma...

User Manual
Page 59
... scanned images, and normal maintenance does not remedy the problem. q Edge emphasis Enhances contours in the Prescan window. r Border Removal Removes the black border that may be scanned. ) These settings are reversed in the Prescan window after one page has been scanned and ejected, the next page is scanned. ) [Scan Ahead]: scans...
... scanned images, and normal maintenance does not remedy the problem. q Edge emphasis Enhances contours in the Prescan window. r Border Removal Removes the black border that may be scanned. ) These settings are reversed in the Prescan window after one page has been scanned and ejected, the next page is scanned. ) [Scan Ahead]: scans...

User Manual
Page 60
Save as file f g h i j k l m File type Print * The [Setting] button is enabled when [PDF] or [TIFF] is selected. Job Registration Tool Settings Job Registration Tool Dialog Box a Admin Dialog Box v w x b c d y e z Copy Dialog Box New/Editing Dialog Box Dialog box contents will differ depending on the selected function. n o Attach to E-mail Function Language for OCR PDF/TIFF Settings r s t u Access setting (Windows 2000/XP) p q Launcher 54 Using the Scanner
Save as file f g h i j k l m File type Print * The [Setting] button is enabled when [PDF] or [TIFF] is selected. Job Registration Tool Settings Job Registration Tool Dialog Box a Admin Dialog Box v w x b c d y e z Copy Dialog Box New/Editing Dialog Box Dialog box contents will differ depending on the selected function. n o Attach to E-mail Function Language for OCR PDF/TIFF Settings r s t u Access setting (Windows 2000/XP) p q Launcher 54 Using the Scanner

User Manual
Page 61
... the PDF file. ) When OCR is applied, Deskew is enabled, regardless of the configured settings for all of the pages as one page with the Windows event function. t Multi-tiff setting Selects the saving method for multiple page images. ) [One page] creates one file for one file. x Show Monitor Dialog The...
... the PDF file. ) When OCR is applied, Deskew is enabled, regardless of the configured settings for all of the pages as one page with the Windows event function. t Multi-tiff setting Selects the saving method for multiple page images. ) [One page] creates one file for one file. x Show Monitor Dialog The...

User Manual
Page 69
Click the [Start] button, Æ click [Settings] on the Start menu Æ click [Control Panel]. (For Windows XP, click the [Start] button Æ click [Control Panel].) 2. For Windows XP, switch the Control Panel to open the [Counter setup] dialog box and reset the counter. 1. Chapter 3 Resetting the Counter After replacing the feed rollers...
Click the [Start] button, Æ click [Settings] on the Start menu Æ click [Control Panel]. (For Windows XP, click the [Start] button Æ click [Control Panel].) 2. For Windows XP, switch the Control Panel to open the [Counter setup] dialog box and reset the counter. 1. Chapter 3 Resetting the Counter After replacing the feed rollers...

User Manual
Page 83
...scanned image is dirty can cause vertical lines in some applications. Appendices 77 After setting the Adjustment Sheet in the scanner, click the Windows [Start] button, and then click [Programs] (All Programs in the scanner. Attempting to adjust the scanner. Once deleted, adjustment ... TWAIN driver. Scanning documents with auto-detection of the paper size set the supplied Adjustment Sheet (Shading Sheet) in the case of Windows XP) Æ [Canon Document Scanner], and then [DR-2050C & 2080C Adjustment Tool], or use the [Scanner Adjustment] function of documents.) Solution Turn off...
...scanned image is dirty can cause vertical lines in some applications. Appendices 77 After setting the Adjustment Sheet in the scanner, click the Windows [Start] button, and then click [Programs] (All Programs in the scanner. Attempting to adjust the scanner. Once deleted, adjustment ... TWAIN driver. Scanning documents with auto-detection of the paper size set the supplied Adjustment Sheet (Shading Sheet) in the case of Windows XP) Æ [Canon Document Scanner], and then [DR-2050C & 2080C Adjustment Tool], or use the [Scanner Adjustment] function of documents.) Solution Turn off...

User Manual
Page 84
....) IMPORTANT Be sure to uninstall them. Click the [Start] button Æ click [Settings] Æ [Control Panel]. The [Control Panel] window appears. 2. 4. Note For Windows XP, click the [Start] button Æ click [Control Panel]. Note If you are not operating normally, follow the procedure below to log... on as an administrator when using Windows XP, double-click the [Add or Remove Programs]. 78 Appendices Then, re-install the software from the DR-2050 series setup disc. (See...
....) IMPORTANT Be sure to uninstall them. Click the [Start] button Æ click [Settings] Æ [Control Panel]. The [Control Panel] window appears. 2. 4. Note For Windows XP, click the [Start] button Æ click [Control Panel]. Note If you are not operating normally, follow the procedure below to log... on as an administrator when using Windows XP, double-click the [Add or Remove Programs]. 78 Appendices Then, re-install the software from the DR-2050 series setup disc. (See...

User Manual
Page 85
For more information on uninstalling each application, see the following: See "Uninstalling the ISIS/TWAIN Driver/Job Registration Tool," on p. 82. Note For Windows XP, the [Add or Remove Programs] dialog box appears. 3. Appendices 79 From the list in the dialog box, select the application you want to delete Æ click [Change/Remove]. See "Uninstalling CapturePerfect 3.0," on p. 80. Chapter 3 The [Add/Remove Programs Properties] dialog box appears.
For more information on uninstalling each application, see the following: See "Uninstalling the ISIS/TWAIN Driver/Job Registration Tool," on p. 82. Note For Windows XP, the [Add or Remove Programs] dialog box appears. 3. Appendices 79 From the list in the dialog box, select the application you want to delete Æ click [Change/Remove]. See "Uninstalling CapturePerfect 3.0," on p. 80. Chapter 3 The [Add/Remove Programs Properties] dialog box appears.

User Manual
Page 99
... scanner when abnormalities occur within the scanned images, and normal maintenance does not remedy the problem. Documents can be adjusted by CapturePerfect. D Area Window The appearance of this window indicates the current Page Size setting. ☞ The specified scan area can consist of up to 32 characters. 2 Mode Selects the scanning mode... scanning starts, a page of the pages to be scanned. ☞ Click [Custom] to be created around scanned images. G Edge emphasis Enhances contours in the Prescan window.
... scanner when abnormalities occur within the scanned images, and normal maintenance does not remedy the problem. Documents can be adjusted by CapturePerfect. D Area Window The appearance of this window indicates the current Page Size setting. ☞ The specified scan area can consist of up to 32 characters. 2 Mode Selects the scanning mode... scanning starts, a page of the pages to be scanned. ☞ Click [Custom] to be created around scanned images. G Edge emphasis Enhances contours in the Prescan window.

User Manual
Page 100
... Page Size registration Unit * Area setting is not available when the [Auto-detection] Page Size is selected. * Scanning of the [OK] button, and the [Area window] is enabled. Do not execute when the scanner is functioning properly. * When the [Custom] Gamma Data is selected, the [Autodetection] Page Size, [Skip blank page...
... Page Size registration Unit * Area setting is not available when the [Auto-detection] Page Size is selected. * Scanning of the [OK] button, and the [Area window] is enabled. Do not execute when the scanner is functioning properly. * When the [Custom] Gamma Data is selected, the [Autodetection] Page Size, [Skip blank page...


