
Instruction Manual
Page 5
... 2 Safety Precautions 6 Chapter 1 About DR-5020/5080C 11 1.1 Features of DR-5020/5080C 12 1.2 Packaging: What's in the Box 14 1.3 Part Names 15 N Front view 15 N Rear view 16 N Operation panel 17 N Removable tray 20 N Document eject support plate 20 N Function key labels...SCSI cable 24 N Setting the SCSI ID and terminator 25 Connecting the Power Cord 26 N Connecting the power cord 26 2.3 Preparing for Paper Feed and Eject 27 Preparing the Document Tray Extension and Document Eject Tray Extension 27 N Document tray extension 27 N Document eject tray extension 29 N Document...
... 2 Safety Precautions 6 Chapter 1 About DR-5020/5080C 11 1.1 Features of DR-5020/5080C 12 1.2 Packaging: What's in the Box 14 1.3 Part Names 15 N Front view 15 N Rear view 16 N Operation panel 17 N Removable tray 20 N Document eject support plate 20 N Function key labels...SCSI cable 24 N Setting the SCSI ID and terminator 25 Connecting the Power Cord 26 N Connecting the power cord 26 2.3 Preparing for Paper Feed and Eject 27 Preparing the Document Tray Extension and Document Eject Tray Extension 27 N Document tray extension 27 N Document eject tray extension 29 N Document...

Instruction Manual
Page 11
... power cord, grip it carefully. Moving the scanner with the power still ON or the SCSI cable still connected might result in the figure below... an object on top of the power cord or step on it firmly with another device. The scanner weights approximately 20 kg (44.2 lb). About the Power Supply • Be sure to connect ...scanner into an outlet shared with both hands as a table leg. • Do not tug the power cord. Also, disconnect the SCSI cable from the power outlet. If you use an extension cable, pay attention to the total amperage of the cable. • If you move the DR-5020...
... power cord, grip it carefully. Moving the scanner with the power still ON or the SCSI cable still connected might result in the figure below... an object on top of the power cord or step on it firmly with another device. The scanner weights approximately 20 kg (44.2 lb). About the Power Supply • Be sure to connect ...scanner into an outlet shared with both hands as a table leg. • Do not tug the power cord. Also, disconnect the SCSI cable from the power outlet. If you use an extension cable, pay attention to the total amperage of the cable. • If you move the DR-5020...

Instruction Manual
Page 17
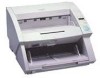
SCSI connectors Connect the SCSI connectors to this connector. Connector shape: D-sub half-pitch 50-pin (pin type) To avoid overheating and causing a fire, never block the air vents on the rear of the scanner. CAUTION 16 Chapter 1 About DR-5020/5080C N Rear view Air vent DIP switch This switch is for setting the SCSI ID and turning the terminator ON or OFF. (P.25) Power cord connector Connect the power cord provided with the scanner to these connectors.
SCSI connectors Connect the SCSI connectors to this connector. Connector shape: D-sub half-pitch 50-pin (pin type) To avoid overheating and causing a fire, never block the air vents on the rear of the scanner. CAUTION 16 Chapter 1 About DR-5020/5080C N Rear view Air vent DIP switch This switch is for setting the SCSI ID and turning the terminator ON or OFF. (P.25) Power cord connector Connect the power cord provided with the scanner to these connectors.

Instruction Manual
Page 23
Chapter 2 Preparation Before Use System Requirements To use the DR-5020/5080C, you need the following items in addition to the standard accessories: G Computer G SCSI card G SCSI cable G Application MEMO • The driver may not function properly depending on the application you are using. • Select a computer, operating environment and SCSI card to suit the application you are using. 22
Chapter 2 Preparation Before Use System Requirements To use the DR-5020/5080C, you need the following items in addition to the standard accessories: G Computer G SCSI card G SCSI cable G Application MEMO • The driver may not function properly depending on the application you are using. • Select a computer, operating environment and SCSI card to suit the application you are using. 22

Instruction Manual
Page 24
... move the scanner, always turn the power switch OFF and disconnect the power cord from the connector. MEMO 2 Carrying When you may drop it carefully. WARNING Before you move the DR-5020/5080C, hold it firmly with the power still ON or the SCSI cable still ...connected might result in the Safety Precautions (P.8). 2.2 Installation and Connection Installation and Connection This section describes scanner installation and connection.
... move the scanner, always turn the power switch OFF and disconnect the power cord from the connector. MEMO 2 Carrying When you may drop it carefully. WARNING Before you move the DR-5020/5080C, hold it firmly with the power still ON or the SCSI cable still ...connected might result in the Safety Precautions (P.8). 2.2 Installation and Connection Installation and Connection This section describes scanner installation and connection.

Instruction Manual
Page 25
... two ports. Connect the scanner to the scanner using . Set the SCSI ID and terminator. (P.25) N Connecting the SCSI cable CAUTION Before you connect the SCSI cable, make sure that the SCSI card is a D-sub half-pitch 50-pin (pin type) connector. To connect another SCSI device to the computer. G SCSI cable The scanner's SCSI connector is installed on your...
... two ports. Connect the scanner to the scanner using . Set the SCSI ID and terminator. (P.25) N Connecting the SCSI cable CAUTION Before you connect the SCSI cable, make sure that the SCSI card is a D-sub half-pitch 50-pin (pin type) connector. To connect another SCSI device to the computer. G SCSI cable The scanner's SCSI connector is installed on your...

Instruction Manual
Page 26
... referring to ON. HINT The SCSI ID default is normally assigned to OFF. If a SCSI hard disk is ON at the up position and OFF at the down position. Terminator OFF Terminator ON Set the terminator switch on the rear of the scanner. The DIP switch is mounted, do not use 0 and ...1. 2.2 Installation and Connection N Setting the SCSI ID and terminator Set the SCSI ID and terminator using the DIP switch on the...
... referring to ON. HINT The SCSI ID default is normally assigned to OFF. If a SCSI hard disk is ON at the up position and OFF at the down position. Terminator OFF Terminator ON Set the terminator switch on the rear of the scanner. The DIP switch is mounted, do not use 0 and ...1. 2.2 Installation and Connection N Setting the SCSI ID and terminator Set the SCSI ID and terminator using the DIP switch on the...
Instruction Manual
Page 34
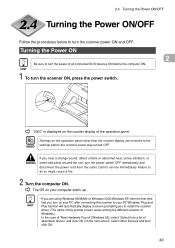
... MEMO settings before the computer ON. Call for service immediately. WARNING If you are reverted to your computer starts up. Failure to turn the scanner power ON and OFF. HINT 1 To turn the power of the operation panel. HINT • If you hear a strange sound, detect ...smoke or abnormal heat, sense vibration, or smell odd odors around the unit, turn on the counter display of all connected SCSI devices ON before the scanner power was turned OFF. Settings on your PC Windows' Plug and Play function will automatically display a screen prompting you turn the...
... MEMO settings before the computer ON. Call for service immediately. WARNING If you are reverted to your computer starts up. Failure to turn the scanner power ON and OFF. HINT 1 To turn the power of the operation panel. HINT • If you hear a strange sound, detect ...smoke or abnormal heat, sense vibration, or smell odd odors around the unit, turn on the counter display of all connected SCSI devices ON before the scanner power was turned OFF. Settings on your PC Windows' Plug and Play function will automatically display a screen prompting you turn the...
Instruction Manual
Page 65
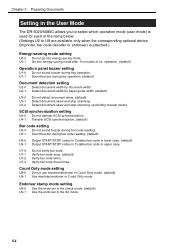
.... (default) Document detection setting U2-0 Detect document width by paper guide width. (default) U3-0 U3-1 U3-2 Do not detect document skew. (default) Detect document skew and stop scanning. (excluding manual mode) SCSI synchronization setting U4-0 Do not transfer SCSI synchronization. Detect document skew and stop...Use imprinter/endorser in the A4 mode. 64 U2-1 Detect document width by document width. U9-1 Use the endorser in Count Only mode. Chapter 3 Preparing Documents Setting in the User Mode The DR-5020/5080C allows you to U9 are available only when the corresponding...
.... (default) Document detection setting U2-0 Detect document width by paper guide width. (default) U3-0 U3-1 U3-2 Do not detect document skew. (default) Detect document skew and stop scanning. (excluding manual mode) SCSI synchronization setting U4-0 Do not transfer SCSI synchronization. Detect document skew and stop...Use imprinter/endorser in the A4 mode. 64 U2-1 Detect document width by document width. U9-1 Use the endorser in Count Only mode. Chapter 3 Preparing Documents Setting in the User Mode The DR-5020/5080C allows you to U9 are available only when the corresponding...

Instruction Manual
Page 68
... Manual. If it is correctly recognized. If either of all connected SCSI devices, and make sure that your computer not recognizing the scanner. Enable the terminator function if the SCSI device has a built-in terminator function. 68 Remedy Connect the scanner to the SCSI card Manual. Also, check the following describes possible causes of the...
... Manual. If it is correctly recognized. If either of all connected SCSI devices, and make sure that your computer not recognizing the scanner. Enable the terminator function if the SCSI device has a built-in terminator function. 68 Remedy Connect the scanner to the SCSI card Manual. Also, check the following describes possible causes of the...

Instruction Manual
Page 69
... then turn the computer ON again. Turn the computer OFF, and correctly connect the scanner's power cord. Remedy Replace with a SCSI card compatible with the driver application. 4 69 Then, turn the scanner ON and then turn the computer ON again. Cause Remedy The scanner's power cord is OFF. Turn the computer OFF, turn the...
... then turn the computer ON again. Turn the computer OFF, and correctly connect the scanner's power cord. Remedy Replace with a SCSI card compatible with the driver application. 4 69 Then, turn the scanner ON and then turn the computer ON again. Cause Remedy The scanner's power cord is OFF. Turn the computer OFF, turn the...

Instruction Manual
Page 77
...are dirty, that dirt will appear on the scanner are inappropriate. If the document cannot be sharp or will not be scanned correctly even if the scan conditions are dirty. If the above remedies do not rectify the problem, contact a Canon service department. 77 For details, see the instruction... how to the computer is sometimes no longer output by turning asynchronous transfer in the scanner's user mode OFF (P.64). If this does not rectify the problem, contact the computer or SCSI card manufacturer. This error message is installed. G Other Causes The computer may be ...
...are dirty, that dirt will appear on the scanner are inappropriate. If the document cannot be sharp or will not be scanned correctly even if the scan conditions are dirty. If the above remedies do not rectify the problem, contact a Canon service department. 77 For details, see the instruction... how to the computer is sometimes no longer output by turning asynchronous transfer in the scanner's user mode OFF (P.64). If this does not rectify the problem, contact the computer or SCSI card manufacturer. This error message is installed. G Other Causes The computer may be ...
Instruction Manual
Page 93
...60, 62, 64, 78, 79, 87, 92 - Main unit 82 Installation Location 8 - Scanning Glasses and Rollers ... 83 Connecting the SCSI cable 24 - Connecting the power cord 26 Job Separation Sheet 56 Connecting to a Computer 24 Count Only key 17, 19, 53, 59 ...cleaning 82 Operation panel 17, 60 Document detection 64 Operation panel buzzer 64 Document eject support plate ... 20, 30 Options 92 Document eject tray 15 Document eject tray extention .. 15, 29 - Carrying the scanner 9, 23 - Index Index - E - D - O - About documents 36 Endorser 67, 78, 79,...
...60, 62, 64, 78, 79, 87, 92 - Main unit 82 Installation Location 8 - Scanning Glasses and Rollers ... 83 Connecting the SCSI cable 24 - Connecting the power cord 26 Job Separation Sheet 56 Connecting to a Computer 24 Count Only key 17, 19, 53, 59 ...cleaning 82 Operation panel 17, 60 Document detection 64 Operation panel buzzer 64 Document eject support plate ... 20, 30 Options 92 Document eject tray 15 Document eject tray extention .. 15, 29 - Carrying the scanner 9, 23 - Index Index - E - D - O - About documents 36 Endorser 67, 78, 79,...
Instruction Manual
Page 94
...- Rear view 16 Power cord 14, 26 Power cord connector 16 Power switch 15 - - Safety Precautions 6 SCSI connectors 16, 24 SCSI ID 25, 68 SCSI synchronization 64 Scan Mode Tables 88 Scan Procedure 39 Scanner control sheets 56 Semi Auto mode 43 Sensor 47 Setting Scan Conditions 58 Setting in the User Mode... 64 Setting the SCSI ID and terminator 25 Simplex/Duplex key 17, 59 Skew compensation 64 Specifications 90 Start key 19...
...- Rear view 16 Power cord 14, 26 Power cord connector 16 Power switch 15 - - Safety Precautions 6 SCSI connectors 16, 24 SCSI ID 25, 68 SCSI synchronization 64 Scan Mode Tables 88 Scan Procedure 39 Scanner control sheets 56 Semi Auto mode 43 Sensor 47 Setting Scan Conditions 58 Setting in the User Mode... 64 Setting the SCSI ID and terminator 25 Simplex/Duplex key 17, 59 Skew compensation 64 Specifications 90 Start key 19...

