User Manual
Page 6
...Scanner 2 Conventions ...3 Before Using the Scanner 5 Safe Operation ...5 Installation Location ...5 Power ...6 Moving the Scanner ...6 Normal Handling ...7 Disposal ...8 Features of the DR-5010C 9 Checking the Packing List 11 Removing the Protective Packing Matarials 12 Names and Functions of Parts 14 Installing the Scanner...with the Event Function 39 Confirming Scanner Event 39 Using the Scanner 42 Documents ...42 Setting Up the Document Feed Tray and the Document Eject Tray 44 Document Eject Tray 45 Installing the Document Eject Guide 47 Placing a Document for Scanning 49 How to ...
...Scanner 2 Conventions ...3 Before Using the Scanner 5 Safe Operation ...5 Installation Location ...5 Power ...6 Moving the Scanner ...6 Normal Handling ...7 Disposal ...8 Features of the DR-5010C 9 Checking the Packing List 11 Removing the Protective Packing Matarials 12 Names and Functions of Parts 14 Installing the Scanner...with the Event Function 39 Confirming Scanner Event 39 Using the Scanner 42 Documents ...42 Setting Up the Document Feed Tray and the Document Eject Tray 44 Document Eject Tray 45 Installing the Document Eject Guide 47 Placing a Document for Scanning 49 How to ...

User Manual
Page 7
... subject to vibration. Installation Location 17.7" (450 mm) when the Document Feed Tray and Document Feed Tray Extension are closed At least 3.9" (100 mm) when Eject Tray is empty 29.5" (750 mm) when the Document Feed Tray and Document Feed Tray Extension are open The performance of the scanner. (See "Document Eject Tray," on p. 45. ) • Avoid locations exposed to direct sunlight...
... subject to vibration. Installation Location 17.7" (450 mm) when the Document Feed Tray and Document Feed Tray Extension are closed At least 3.9" (100 mm) when Eject Tray is empty 29.5" (750 mm) when the Document Feed Tray and Document Feed Tray Extension are open The performance of the scanner. (See "Document Eject Tray," on p. 45. ) • Avoid locations exposed to direct sunlight...
User Manual
Page 11
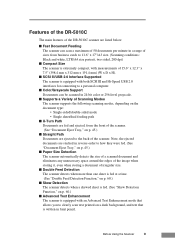
... sizes from the front of the scanner. (See "Document Eject Tray," on p. 60.) ■ Advanced Text Enhancement The scanner is extremely compact, with measurements of the scanner. Note, the ejected documents are stacked in reverse order to how they were fed. (See "Document Eject Tray," on p. 45.) ■ Paper Size Detection The scanner automatically detects the size of a scanned...
... sizes from the front of the scanner. (See "Document Eject Tray," on p. 60.) ■ Advanced Text Enhancement The scanner is extremely compact, with measurements of the scanner. Note, the ejected documents are stacked in reverse order to how they were fed. (See "Document Eject Tray," on p. 45.) ■ Paper Size Detection The scanner automatically detects the size of a scanned...

User Manual
Page 12
..., can create two images with different scanning conditions from scanned images. ■ Skip Blank Page Function The scanner is equipped with a Prescan function that puts the scanner in the document feed tray. ■ Compatible with Carbonless Duplicating Paper The scanner is equipped with a Skip Blank Page function that allows it has been idle for the...
..., can create two images with different scanning conditions from scanned images. ■ Skip Blank Page Function The scanner is equipped with a Prescan function that puts the scanner in the document feed tray. ■ Compatible with Carbonless Duplicating Paper The scanner is equipped with a Skip Blank Page function that allows it has been idle for the...
User Manual
Page 14
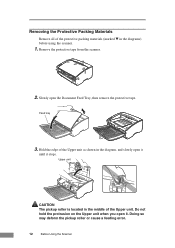
Slowly open it stops. Feed tray 3. Doing so may deform the pickup roller or cause a feeding error. 12 Before Using the Scanner Hold the edge of the protective packing materials (marked ▼ in the diagrams) before using the scanner. 1. Removing the Protective Packing Materials Remove all of the Upper unit as ...shown in the diagram, and slowly open it until it . Remove the protective tape from the scanner. 2. Upper unit CAUTION The pickup roller is located in the middle of the Upper unit. Do not hold the protrusion on the Upper ...
Slowly open it stops. Feed tray 3. Doing so may deform the pickup roller or cause a feeding error. 12 Before Using the Scanner Hold the edge of the protective packing materials (marked ▼ in the diagrams) before using the scanner. 1. Removing the Protective Packing Materials Remove all of the Upper unit as ...shown in the diagram, and slowly open it until it . Remove the protective tape from the scanner. 2. Upper unit CAUTION The pickup roller is located in the middle of the Upper unit. Do not hold the protrusion on the Upper ...

User Manual
Page 16
... scanner. ■ Front (Feed Tray Open) Document Feed Tray Place the document to be scanned here. (See p. 44.) Document Feed Tray Extension Pull this tray out if the document hangs over the edge of the main tray. (See p. 44.) Document Eject Tray Extension Open if the document extends beyond the edge of each part. Familiarize yourself with the width of the document. Document Eject Tray 1 Scanned documents...
... scanner. ■ Front (Feed Tray Open) Document Feed Tray Place the document to be scanned here. (See p. 44.) Document Feed Tray Extension Pull this tray out if the document hangs over the edge of the main tray. (See p. 44.) Document Eject Tray Extension Open if the document extends beyond the edge of each part. Familiarize yourself with the width of the document. Document Eject Tray 1 Scanned documents...

User Manual
Page 17
... to the power cord. (See p. 24.) Ventilation Openings CAUTION Do not block the Ventilation Openings. Before Using the Scanner 15 ■ Rear Document Eject Tray 2 Switch the direction documents are not used. Doing so could cause the scanner to overheat, creating a risk of fire. ■ Interface DIP Switches Set the SCSI ID. (See p. 22.) Not...
... to the power cord. (See p. 24.) Ventilation Openings CAUTION Do not block the Ventilation Openings. Before Using the Scanner 15 ■ Rear Document Eject Tray 2 Switch the direction documents are not used. Doing so could cause the scanner to overheat, creating a risk of fire. ■ Interface DIP Switches Set the SCSI ID. (See p. 22.) Not...

User Manual
Page 44
... embossing (*1) For information about eject directions, see "Document Eject Tray," on p. 45. (*2) For information about feeding documents, see "Placing a Document for Scanning," on a document is shown below. IMPORTANT A document must be grouped together so that they have the same size, thickness, and weight. Using the Scanner Documents This scanner can scan documents ranging in size from business cards and checks...
... embossing (*1) For information about eject directions, see "Document Eject Tray," on p. 45. (*2) For information about feeding documents, see "Placing a Document for Scanning," on a document is shown below. IMPORTANT A document must be grouped together so that they have the same size, thickness, and weight. Using the Scanner Documents This scanner can scan documents ranging in size from business cards and checks...

User Manual
Page 46
Doing so may damage the scanner, reduce scanning quality, or cause the feed tray to fall off and injure someone. 2. Pull out the Document Feed Tray Extension when scanning large documents. 44 Using the Scanner Hold the middle of the Document Feed Tray and slowly open it toward you. Setting Up the Document Feed Tray and the Document Eject Tray 1. CAUTION Do not place anything other than documents on the Document Feed Tray.
Doing so may damage the scanner, reduce scanning quality, or cause the feed tray to fall off and injure someone. 2. Pull out the Document Feed Tray Extension when scanning large documents. 44 Using the Scanner Hold the middle of the Document Feed Tray and slowly open it toward you. Setting Up the Document Feed Tray and the Document Eject Tray 1. CAUTION Do not place anything other than documents on the Document Feed Tray.

User Manual
Page 47
... The U-Turn Path cannot be used if Document Eject Tray 2 is open. 2. Document Eject Tray The scanner has two eject methods; If Document Eject Tray 2 is not opened, the documents may fly off the tray and cause a paper jam. If it is open the Document Eject Tray Extention to open , close it. Using the Scanner 45 Select the eject method according to...
... The U-Turn Path cannot be used if Document Eject Tray 2 is open. 2. Document Eject Tray The scanner has two eject methods; If Document Eject Tray 2 is not opened, the documents may fly off the tray and cause a paper jam. If it is open the Document Eject Tray Extention to open , close it. Using the Scanner 45 Select the eject method according to...

User Manual
Page 48
If there is enough space for ejected documents, the documents may be damaged or a paper jam may cause a paper jam. 46 Using the Scanner IMPORTANT • Be sure there is not enough space for documents that are stacked in reverse order to scan documents. Note When using the Straight Path, the ejected documents are ejected behind the scanner when using the Straight Path. Opening or closing Document Eject Tray 2 while scanning may occur. • Open or close Document Eject Tray 2 before starting to how they were fed. Using the Straight Path 1. Open Document Eject Tray 2.
If there is enough space for ejected documents, the documents may be damaged or a paper jam may cause a paper jam. 46 Using the Scanner IMPORTANT • Be sure there is not enough space for documents that are stacked in reverse order to scan documents. Note When using the Straight Path, the ejected documents are ejected behind the scanner when using the Straight Path. Opening or closing Document Eject Tray 2 while scanning may occur. • Open or close Document Eject Tray 2 before starting to how they were fed. Using the Straight Path 1. Open Document Eject Tray 2.

User Manual
Page 49
Attach the Document Eject Guide in the scanner. Using the Scanner 47 Open the Document Eject Tray Extention toward you. 2. Installing the Document Eject Guide When scanning a document that is particularly thin or particularly long, it to attach it could droop down over the edge of the Document Eject Tray Extension and become jammed in the order ➀, ➁ as shown. 3. Avoid this problem by attaching the Document Eject Guide. 1. Press the Document Eject Guide to Document Eject Tray Extention.
Attach the Document Eject Guide in the scanner. Using the Scanner 47 Open the Document Eject Tray Extention toward you. 2. Installing the Document Eject Guide When scanning a document that is particularly thin or particularly long, it to attach it could droop down over the edge of the Document Eject Tray Extension and become jammed in the order ➀, ➁ as shown. 3. Avoid this problem by attaching the Document Eject Guide. 1. Press the Document Eject Guide to Document Eject Tray Extention.

User Manual
Page 50
4. To remove the Document Eject Guide, lift the Document Eject Tray Extension a little and unhook the Document Eject Guide. 5. Reverse the procedure for attaching the Document Eject Guide to remove it. 48 Using the Scanner
4. To remove the Document Eject Guide, lift the Document Eject Tray Extension a little and unhook the Document Eject Guide. 5. Reverse the procedure for attaching the Document Eject Guide to remove it. 48 Using the Scanner
User Manual
Page 51
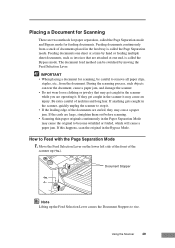
... hair. If this happens, scan the original in the feed tray is called the Page Separation mode. During the scanning process, such objects can be careful to Feed with the Page Separation Mode 1. Using the Scanner 49 Feeding documents continuously from the document. Feeding documents one sheet at one end, is called the Bypass mode.
... hair. If this happens, scan the original in the feed tray is called the Page Separation mode. During the scanning process, such objects can be careful to Feed with the Page Separation Mode 1. Using the Scanner 49 Feeding documents continuously from the document. Feeding documents one sheet at one end, is called the Bypass mode.

User Manual
Page 52
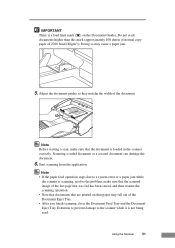
Straighten the edges of paper. 3. Doing so may cause a malfunction. • Be careful when placing a document in the scanner. Place the documents face up into the Document Feed Tray and so they are wider than the document to be scanned. It is possible to cut your hand on top of the scanner to be scanned. 4. Set the Document Guides so they touch the stoppers. 50 Using the Scanner 2. CAUTION • Do not place the documents on the edge of a sheet of the document to align them.
Straighten the edges of paper. 3. Doing so may cause a malfunction. • Be careful when placing a document in the scanner. Place the documents face up into the Document Feed Tray and so they are wider than the document to be scanned. It is possible to cut your hand on top of the scanner to be scanned. 4. Set the Document Guides so they touch the stoppers. 50 Using the Scanner 2. CAUTION • Do not place the documents on the edge of a sheet of the document to align them.
User Manual
Page 53
... image of the Document Eject Tray. • After you finish scanning, close the Document Feed Tray and the Document Eject Tray Extention to prevent damage to a system error or a paper jam while the scanner is scanning, resolve the problem, make sure that are printed on the Document Guides. Scanning a curled document or a creased document can damage the document. 6. Note • If...
... image of the Document Eject Tray. • After you finish scanning, close the Document Feed Tray and the Document Eject Tray Extention to prevent damage to a system error or a paper jam while the scanner is scanning, resolve the problem, make sure that are printed on the Document Guides. Scanning a curled document or a creased document can damage the document. 6. Note • If...

User Manual
Page 54
... Feed Selection Lever causes the Document Stoppers to go down ( ). Move the Feed Selection Lever on the lower left side of the front of the scanner down . • The ISIS/TWAIN Driver settings change to Feed with the Bypass Mode 1. Place the document into the Document Feed Tray one sheet at a time... and adjust the position of the document is fed. 52 Using the...
... Feed Selection Lever causes the Document Stoppers to go down ( ). Move the Feed Selection Lever on the lower left side of the front of the scanner down . • The ISIS/TWAIN Driver settings change to Feed with the Bypass Mode 1. Place the document into the Document Feed Tray one sheet at a time... and adjust the position of the document is fed. 52 Using the...

User Manual
Page 55
... Pickup Roller • After you place several documents that are not fastened together on the feed tray at one time, they will be fed together. • Particularly, very thin or curled documents will not be careful not to the scanner while it is not being used. When doing this case, lightly press... on the leading edge of the documents when you set the ...
... Pickup Roller • After you place several documents that are not fastened together on the feed tray at one time, they will be fed together. • Particularly, very thin or curled documents will not be careful not to the scanner while it is not being used. When doing this case, lightly press... on the leading edge of the documents when you set the ...

User Manual
Page 59
... possible to the point where you open it . It is located in the middle of paper. 1. Hold the Upper unit as shown in the eject tray. 2. Doing so may deform the pickup roller or cause a feeding error. Do not hold the protrusion on the edge of a sheet of the Upper unit.... CAUTION Be careful when removing jammed paper. Clearing a Paper Jam When paper jams occur during scanning, use the following procedure to clear them. Remove any documents that have been left in the diagram, and open it to cut your hand on the Upper unit when you can remove the jammed...
... possible to the point where you open it . It is located in the middle of paper. 1. Hold the Upper unit as shown in the eject tray. 2. Doing so may deform the pickup roller or cause a feeding error. Do not hold the protrusion on the edge of a sheet of the Upper unit.... CAUTION Be careful when removing jammed paper. Clearing a Paper Jam When paper jams occur during scanning, use the following procedure to clear them. Remove any documents that have been left in the diagram, and open it to cut your hand on the Upper unit when you can remove the jammed...
User Manual
Page 90
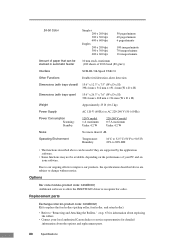
...code: 0434B003) Additional software to allow the ISIS/TWAIN driver to "Removing and Attaching the Rollers," on your local authorized Canon dealer or service representative for information about replacing the rollers. • Contact your software. 24-bit Color Simplex 200 ...20 lb bond (80 g/m2)) Interface SCSI-III / Hi-Speed USB 2.0 Other Functions Double feed detection, skew detection Dimensions (with trays closed) 15.6" x 12.3" x 7.5" (W x D x H) 398.4 mm x 312 mm x 191.4 mm (W x D x H) Dimensions (with trays open) 15.6" x 26.3" x 7.6" (W x D x H) 398.4 mm x 668 mm x 194 mm (W x D...
...code: 0434B003) Additional software to allow the ISIS/TWAIN driver to "Removing and Attaching the Rollers," on your local authorized Canon dealer or service representative for information about replacing the rollers. • Contact your software. 24-bit Color Simplex 200 ...20 lb bond (80 g/m2)) Interface SCSI-III / Hi-Speed USB 2.0 Other Functions Double feed detection, skew detection Dimensions (with trays closed) 15.6" x 12.3" x 7.5" (W x D x H) 398.4 mm x 312 mm x 191.4 mm (W x D x H) Dimensions (with trays open) 15.6" x 26.3" x 7.6" (W x D x H) 398.4 mm x 668 mm x 194 mm (W x D...
