
ImageBrowser 6.5 for Macintosh Instruction Manual
Page 17
.... Selects all images. IMPORTANT • The functions (buttons) that have not yet been transferred. Select the image you click [Import Images from Camera] on the camera model. Transfers the image chosen in the area to your computer. Cancels image selection. Changes thumbnail size (when in thumbnail display). Things to Remember... an image switches to preview display when a single image is selected. Turns the shooting date and folder name below the thumbnails on the camera that match the selected filter display in Viewer Window to the right. Table of chosen images turns...
.... Selects all images. IMPORTANT • The functions (buttons) that have not yet been transferred. Select the image you click [Import Images from Camera] on the camera model. Transfers the image chosen in the area to your computer. Cancels image selection. Changes thumbnail size (when in thumbnail display). Things to Remember... an image switches to preview display when a single image is selected. Turns the shooting date and folder name below the thumbnails on the camera that match the selected filter display in Viewer Window to the right. Table of chosen images turns...
ImageBrowser 6.5 for Macintosh Instruction Manual
Page 18
.... Viewer Window (thumbnail display) Closes CameraWindow. Protects/cancels protection for the image chosen in thumbnail display). Table of chosen images turns blue. Changes thumbnail size (when in Viewer Window. This mark appears on the right of the screen. Deletes the image chosen in the... below the thumbnails on your computer to the left will display all images within the folder as you click [Organize Images on Camera] on the camera model. • Clicking the (Delete) button will differ depending on the Menu screen, then click [Organize Images]. Thumbnail display...
.... Viewer Window (thumbnail display) Closes CameraWindow. Protects/cancels protection for the image chosen in thumbnail display). Table of chosen images turns blue. Changes thumbnail size (when in Viewer Window. This mark appears on the right of the screen. Deletes the image chosen in the... below the thumbnails on your computer to the left will display all images within the folder as you click [Organize Images on Camera] on the camera model. • Clicking the (Delete) button will differ depending on the Menu screen, then click [Organize Images]. Thumbnail display...

ImageBrowser 6.5 for Macintosh Instruction Manual
Page 24
... overwritten after an image is edited unless the file name is changed before saving it. Color/Brightness Adjustment Adjusts the images' RGB values (red, green, blue) and the saturation and brightness. Things to Remember Mastering the Basics More Advanced Techniques Appendices Editing Images IMPORTANT • The original image will be edited.
... overwritten after an image is edited unless the file name is changed before saving it. Color/Brightness Adjustment Adjusts the images' RGB values (red, green, blue) and the saturation and brightness. Things to Remember Mastering the Basics More Advanced Techniques Appendices Editing Images IMPORTANT • The original image will be edited.

ImageBrowser 6.5 for Macintosh Instruction Manual
Page 42
... Information Settings Setting Star Ratings You can set the Star Ratings by accessing the [Edit] menu, the File Information Window or the Viewer Window. Trip blue to the sea Esnanddleyssbweahcihtees Your choice of Contents 42 Things to [Preview Mode]. 3 Set [Star Rating]. • You can also set the Star Ratings used...
... Information Settings Setting Star Ratings You can set the Star Ratings by accessing the [Edit] menu, the File Information Window or the Viewer Window. Trip blue to the sea Esnanddleyssbweahcihtees Your choice of Contents 42 Things to [Preview Mode]. 3 Set [Star Rating]. • You can also set the Star Ratings used...
ZoomBrowser EX 6.5 for Windows Instruction Manual
Page 17
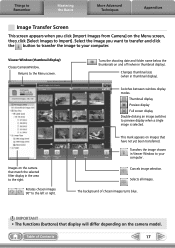
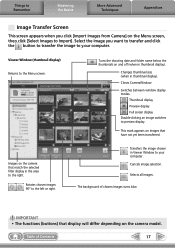
... preview display. Closes CameraWindow. Rotates chosen images 90° to the left or right. Table of chosen images turns blue. Select the image you click [Import Images from Camera] on the Menu screen, then click [Select Images to Import]. Images on and off (when in thumbnail display). ...Transfers the image chosen in the area to the right. Turns the shooting date and folder name below the thumbnails on the camera that have not yet been transferred. Things to Remember Mastering the Basics More Advanced Techniques Appendices Image Transfer Screen This screen appears when...
... preview display. Closes CameraWindow. Rotates chosen images 90° to the left or right. Table of chosen images turns blue. Select the image you click [Import Images from Camera] on the Menu screen, then click [Select Images to Import]. Images on and off (when in thumbnail display). ...Transfers the image chosen in the area to the right. Turns the shooting date and folder name below the thumbnails on the camera that have not yet been transferred. Things to Remember Mastering the Basics More Advanced Techniques Appendices Image Transfer Screen This screen appears when...
ZoomBrowser EX 6.5 for Windows Instruction Manual
Page 18
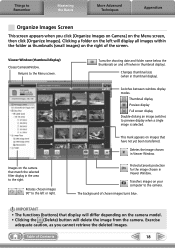
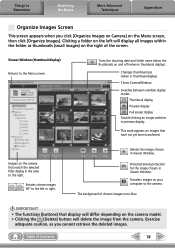
...cancels protection for the image chosen in Viewer Window. Switches between window display modes. Images on your computer to the camera. Transfers images on the camera that match the selected filter display in the area to the right. Exercise adequate caution, as thumbnails (small images) ...on the Menu screen, then click [Organize Images]. Table of chosen images turns blue. Thumbnail display Preview display Full screen display ...
...cancels protection for the image chosen in Viewer Window. Switches between window display modes. Images on your computer to the camera. Transfers images on the camera that match the selected filter display in the area to the right. Exercise adequate caution, as thumbnails (small images) ...on the Menu screen, then click [Organize Images]. Table of chosen images turns blue. Thumbnail display Preview display Full screen display ...

ZoomBrowser EX 6.5 for Windows Instruction Manual
Page 41
... the index list. : Ultimate : Moderate : Okay Procedures 1 Switch to [Preview Mode]. 2 Set [Star Rating]. • You can also be managed in the Properties Window. Trip blue to the sea Esnanddleyssbweahcihtees Your choice of Contents 41
... the index list. : Ultimate : Moderate : Okay Procedures 1 Switch to [Preview Mode]. 2 Set [Star Rating]. • You can also be managed in the Properties Window. Trip blue to the sea Esnanddleyssbweahcihtees Your choice of Contents 41

Software Guide for Macintosh
Page 22
... overwritten after an image is edited unless the file name is changed before saving it. Color/Brightness Adjustment Adjusts the images' RGB values (red, green, blue) and the saturation and brightness. Saturation, Brightness Procedures 1 Double-click an image. 2 [Edit] and [Color/ Brightness Adjustment]. • Movies and RAW images cannot be edited...
... overwritten after an image is edited unless the file name is changed before saving it. Color/Brightness Adjustment Adjusts the images' RGB values (red, green, blue) and the saturation and brightness. Saturation, Brightness Procedures 1 Double-click an image. 2 [Edit] and [Color/ Brightness Adjustment]. • Movies and RAW images cannot be edited...

Software Guide for Macintosh
Page 37
... your choice of text as comments Relaxing afternoon snooze Procedures 1 Select an image. 2 Switch to the sea Esnanddleyssbweahcihtees Your choice of text as Comments. Trip blue to [Preview Mode]. 3 Insert [Comment]. • Comments can also set the Star Ratings used in searching and displaying images in the index list. : Ultimate : Moderate...
... your choice of text as comments Relaxing afternoon snooze Procedures 1 Select an image. 2 Switch to the sea Esnanddleyssbweahcihtees Your choice of text as Comments. Trip blue to [Preview Mode]. 3 Insert [Comment]. • Comments can also set the Star Ratings used in searching and displaying images in the index list. : Ultimate : Moderate...

Software Guide for Windows
Page 36
... [Preview Mode]. 2 Set [Star Rating]. • You can also set the Star Ratings used in searching and displaying images in the Properties Window. 36 Trip blue to the sea Esnanddleyssbweahcihtees Your choice of text as comments Relaxing afternoon snooze Procedures 1 Switch to [Preview Mode]. 2 Insert [Comment]. • Comments can freely insert...
... [Preview Mode]. 2 Set [Star Rating]. • You can also set the Star Ratings used in searching and displaying images in the Properties Window. 36 Trip blue to the sea Esnanddleyssbweahcihtees Your choice of text as comments Relaxing afternoon snooze Procedures 1 Switch to [Preview Mode]. 2 Insert [Comment]. • Comments can freely insert...
Direct Print User Guide
Page 2
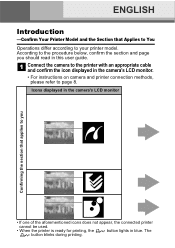
Icons displayed in the camera's LCD monitor Confirming the section that Applies to You Operations differ according to your printer model. According to the procedure below, confirm the section and ... be used. • When the printer is ready for printing, the button lights in blue. Connect the camera to the printer with an appropriate cable and confirm the icon displayed in the camera's LCD monitor. • For instructions on camera and printer connection methods, please refer to page 8. ENGLISH Introduction -Confirm Your Printer Model...
Icons displayed in the camera's LCD monitor Confirming the section that Applies to You Operations differ according to your printer model. According to the procedure below, confirm the section and ... be used. • When the printer is ready for printing, the button lights in blue. Connect the camera to the printer with an appropriate cable and confirm the icon displayed in the camera's LCD monitor. • For instructions on camera and printer connection methods, please refer to page 8. ENGLISH Introduction -Confirm Your Printer Model...
Direct Print User Guide
Page 30
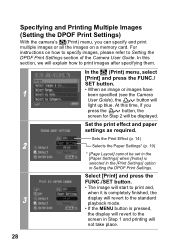
... revert to the standard playback mode. • If the MENU button is selected in the [Print Settings] option in Step 1 and printing will light up blue. In this time, if you can specify and print multiple images or all the images on how to specify images, please refer to Setting the... DPOF Print Settings section of the Camera User Guide. At this section, we will explain how to the screen in Setting the DPOF Print Settings. For instructions on a memory card. Set the...
... revert to the standard playback mode. • If the MENU button is selected in the [Print Settings] option in Step 1 and printing will light up blue. In this time, if you can specify and print multiple images or all the images on how to specify images, please refer to Setting the... DPOF Print Settings section of the Camera User Guide. At this section, we will explain how to the screen in Setting the DPOF Print Settings. For instructions on a memory card. Set the...

Direct Print User Guide
Page 38
... is also printed. Default Print effects will be obtained depending on the embedded information which has had the shooting date embedded in it using a camera with a Postcard Date Imprint mode, [ ] will differ according to [Off]. Vivid Prints more vibrant colors, such as the green of trees or the... blue of backlighting, etc. Off Prints without any effects. NR Prints with red-eye color corrected. Red-Eye2 Prints using both the [Vivid] and [NR] ...
... is also printed. Default Print effects will be obtained depending on the embedded information which has had the shooting date embedded in it using a camera with a Postcard Date Imprint mode, [ ] will differ according to [Off]. Vivid Prints more vibrant colors, such as the green of trees or the... blue of backlighting, etc. Off Prints without any effects. NR Prints with red-eye color corrected. Red-Eye2 Prints using both the [Vivid] and [NR] ...
Direct Print User Guide
Page 49
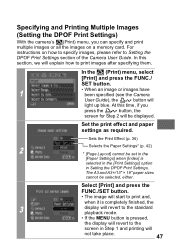
... (Print) menu, select [Print] and press the FUNC./ SET button. 1 • When an image or images have been specified (see the Camera User Guide), the button will light up blue. The A3 and A3+/13" × 19" paper sizes cannot be displayed. Select [Print] and press the FUNC./SET button. • The... Layout] cannot be set in the [Paper Settings] when [Index] is pressed, the display will revert to Setting the DPOF Print Settings section of the Camera User Guide. In this time, if you can specify and print multiple images or all the images on how to specify images, please refer to...
... (Print) menu, select [Print] and press the FUNC./ SET button. 1 • When an image or images have been specified (see the Camera User Guide), the button will light up blue. The A3 and A3+/13" × 19" paper sizes cannot be displayed. Select [Print] and press the FUNC./SET button. • The... Layout] cannot be set in the [Paper Settings] when [Index] is pressed, the display will revert to Setting the DPOF Print Settings section of the Camera User Guide. In this time, if you can specify and print multiple images or all the images on how to specify images, please refer to...
Direct Print User Guide
Page 69
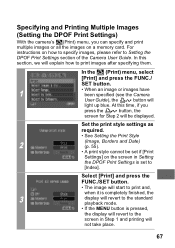
...if [Print Settings] on a memory card. Specifying and Printing Multiple Images (Setting the DPOF Print Settings) With the camera's (Print) menu, you press the button, the screen for Step 2 will light up blue. In the (Print) menu, select [Print] and press the FUNC./ SET button. 1 • When an ...image or images have been specified (see the Camera User Guide), the button will be set to print images after specifying them...
...if [Print Settings] on a memory card. Specifying and Printing Multiple Images (Setting the DPOF Print Settings) With the camera's (Print) menu, you press the button, the screen for Step 2 will light up blue. In the (Print) menu, select [Print] and press the FUNC./ SET button. 1 • When an ...image or images have been specified (see the Camera User Guide), the button will be set to print images after specifying them...
PowerShot A470 Getting Started
Page 16
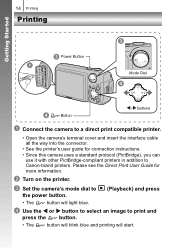
c Set the camera's mode dial to Canon-brand printers. Getting Started 14 Printing Printing c Power Button a c Mode Dial d d Button / Buttons a Connect the camera to a direct print compatible printer. • Open the camera's terminal cover and insert the interface cable all the way into the connector. • See...print and press the button. • The button will blink blue and printing will light blue. b Turn on the printer. Please see the Direct Print User Guide for connection instructions. • Since this camera uses a standard protocol (PictBridge), you can use it with ...
c Set the camera's mode dial to Canon-brand printers. Getting Started 14 Printing Printing c Power Button a c Mode Dial d d Button / Buttons a Connect the camera to a direct print compatible printer. • Open the camera's terminal cover and insert the interface cable all the way into the connector. • See...print and press the button. • The button will blink blue and printing will light blue. b Turn on the printer. Please see the Direct Print User Guide for connection instructions. • Since this camera uses a standard protocol (PictBridge), you can use it with ...

PowerShot A470 Getting Started
Page 27
Getting Started Downloading Images to a Computer 25 Downloading Images Using the Camera (Direct Transfer) Use this method to the computer. Direct Transfer Menu • Images not previously downloaded will light blue. • Press the MENU button if the Direct Transfer menu fails to appear. b Press the ...button. a Button / / / Buttons Button b Button a Confirm that the Direct Transfer menu is displayed on the camera's LCD monitor. • ...
Getting Started Downloading Images to a Computer 25 Downloading Images Using the Camera (Direct Transfer) Use this method to the computer. Direct Transfer Menu • Images not previously downloaded will light blue. • Press the MENU button if the Direct Transfer menu fails to appear. b Press the ...button. a Button / / / Buttons Button b Button a Confirm that the Direct Transfer menu is displayed on the camera's LCD monitor. • ...

PowerShot A470 Getting Started
Page 28
...(or FUNC./SET) button. Wallpaper Transfers and saves single images to the computer as you view and select them . The button will blink blue while downloading is in the Direct Transfer menu to set the method for downloading images. Use the S or T button to the computer only...• To cancel the download, press the FUNC./SET button. „ Select & Transfer/Wallpaper 1. Confirm that the Direct Transfer menu is displayed on the camera's LCD monitor. 2. Transfers and saves to the computer. The transferred images display as you view and select them . Use the S or T button to ...
...(or FUNC./SET) button. Wallpaper Transfers and saves single images to the computer as you view and select them . The button will blink blue while downloading is in the Direct Transfer menu to set the method for downloading images. Use the S or T button to the computer only...• To cancel the download, press the FUNC./SET button. „ Select & Transfer/Wallpaper 1. Confirm that the Direct Transfer menu is displayed on the camera's LCD monitor. 2. Transfers and saves to the computer. The transferred images display as you view and select them . Use the S or T button to ...

PowerShot A470 Getting Started
Page 29
The button will blink blue while downloading is turned off. The option selected with the button is retained even when the camera's power is in progress. 4. Click at the bottom right of the window to close the CameraWindow and the downloaded images will display on the computer. &#...
The button will blink blue while downloading is turned off. The option selected with the button is retained even when the camera's power is in progress. 4. Click at the bottom right of the window to close the CameraWindow and the downloaded images will display on the computer. &#...

PowerShot A470 Camera User Guide
Page 20
... and press the button. • The button will blink blue and printing will light blue. Please see the Direct Print User Guide for connection instructions. • Since this camera uses a standard protocol (PictBridge), you can use it with other PictBridge-compliant printers in addition to Canon-brand printers. d Use the W or X button to select...
... and press the button. • The button will blink blue and printing will light blue. Please see the Direct Print User Guide for connection instructions. • Since this camera uses a standard protocol (PictBridge), you can use it with other PictBridge-compliant printers in addition to Canon-brand printers. d Use the W or X button to select...

