

Instruction Manual
Page 3
Camera (with eyecup and body cap) Battery Pack LP-E5 (with protective cover) Battery Charger LC-E5/LC-E5E* Wide Strap EW-100DB III Interface Cable IFC-200U Video Cable VC-100 EOS DIGITAL Solution Disk (Software) Software Instruction Manual (1) Instruction Manual (this booklet) (2) Pocket Guide Quick start guide ... to lose any of the above items. 3 If anything is included. Be careful not to the bundled software (EOS DIGITAL Solution Disk) and Software Instruction Manual. * Battery Charger LC-E5 or LC-E5E is provided. (The LC-E5E comes with your dealer. Depending on the Lens ...
Camera (with eyecup and body cap) Battery Pack LP-E5 (with protective cover) Battery Charger LC-E5/LC-E5E* Wide Strap EW-100DB III Interface Cable IFC-200U Video Cable VC-100 EOS DIGITAL Solution Disk (Software) Software Instruction Manual (1) Instruction Manual (this booklet) (2) Pocket Guide Quick start guide ... to lose any of the above items. 3 If anything is included. Be careful not to the bundled software (EOS DIGITAL Solution Disk) and Software Instruction Manual. * Battery Charger LC-E5 or LC-E5E is provided. (The LC-E5E comes with your dealer. Depending on the Lens ...
Instruction Manual
Page 6
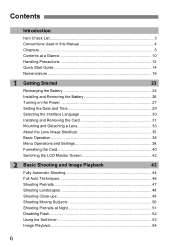
... ...5 Contents at a Glance 10 Handling Precautions 12 Quick Start Guide 14 Nomenclature 16 1 Getting Started 23 Recharging the Battery 24 Installing and Removing the Battery 26 Turning on the Power 27 Setting the Date and Time 29 Selecting the Interface Language 30 Installing and Removing the... Card 31 Mounting and Detaching a Lens 33 About the Lens Image Stabilizer 35 Basic Operation 36 Menu Operations and Settings 38 Formatting the Card...
... ...5 Contents at a Glance 10 Handling Precautions 12 Quick Start Guide 14 Nomenclature 16 1 Getting Started 23 Recharging the Battery 24 Installing and Removing the Battery 26 Turning on the Power 27 Setting the Date and Time 29 Selecting the Interface Language 30 Installing and Removing the... Card 31 Mounting and Detaching a Lens 33 About the Lens Image Stabilizer 35 Basic Operation 36 Menu Operations and Settings 38 Formatting the Card...

Instruction Manual
Page 12
... camera to disassemble the camera yourself. To prevent condensation, first put the camera in from the cold into water, promptly consult your nearest Canon Service Center. If you have the camera checked by your fingers. Even while the camera is in storage, press the shutter button a few... to check that contain organic solvents to avoid damaging the camera. Handling Precautions Camera Care This camera is condensation, remove the lens, card and battery from the camera, and wait until the condensation has evaporated before using the camera. If there is a precision instrument.
... camera to disassemble the camera yourself. To prevent condensation, first put the camera in from the cold into water, promptly consult your nearest Canon Service Center. If you have the camera checked by your fingers. Even while the camera is in storage, press the shutter button a few... to check that contain organic solvents to avoid damaging the camera. Handling Precautions Camera Care This camera is condensation, remove the lens, card and battery from the camera, and wait until the condensation has evaporated before using the camera. If there is a precision instrument.
Instruction Manual
Page 14
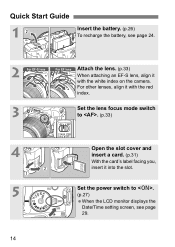
Set the power switch to . (p.33) 4 5 14 Open the slot cover and insert a card. (p.31) With the card's label facing you, insert it into the slot. Quick Start Guide 1 Insert the battery. (p.26) To recharge the battery, see page 24. 2 For EF-S lens For EF lens Attach the lens. (p.33) When attaching an EF-S lens, align it with the red index. 3 Set the lens focus mode switch to . (p.27) When the LCD monitor displays the Date/Time setting screen, see page 29. For other lenses, align it with the white index on the camera.
Set the power switch to . (p.33) 4 5 14 Open the slot cover and insert a card. (p.31) With the card's label facing you, insert it into the slot. Quick Start Guide 1 Insert the battery. (p.26) To recharge the battery, see page 24. 2 For EF-S lens For EF lens Attach the lens. (p.33) When attaching an EF-S lens, align it with the red index. 3 Set the lens focus mode switch to . (p.27) When the LCD monitor displays the Date/Time setting screen, see page 29. For other lenses, align it with the white index on the camera.
Instruction Manual
Page 17
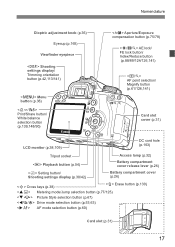
...124/126,141) AF point selection/ Magnify button (p.61/126,141) Card slot cover (p.31) LCD monitor (p.38,109) DC cord hole (p.163) Tripod socket Playback button (p.54) Access lamp (p.32) Battery compartment cover release lever (p.26) Setting button/ Shooting settings display (p.38.../42) Battery compartment cover (p.26) Cross keys (p.38) Erase button (p.130) Metering mode/Jump selection button (p....
...124/126,141) AF point selection/ Magnify button (p.61/126,141) Card slot cover (p.31) LCD monitor (p.38,109) DC cord hole (p.163) Tripod socket Playback button (p.54) Access lamp (p.32) Battery compartment cover release lever (p.26) Setting button/ Shooting settings display (p.38.../42) Battery compartment cover (p.26) Cross keys (p.38) Erase button (p.130) Metering mode/Jump selection button (p....
Instruction Manual
Page 18
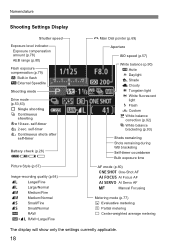
... flash External Speedlite Shooting mode Drive mode (p.53,63) u Single shooting i Continuous shooting 10-sec. self-timer l 2-sec. self-timer q Continuous shots after self-timer Battery check (p.28) zxcn Picture Style (p.67) Image-recording quality (p.64) 73 Large/Fine 83 Large/Normal 74 Medium/Fine 84 Medium/Normal 76 Small/Fine...
... flash External Speedlite Shooting mode Drive mode (p.53,63) u Single shooting i Continuous shooting 10-sec. self-timer l 2-sec. self-timer q Continuous shots after self-timer Battery check (p.28) zxcn Picture Style (p.67) Image-recording quality (p.64) 73 Large/Fine 83 Large/Normal 74 Medium/Fine 84 Medium/Normal 76 Small/Fine...
Instruction Manual
Page 21
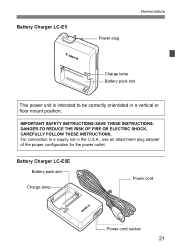
IMPORTANT SAFETY INSTRUCTIONS-SAVE THESE INSTRUCTIONS. For connection to be correctly orientated in the U.S.A., use an attachment plug adapter of the proper configuration for the power outlet. Battery Charger LC-E5E Battery pack slot Charge lamp Power cord Power cord socket 21 Battery Charger LC-E5 Nomenclature Power plug Charge lamp Battery pack slot This power unit is intended to a supply not in a vertical or floor mount position. DANGER-TO REDUCE THE RISK OF FIRE OR ELECTRIC SHOCK, CAREFULLY FOLLOW THESE INSTRUCTIONS.
IMPORTANT SAFETY INSTRUCTIONS-SAVE THESE INSTRUCTIONS. For connection to be correctly orientated in the U.S.A., use an attachment plug adapter of the proper configuration for the power outlet. Battery Charger LC-E5E Battery pack slot Charge lamp Power cord Power cord socket 21 Battery Charger LC-E5 Nomenclature Power plug Charge lamp Battery pack slot This power unit is intended to a supply not in a vertical or floor mount position. DANGER-TO REDUCE THE RISK OF FIRE OR ELECTRIC SHOCK, CAREFULLY FOLLOW THESE INSTRUCTIONS.
Instruction Manual
Page 24
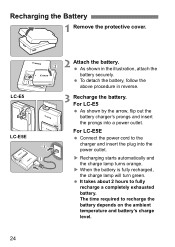
... fully recharged, the charge lamp will turn green. As shown in reverse. 3 Recharge the battery. Recharging the Battery 1 Remove the protective cover. To detach the battery, follow the above procedure in the illustration, attach the battery securely. For LC-E5E Connect the power cord to the charger and insert the plug into a power outlet...
... fully recharged, the charge lamp will turn green. As shown in reverse. 3 Recharge the battery. Recharging the Battery 1 Remove the protective cover. To detach the battery, follow the above procedure in the illustration, attach the battery securely. For LC-E5E Connect the power cord to the charger and insert the plug into a power outlet...

Instruction Manual
Page 25
...be used in malfunction or accidents for which Canon cannot be used . Even during non-use or storage, a charged battery will gradually discharge and lose its power. Battery Pack LP-E5 is compatible with the protective cover attached. The battery charger is dedicated to 240 V AC 50...unplug the charger from the power outlet. If the battery is left in excess discharge and shorter battery life. Store the battery with a 100 V AC to Canon products only. Doing so can lower the battery's performance. After recharging the battery, detach it is released, resulting in the camera ...
...be used in malfunction or accidents for which Canon cannot be used . Even during non-use or storage, a charged battery will gradually discharge and lose its power. Battery Pack LP-E5 is compatible with the protective cover attached. The battery charger is dedicated to 240 V AC 50...unplug the charger from the power outlet. If the battery is left in excess discharge and shorter battery life. Store the battery with a 100 V AC to Canon products only. Doing so can lower the battery's performance. After recharging the battery, detach it is released, resulting in the camera ...
Instruction Manual
Page 26
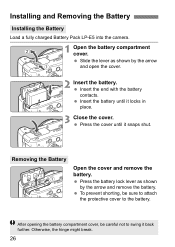
... the cover. Slide the lever as shown by the arrow and open the cover. 2 Insert the battery. Press the battery lock lever as shown by the arrow and remove the battery. Otherwise, the hinge might break. 26 Press the cover until it back further. Insert the end with... the battery contacts. Installing and Removing the Battery Installing the Battery Load a fully charged Battery Pack LP-E5 into the camera. 1 Open the battery compartment cover. To prevent...
... the cover. Slide the lever as shown by the arrow and open the cover. 2 Insert the battery. Press the battery lock lever as shown by the arrow and remove the battery. Otherwise, the hinge might break. 26 Press the cover until it back further. Insert the end with... the battery contacts. Installing and Removing the Battery Installing the Battery Load a fully charged Battery Pack LP-E5 into the camera. 1 Open the battery compartment cover. To prevent...

Instruction Manual
Page 27
...appears, see page 29 to set the power switch to while an image is being recorded to the card, [Recording ...] will be displayed and the power will turn off after about 30 seconds of non.... If you turn on the camera again, just press the shutter button. About Auto Power Off To save battery power, the camera turns off the power switch / at a short interval, the icon might not be executed...(p.109) If you set the date/time. : The camera turns on /off automatically after the card finishes recording the image. 27 Even during the sensor cleaning, you set the power switch to this position when...
...appears, see page 29 to set the power switch to while an image is being recorded to the card, [Recording ...] will be displayed and the power will turn off after about 30 seconds of non.... If you turn on the camera again, just press the shutter button. About Auto Power Off To save battery power, the camera turns off the power switch / at a short interval, the icon might not be executed...(p.109) If you set the date/time. : The camera turns on /off automatically after the card finishes recording the image. 27 Even during the sensor cleaning, you set the power switch to this position when...

Instruction Manual
Page 28
...Approx. The number of possible shots. The lens operation is slightly down, but adequate power remains. number of possible shots (shorter battery life). Pressing the shutter button halfway for long periods or operating only the autofocus can reduce the number of possible shots will ... in one of shots may be recharged. Turning on the Power Checking the Battery Level When the power switch is set to , the battery level will be exhausted soon. x : Battery level is powered by the camera's battery. Using the Image Stabilizer of the lens will decrease the number of shots]...
...Approx. The number of possible shots. The lens operation is slightly down, but adequate power remains. number of possible shots (shorter battery life). Pressing the shutter button halfway for long periods or operating only the autofocus can reduce the number of possible shots will ... in one of shots may be recharged. Turning on the Power Checking the Battery Level When the power switch is set to , the battery level will be exhausted soon. x : Battery level is powered by the camera's battery. Using the Image Stabilizer of the lens will decrease the number of shots]...
Instruction Manual
Page 29
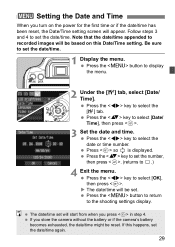
... key to select the [6] tab. Press so is displayed. The date/time set will be set. If you store the camera without the battery or if the camera's battery becomes exhausted, the date/time might be reset. Be sure to set the date/time. 1 Display the menu. Press the button to return...
... key to select the [6] tab. Press so is displayed. The date/time set will be set. If you store the camera without the battery or if the camera's battery becomes exhausted, the date/time might be reset. Be sure to set the date/time. 1 Display the menu. Press the button to return...
Instruction Manual
Page 32
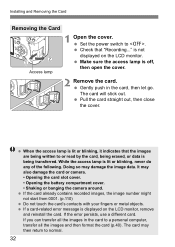
... stick out. Doing so may also damage the card or camera. • Opening the card slot cover. • Opening the battery compartment cover. • Shaking or banging the camera around. If a card-related error message is off, then open the cover. 2 Remove the card. Make sure the access lamp is displayed on the LCD monitor...
... stick out. Doing so may also damage the card or camera. • Opening the card slot cover. • Opening the battery compartment cover. • Shaking or banging the camera around. If a card-related error message is off, then open the cover. 2 Remove the card. Make sure the access lamp is displayed on the LCD monitor...
Instruction Manual
Page 35
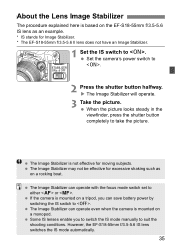
... switches the IS mode automatically. 35 When the picture looks steady in the viewfinder, press the shutter button completely to . The Image Stabilizer can save battery power by switching the IS switch to take the picture. Some IS lenses enable you can operate even when the camera is mounted on the...
... switches the IS mode automatically. 35 When the picture looks steady in the viewfinder, press the shutter button completely to . The Image Stabilizer can save battery power by switching the IS switch to take the picture. Some IS lenses enable you can operate even when the camera is mounted on the...

Instruction Manual
Page 100
...shooting, do not use Live View shooting for a long period, the camera's internal temperature may cause noise or irregular colors in red. A non-Canon flash will decrease the number of shots] Temperature At 23°C / 73°F At 0°C / 32°F Shooting Conditions No Flash 50%...be used . number of possible shots. Terminate Live View shooting when not shooting images. The focus preset feature on a fully-charged LP-E5 battery and CIPA (Camera & Imaging Products Association) testing standards. FE lock is not possible when the built-in flash or external Speedlite is magnified...
...shooting, do not use Live View shooting for a long period, the camera's internal temperature may cause noise or irregular colors in red. A non-Canon flash will decrease the number of shots] Temperature At 23°C / 73°F At 0°C / 32°F Shooting Conditions No Flash 50%...be used . number of possible shots. Terminate Live View shooting when not shooting images. The focus preset feature on a fully-charged LP-E5 battery and CIPA (Camera & Imaging Products Association) testing standards. FE lock is not possible when the built-in flash or external Speedlite is magnified...

Instruction Manual
Page 101
.... Drive mode White balance Picture Style Image-recording quality Live View exposure simulation AE lock Shutter speed Flash-ready Aperture Histogram (Brightness/RGB) Focusing frame Battery check ISO speed Shots remaining Flash exposure compensation Exposure level When < > is set, the < > icon and histogram will look like.
.... Drive mode White balance Picture Style Image-recording quality Live View exposure simulation AE lock Shutter speed Flash-ready Aperture Histogram (Brightness/RGB) Focusing frame Battery check ISO speed Shots remaining Flash exposure compensation Exposure level When < > is set, the < > icon and histogram will look like.

Instruction Manual
Page 109
Handy Features 3 Setting the Auto Power-off Time To save battery power. Under the [5] tab, select [Auto power off time. With the adjustment screen displayed, press the key to auto power off automatically. Under the [6] tab, ... button. If [Off] has been set, either turn off the camera yourself or press the button to turn off the shooting settings display to save battery power, the camera turns off automatically after the set time of an image, set this auto power-off ], then press . You can adjust the brightness...
Handy Features 3 Setting the Auto Power-off Time To save battery power. Under the [5] tab, select [Auto power off time. With the adjustment screen displayed, press the key to auto power off automatically. Under the [6] tab, ... button. If [Off] has been set, either turn off the camera yourself or press the button to turn off the shooting settings display to save battery power, the camera turns off automatically after the set time of an image, set this auto power-off ], then press . You can adjust the brightness...

Instruction Manual
Page 121
...cleaning], then press . 2 Select [Clean manually]. Select [OK], then press . If you use the battery, make sure it done by the automatic sensor cleaning can be removed manually with size-AA batteries is recommended. The surface of the image sensor is fully recharged. Select [Clean manually], then press . 3... the sensor, detach the lens from the camera. 1 Select [Sensor cleaning]. 3 Manual Sensor CleaningN Dust which could not be removed by a Canon Service Center is recommended. X In a moment, the mirror will lockup and the shutter will not be possible. 121 For the power source, using...
...cleaning], then press . 2 Select [Clean manually]. Select [OK], then press . If you use the battery, make sure it done by the automatic sensor cleaning can be removed manually with size-AA batteries is recommended. The surface of the image sensor is fully recharged. Select [Clean manually], then press . 3... the sensor, detach the lens from the camera. 1 Select [Sensor cleaning]. 3 Manual Sensor CleaningN Dust which could not be removed by a Canon Service Center is recommended. X In a moment, the mirror will lockup and the shutter will not be possible. 121 For the power source, using...
Instruction Manual
Page 122
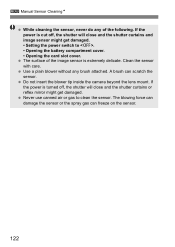
... force can damage the sensor or the spray gas can scratch the sensor. Never use canned air or gas to . • Opening the battery compartment cover. • Opening the card slot cover. Use a plain blower without any of the image sensor is cut off , the shutter will close and the shutter curtains...
... force can damage the sensor or the spray gas can scratch the sensor. Never use canned air or gas to . • Opening the battery compartment cover. • Opening the card slot cover. Use a plain blower without any of the image sensor is cut off , the shutter will close and the shutter curtains...


