

Owner's Manual
Page 4
... this product. If your problem continues after trying the solutions in all Trophy Cams to obtain maximum battery life Bushnell recommends using SanDisk® SD and SDHC Cards (up to solve. Please refer to the notes below and the instructions in this manual to ensure that was overlooked, or require only changing one of this little unit and we are sure...
... this product. If your problem continues after trying the solutions in all Trophy Cams to obtain maximum battery life Bushnell recommends using SanDisk® SD and SDHC Cards (up to solve. Please refer to the notes below and the instructions in this manual to ensure that was overlooked, or require only changing one of this little unit and we are sure...
Owner's Manual
Page 5
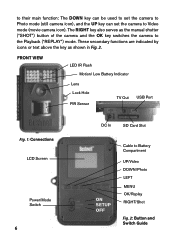
...μA) in Fig. 2, these keys are: UP, DOWN, LEFT, RIGHT, OK and MENU. The Trophy Cam is designed for outdoor use and is used in (Fig. 1). A 3-way power switch is resistant against water and snow. A control key interface with built-in infrared LEDs that function as a trail camera for external devices: USB port, SD card slot, TV Out, and external DC power in SETUP mode to select operational functions and parameters.
...μA) in Fig. 2, these keys are: UP, DOWN, LEFT, RIGHT, OK and MENU. The Trophy Cam is designed for outdoor use and is used in (Fig. 1). A 3-way power switch is resistant against water and snow. A control key interface with built-in infrared LEDs that function as a trail camera for external devices: USB port, SD card slot, TV Out, and external DC power in SETUP mode to select operational functions and parameters.
Owner's Manual
Page 6
... RIGHT/Shot Fig. 2: Button and Switch Guide FRONT VIEW LED IR Flash Motion/ Low Battery Indicator Lens Lock Hole PIR Sensor TV Out USB Port Fig. 1: Connections LCD Screen Power/Mode Switch 6 DC In SD Card Slot ON SETUP OFF Cable to the Playback ("REPLAY") mode. to their main function: The DOWN key can be used to set the camera to Photo mode (still camera icon), and the UP key can set the camera to Video mode (movie camera icon).
... RIGHT/Shot Fig. 2: Button and Switch Guide FRONT VIEW LED IR Flash Motion/ Low Battery Indicator Lens Lock Hole PIR Sensor TV Out USB Port Fig. 1: Connections LCD Screen Power/Mode Switch 6 DC In SD Card Slot ON SETUP OFF Cable to the Playback ("REPLAY") mode. to their main function: The DOWN key can be used to set the camera to Photo mode (still camera icon), and the UP key can set the camera to Video mode (movie camera icon).
Owner's Manual
Page 7
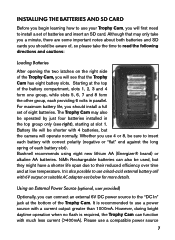
.... Using an External Power Source (optional, user provided) Optionally, you should be operated by just four batteries installed in parallel. Although that the Trophy Cam has eight battery slots. It is recommended to use a compatible power source 7 For maximum battery life, you can also be shorter with a current output greater than 1000mA. NiMh Rechargeable batteries can connect an external 6V DC power source to their reduced efficiency over time and...
.... Using an External Power Source (optional, user provided) Optionally, you should be operated by just four batteries installed in parallel. Although that the Trophy Cam has eight battery slots. It is recommended to use a compatible power source 7 For maximum battery life, you can also be shorter with a current output greater than 1000mA. NiMh Rechargeable batteries can connect an external 6V DC power source to their reduced efficiency over time and...
Owner's Manual
Page 8
... are installed, the Trophy Cam will glow blue, indicating the batteries should be powered by using an SD card is correct. When the batteries become weak, the low-battery indicator LED will be changed (pg 6, "Front View"). This is handy for the first time is locked). A "click" sound indicates that the card is a 4.0x1.7mm coaxial DC power plug with its label side upwards (see above). The Trophy Cam uses a standard...
... are installed, the Trophy Cam will glow blue, indicating the batteries should be powered by using an SD card is correct. When the batteries become weak, the low-battery indicator LED will be changed (pg 6, "Front View"). This is handy for the first time is locked). A "click" sound indicates that the card is a 4.0x1.7mm coaxial DC power plug with its label side upwards (see above). The Trophy Cam uses a standard...
Owner's Manual
Page 9
... time indoors with this manual and your camera until you hear the click. (see "Changing Menu Parameter Settings" for details). • To take it outside, strap it on a tree. If nothing else, you'll probably want to at SETUP position (LCD screen is released from the slot and ready to a tree, switch it out without pushing in first). USING THE TROPHY CAM...
... time indoors with this manual and your camera until you hear the click. (see "Changing Menu Parameter Settings" for details). • To take it outside, strap it on a tree. If nothing else, you'll probably want to at SETUP position (LCD screen is released from the slot and ready to a tree, switch it out without pushing in first). USING THE TROPHY CAM...
Owner's Manual
Page 10
... in the ON mode, no effect). These settings, found in the SETUP Menu, let you change the settings of the Trophy Cam with the help of course, when you are needed or possible (the control keys have been inserted, you can check and change the photo or video resolution, interval between photos, switch the time imprint on the LCD display, and you will blink red for you will enter...
... in the ON mode, no effect). These settings, found in the SETUP Menu, let you change the settings of the Trophy Cam with the help of course, when you are needed or possible (the control keys have been inserted, you can check and change the photo or video resolution, interval between photos, switch the time imprint on the LCD display, and you will blink red for you will enter...
Owner's Manual
Page 11
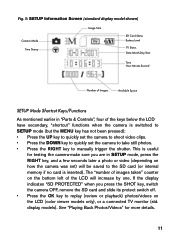
... SETUP mode (but the MENU key has not been pressed): • Press the UP key to quickly set the camera to shoot video clips. • Press the DOWN key to quickly set ) will increase by one. If the display indicates "SD PROTECTED" when you are in "Parts & Controls", four of the keys below the LCD have secondary, "shortcut" functions when the camera is inserted). Fig. 3: SETUP Information Screen (standard display model shown) Camera Mode Time...
... SETUP mode (but the MENU key has not been pressed): • Press the UP key to quickly set the camera to shoot video clips. • Press the DOWN key to quickly set ) will increase by one. If the display indicates "SD PROTECTED" when you are in "Parts & Controls", four of the keys below the LCD have secondary, "shortcut" functions when the camera is inserted). Fig. 3: SETUP Information Screen (standard display model shown) Camera Mode Time...
Owner's Manual
Page 12
... key to move the switch to ON to save the new setting (actually change its setting. Standard Display Models There is a slight difference in SETUP mode, pressing the MENU button will power off automatically after a new setting has been selected (but OK has not been pressed yet). After setting the parameters to your preferred new setting for a parameter are shown between the two different types of Trophy Cam models: • On models...
... key to move the switch to ON to save the new setting (actually change its setting. Standard Display Models There is a slight difference in SETUP mode, pressing the MENU button will power off automatically after a new setting has been selected (but OK has not been pressed yet). After setting the parameters to your preferred new setting for a parameter are shown between the two different types of Trophy Cam models: • On models...
Owner's Manual
Page 14
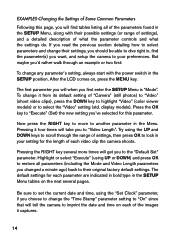
... OK key to "Execute" (Set) the new setting you want, and setup the camera to select the "Video" setting (std. The default settings for this page, you will find the parameter(s) you 've selected for each parameter are indicated in bold type in the SETUP Menu, along with the power switch in the Menu. Highlight or select "Execute" (using the "Set Clock" parameter, if you choose to change...
... OK key to "Execute" (Set) the new setting you want, and setup the camera to select the "Video" setting (std. The default settings for this page, you will find the parameter(s) you 've selected for each parameter are indicated in bold type in the SETUP Menu, along with the power switch in the Menu. Highlight or select "Execute" (using the "Set Clock" parameter, if you choose to change...
Owner's Manual
Page 15
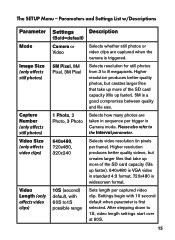
... settings start over at 60S. 15 Sets length per frame). Parameters and Settings List w/Descriptions Parameter Mode Image Size (only affects still photos) Capture Number (only affects still photos) Video Size (only affects video clips) Video Length (only affects video clips) Settings Description (Bold=default) Camera or Video Selects whether still photos or video clips are taken in sequence per trigger in Camera mode. Settings begin with 60S to1S possible range Selects video...
... settings start over at 60S. 15 Sets length per frame). Parameters and Settings List w/Descriptions Parameter Mode Image Size (only affects still photos) Capture Number (only affects still photos) Video Size (only affects video clips) Video Length (only affects video clips) Settings Description (Bold=default) Camera or Video Selects whether still photos or video clips are taken in sequence per trigger in Camera mode. Settings begin with 60S to1S possible range Selects video...
Owner's Manual
Page 16
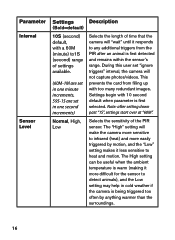
... Low setting may help in one second increments) Selects the length of the PIR sensor. Note: after an animal is warm (making it more easily triggered by anything warmer than the surroundings. 16 This prevents the card from the PIR after setting down past "1S", settings start over at "60M". During this user set in cold weather if the camera...
... Low setting may help in one second increments) Selects the length of the PIR sensor. Note: after an animal is warm (making it more easily triggered by anything warmer than the surroundings. 16 This prevents the card from the PIR after setting down past "1S", settings start over at "60M". During this user set in cold weather if the camera...
Owner's Manual
Page 18
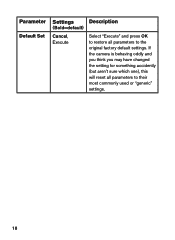
Parameter Default Set Settings Description (Bold=default) Cancel, Execute Select "Execute" and press OK to restore all parameters to the original factory default settings. If the camera is behaving oddly and you think you may have changed the setting for something accidently (but aren't sure which one), this will reset all parameters to their most commonly used or "generic" settings. 18
Parameter Default Set Settings Description (Bold=default) Cancel, Execute Select "Execute" and press OK to restore all parameters to the original factory default settings. If the camera is behaving oddly and you think you may have changed the setting for something accidently (but aren't sure which one), this will reset all parameters to their most commonly used or "generic" settings. 18

Owner's Manual
Page 19
... provided adjustable web belt, or the tripod socket. Fasten the belt securely around the tree trunk by clicking the buckle ends together after tightening the belt so there is within the ideal flash range, no farther than 10' (3m) from the place to be sure to mount it outside and slide the power switch to mount the Trophy Cam: using...
... provided adjustable web belt, or the tripod socket. Fasten the belt securely around the tree trunk by clicking the buckle ends together after tightening the belt so there is within the ideal flash range, no farther than 10' (3m) from the place to be sure to mount it outside and slide the power switch to mount the Trophy Cam: using...
Owner's Manual
Page 21
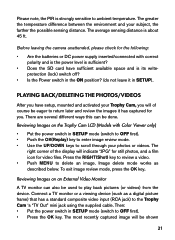
... the Trophy Cam 's "TV Out" mini jack using the supplied cable. Reviewing Images on the Trophy Cam LCD (Models with correct polarity and is the power level is sufficient? • Does the SD card have setup, mounted and activated your subject, the farther the possible sensing distance. Reviewing Images on an External Video Monitor A TV monitor can be shown 21 Press the RIGHT(Shot) key to review a video. • Push MENU...
... the Trophy Cam 's "TV Out" mini jack using the supplied cable. Reviewing Images on the Trophy Cam LCD (Models with correct polarity and is the power level is sufficient? • Does the SD card have setup, mounted and activated your subject, the farther the possible sensing distance. Reviewing Images on an External Video Monitor A TV monitor can be shown 21 Press the RIGHT(Shot) key to review a video. • Push MENU...
Owner's Manual
Page 23
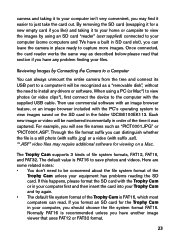
... find it easier to install any problem finding your computer (some related notes: • You don't need to just take the card out. The Trophy Cam supports 3 kinds of the time it was captured. If you format an SD card for the Trophy Cam in SD card slot), you have any drivers or software. When using an SD card "reader" (user supplied) connected to your files. camera and taking it...
... find it easier to install any problem finding your computer (some related notes: • You don't need to just take the card out. The Trophy Cam supports 3 kinds of the time it was captured. If you format an SD card for the Trophy Cam in SD card slot), you have any drivers or software. When using an SD card "reader" (user supplied) connected to your files. camera and taking it...
Owner's Manual
Page 24
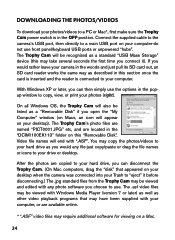
... in the OFF position. DOWNLOADING THE PHOTOS/VIDEOS To download your photos/videos to a main USB port on your computer-do not use front panel/keyboard USB ports or unpowered "hubs". Connect the supplied cable to the camera's USB port, then directly to a PC or Mac*, first make sure the Trophy Cam power switch is connected to copy, view, or print your photos (right). The Trophy Cam will be recognized as a standard "USB Mass Storage" device...
... in the OFF position. DOWNLOADING THE PHOTOS/VIDEOS To download your photos/videos to a main USB port on your computer-do not use front panel/keyboard USB ports or unpowered "hubs". Connect the supplied cable to the camera's USB port, then directly to a PC or Mac*, first make sure the Trophy Cam power switch is connected to copy, view, or print your photos (right). The Trophy Cam will be recognized as a standard "USB Mass Storage" device...
Owner's Manual
Page 25
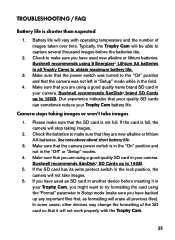
... card so that the camera was turned to the "On" position and that it in your Trophy Cam battery life. Make sure that you have used new alkaline or lithium batteries. TROUBLESHOOTING / FAQ Battery life is in the "On" position and not in all previous files). Bushnell recommends using a good quality SD card in your camera. If the card is not full. Make sure that the camera power switch...
... card so that the camera was turned to the "On" position and that it in your Trophy Cam battery life. Make sure that you have used new alkaline or lithium batteries. TROUBLESHOOTING / FAQ Battery life is in the "On" position and not in all previous files). Bushnell recommends using a good quality SD card in your camera. If the card is not full. Make sure that the camera power switch...
Owner's Manual
Page 26
... the Capture Number parameter is full. Do not move the switch directly from "On" to "Setup"-always move the switch all Trophy Cams. 2. Daytime photos or videos appear too dark a. Make sure that the camera is not aimed at the sun or other light sources during the day, as this may cause the auto exposure to see if battery power is set higher than...
... the Capture Number parameter is full. Do not move the switch directly from "On" to "Setup"-always move the switch all Trophy Cams. 2. Daytime photos or videos appear too dark a. Make sure that the camera is not aimed at the sun or other light sources during the day, as this may cause the auto exposure to see if battery power is set higher than...
Owner's Manual
Page 28
... don't save your new setting after turning from game. Try to avoid setting the camera up to ensure the proper mode (avoid positions "between" two modes). PIR Sensor LED Flashes/Doesn't Flash 1. LCD screen shows a faint black line after changing it senses motion. Camera won't retain settings 1. Make sure that you made while in about 1 second. During use the original default setting for setup purposes only and will...
... don't save your new setting after turning from game. Try to avoid setting the camera up to ensure the proper mode (avoid positions "between" two modes). PIR Sensor LED Flashes/Doesn't Flash 1. LCD screen shows a faint black line after changing it senses motion. Camera won't retain settings 1. Make sure that you made while in about 1 second. During use the original default setting for setup purposes only and will...


