Users Manual - English
Page 5
... controller 10 Changing the needle stop position ...10 Changing the initial needle position ...11 Cancelling the operation beep ...11 THREADING THE MACHINE 12 Winding the bobbin ...12 Lower threading ...15 Upper threading ...17 Drawing up the lower thread ...20 REPLACING THE NEEDLE 21 Needle precautions ...21 Needle types and their uses...
... controller 10 Changing the needle stop position ...10 Changing the initial needle position ...11 Cancelling the operation beep ...11 THREADING THE MACHINE 12 Winding the bobbin ...12 Lower threading ...15 Upper threading ...17 Drawing up the lower thread ...20 REPLACING THE NEEDLE 21 Needle precautions ...21 Needle types and their uses...
Users Manual - English
Page 6
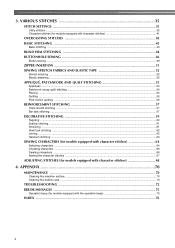
3. APPENDIX ...70 MAINTENANCE ...70 Cleaning the machine surface ...70 Cleaning the bobbin case ...70 TROUBLESHOOTING ...72 ERROR MESSAGES ...75 Operation beep (for models equipped with the operation beep 75 INDEX ...76 4 VARIOUS STITCHES 35 STITCH SETTINGS ...35 ...
3. APPENDIX ...70 MAINTENANCE ...70 Cleaning the machine surface ...70 Cleaning the bobbin case ...70 TROUBLESHOOTING ...72 ERROR MESSAGES ...75 Operation beep (for models equipped with the operation beep 75 INDEX ...76 4 VARIOUS STITCHES 35 STITCH SETTINGS ...35 ...

Users Manual - English
Page 7
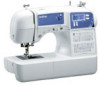
... to manually raise and lower the needle. 1 KNOWING YOUR SEWING MACHINE 1 NAMES OF MACHINE PARTS AND THEIR FUNCTIONS The main parts a Bobbin winder (page 12) This winds the thread onto the bobbin for lubrication. l Main power and sewing light switch (page 9) You can use as the lower thread. p Presser foot lever (page...) Used to select the stitch and specify the various settings. e Thread guide (pages 12 and 17) This is used when winding the thread onto the bobbin and then threading the machine.
... to manually raise and lower the needle. 1 KNOWING YOUR SEWING MACHINE 1 NAMES OF MACHINE PARTS AND THEIR FUNCTIONS The main parts a Bobbin winder (page 12) This winds the thread onto the bobbin for lubrication. l Main power and sewing light switch (page 9) You can use as the lower thread. p Presser foot lever (page...) Used to select the stitch and specify the various settings. e Thread guide (pages 12 and 17) This is used when winding the thread onto the bobbin and then threading the machine.

Users Manual - English
Page 8
... foot The presser foot applies pressure consistently on the sewing machine model. h Bobbin cover Open the bobbin cover to set bobbin (for models equipped with the quickset bobbin) You can start sewing without pulling up the bobbin thread. a Presser foot lever Raise and lower the presser foot lever to ...SEWING MACHINE Needle and presser foot section a Buttonhole lever Lower the buttonhole lever when sewing buttonholes and bar tacks. g Quick-set the bobbin. The machine sews at a slow speed at the beginning of sewing while the button is installed onto the presser foot holder. k Needle...
... foot The presser foot applies pressure consistently on the sewing machine model. h Bobbin cover Open the bobbin cover to set bobbin (for models equipped with the quickset bobbin) You can start sewing without pulling up the bobbin thread. a Presser foot lever Raise and lower the presser foot lever to ...SEWING MACHINE Needle and presser foot section a Buttonhole lever Lower the buttonhole lever when sewing buttonholes and bar tacks. g Quick-set the bobbin. The machine sews at a slow speed at the beginning of sewing while the button is installed onto the presser foot holder. k Needle...
Users Manual - English
Page 10
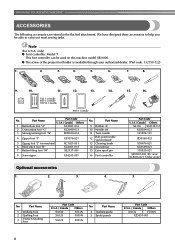
...3 Monogramming foot "N" Part Code U.S.A. / Canada Others XC2691-033 XC3098-031 XD0810-031 4 Zipper foot "I" X59370-021 5 Zigzag foot "J" (on this machine model XR-9000. ● The screw of the presser foot holder is available through your authorized dealer. (Part code: 132730-122) 1. 2. 3. 4. 5. 6. 7. 8. 9.... 10. 11. 12. 13. 14. 75/11 1 needle 90/14 1 needle 100/16 1 needle 90/14 1 needle No. Part Name 9 Bobbin (4) 10 Needle set 11 Twin needle 12 Ball point needle (gold colored) 13 Cleaning brush 14 Screwdriver 15 Extra spool pin 16 Foot controller Optional...
...3 Monogramming foot "N" Part Code U.S.A. / Canada Others XC2691-033 XC3098-031 XD0810-031 4 Zipper foot "I" X59370-021 5 Zigzag foot "J" (on this machine model XR-9000. ● The screw of the presser foot holder is available through your authorized dealer. (Part code: 132730-122) 1. 2. 3. 4. 5. 6. 7. 8. 9.... 10. 11. 12. 13. 14. 75/11 1 needle 90/14 1 needle 100/16 1 needle 90/14 1 needle No. Part Name 9 Bobbin (4) 10 Needle set 11 Twin needle 12 Ball point needle (gold colored) 13 Cleaning brush 14 Screwdriver 15 Extra spool pin 16 Foot controller Optional...

Users Manual - English
Page 14
... of thread on the sewing machine. Put the bobbin onto the bobbin winder shaft d and slide the bobbin winder shaft to the machine. ● We designed the bobbin that comes with this machine or bobbins of the bobbin Turn on this pin. If you use bobbins (part code: SA156, SFB) that have been... same type (part code: SA156, SFB). KNOWING YOUR SEWING MACHINE THREADING THE MACHINE Winding the bobbin This section describes how to wind the thread onto the bobbin. • For details on the fast bobbin winding, see page 14. 1 Pulling it in the right place, the thread may cause damage...
... of thread on the sewing machine. Put the bobbin onto the bobbin winder shaft d and slide the bobbin winder shaft to the machine. ● We designed the bobbin that comes with this machine or bobbins of the bobbin Turn on this pin. If you use bobbins (part code: SA156, SFB) that have been... same type (part code: SA156, SFB). KNOWING YOUR SEWING MACHINE THREADING THE MACHINE Winding the bobbin This section describes how to wind the thread onto the bobbin. • For details on the fast bobbin winding, see page 14. 1 Pulling it in the right place, the thread may cause damage...

Users Manual - English
Page 15
.../stop button) to fast) (for models equipped with the sewing speed controller). Slide the sewing speed controller back to the left and remove the bobbin. Memo ● When the sewing machine is started or the handwheel is plugged in, the start/stop button cannot be operated using the foot ... speed controller). Then stop the machine. 1 Note ● If the sewing machine is to the right. g CAUTION ● Make sure you slide the bobbin winding shaft to be used to start sewing (only for models equipped with the start/stop button). If you do not cut the thread completely...
.../stop button) to fast) (for models equipped with the sewing speed controller). Slide the sewing speed controller back to the left and remove the bobbin. Memo ● When the sewing machine is started or the handwheel is plugged in, the start/stop button cannot be operated using the foot ... speed controller). Then stop the machine. 1 Note ● If the sewing machine is to the right. g CAUTION ● Make sure you slide the bobbin winding shaft to be used to start sewing (only for models equipped with the start/stop button). If you do not cut the thread completely...
Users Manual - English
Page 16
...to fast) (for models equipped with the start/stop button) (for models equipped with the sewing speed controller). a Sewing speed controller Turn on the bobbin winder shaft b so that wraps around the d pre-tension disk with the start /stop button) (for models equipped with your right hand to wind... the free end of the procedure in the bobbin or the needle may cause the thread tension to the right. c While holding the thread that the spring on the machine. ● When ...
...to fast) (for models equipped with the start/stop button) (for models equipped with the sewing speed controller). a Sewing speed controller Turn on the bobbin winder shaft b so that wraps around the d pre-tension disk with the start /stop button) (for models equipped with your right hand to wind... the free end of the procedure in the bobbin or the needle may cause the thread tension to the right. c While holding the thread that the spring on the machine. ● When ...

Users Manual - English
Page 17
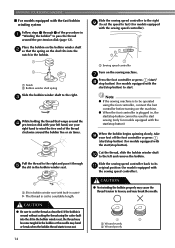
... will make a clicking sound; CAUTION ● Make sure you accidentally step on quick-set the bobbin so the thread unrolls in injury. 1 2 a Wound evenly b Wound poorly ● The bobbin was designed specifically for models equipped with this machine. this sewing machine. Raise the needle to the...; For more details on the foot controller and the machine starts to sew, you slide the bobbin winding shaft to its highest position by the arrow. Install the bobbin wound with your finger, and then pass the thread through the tension-adjusting spring of the same...
... will make a clicking sound; CAUTION ● Make sure you accidentally step on quick-set the bobbin so the thread unrolls in injury. 1 2 a Wound evenly b Wound poorly ● The bobbin was designed specifically for models equipped with this machine. this sewing machine. Raise the needle to the...; For more details on the foot controller and the machine starts to sew, you slide the bobbin winding shaft to its highest position by the arrow. Install the bobbin wound with your finger, and then pass the thread through the tension-adjusting spring of the same...
Users Manual - English
Page 18
... tab in the right direction. Slide the button and open the cover. Memo ● You can begin sewing immediately without drawing up the bobbin thread before you (counterclockwise) or press (needle position button) (for models equipped with this machine. CAUTION ● Make sure you want... to draw up the bobbin thread. If you set bobbin Raise the needle to be used with the needle position button), and raise the presser foot lever. KNOWING YOUR SEWING MACHINE Replace...
... tab in the right direction. Slide the button and open the cover. Memo ● You can begin sewing immediately without drawing up the bobbin thread before you (counterclockwise) or press (needle position button) (for models equipped with this machine. CAUTION ● Make sure you want... to draw up the bobbin thread. If you set bobbin Raise the needle to be used with the needle position button), and raise the presser foot lever. KNOWING YOUR SEWING MACHINE Replace...

Users Manual - English
Page 22
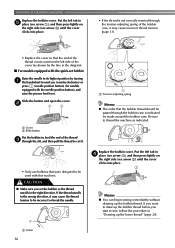
.... When sewing gathers or darts, you can begin sewing immediately without cutting it. • The bobbin cover should still be left over. Replace the bobbin cover. Draw up the lower thread, put the bobbin back in b steps 1 to draw up the lower thread by turning the handwheel toward the back...removed. or a Mark b Needle position button Pull on the wheel points up or by pressing (needle position button) (for models equipped with the quick-set bobbin You can draw up the lower c thread. c 20 a Pull out about 10 cm (4 inch) of both threads d and pull them toward you ...
.... When sewing gathers or darts, you can begin sewing immediately without cutting it. • The bobbin cover should still be left over. Replace the bobbin cover. Draw up the lower thread, put the bobbin back in b steps 1 to draw up the lower thread by turning the handwheel toward the back...removed. or a Mark b Needle position button Pull on the wheel points up or by pressing (needle position button) (for models equipped with the quick-set bobbin You can draw up the lower c thread. c 20 a Pull out about 10 cm (4 inch) of both threads d and pull them toward you ...
Users Manual - English
Page 33
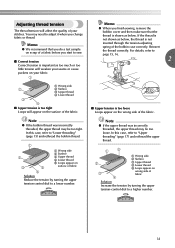
... the thread correctly. In this case, refer to "Lower threading" (page 15) and rethread the bobbin thread. 1 2 3 5 4 a Wrong side b Surface c Upper thread d Lower thread e...test sample on scrap of a fabric before you start to adjust it when you finish sewing, remove the bobbin cover and then make sure that the thread is shown as below . If the thread is not shown... as below , the thread is not inserted through the tension-adjusting spring of the bobbin case correctly. Note ● If the bobbin thread was incorrectly threaded, the upper thread may need to sew. ■ Correct...
... the thread correctly. In this case, refer to "Lower threading" (page 15) and rethread the bobbin thread. 1 2 3 5 4 a Wrong side b Surface c Upper thread d Lower thread e...test sample on scrap of a fabric before you start to adjust it when you finish sewing, remove the bobbin cover and then make sure that the thread is shown as below . If the thread is not shown... as below , the thread is not inserted through the tension-adjusting spring of the bobbin case correctly. Note ● If the bobbin thread was incorrectly threaded, the upper thread may need to sew. ■ Correct...
Users Manual - English
Page 35
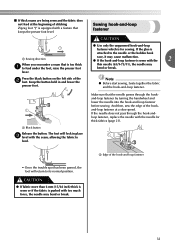
...). CAUTION ● If fabric more than 6 mm (15/64 inch) thick is sewn or if the fabric is too thick a to the needle or the bobbin hook race, it may bend or break. If the glue is attached to feed under the foot, raise the presser foot lever. ■ If thick...
...). CAUTION ● If fabric more than 6 mm (15/64 inch) thick is sewn or if the fabric is too thick a to the needle or the bobbin hook race, it may bend or break. If the glue is attached to feed under the foot, raise the presser foot lever. ■ If thick...
Users Manual - English
Page 52
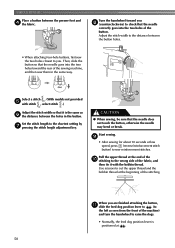
... and then sew them in the button. Pull the upper thread at the end of the j stitching to cut the upper thread and the bobbin thread at low speed, press (reverse/reinforcement stitch button) to the shortest setting by g pressing the stitch length adjustment key. Select a stitch .... (With models not provided e with the bobbin thread. Adjust the stitch width to the distance between the button holes. • When attaching four-hole buttons, first sew the two holes closest ...
... and then sew them in the button. Pull the upper thread at the end of the j stitching to cut the upper thread and the bobbin thread at low speed, press (reverse/reinforcement stitch button) to the shortest setting by g pressing the stitch length adjustment key. Select a stitch .... (With models not provided e with the bobbin thread. Adjust the stitch width to the distance between the button holes. • When attaching four-hole buttons, first sew the two holes closest ...
Users Manual - English
Page 63
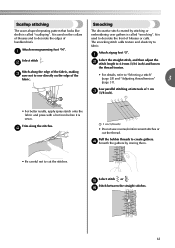
.... The smocking stitch adds texture and elasticity to create gathers. d a 1 cm (3/8 inch) • Do not sew reverse/reinforcement stitches or cut the stitches. Pull the bobbin threads to fabric. d Smooth the gathers by stitching or embroidering over gathers is called "scalloping". Select stitch or . It is used on the edge of...
.... The smocking stitch adds texture and elasticity to create gathers. d a 1 cm (3/8 inch) • Do not sew reverse/reinforcement stitches or cut the stitches. Pull the bobbin threads to fabric. d Smooth the gathers by stitching or embroidering over gathers is called "scalloping". Select stitch or . It is used on the edge of...
Users Manual - English
Page 72
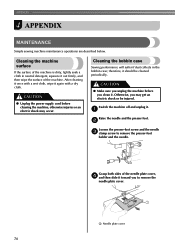
...it once with a wet cloth, wipe it should be injured. CAUTION ● Unplug the power supply cord before you clean it. Cleaning the bobbin case Sewing performance will suffer if dust collects in neutral detergent, squeeze it out firmly, and then wipe the surface of the needle plate cover... needle. Grasp both sides of the machine. Cleaning the machine surface If the surface of the machine is dirty, lightly soak a cloth in the bobbin case; therefore, it again with a dry cloth. Switch the machine off and unplug it toward you may occur. a Needle plate cover 70 APPENDIX...
...it once with a wet cloth, wipe it should be injured. CAUTION ● Unplug the power supply cord before you clean it. Cleaning the bobbin case Sewing performance will suffer if dust collects in neutral detergent, squeeze it out firmly, and then wipe the surface of the needle plate cover... needle. Grasp both sides of the machine. Cleaning the machine surface If the surface of the machine is dirty, lightly soak a cloth in the bobbin case; therefore, it again with a dry cloth. Switch the machine off and unplug it toward you may occur. a Needle plate cover 70 APPENDIX...

Users Manual - English
Page 73
... plate, and then slide the cover back on the bobbin case. CAUTION a Cleaning brush b Race ● Never use a bobbin case that the projection g on the bobbin case aligns with the spring. 1 2 1 2 a Projection b Spring 71 For a new bobbin case (part code: XC3152-021), contact your nearest authorized... service center. 4 ● Make sure that you fit the bobbin case properly, otherwise the needle may suffer. Insert the bobbin case so that is scratched, otherwise the upper thread may become tangled, the needle may break or ...
... plate, and then slide the cover back on the bobbin case. CAUTION a Cleaning brush b Race ● Never use a bobbin case that the projection g on the bobbin case aligns with the spring. 1 2 1 2 a Projection b Spring 71 For a new bobbin case (part code: XC3152-021), contact your nearest authorized... service center. 4 ● Make sure that you fit the bobbin case properly, otherwise the needle may suffer. Insert the bobbin case so that is scratched, otherwise the upper thread may become tangled, the needle may break or ...
Users Manual - English
Page 74
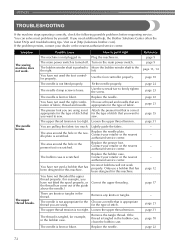
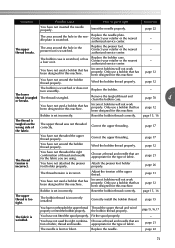
...screw. The needle clamp screw is bent or blunt. Contact your retailer or the nearest authorized service center. You have not used a bobbin that is tangled in . for this machine. Remove the tangle thread. Choose a thread and needle that are using is not Attach the... off. Use the screwdriver to the the right. The main power switch is too tight. The bobbin winder shaft is appropriate thread you need additional help, the Brother Solutions Center offers the latest FAQs and troubleshooting tips. Contact your retailer or the nearest authorized service center...
...screw. The needle clamp screw is bent or blunt. Contact your retailer or the nearest authorized service center. You have not used a bobbin that is tangled in . for this machine. Remove the tangle thread. Choose a thread and needle that are using is not Attach the... off. Use the screwdriver to the the right. The main power switch is too tight. The bobbin winder shaft is appropriate thread you need additional help, the Brother Solutions Center offers the latest FAQs and troubleshooting tips. Contact your retailer or the nearest authorized service center...
Users Manual - English
Page 75
... area around the hole in the presser foot is scratched. Contact your retailer or the nearest authorized service center. - The bobbin case is tangled on it right Reference You have not threaded the upper thread Thread the upper thread and wind properly or fitted the... bobbin properly. Replace the bobbin case. Wind the bobbin thread properly. page 12 Bobbin is incorrect. Correct the upper threading. Wind the bobbin thread properly. Adjust the tension of fabric, thread and needle. page 31 You...
... area around the hole in the presser foot is scratched. Contact your retailer or the nearest authorized service center. - The bobbin case is tangled on it right Reference You have not threaded the upper thread Thread the upper thread and wind properly or fitted the... bobbin properly. Replace the bobbin case. Wind the bobbin thread properly. page 12 Bobbin is incorrect. Correct the upper threading. Wind the bobbin thread properly. Adjust the tension of fabric, thread and needle. page 31 You...

Users Manual - English
Page 76
...Dust has built up or by turning the handwheel toward you (counterclockwise) so that has been designed for example, in the bobbin case, clean the bobbin case. Incorrect bobbins will not work properly. Raise the needle either by pressing (needle position button) once or twice. Choose a thread and... needle that are appropriate for the type of stitch that has been designed for the type of fabric. The bobbin case is not sewn correctly. the type of fabric. The thread is correct for not correct for this machine. Insert the needle properly...
...Dust has built up or by turning the handwheel toward you (counterclockwise) so that has been designed for example, in the bobbin case, clean the bobbin case. Incorrect bobbins will not work properly. Raise the needle either by pressing (needle position button) once or twice. Choose a thread and... needle that are appropriate for the type of stitch that has been designed for the type of fabric. The bobbin case is not sewn correctly. the type of fabric. The thread is correct for not correct for this machine. Insert the needle properly...


