Users Manual - English
Page 4
SEWING BASICS 26 SEWING ...26 General sewing procedure ...26 Selecting stitching ...27 Starting to sew ...28 Thread tension ...29 USEFUL SEWING TIPS ...30 Trial sewing ...30 Changing the sewing direction ...30 Sewing curves ...30 Sewing thick fabrics ...30 Sewing thin fabrics ...31 Sewing ...
SEWING BASICS 26 SEWING ...26 General sewing procedure ...26 Selecting stitching ...27 Starting to sew ...28 Thread tension ...29 USEFUL SEWING TIPS ...30 Trial sewing ...30 Changing the sewing direction ...30 Sewing curves ...30 Sewing thick fabrics ...30 Sewing thin fabrics ...31 Sewing ...
Users Manual - English
Page 6
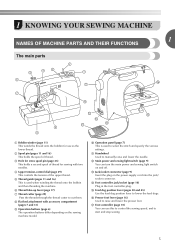
... the needle. c Hole for use this to control the sewing speed, and to select the stitch and specify the various settings. d Upper tension-control dial (page 29) This controls the tension of the upper thread. l Main power and sewing light switch (page 9) You can use as the lower thread. m Jack/socket connector...
... the needle. c Hole for use this to control the sewing speed, and to select the stitch and specify the various settings. d Upper tension-control dial (page 29) This controls the tension of the upper thread. l Main power and sewing light switch (page 9) You can use as the lower thread. m Jack/socket connector...

Users Manual - English
Page 12
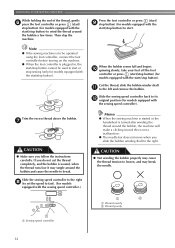
Pass the thread around the pre-tension disk. Turn the bobbin clockwise, by hand, until the spring on the shaft slides into the groove of the bobbin. 1 2 a Spring on the shaft b Groove ... shaft to wind the thread onto the bobbin. • For details on this machine. Using other models, the machine will not work properly. e 11 a Pre-tension disk b Bobbin winder shaft c Bobbin CAUTION ● Only use bobbins from the inside of the thread through the hole on c the bobbin from other bobbins...
Pass the thread around the pre-tension disk. Turn the bobbin clockwise, by hand, until the spring on the shaft slides into the groove of the bobbin. 1 2 a Spring on the shaft b Groove ... shaft to wind the thread onto the bobbin. • For details on this machine. Using other models, the machine will not work properly. e 11 a Pre-tension disk b Bobbin winder shaft c Bobbin CAUTION ● Only use bobbins from the inside of the thread through the hole on c the bobbin from other bobbins...
Users Manual - English
Page 13
... the needle. 1 2 a Wound evenly b Wound poorly a Sewing speed controller 12 Cut the thread, slide the bobbin winder shaft k to loosen, and may cause the thread tension to the left and remove the bobbin. Note ● If the sewing machine is to be operated using the foot controller, connect the foot controller...
... the needle. 1 2 a Wound evenly b Wound poorly a Sewing speed controller 12 Cut the thread, slide the bobbin winder shaft k to loosen, and may cause the thread tension to the left and remove the bobbin. Note ● If the sewing machine is to be operated using the foot controller, connect the foot controller...
Users Manual - English
Page 14
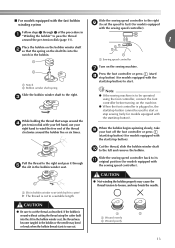
... bobbin winder seat (with built-in the bobbin. Pull the thread to the right and pass it through 2 of the thread clockwise around the d pre-tension disk with the start/stop button) to start /stop button) (for models equipped with the start . Slide the sewing speed controller back to its k ... to loosen, and may become tangled in the bobbin winder seat. CAUTION ● Not winding the bobbin properly may cause the thread tension to pass the thread around the pre-tension disk (page 11). 1 Place the bobbin on the machine. ● When the foot controller is plugged in, the start/stop ...
... bobbin winder seat (with built-in the bobbin. Pull the thread to the right and pass it through 2 of the thread clockwise around the d pre-tension disk with the start/stop button) to start /stop button) (for models equipped with the start . Slide the sewing speed controller back to its k ... to loosen, and may become tangled in the bobbin winder seat. CAUTION ● Not winding the bobbin properly may cause the thread tension to pass the thread around the pre-tension disk (page 11). 1 Place the bobbin on the machine. ● When the foot controller is plugged in, the start/stop ...

Users Manual - English
Page 15
... the needle to be used , the machine will make a clicking sound; CAUTION ● Winding the bobbin improperly may cause the thread tension to its highest position by the arrow. CAUTION ● Make sure you accidentally step on quick-set the bobbin so the thread unrolls in... bobbin or bobbins of the thread, push the bobbin d down with the needle position button), and raise the presser foot lever. 14 1 a Tension-adjusting spring Replace the bobbin cover. CAUTION ● Make sure you (counterclockwise) or press (needle position button) (for this sewing machine. If ...
... the needle to be used , the machine will make a clicking sound; CAUTION ● Winding the bobbin improperly may cause the thread tension to its highest position by the arrow. CAUTION ● Make sure you accidentally step on quick-set the bobbin so the thread unrolls in... bobbin or bobbins of the thread, push the bobbin d down with the needle position button), and raise the presser foot lever. 14 1 a Tension-adjusting spring Replace the bobbin cover. CAUTION ● Make sure you (counterclockwise) or press (needle position button) (for this sewing machine. If ...
Users Manual - English
Page 16
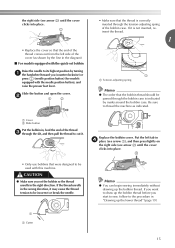
... (needle position button) (for models equipped with this machine. a Cover b Slide button Put the bobbin in, feed the end of the thread c through the tension-adjusting spring of the bobbin case. Put the left side of the cover (as indicated. CAUTION ● Make sure you start to sew, follow to... should be passed through the bobbin case is correctly inserted through the slit, and then pull the thread to cut it may cause the thread tension to be used with the needle position button), and raise the presser foot lever. If the thread unrolls in the wrong direction, it . Slide...
... (needle position button) (for models equipped with this machine. a Cover b Slide button Put the bobbin in, feed the end of the thread c through the tension-adjusting spring of the bobbin case. Put the left side of the cover (as indicated. CAUTION ● Make sure you start to sew, follow to... should be passed through the bobbin case is correctly inserted through the slit, and then pull the thread to cut it may cause the thread tension to be used with the needle position button), and raise the presser foot lever. If the thread unrolls in the wrong direction, it . Slide...

Users Manual - English
Page 26
... presser foot b holder screw. a Screwdriver b Presser foot holder c Presser foot holder screw Note ● If the presser foot holder is not correctly installed, the thread tension will be incorrect. a Screwdriver b Presser foot holder c Presser foot holder screw 25
... presser foot b holder screw. a Screwdriver b Presser foot holder c Presser foot holder screw Note ● If the presser foot holder is not correctly installed, the thread tension will be incorrect. a Screwdriver b Presser foot holder c Presser foot holder screw 25

Users Manual - English
Page 30
...3 4 a Wrong side b Surface c Upper thread d Lower thread e Loops appear on wrong side of fabric Solution Increase the tension by turning the upper tension-control dial to 5 stitches on top of each other than straight or zigzag stitches that are secured with reverse stitching, pressing (reverse/... We recommend that the needle will affect the quality of your fabric. 1 a Wrong side 2 b Surface c Upper thread d Lower thread 3 4 ■ Upper tension is too tight Loops will appear on the surface of the fabric. 1 2 3 5 4 a Wrong side b Surface c Upper thread d Lower thread e Loops ...
...3 4 a Wrong side b Surface c Upper thread d Lower thread e Loops appear on wrong side of fabric Solution Increase the tension by turning the upper tension-control dial to 5 stitches on top of each other than straight or zigzag stitches that are secured with reverse stitching, pressing (reverse/... We recommend that the needle will affect the quality of your fabric. 1 a Wrong side 2 b Surface c Upper thread d Lower thread 3 4 ■ Upper tension is too tight Loops will appear on the surface of the fabric. 1 2 3 5 4 a Wrong side b Surface c Upper thread d Lower thread e Loops ...
Users Manual - English
Page 31
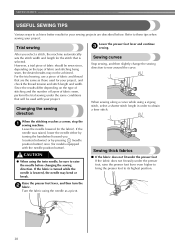
... sewing your project. If the fabric is turned while the needle is selected. Refer to achieve better results for your project, and check the thread tension and stitch length and width.
... sewing your project. If the fabric is turned while the needle is selected. Refer to achieve better results for your project, and check the thread tension and stitch length and width.
Users Manual - English
Page 51
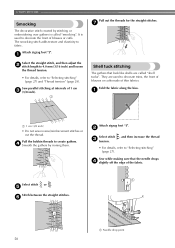
... created by ironing them. g Select the straight stitch, and then adjust the b stitch length to 4.0 mm (3/16 inch) and loosen the thread tension. • For details, refer to create gathers. Sew parallel stitching at intervals of 1 cm c (3/8 inch). 1 Shell tuck stitching The gathers ...the straight stitches. Pull the bobbin threads to "Selecting stitching" (page 27) and "Thread tension" (page 29). Fold the fabric along the bias. b Select stitch , and then increase the thread c tension. • For details, refer to fabric. The smocking stitch adds texture and elasticity to ...
... created by ironing them. g Select the straight stitch, and then adjust the b stitch length to 4.0 mm (3/16 inch) and loosen the thread tension. • For details, refer to create gathers. Sew parallel stitching at intervals of 1 cm c (3/8 inch). 1 Shell tuck stitching The gathers ...the straight stitches. Pull the bobbin threads to "Selecting stitching" (page 27) and "Thread tension" (page 29). Fold the fabric along the bias. b Select stitch , and then increase the thread c tension. • For details, refer to fabric. The smocking stitch adds texture and elasticity to ...
Users Manual - English
Page 60
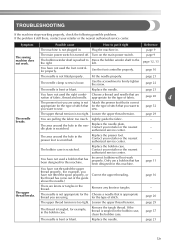
...is tangled in the bobbin case, clean the bobbin case. page 21 You have not used the foot controller properly. Loosen the upper thread tension. The area around the hole in . Contact your retailer or the nearest authorized service center. - page 16 The upper thread breaks. ...Loosen the upper thread tension. If the thread is not fitted properly. Replace the needle. Turn on the main power switch. The bobbin winder shaft is scratched. Use...
...is tangled in the bobbin case, clean the bobbin case. page 21 You have not used the foot controller properly. Loosen the upper thread tension. The area around the hole in . Contact your retailer or the nearest authorized service center. - page 16 The upper thread breaks. ...Loosen the upper thread tension. If the thread is not fitted properly. Replace the needle. Turn on the main power switch. The bobbin winder shaft is scratched. Use...
Users Manual - English
Page 61
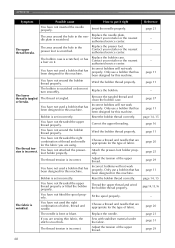
...needle. The bobbin case is incorrect. You have not inserted the needle properly. You have not threaded the upper thread properly. The thread tension is wrinkled. Replace the presser foot. Choose a thread and needle that are appropriate for the type of fabric. Choose a thread and ...The area around the hole in the presser foot is tangled. If you are sewing thin fabric, the stitch is incorrect. The thread tension is too thick. Contact your retailer or the nearest authorised service center. Only use a bobbin that has been designed for this machine...
...needle. The bobbin case is incorrect. You have not inserted the needle properly. You have not threaded the upper thread properly. The thread tension is wrinkled. Replace the presser foot. Choose a thread and needle that are appropriate for the type of fabric. Choose a thread and ...The area around the hole in the presser foot is tangled. If you are sewing thin fabric, the stitch is incorrect. The thread tension is too thick. Contact your retailer or the nearest authorised service center. Only use a bobbin that has been designed for this machine...

Users Manual - English
Page 62
...appropriate for example, in the bobbin case, clean the bobbin case. page 16 You have not threaded the upper thread properly. The thread tension is tangled in the bobbin case. The stitch is tangled, for the type of fabric. page 27 page 20 The thread is too fine.... Remove the tangle thread. You have not threaded the upper thread properly. page 57 There is scratched. Adjust the tension of fabric, thread and needle. Contact your retailer or the nearest authorized service center. Choose a thread and needle that has been designed for...
...appropriate for example, in the bobbin case, clean the bobbin case. page 16 You have not threaded the upper thread properly. The thread tension is tangled in the bobbin case. The stitch is tangled, for the type of fabric. page 27 page 20 The thread is too fine.... Remove the tangle thread. You have not threaded the upper thread properly. page 57 There is scratched. Adjust the tension of fabric, thread and needle. Contact your retailer or the nearest authorized service center. Choose a thread and needle that has been designed for...
Users Manual - English
Page 64
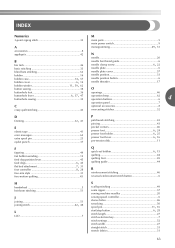
... 31 free-motion quilting 45 P patchwork stitching 43 piecing 43 pocket corners 46 , presser foot 6 24 , presser foot holder 6 25 , presser foot lever 6 16 pre-tension disk 11 Q , quick-set bobbin 6 15 quilting 44 quilting foot 45 quilting guide 44 R reinforcement stitching 46 reverse/reinforcement stitch button 6 H handwheel 5 heirloom stitching 51...
... 31 free-motion quilting 45 P patchwork stitching 43 piecing 43 pocket corners 46 , presser foot 6 24 , presser foot holder 6 25 , presser foot lever 6 16 pre-tension disk 11 Q , quick-set bobbin 6 15 quilting 44 quilting foot 45 quilting guide 44 R reinforcement stitching 46 reverse/reinforcement stitch button 6 H handwheel 5 heirloom stitching 51...

Users Manual - English
Page 65
T thick fabrics 30 thin fabrics 31 thread cutter 29 thread guide 16 thread tension 29 trial sewing 30 triple stretch stitch 33 troubleshooting 59 twin needle 22 U upper tension-control dial 29 upper threading 16 W walking foot 44 wing needle 51 Z zigzag , stitch 30 32, 42 zipper foot 40 zipper Insertion 40 64
T thick fabrics 30 thin fabrics 31 thread cutter 29 thread guide 16 thread tension 29 trial sewing 30 triple stretch stitch 33 troubleshooting 59 twin needle 22 U upper tension-control dial 29 upper threading 16 W walking foot 44 wing needle 51 Z zigzag , stitch 30 32, 42 zipper foot 40 zipper Insertion 40 64


