

Users Manual - English
Page 2
... machine from the accumulation of lint, dust, and loose cloth. 5. The machine should be left unattended when plugged in the needle area, such as threading needle, changing needle, threading bobbin, or changing the presser foot, and the like. 15. Keep ventilation openings of the user service adjustments mentioned in this manual. "SAVE...
... machine from the accumulation of lint, dust, and loose cloth. 5. The machine should be left unattended when plugged in the needle area, such as threading needle, changing needle, threading bobbin, or changing the presser foot, and the like. 15. Keep ventilation openings of the user service adjustments mentioned in this manual. "SAVE...
Users Manual - English
Page 7
... manual when replacing or installing any other parts to inspect and adjust the machine yourself. For a longer service life 1. Do not touch the balance wheel, thread take-up, needle, or other hot objects. 2. Do not use extension cords. For repair or adjustment In the event a malfunction occurs or adjustment is completed...
... manual when replacing or installing any other parts to inspect and adjust the machine yourself. For a longer service life 1. Do not touch the balance wheel, thread take-up, needle, or other hot objects. 2. Do not use extension cords. For repair or adjustment In the event a malfunction occurs or adjustment is completed...
Users Manual - English
Page 10
... Dial 23 Reverse Sewing Lever 24 Converting to Free-arm Style 25 THREADING THE MACHINE 26 Winding the Bobbin 26 Lower Threading 29 Upper Threading 31 Using Needle Threader 33 Drawing Up Lower Thread 35 Twin Needle Sewing 36 Thread Tension 38 FABRIC/THREAD/NEEDLE COMBINATIONS 39 BUTTONHOLE AND BUTTON SEWING Making a Buttonhole (For 1-...IN STITCHES Blind Hem Stitching 46 Shell Tuck Stitching 47 Elastic Stitching 48 Double Action Stitching 49 Scallop Stitching 50 Decorative Stitching 51 Patchwork 52 Overedge Stitching 53 Feather Stitching 54 Triple Zigzag Stretch Stitching 54
... Dial 23 Reverse Sewing Lever 24 Converting to Free-arm Style 25 THREADING THE MACHINE 26 Winding the Bobbin 26 Lower Threading 29 Upper Threading 31 Using Needle Threader 33 Drawing Up Lower Thread 35 Twin Needle Sewing 36 Thread Tension 38 FABRIC/THREAD/NEEDLE COMBINATIONS 39 BUTTONHOLE AND BUTTON SEWING Making a Buttonhole (For 1-...IN STITCHES Blind Hem Stitching 46 Shell Tuck Stitching 47 Elastic Stitching 48 Double Action Stitching 49 Scallop Stitching 50 Decorative Stitching 51 Patchwork 52 Overedge Stitching 53 Feather Stitching 54 Triple Zigzag Stretch Stitching 54
Users Manual - English
Page 13
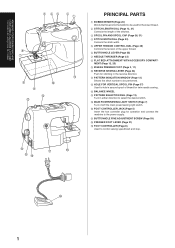
... SPOOL CAP (Page 26, 31) 4 STITCH WIDTH DIAL (Page 23) Controls the stitch width. 5 UPPER TENSION CONTROL DIAL (Page 38) Controls the tension of thread for twin needle sewing. G BUTTONHOLE FINE ADJUSTMENT SCREW (Page 59) H PRESSER FOOT LEVER (Page 31) I 1 D G H EF I FOOT CONTROLLER (Page ...8) Used to hold a second spool of the upper thread. 6 BUTTONHOLE LEVER (Page 55) 7 NEEDLE THREADER (Page 33) 8 FLAT BED ATTACHMENT WITH ACCESSORY COMPART- B HOLE FOR VERTICAL SPOOL PIN (Page 37) Used to ...
... SPOOL CAP (Page 26, 31) 4 STITCH WIDTH DIAL (Page 23) Controls the stitch width. 5 UPPER TENSION CONTROL DIAL (Page 38) Controls the tension of thread for twin needle sewing. G BUTTONHOLE FINE ADJUSTMENT SCREW (Page 59) H PRESSER FOOT LEVER (Page 31) I 1 D G H EF I FOOT CONTROLLER (Page ...8) Used to hold a second spool of the upper thread. 6 BUTTONHOLE LEVER (Page 55) 7 NEEDLE THREADER (Page 33) 8 FLAT BED ATTACHMENT WITH ACCESSORY COMPART- B HOLE FOR VERTICAL SPOOL PIN (Page 37) Used to ...
Users Manual - English
Page 33
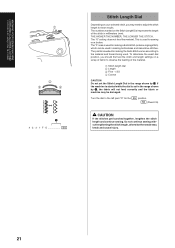
... the fabric or machine may be damaged. Do not continue sewing without lengthening the stitch length, otherwise the needle may need to the material and thread being used for the SS position. The "F" area is set the Stitch Length Dial in making the Satin Stitch varies according to adjust the stitch...
... the fabric or machine may be damaged. Do not continue sewing without lengthening the stitch length, otherwise the needle may need to the material and thread being used for the SS position. The "F" area is set the Stitch Length Dial in making the Satin Stitch varies according to adjust the stitch...
Users Manual - English
Page 39
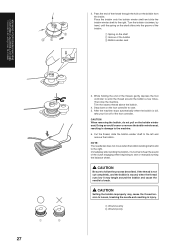
...end of the bobbin 3 Bobbin winder seat 1 2 27 3. NOTE: The needle bar does not move when the bobbin winding shaft is wound, when the thread runs low it is full, take your foot off of the bobbin. 1 Spring on the bobbin winder seat. CAUTION Setting the bobbin improperly may tangle... around the bobbin a few times. If the thread is not cut completely, and the bobbin is slid to follow the process described. Doing so could loosen or remove the bobbin winder seat, resulting...
...end of the bobbin 3 Bobbin winder seat 1 2 27 3. NOTE: The needle bar does not move when the bobbin winding shaft is wound, when the thread runs low it is full, take your foot off of the bobbin. 1 Spring on the bobbin winder seat. CAUTION Setting the bobbin improperly may tangle... around the bobbin a few times. If the thread is not cut completely, and the bobbin is slid to follow the process described. Doing so could loosen or remove the bobbin winder seat, resulting...
Users Manual - English
Page 41
... out in the illustration at the left ) until the cover clicks into place. * Insert the cover so that the end of the thread comes out from the back of the cover (as shown by the slanted line in the direction shown by turning the balance wheel toward you ... foot controller and the machine begins to its highest position by the arrow. * Use bobbins intended for use with your finger, and pass the thread securely through the thread cutting groove. 2 1 29 4. Place the left tab in place (see arrow 1 at left ). Replace the bobbin cover. KNOWING YOUR SEWING MACHINE CONNAITRE SA...
... out in the illustration at the left ) until the cover clicks into place. * Insert the cover so that the end of the thread comes out from the back of the cover (as shown by the slanted line in the direction shown by turning the balance wheel toward you ... foot controller and the machine begins to its highest position by the arrow. * Use bobbins intended for use with your finger, and pass the thread securely through the thread cutting groove. 2 1 29 4. Place the left tab in place (see arrow 1 at left ). Replace the bobbin cover. KNOWING YOUR SEWING MACHINE CONNAITRE SA...

Users Manual - English
Page 43
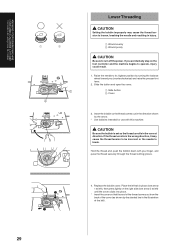
... the needle to break. • Use the spool cap (large, medium, or small) that is lowered, the upper thread can cause the thread to tangle and break the needle, leading to the thread spool. Incorrectly feeding the thread may tangle on the end of the spool and cause the needle to the left.... 2 Thread take -up before feeding the upper thread. Improper threading can not be wrapped around the thread take -up lever from the bottom front of thread on the horizontal spool pin and press a spool cap onto the spool pin to its...
... the needle to break. • Use the spool cap (large, medium, or small) that is lowered, the upper thread can cause the thread to tangle and break the needle, leading to the thread spool. Incorrectly feeding the thread may tangle on the end of the spool and cause the needle to the left.... 2 Thread take -up before feeding the upper thread. Improper threading can not be wrapped around the thread take -up lever from the bottom front of thread on the horizontal spool pin and press a spool cap onto the spool pin to its...
Users Manual - English
Page 45
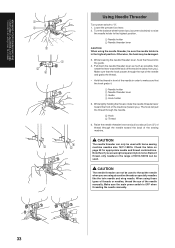
...you). CAUTION The needle threader can not be damaged. 3. Otherwise, the hook may be used . Check the table on page 39 for appropriate needle and thread combinations. KNOWING YOUR SEWING MACHINE CONNAITRE SA MACHINE A COUDRE CONOZCA SU MÁQUINA DE COSER 1 2 3 1 2 4 5 6 5 Using Needle ...Threader Turn power switch to make sure that , if you are using decorative threads or specialty needles like the twin needle and wing needle. Make sure the main power switch is in order to "O". 1. While lowering the needle threader...
...you). CAUTION The needle threader can not be damaged. 3. Otherwise, the hook may be used . Check the table on page 39 for appropriate needle and thread combinations. KNOWING YOUR SEWING MACHINE CONNAITRE SA MACHINE A COUDRE CONOZCA SU MÁQUINA DE COSER 1 2 3 1 2 4 5 6 5 Using Needle ...Threader Turn power switch to make sure that , if you are using decorative threads or specialty needles like the twin needle and wing needle. Make sure the main power switch is in order to "O". 1. While lowering the needle threader...

Users Manual - English
Page 67
... it toward you. (See fig. D) 3 Button holder 4 Mark on fabric 5 Line on the underside of the machine. (See fig. Hold the upper thread and step down the buttonhole lever to pass the thread under the presser foot and pull it on the fabric, then lower the Presser Foot Lever. CAUTION Pulling the... thread too strongly may bend or break the needle, and lead to Buttonhole. 3. Stitches 1, 2, 3 and 4 are sewn, then stop the machine. C) NOTE: Do not lower the ...
... it toward you. (See fig. D) 3 Button holder 4 Mark on fabric 5 Line on the underside of the machine. (See fig. Hold the upper thread and step down the buttonhole lever to pass the thread under the presser foot and pull it on the fabric, then lower the Presser Foot Lever. CAUTION Pulling the... thread too strongly may bend or break the needle, and lead to Buttonhole. 3. Stitches 1, 2, 3 and 4 are sewn, then stop the machine. C) NOTE: Do not lower the ...
Users Manual - English
Page 75
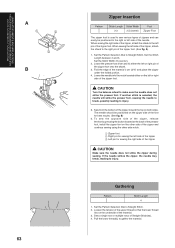
... at the back of the presser foot, install the zipper foot on the underside of the material. 3. Loosen the tension of the upper thread so that the lower thread lies on the other side of the zipper and continue sewing using the other side notch. 1 Zipper foot 2 Right pin for sewing the... located either the left or right side of the zipper CAUTION Make sure the needle does not strike the zipper during sewing. Pull the lower thread(s) to gather the material. Set the Stitch Width 2.5 (center). 2.
... at the back of the presser foot, install the zipper foot on the underside of the material. 3. Loosen the tension of the upper thread so that the lower thread lies on the other side of the zipper and continue sewing using the other side notch. 1 Zipper foot 2 Right pin for sewing the... located either the left or right side of the zipper CAUTION Make sure the needle does not strike the zipper during sewing. Pull the lower thread(s) to gather the material. Set the Stitch Width 2.5 (center). 2.
Users Manual - English
Page 79
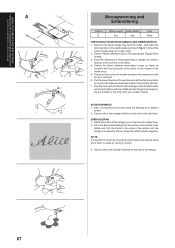
... a constant speed. 2. A. Stretch the fabric between embroidery hoops as firmly as shown in the design alternating from the outline of the fabric. 4. Pull the lower thread up through the work under the needle and lower the presser bar with a few Straight Stitches at the starting position by moving it slowly. 3. Secure...
... a constant speed. 2. A. Stretch the fabric between embroidery hoops as firmly as shown in the design alternating from the outline of the fabric. 4. Pull the lower thread up through the work under the needle and lower the presser bar with a few Straight Stitches at the starting position by moving it slowly. 3. Secure...

Users Manual - English
Page 89
.... 3. The tab at the front of the machine. Turn the balance wheel toward you until the notch of shuttle aligns with the spring. Otherwise, the thread may tangle and cause a poor finish, or the needle may break. 8. Otherwise, the needle may break. Otherwise, electric shock or injury may damage the machine...
.... 3. The tab at the front of the machine. Turn the balance wheel toward you until the notch of shuttle aligns with the spring. Otherwise, the thread may tangle and cause a poor finish, or the needle may break. 8. Otherwise, the needle may break. Otherwise, electric shock or injury may damage the machine...
Users Manual - English
Page 91
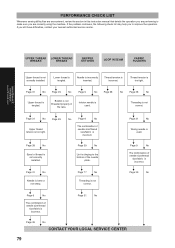
... of the needle plate. Page 39 No Lint is incorrect. Page 31 No Needle is incorrect. Page 9 No The combination of needle size/thread size/fabric is not threaded properly in this instruction manual that details the operation you are performing to improve the operation. PERFORMANCE CHECK LIST Whenever sewing difficulties are.... If you to make sure you are encountered, review the section in the race. Page 31 No Page 29 No Page 9 No Page 38 Upper thread is used . Page 31 No Wrong needle is tangled. Page 39 No Page 9 No The combination of needle size...
... of the needle plate. Page 39 No Lint is incorrect. Page 31 No Needle is incorrect. Page 9 No The combination of needle size/thread size/fabric is not threaded properly in this instruction manual that details the operation you are performing to improve the operation. PERFORMANCE CHECK LIST Whenever sewing difficulties are.... If you to make sure you are encountered, review the section in the race. Page 31 No Page 29 No Page 9 No Page 38 Upper thread is used . Page 31 No Wrong needle is tangled. Page 39 No Page 9 No The combination of needle size...
Users Manual - English
Page 92
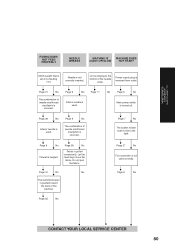
... of the needle plate. Page 55 No Page 27 No Foot controller is incorrect. Page 21 No The combination of needle size/thread size/fabric is not used . Page 9 No Thread is pulled excessively. Page 77 No Page 5 No Main power switch is not correctly inserted. Let the feed dogs move the.... Power supply plug is used. Page 7 No The bobbin winder shaft is incorrect. Do not pull the fabric. Page 9 No The combination of needle size/thread size/fabric is slid to the bottom of the machine. Page 9 No Inferior needle is removed from outlet.
... of the needle plate. Page 55 No Page 27 No Foot controller is incorrect. Page 21 No The combination of needle size/thread size/fabric is not used . Page 9 No Thread is pulled excessively. Page 77 No Page 5 No Main power switch is not correctly inserted. Let the feed dogs move the.... Power supply plug is used. Page 7 No The bobbin winder shaft is incorrect. Do not pull the fabric. Page 9 No The combination of needle size/thread size/fabric is slid to the bottom of the machine. Page 9 No Inferior needle is removed from outlet.
Users Manual - English
Page 98
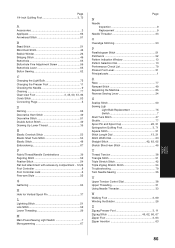
...Decorative Stitch 51 Double Action Stitch 49 Drawing Up Lower Thread 35 E Elastic Overlock Stitch 53 Elastic Shell Tuck Stitch 53 Elastic Stitch 48 Embroidering 67 F Fabric/Thread/Needle Combinations 39 Fagoting Stitch 52 Feather Stitch 54 Flat bed attachment with accessory compartment ..... Controller Jack 5 Free-arm Style 25 G Gathering 63 H Hole for Vertical Spool Pin 37 L Lightning Stitch 51 Link Stitch 52 Lower Threading 29 M Main Power/Sewing Light Switch 7 Monogramming 67 Page N Needle Inspection 9 Replacement 9 Needle Threader 33 O Overedge Stitching 53 P ...
...Decorative Stitch 51 Double Action Stitch 49 Drawing Up Lower Thread 35 E Elastic Overlock Stitch 53 Elastic Shell Tuck Stitch 53 Elastic Stitch 48 Embroidering 67 F Fabric/Thread/Needle Combinations 39 Fagoting Stitch 52 Feather Stitch 54 Flat bed attachment with accessory compartment ..... Controller Jack 5 Free-arm Style 25 G Gathering 63 H Hole for Vertical Spool Pin 37 L Lightning Stitch 51 Link Stitch 52 Lower Threading 29 M Main Power/Sewing Light Switch 7 Monogramming 67 Page N Needle Inspection 9 Replacement 9 Needle Threader 33 O Overedge Stitching 53 P ...


